Policy Engine Installation
Understanding Deployment Modes
Before moving to the installation steps, it is essential to understand the possible deployment modes and their use cases. Policy Engine deployment can be done in the following modes:
-
Standalone mode: For quick verifications, POCs.
-
2-Node Active-Passive: Having high-availability but requires manual intervention. Suitable for UATs and small deployments.
-
Cluster Mode (Recommended): Having a 3-node setup with high-availability and fault-tolerance.
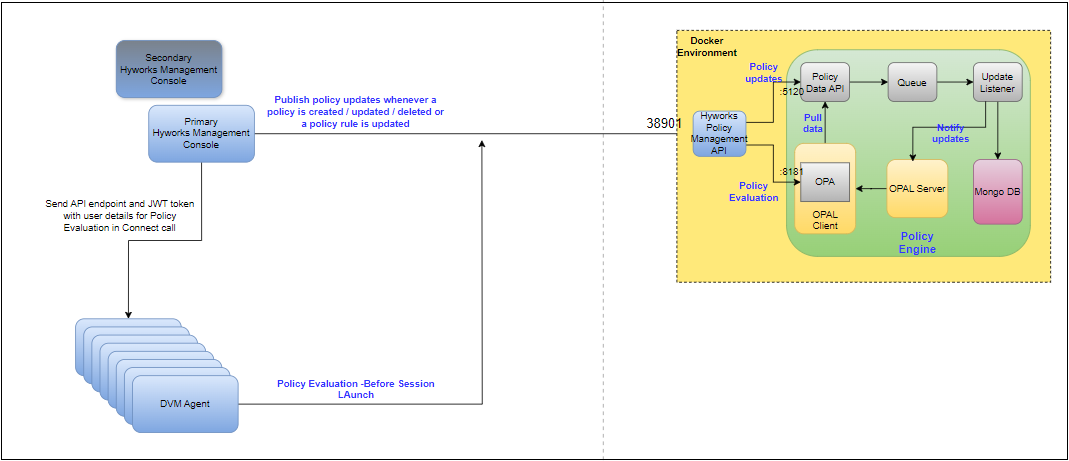
Standalone Mode
This is the simplest of all the available deployment modes. As shown in Figure 1, all services required by the Policy Engine are installed on a single VM.
- High-availability: No. If any of the services go down, Policy Engine will not be functional.
2-Node Active-Passive Standalone mode
2 VM Active-Passive Standalone mode is a slightly better version of Standalone mode, which allows for manual failover. As shown in Figure 2, all services required by the Policy Engine are installed on two (2) VMs, but only one VM is powered on at a time. In this deployment mode, two independent (standalone) VMs are prepared as Policy Engine servers, with the second being kept in a powered-off state.
- High-availability: Manual. Whenever a failover is performed, HyWorks Policy Management API fetches the latest policies from its database and publishes the data to Policy Data API.
- To use this mode, check UPDATE_OPAL_DATA_ON_SERVICE_START in Deployment Configurations.

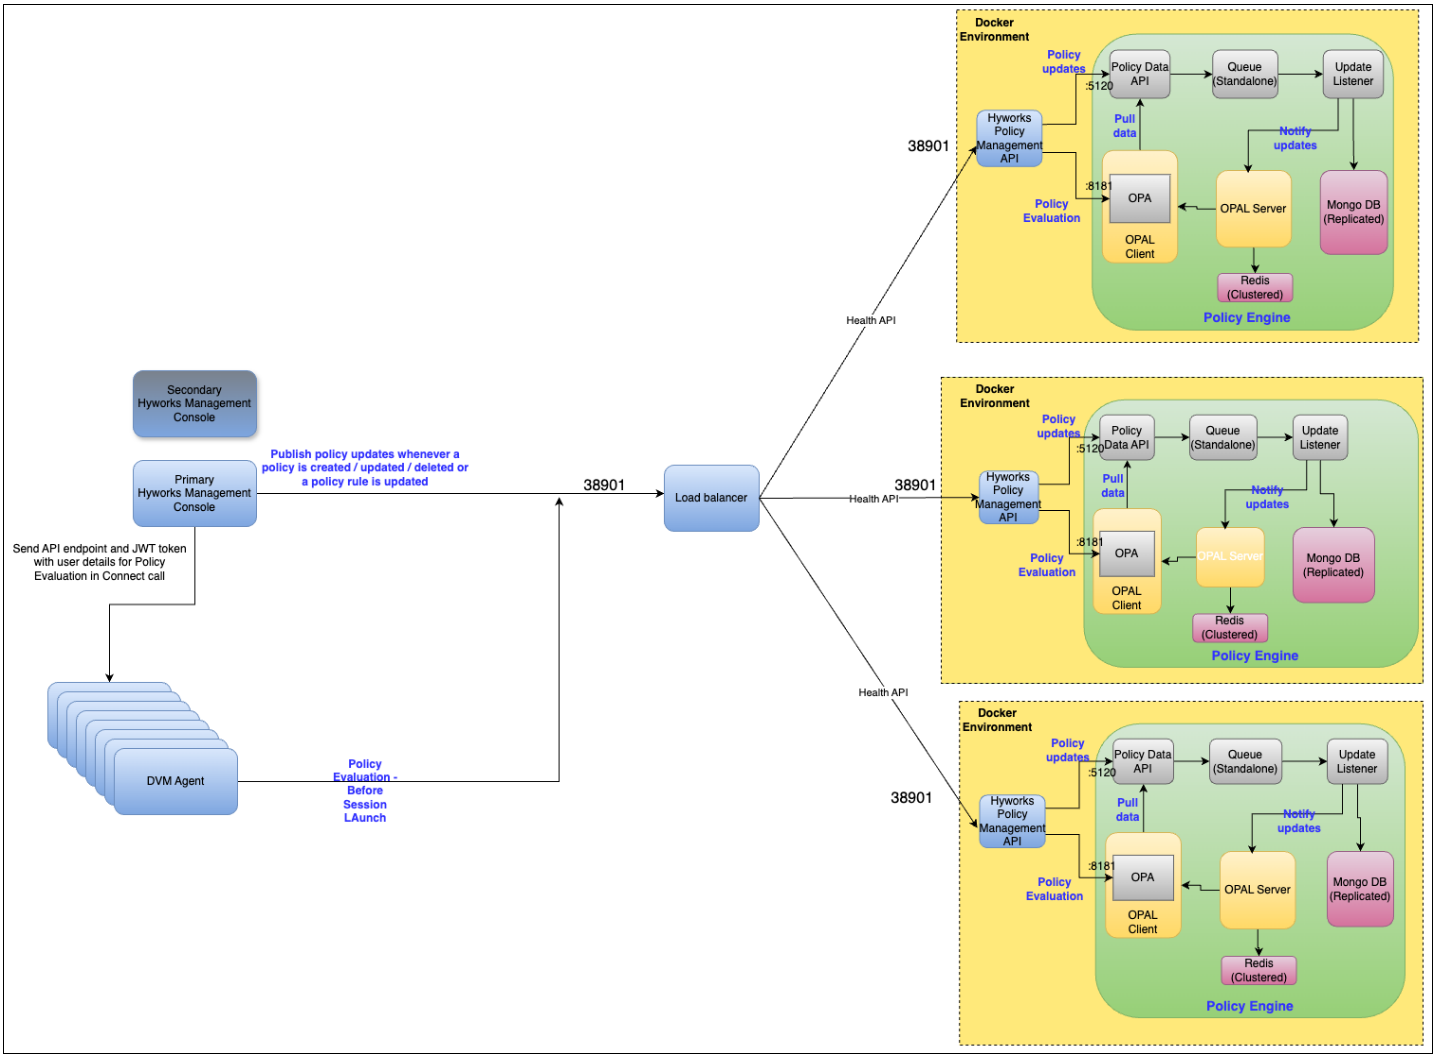
Cluster Mode
In cluster mode, all services required by the Policy Engine are installed on three (3) VMs. Since all VMs are active, the setup provides high availability and some level of fault tolerance.
Deployment Steps
Below is the list of all the steps required to get your Policy Engine deployment up and ready
Subsequent sections provide details of the above steps.
Docker Installation
Ensure the VM’s Internet connection is available for Docker and Docker Compose installation. The Internet is required only for the first-time setup.
Run the commands below to install Docker and Docker Compose.
-
sudo dnf config-manager --add-repo https://download.docker.com/linux/centos/docker-ce.repo -
sudo dnf install docker-ce -
sudo systemctl start docker -
sudo systemctl enable docker -
sudo dnf install curl -
sudo curl -L https://github.com/docker/compose/releases/download/1.25.4/docker-compose-$(uname -s)-$(uname -m) -o /usr/local/bin/docker-compose -
sudo ln -s /usr/local/bin/docker-compose /usr/bin/docker-compose
Once you have installed Docker and Docker Compose on all your VMs, you will need to copy the deployment files to each VM, as outlined in the next section.
Get deployment files
Download the Policy Engine zip file, extract the files, and place them in the /opt directory on the VM. Ensure the VM meets the software and hardware prerequisites and has Docker installed. The directory structure will be like this:
/opt/<release_name>/automation, whereis the extracted directory e.g., /opt/v3.6-SP1_v20250819T1700/automation
Folder structure
A tree view of the folder structure of the deployment folder is shown below:
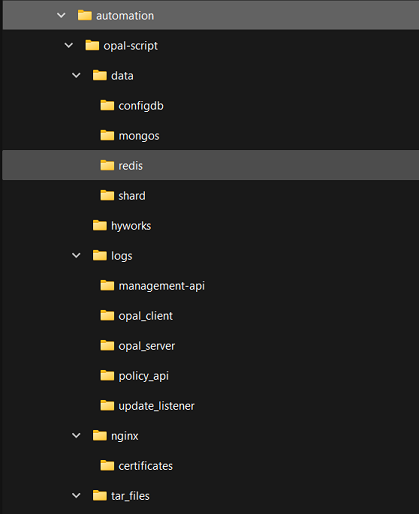
Locations for various files that you may need to use are mentioned below
-
.env, deploy.sh, cleanup.sh files are located at the root level.
-
docker-compose-standalone.yml and docker-compose.yml files are in
automation/opal-script/folder. -
Log files of all services are in
automation/opal-script/logs/folder. -
Certificates for the SSL configuration of HyWorks Policy Management API are in
automation/opal-script/nginx/certificates/folder.
Log files
The locations of the log files for all services are listed below.
-
Policy Data API:
automation/opal-script/logs/policy_api/ -
OPAL client:
automation/opal-script/logs/opal_client/ -
OPAL server:
automation/opal-script/logs/opal_server/ -
Update listener:
automation/opal-script/logs/update_listener/ -
HyWorks Policy Management API: OPAL client:
automation/opal-script/logs/hyworks_policy_manager_api/ -
Nginx:
automation/opal-script/nginx/error.log
The next step is updating the deployment configurations.
Environment configurations Before Deployments
Before deploying the builds, appropriate configurations must be carefully completed. This section of the document will provide details for configurations:
Updating Environment File
Deployment configuration can be specified in the .env file located at the root level of the copied folder. If this file is not visible, make sure the hidden files option in your file explorer or terminal command is enabled. Below is a brief description of all the configurations available in the .env file
| Configuration | Values to set |
|---|---|
| CLUSTER_MODE | Cluster mode, set as 1 Standalone mode, set as 0. |
| HOST_IP | IP address of the system, where the script is being run. |
| IS_PRIMARY | Cluster deployment, set to 1 on the first machine and 0 on the other nodes. Standalone or 2-Node deployment set as 1. |
| IS_LAST_MACHINE | Cluster deployment, set to 1 on the last node, on which the script runs. Standalone or 2-Node deployment set as 0. |
| PRIMARY_NODE_IP | Cluster Deployment: For the first machine, this value will match HOST_IP. For the last two nodes, the IP address of the first machine, the script runs on. In a standalone or 2-Node deployment, this will always match Host_IP. |
| OTHER_NODE_1 OTHER_NODE_2 |
Cluster Deployment: These refer to the other two machines in the cluster. --- On the primary machine, these will have two different IP addresses of non-primary nodes. --- On the other two non-primary machines, configure only one OTHER_NODE with the IP address of the other non-primary node; leave the second OTHER_NODE configuration empty. OTHER_NODE set empty will automatically pick the primary machine IP address from PRIMARY_NODE_IP. Standalone or 2-Node deployment --- Leave it empty. For Example: Primary Node: 192.168.1.1, first non-primary node: 192.168.1.8, second non-primary node: 192.168.1.9 --- Primary Node: OTHER_NODE_1:192.168.8, OTHER_NODE_2:192.168.1.9 --- First Non-Primary: OTHER_NODE_1:192.168.1.9, OTHER_NODE_2: --- Second Non-Primary: OTHER_NODE_1:192.168.1.8, OTHER_NODE_2: |
| UPDATE_OPAL_DATA_ON_SERVICE_START | In some cases, we might need to update policies and rules data in OPAL when the HyWorks Policy Management API starts. By default, its value is set to false, which means the Policy Manager API will not update policies and rules data in OPAL at service start. For single-VM standalone and cluster modes, it is recommended to keep this setting set to false. It is recommended to set this to true in a 2-Node Active-Passive Standalone mode setup. |
| UPDATE_RETRY_COUNT | This is the maximum number of attempts the HyWorks policy management API makes to update policies during service start. The default value is 3. |
| UPDATE_RETRY_INTERVAL_IN_SECONDS | This is the interval in seconds between retries. The default value is 30 seconds. |
| DATA_API_IP | Specify the IP or FQDN of the Policy Data API. For standalone mode, the default value (management_api) will work. For cluster mode, specify the IP or FQDN of your load balancer here. |
| DATA_API_PORT | Specify the port number of the Policy Data API |
| EVALUATION_API_IP | Specify the IP or FQDN of the Policy Evaluation API. For standalone mode, the default value (opal_client) will work. For cluster mode, specify the IP or FQDN of your load balancer. |
| EVALUATION_API_PORT | Specify the port number of the Policy Evaluation API |
| PRIMARY_CONTROLLER_IP | Specify the IP address or hostname of the primary controller. This configuration is mandatory. |
| PRIMARY_CONTROLLER_PORT | Specify the primary controller’s port number. This configuration is mandatory. |
| SECONDARY_CONTROLLER_IP | Specify the IP address or hostname of the secondary controller. Leave blank if your setup does not have a secondary controller. |
| SECONDARY_CONTROLLER_PORT | Specify the secondary controller’s port number. Leave blank if your setup does not have a secondary controller. |
| MQ_HOSTNAME | Specify the IP address or hostname of the RabbitMQ server used for the HA notifier. |
| MQ_PORT | Specify the RabbitMQ port number used for the HA notifier. |
| MQ_USERNAME | Specify the RabbitMQ username used for the HA notifier. |
| MQ_PASSWORD | Specify the encrypted password for the RabbitMQ used for the HA notifier. Connect with the Accops team to get more details on password encryption. |
EXAMPLE ENVIRONMENT FILES:
| Standalone | 2-Node (On both nodes) | Cluster (3-Node) | ||
|---|---|---|---|---|
| ---- | ---- | Primary | 1st Non-primary | 2nd Non-primary |
|
Same as Standalone Deployment Environment File |
|
|
|
Important
- Make sure not to modify/copy environment files from Windows systems, as this may cause issues in deployment if any corruption happens.
Optional Steps (if needed): Correcting the Out Environment File:
-
Once the .env file is modified, the following command can be run explicitly to correct any issues in the file:
-
Take backup of existing env file:
cp .env .env.bak -
Run this command to preview the output
sed 's/\r$//' .env | head -
If the preview looks correct, then run
sed -i 's/\r$//' .env
-
After you have updated your deployment configurations, you must update service configurations for HyWorks Policy Management API as outlined in the next section.
Service configurations
When deploying the Policy Engine, most services work well with their default values and don't require any changes. Still, specific configurations of the HyWorks Policy Management API need to be updated to integrate the Policy Engine with your HyWorks controller.
Service configurations need to be completed for the deployment modes listed below.
-
For Standalone mode: Make a change in
docker-compose-standalone.yml -
For Cluster mode: Make changes in
docker-compose.yml
These files can be found inside the automation/opal-script folder inside your copied folder.
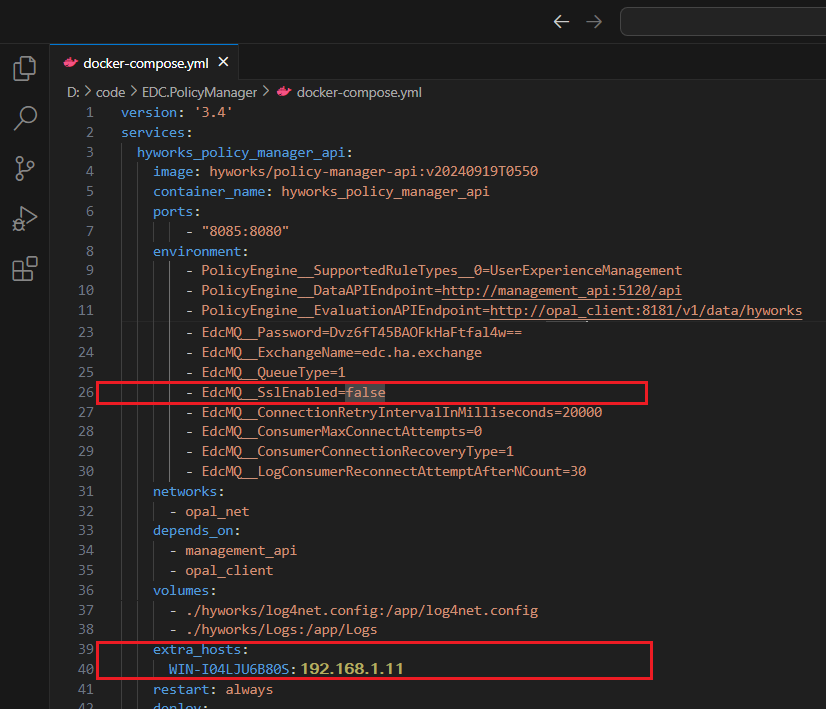
Configurations for HyWorks Policy Management API that need to be updated can be found in the above configuration files under the section called hyworks_policy_manager_api. Below is a brief description of all the settings that need to be updated
-
EdcMQ__SslEnabled: Boolean, set is as true, if HA notifier RabbitMQ uses SSL. Do not modify if the HA notifier RabbitMQ does not use SSL.
-
Adding HyWorks Database Server Host Entries: HyWorks Policy Management API uses the same database as the Controller. Sometimes it cannot access the database details received from the controller (because the hostname is not resolved). For such cases, you might have a specific hostname to IP mapping in the section called hyworks_policy_manager_api/extra_hosts in the format
<hostname>: <IP address>Important
-
These are the database server hostname and IP addresses, not of HyWorks Controllers.
-
If having more than one database servers, make entries of all database servers (e.g., HyWorks Controller 2-node active-passive deployment)
Screenshot for reference:
-
-
When you use the default configuration, the HyWorks Policy Management API is exposed over SSL using self-signed certificates provided with the deployment files. If you want to use your own certificates, refer to Change SSL certificates.
Once all configurations have been updated, you can run the Policy Engine services. The steps for running Policy Engine services differ slightly between the two deployment modes, as outlined in the following two sections.
Run Policy engine services
Now that all prerequisites and configurations are in place, the next step is to run the deployment scripts.
Standalone mode or 2-Node Active-Passive Standalone Mode
Running Policy Engine services in standalone or 2-Node Active-Passive Standalone mode is the same. Below are the steps for the same
- Log in to your VM.
- Open a terminal window.
- Navigate to the automation folder in your copied folder.
-
Run the script deploy.sh by executing the command below.
sudo sh deploy.sh- If you need to start all containers from scratch, run the
cleanup.shscript, thendeploy.shagain. -
sudo sh cleanup.sh -
sudo sh deploy.sh
Note
-
For 2-Node Active-Passive Standalone mode:
-
Once both VMs are set up, one of the VMs can be powered off.
-
When a failover is needed, power on the stand-by VM and update the Policy Manager Endpoint advanced setting in the HyWorks Management Console to point to the stand-by VM.
-
Cluster mode
Running Policy Engine services in cluster mode is a little more involved. Below are the steps for the same
-
Log in to all three (3) VMs.
-
Open a terminal window on all 3 VMs and navigate to the automation folder.
-
Go to your primary server, run the
deploy.shscript, and wait for it to complete.sudo sh deploy.sh
-
Go to node one, run the deploy.sh script, and wait for it to complete.
sudo sh deploy.sh
-
Go to node 2, run the
deploy.shscript, and wait for it to complete.sudo sh deploy.sh
-
In case you need to start all containers from scratch, you can run the script cleanup.sh and subsequently run script deploy.sh once again.
-
sudo sh cleanup.sh -
sudo sh deploy.sh
-
On the first machine, the script enables clustering for the MongoDB containers, and every subsequent machine that runs the script joins the cluster.
The script installs the OPAL server along with its Redis backbone on every machine it runs on, then joins all the Redis instances while executing on the last machine. This way, all OPAL servers stay in sync with each other through the Redis backbone.
Now you will need to add HyWorks Policy Management API (port: 38901), Opal client (port: 8181), and Policy Data API (port: 5120) of all 3 VMs to your load balancer. The steps for this are in your load balancer documentation.
Verifying Deployment
On each of the nodes, the following command can be run to check if all needed services are up and running:
sudo docker ps -a
It should list out all the running Docker containers, and all of them should be listed and should be running:
-
nginx
-
hyworks_policy_manager_api
-
opal_client
-
opal_server
-
queue_provider
-
rabbitmq
-
management_api
-
mongodb