Provisioning Profiles
Provisioning profile in HyLabs defines following attributes of a reservation:
-
While creating reservations, how the operating system of provisioned VMs will be customized.
-
Deployment Configurations: Defining the storage (datastore in case of vCenter) and location (resource pool in case of vCenter) for the provisioned reserved VMs.
-
Advanced desktop pool configurations specifying special configurations (if needed)
For any gold master to be used in HyLabs, one provisioning profile must be associated so whenever reservations are created, the customization will be done using specified profile.
Default Provisioning Profile
-
By default, there are no provisioning profile available in HyLabs, but every dedicated session provider must have at least one default provisioning profile so that any gold master can be used to provision new VMs for reservations.
-
If no provisioning profile exists, then gold master will not get imported.
- This applies to both the types of gold master import mechanism i.e., using CSV import or added from HyLabs Admin Portal.
-
When multiple provisioning profiles exist, then default provisioning profile will be used while importing (if provisioning profile information is not used).Click
Add Provisioning Profile
To add a provisioning profile, follow the below steps:
-
Go to Configurations > Provisioning Profile
-
Click Add to open wizard
-
In Basic Info tab
-
Provide Profile Name
-
Select Connection profile to be used (Selected connection profile will get applied to all reservations deployed from Gold Master using this provisioning profile)
-
Select checkbox Default to make the profile as default. There can only one default profile for a provider, attempt to add another as default will fail with relevant error. Default profile is used when no provisioning profile is specified in gold master CSV import.
-
-
Click Next to go to Deployment tab. In Deployment tab,
-
Select Session Provider to which this provisioning profile will be applied.
-
For deployment, two sections are available to set datastore and resource pool configurations for
-
Replica VM: Defining the datastore and resource pool, where the replica VM will be placed while creating reservations.
-
Cloned VM Deployment Settings: Defining the datastore and resource pool, where the Cloned VMs will be placed while creating reservations.
-
-
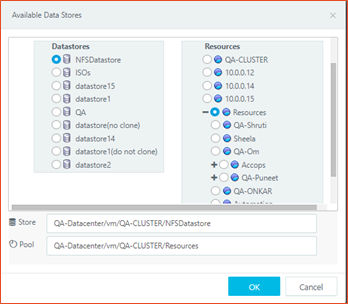
To change deployment configuration of Replica VM: Click Change Location button shown in the section Replica VM Deployment Settings:
-
It will display Available Datastore dialog, with option to select resource pool and datastore. Expand the respective option to select appropriate datastore and resource pool.
-
-
Repeat the above step for configuring the Cloned VM Deployment Settings as well.
Important
-
Deployment Settings dialog provides locations and storage details according to the selected provider, e.g.,
-
For VMware, all datastores, datastore clusters are listed on left hand side drop-down in appropriate tree architecture, whereas on right hand side expandable tree architecture of all resource pools, clusters, hosts will be shown. Administrator will be able to select any of resource pools and datastore.
-
For Nutanix, Deployment Settings will show single tree structure with option to select a storage container for cloned VMs. On Nutanix, a known limitation is there, that even after selecting a different storage container, clones are created on same storage containers as the gold masters.
-
For Azure and AWS, Deployment settings cannot be changed, and all deployments will be as per gold master’s configurations.
-
-
-
-
Once Session Provider, Replica VM Deployment Settings and Cloned VM Deployment Settings are configured, click Next.
-
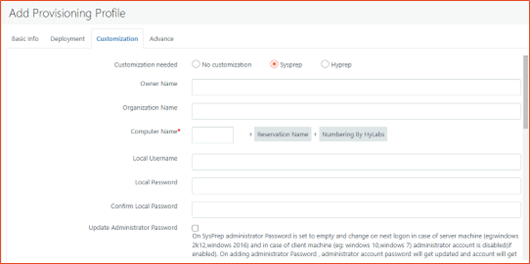
Next Tab is Customization, which defines the cloned VMs customization behaviour. E.g., if an organization wants all the cloned VMs to join domain then such configurations can be set in Customization section of Provisioning Profile. In Customization tab
-
Select the option for Customization needed:
-
No customization: Deployed VMs will not be customized and will retain exact configurations as gold image. This may cause duplicate objects in the infrastructure e.g., duplicate hostnames. Selecting this option will hide all other fields in Customization tab.
-
Sysprep: Accops DVM agent on deployed VM will use Microsoft Sysprep process to customize the deployed VM. Sysprep will take 3-10 minutes or more, based on configuration needs.
-
Hyprep: Accops DVM agent on VDI will use Accops customization process. Hyprep is a quick VM customization process build by Accops. Hyprep process can take 1-3 minutes.
-
-
On selecting Sysprep or Hyprep as customization method, following fields will be enabled and can be configured for deployed VM customization:
-
Owner Name: Owner name of the Desktop (Optional)
-
Organization Name: Organization name of the Desktop (Optional)
-
Computer Name: 4-character computer name prefix can be specified. For maintaining uniqueness, HyLabs automatically appends reservation Id (Dynamically generated during reservation creation) and number. e.g., if Computer name prefix is set as ITW8 then the actual computer name to be set will be ITW8-ResId-0001
-
Local Username: The new local user to be created on new Desktop. (Optional)
-
Local Password and Confirm Local Password: Password to be set for new local user (* Mandatory field if local username is provided)
-
Update Administrator Password: Though it is enabled for both Hyprep and Sysprep but applied to Sysprep only. Where if the check box is not checked, the user “Administrator” in deployed VM will get reset and it will not be possible to access system using user “Administrator”. To avoid this, administrator password can be explicitly reset with Sysprep.
-
Select the checkbox Update Administrator Password
-
Provide appropriate Administrator Password and Confirm Administrator Password.
Note
- If leaving Local Username field blank then, it should be made sure that at least one local admin (other than Administrator) user is already available on gold image, because post Sysprep administrator user gets disabled and could lead to configuration with no local administrator.
-
Update Administrator Password can be kept unchecked in HyLabs, as normally desktop OS does not have administrator account enabled by default and with HyLabs usually desktop OSes e.g., Windows 10 etc. are delivered to end-users.
-
Update Administrator Password filed is not used for Linux based deployments and with Hyprep.
-
-
Workgroup/ Domain Configurations:
-
Join a workgroup is selected by default and requires entries in Workgroup textbox. This option can be used if deployed VMs to be kept in workgroup.
-
Join a Domain: If new Desktops need to be joined to existing Domain, then this option can be selected while enabling following fields:
-
Domain Name: e.g., accops.local (* Mandatory if Join a domain combo box is selected)
-
Username: User with privileges to join a machine to domain e.g., domain admin user (* Mandatory if Join a domain combo box is selected)
-
Password and Confirm Domain Password: Password for domain admin user (* Mandatory if Join a domain combo box is selected)
-
-
-
DNS Configurations:
-
Preferred DNS: Preferred DNS to be configured in network settings (Optional)
-
Alternate DNS: Alternate DNS to be configured in network settings (Optional)
-
-
AD Path: Full OU path to which this computer should be registered. The provided domain username should have adequate rights to create objects in specified OU. (Optional)
-
AD Group: Specify comma separated active directory groups. Provisioned VMs will be made member of these groups.
-
Select Locale: For configuring local language of new Desktop.
-
OS Product Key: Provided product key will be applied on new Desktop however if creating multiple Desktops then this should be mass activation key or should be left blank for activating the OS later manually.
-
-
-
Once appropriate information for customization is provided, click Next to proceed to Advance tab. In Advance tab, following configurations are available:
-
Assign Network Ready Desktops: Option Assign Network Ready Desktops to check reserved VMs RDP readiness has been added. Enabling this option on desktop pool, keeps on checking the RDP readiness of the desktops and only those desktops are assigned to the users which are currently network ready and thus avoiding assignment of those VMs which are not ready.
- Network readiness of a desktop is determined by checking the availability of desktop on its RDP Port (RDP port can be configured while adding the session provider, default RDP port is 3389).
-
Dedicated Linux Pool: This option should be checked if this reservation profile is being used to deliver Linux based pools (Accops Ubuntu/CentOS) will be delivered using this mechanism.
-
Gold Master OS Type: Defines the kind of gold master to which this customization profile will be used. Available options are:
-
Windows (WXXX): For Windows based gold master VMs
-
Ubuntu (LUXX): For Linux – Ubuntu gold master VMs
-
CentOS (LCXX): For Linux – CentOS gold master VMs
-
-
-
Configure appropriate advance options (as needed) and Click Save button to save the provisioning profile.
-
Provisioning profile will be saved and now the same can now be assigned to gold master VMs, so that whenever reservations are being created, reserved VMs will be deployed according to the configurations.
Edit Provisioning Profile
To edit an existing provisioning profile, follow the below steps:
-
Go to Configurations > Provisioning Profiles.
-
Select Provisioning profile to be modified.
-
Click Edit Provisioning Profile.
-
In Edit Provisioning Profile wizard (Similar to Add Provisioning Profile), following options can be modified:
-
Basic Info tab
-
Change Profile Name
-
Changing associated Connection Profile
-
Marking provisioning profile as default
-
-
Deployment tab
-
Replica VM Deployment Settings
-
Cloned VMs Deployment Settings
-
-
Customization tab
- Any of the configurations can be changed and all new VMs to deployed in HyLabs using this provisioning profile will get customized as per new configurations.
-
Advance tab
- All configurations from Advance tab can be changed.
-
-
Once all desired changes have been made in provisioning profile, Click Save button.
-
Provisioning profile will be saved, and new reservations will use the new configurations.
Note
-
Once a session provider is configured in provisioning profile, provider cannot be changed.
-
Modification done in provisioning profile does not affect already deployed reservations and will only be applied on new reservations to be deployed using this provisioning profile or on redeployment of existing reservations.
Delete Provisioning Profile
To delete a provisioning profile, follow the below process:
-
Go to Configurations > Provisioning Profiles
-
Select Provisioning profile to be modified.
-
Click Delete Provisioning Profile
-
On Confirm Action dialog, type profile name to be deleted and Delete to continue.
-
Provisioning profile will get deleted:
-
New deployments using Gold Master which was associated with the deleted provisioning profile will start using default provisioning profile of the session provider.
- If default provide profile is also deleted, the new deployment may go into error state as there is no profile available for new deployments.
-
Note
If provisioning profile is associated with any gold master, then it will not get deleted and will show error for assigned gold master. Which means if administrator needs to delete a provisioning profile, then it must delete the associated Gold Master first.
Provisioning and Customization Process
Following the given steps to customize desktops:
-
Once all the customization attributes are properly configured and administrator committed the pool changes by completing the Desktop Pool wizard, HyWorks Controller will mark that the new Desktops will require customization. (This can be observed in Desktop Details dialog > SYSPREP Info)
-
Source VM will be powered off and will be cloned multiple times as specified - New Desktops will be created as per provided deployment options.
-
Desktops will be powered on automatically if configured or will require manual power on from administrator if Power on Desktop Post Provisioning is not enabled.
-
After Desktops are powered on, HyWorks Controller will try to communicate with HyWorks Desktop Agent on each Desktop.
Note
This step requires that the source VM must have VMware tools and HyWorks Desktop Agent installed
-
Till step# 4, new Desktops are exact replica of the source VM, Desktop details will display attribute SYSPREP Info as Required, which specifies that the new Desktop will require customization.
-
Once HyWorks Controller can communicate with HyWorks Desktop Agent on new Desktops, it will share the customization details with each Desktop.
-
Desktops will be rebooted and will run setup to customize the Desktop as per provided parameters (This step may take some time depending on the hardware, software resources and network settings)
-
Once the setup is completed, all new Desktops will be having a unique name, same local user with same password, joined with specified domain or workgroup, set with specified locale, and activated with provided OS Product key.
-
The Desktop status will start displaying as Responding in Desktops VMs tab with Sysprep Info attribute showing as completed.