Management
The primary objective of HyWorks deployment is to provide desktop/application sessions to its intended client. The client could be a device, a user, a group of users, etc. It is important to associate target desktops with appropriate clients.
The Desktop Pools tab provides an interface for creating and managing desktop pools and associating Desktops with intended clients.
Desktop Pool Categorization
Desktop pools can be categorized based on the following factors:
-
Desktop Virtualization Type
-
Desktop Provisioning
-
Entitlement Type
-
Assignment Lifespan
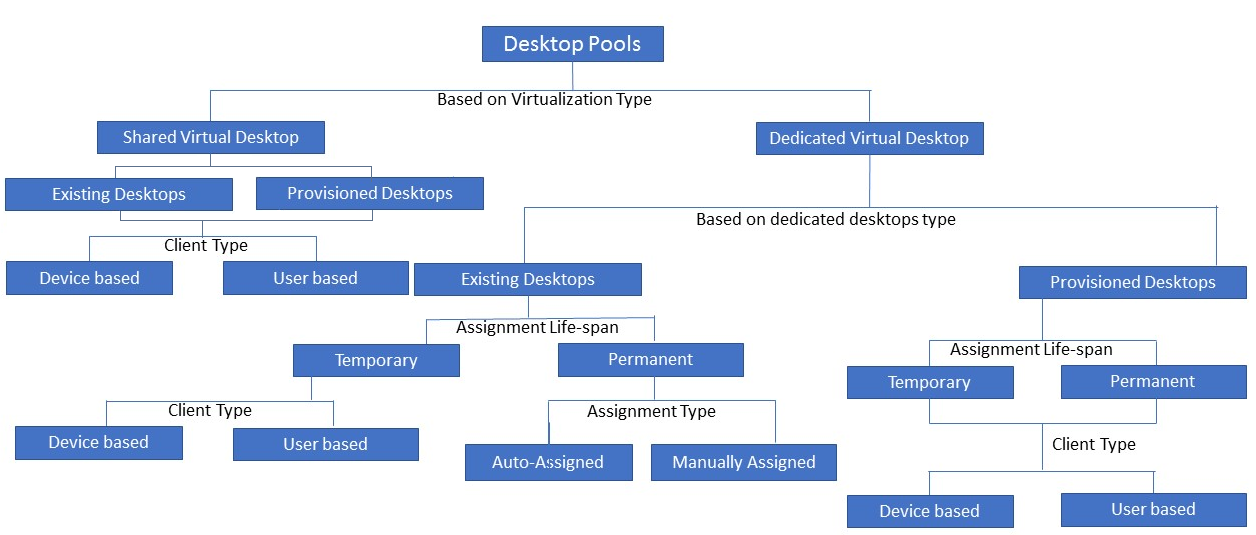
As shown in the above diagram, HyWorks offers multiple options for delivering desktops according to the end user's needs.
Desktop Virtualization Type
The Administrator must choose the kind of virtualization type that must be done out of the following options:
-
Persistent Virtual Desktops: Dedicated desktops that will not be reverted to a fresh state and will retain all the changes done by the user.
Applicable for existing desktops and provisioned desktop pools. -
Non-persistent Virtual desktops: This applies only to provisioned desktops where users' changes to the desktop VMs will be reverted after logging out.
-
Shared Hosted Desktop: This is used to deliver shared hosted desktops to end users.
-
Provisioned Shared Hosted Desktop: This is used to deliver provisioned (dynamically created) Shared Hosted Desktops to the end-users.
-
Physical Desktop: This is for delivering a desktop not belonging to the hypervisor.
Desktop Provisioning
HyWorks can deploy a new virtual machine from a pre-configured gold image or source VM to the respective Session Provider. This process is called desktop provisioning. An environment with existing VMs can be re-used instead of deploying new ones. HyWorks can be used to deliver dedicated desktops to the end-user. This choice is given during Desktop Pool creation as the Provisioning, which can be set as:
-
None: To use the existing desktop VMs on the Session Provider.
-
Dynamic: To provision new VMs in the Desktop Pool, new VMs will be cloned from the master image.
Once the Provisioning is set, it cannot be changed.
Entitlement Type or Client Type
HyWorks can assign desktops either to registered endpoints or to users. In an office, desktops could be assigned to registered endpoints, where the user will get assigned a desktop only when logging in from a device. If desktops are directly assigned to users, they will get a desktop, irrespective of the endpoints from which they log in.
The choice is shown under Entitlement Type in the Desktop Pool wizard, which can be set as:
-
Device-based: This is used to entitle the desktops to registered endpoints.
-
User-based: Assigning the desktops to users from a configured authentication server. In the user-based assignment, the Administrator can select the following types of entities from a particular authentication server:
-
User
-
Group
-
OU (Organizational Units)
The Entitlement type can be configured during pool creation and cannot be changed afterward.
Assignment Lifespan
The assignment lifespan defines the lifespan of the client's desktop assignment. The available options are:
-
Personal: Personal assignment will keep the assignment for the client unless the Administrator manually revokes it.
-
Floating: When the user logs out, the floating assignment will be removed. The floating assignment can be further subdivided into the following two use cases:
-
On Connect: The desktop will be assigned whenever the user requests access, un-assigned when the user is disconnected (after a specified time) or logs out.
-
On Login: The desktop will be assigned when the user logs in and unassigned when the user logs out.
Configuration Options for Dedicated Desktop Pools
Desktop pool configurations consist of two parts:
-
Common Configurations: Configurations that will be common across the desktop pools of different types.
-
Critical Configurations affecting deployment type: Configurations which will affect the whole deployment of desktops in HyWorks
Common Configurations
Common Configurations of General Screen
-
Name: The name of the desktop pool shown to end-users when they log in if configured in Advance Configuration > Display Preferences.
-
Display Name: The name of the desktop, which can be the same or different from the name. As per configurations in Advance Configuration > Display Preferences, this can also be shown to end-users.
-
Description: To provide logical details of the desktop pools.
-
Connection Profiles: The connection attributes will be decided according to the provided connection profile to assign a specific connection profile for the desktop pool.
-
Active: To mark the desktop pool as active or inactive. For inactive desktop pools, HyWorks stops processing desktops and does not provide access to clients on logon from inactive desktop pools.
-
Maintenance Mode: To enable maintenance mode in the desktop pool. In maintenance mode, HyWorks continues processing the desktops but does not provide access to the end-users. The Purpose of maintenance mode is to restrict the user's access to the desktop pool during deployment, redeployment, or maintenance activities.
-
Remote Desktop Connection Port: The port number of virtual desktops on which the client will initiate a remote connection. The default value is 3389. The port change must be done on virtual desktops first, and then the same should be configured in the desktop pool wizard.
Clients (Users/Devices) Screen
Devices/Users: A screen for devices or users will appear based on the Entitlement Type selected. The screen can add or remove devices, users/groups, or OUs.
Important Points for Adding Groups or OUs as a Client:
-
If groups or OUs are being added as clients for permanent dedicated Desktop Pools, assignments should be kept Automatic, as one virtual machine can be assigned to only one user (client) at a time.
-
If the assignment is manual, none of the users (members of the added group/OU) will be given a desktop session.
Desktop Assignment
Assignments happen automatically, or the administrator should manually assign desktops to different clients.
-
In an automatic assignment, HyWorks assigns the desktop, using its mechanism to identify the best desktop pool.
-
Default mechanism for provisioned desktop.
-
Should be used when trying to entitle desktops to groups/ organizational units.
-
-
In manual assignment, the administrator will be required to assign desktops to the clients.
- Can be used for the desktop pool with existing VMs.
Important
The Desktop Assignment screen is not displayed while creating the desktop pool through Dynamic Desktop Provisioning. This is because all the cloned VMs will have the same configurations, and the assignment will be done automatically for the clients, i.e., users or endpoints (based on the configured Assignment Type).
Classification Rules
Configure the Classification Rules to restrict desktop access to connecting users from specific classified devices.
Refer to the Classification Rules section to enable restricted client group access.
-
Select the access policy From specific classification rules only.
-
It will list the added classification rules.
-
Select the classification rules and move them to the allowed list.
-
Endpoints satisfying the classification rules settings can access the desktops from this pool.
Advanced Configurations
The following advanced configurations are commonly configured for users:
-
Keep desktops in power-on state: Configurations to set if the associated desktops should also be powered on. The administrator can have the following options:
-
Not configured: Desktops will remain powered on as managed by the administrator or users.
-
All Desktops: All desktops are to be kept powered on.
-
Specified Desktops: A minimum number of desktops should be powered on perpetually.
-
-
Power on state timing: If the option Keep desktops in power on state is set as All Desktops or Specified Desktops, then this option will get enabled. This option can specify when the desktops should be checked as being powered on and turned on if found powered off. The possible configurations can be:
- Always: This option helps keep the specified desktops or all of them always powered. Even if an administrator or user turns it off outside of HyWorks, the controller will power it on whenever it fetches the state as powered off.
- Before Specified Timing: To be entered in HH:MM TT format, this specifies when the desktops will be powered on if they are found powered off. The HyWorks Controller starts turning the desktops' power on before the specified time to have them ready before the specified time. HyWorks performs this task only at the specified time, which means HyWorks will not always maintain the number of desktops in the powered-on state.
-
Power action when user logs off: The setting Power action when user logs off specifies what action will be taken by the HyWorks Controller once the user logs off their session. Possible actions can be:
-
Not Configured: Do not take any action.
-
Power Off: Power off the desktop once the user has logged off the session.
-
Suspend: Suspend the desktop once the user has logged off the session.
-
Restart: Restart the desktop when the user logs off.
-
Shutdown: Shutdown desktop when the user logs off.
Important
The setting Power action when the user logs off will not be enabled when the **Keep Desktops in Power On state** is configured as **All desktops** because keeping all the desktops in the Powered-on state will contradict the setting related to Power actions when the user logs off. -
User Permission (Add user to the local Administrator group): Selecting this option will make the logged-in user a member of the local Administrator group on the target Desktop. Unchecking this option will not modify user privileges on the desktops.
- Dedicated Linux VM Pool: This is a special configuration for delivering Linux-based dedicated desktops to end users.
- Use last known good IP address: This specific advanced setting enables HyWorks to use the desktop's last cached good IP address if it does not receive the IP address from the Session Provider.
- Assign Network Ready Desktops: A specific advanced setting that will enable the delivery of only those desktops that are ready for a desktop connection based on the reachability of the configured RDP port. If enabled:
- The HyWorks Controller periodically checks desktops' reachability in virtual machines.
- If any desktop virtual machine is unreachable on the RDP port, it will not give sessions from that machine to the end user.
-
-
Assign Desktop: This option is enabled if the assignment type is Floating Desktop. There are 2 Types:
- On Login: Desktop will be assigned when the user logs on.
- On Connect: Desktop will be assigned when the user clicks on desktop (shows at the HyWorks client's end). The following settings will be enabled for the On Connect option:
- Unassign disconnected desktop after (Min.): Remove assignment after this timeout on RDP disconnect: After the remote session disconnection to the assigned desktop, the assignment will be removed after a specified time limit. The value cannot be empty. If specified as zero, assignments will be removed when the user logs out.
- Unassign on VDI Logoff: This feature is only supported with HyWorks configurations in Hybrid mode.
Enable this option to release user assignments from the desktop VM when the remote session logs off. Note: If the desktop agent is unreachable, the assignment will be released per the 'Un-assign disconnected desktop after' timer.
- Auto upgrade desktop agent: To upgrade HyWorks DVM tools. All desktops will be notified about desktop agent upgrades and will be upgraded as per the available version of DVM Tools. The following additional configurations can be done:
- HyWorks Desktop Agent: For upgrading the desktop agent.
- HyWorks Printing Module: To be enabled to upgrade the HyWorks printing module.
- HyWorks USB cleaner: To upgrade the HyWorks USB cleaner utility.
- HyWorks USB Redirection Driver: For upgrading the Built-in USB redirection driver (server side) module.
- Reboot if required: Select this option if the desktop VMs can be rebooted after upgrading the DVM tools.
- A specific component or all components can be selected to be upgraded. This option is usually enabled after the desktop pool is created when the HyWorks DVM Tools need to be upgraded.
- The Administrator should configure appropriate Advance settings based on the requirements on the Advance screen and can move to the Summary screen to verify the configured options.
- Display Preferences for Desktop Pool Name to End-users: Suppose the end-users should be given a different display name for the desktop pool than the one displayed to the Administrator. In that case, a configuration is provided in the desktop pool to allow for this. To achieve this, HyWorks v3.3 has two configurations for the desktop pool: 1. Name 2. Display Name, with the Advanced Configuration, to specify which field should be displayed to the end users.
-
Virtual Desktop Connection Method: There are two Virtual Desktop Connection Methods:
- Remote Desktop: Default connection method to provide remote access to end-users. More options are available to use:
- A common username, password, and domain name for all users connecting to the desktop pool. Personal desktop delivery supports specifying the username, password, or domain; only the domain name can be specified for shared hosted desktop pools.
- Hypervisor Console: The Hypervisor Console Connection Method specifies the user's login credentials for the Console connection to the Virtual Desktop. These can be the logged-in user credentials specified in the domain or specified by the user on the login screen.
The feature enables users to connect to the Console for VMs running on Hyper-V, ESXi, and Virtual Center Hypervisor, allowing users to connect to desktops even when the network is unavailable on the VMs.
This feature is available for Hyper-V, ESXi, and Virtual Center session providers, where the VM console session can be connected. Enabling this feature will require the following conditions to be met:
Hyper-V:
-
The Provider must be a Hyper-V server.
-
User credentials must be able to connect to the VM console.
-
Required user credentials - Username, Password, Domain, Port.
-
Port 2179 must be accessible from the endpoints to the Hyper-V server.
-
This feature must be supported on the HyDesk Hy3000/Hy4000, Windows Clients, Hy1000, Ubuntu Clients.
-
Hy2000 and HyLite do not support the Console Connect feature.
ESXi and Virtual Center
-
The Provider must be an ESXi or Virtual Center.
-
User credentials must have the authority to connect to the Console of the VM.
-
Required user credentials - Username and Password of ESXi or vCenter Server.
-
The supported default ports, 433 and 902, must be accessible from the endpoints to the ESXi or Virtual Center server.
-
The feature is supported only on Windows Clients.
-
HyLite does not support the Console Connect feature.
Refer to this section for detailed information on console connection.
- Remote Desktop: Default connection method to provide remote access to end-users. More options are available to use:
-
Site Association: Now, every pool is associated with either a local or remote site. Site association option is available for all types of pools like Shared and Dedicated (Existing or deployed).
For more information refere to Site Management - Local site: By default, every pool is associated with a local site. Access to the local site will not be blocked because the DR-enabled/Disabled option is unavailable (the local site is a DC site).
- **Remote Site**:

  1.  If the admin wants to create a pool for the remote site, select the Remote Site option.

  2.  Then, the admin must select at least one remote site.

  3.  Once a pool is created for a remote site and particular sites are selected, users cannot access the pool until at least one site DR is enabled.
- IP Address Filtering in the Desktop Pool: If desktop VMs configured in HyWorks have multiple network adapters or multiple IPs allocated, the HyWorks Controller can use the provided IP range filter to get a specific IP. This should be used to communicate with the desktop agents and provide an IP address in the connection settings to initiate the connection.
Previous versions (3.2 or older) had this configuration as the registry entries and required restarting the Controller service, which was difficult to manage.
Summary Screen
The summary screen provides configuration information to re-validate the settings before committing the changes.
The administrator can use the Back button on each screen to modify the configurations or Click Finish to commit the pool changes. The HyWorks Controller will start the operations required after pool creation, such as Desktop Provisioning or getting Desktop details.
Important Configurations Affecting Deployment
Configurations that decide the deployment of the desktop virtual machines will be briefly discussed in this section.
General Screen
-
Entitlement Type: This affects the deployment as the client for desktops will be changed. Selections have the following impact:
1. **Device-based** will show the **Devices** screen to the configured registered devices as clients. 2. **User-based** will change the screen to **Users,** which can be used to add/remove users from the configured authorization server. -
Desktop Virtualization Type: The desktop virtualization type decides which desktops will be given to the end-users. Each of the available options further enables or disables other controls.
1. **Shared hosted desktop:** To be used for Shared Hosted Desktop delivery and not for dedicated desktops. Refer to the [Shared Hosted Desktop Delivery](shared_hosted_desktop_delivery.md) section for detailed information. 2. **Persistent Virtual Desktops:** Selecting the **Virtualization Type** as **Persistent Virtual Desktops** will have the following impact: 1. **Select Session Provider:** Listing all configured session providers. 2. **Provisioning:** Enabling both options, **None** for existing VMs and **Dynamic** for provisioning desktops. 3. **Non-persistent Virtual Desktops/ Non-persistent Shared Hosted Desktops:** Selecting the **Virtualization Type** as a **Non-persistent Virtual Desktops** or **Non-persistent Shared Hosted Desktops** will have the following impact: 1. **Select Session Provider:** Listing all the configured session providers that support the deployment of non-persistent desktops. 1. If configured, it will list the SCVMM server, VMware vCenter Server, and Nutanix server. 2. It will remove any configured ESXi servers, Azure, or Hyper-V Servers. -
Provisioning: Only the Dynamic option will be shown and will be selected by default.
1. **Physical Desktop:** Physical desktops with no hypervisor are mapped to a manually created desktop provider. Selecting the **Virtualization Type** as **Physical Desktop** will have the following impact: 2. **Select Session Provider:** List all configured session providers with the type of **Physical PC**. -
Provisioning Type: The type of dedicated desktops to be used in this pool:
-
None: The Provisioning Type will be selected as None for using existing desktops. This enables:
-
The Desktops tab will get the desired desktops from the selected dedicated Session Provider.
-
The Desktop Assignment tab is for assigning desktops to clients.
-
The Session Providers dropdown control will list all configured Session Providers.
-
-
Dynamic: The Provisioning Type should be selected as Dynamic for provisioning new desktops by cloning gold images. Selecting Provisioning Type as Dynamic enables the following:
-
The Session Providers dropdown control will list all configured Session Providers that support provisioning.
-
If configured, it will list the Hyper-V, SCVMM, VMware vCenter Server, Microsoft Azure, or Nutanix server.
-
It will remove any configured ESXi servers from the list.
-
-
The Deployment and Customization tabs will be used to provision and prepare customized new desktops.
-
The Desktop Assignment screen will be removed, as dynamically provisioned desktops are assigned automatically.
-
Logically, all the desktops will have the same configuration, so it is not required to assign them manually.
-
Desktops will be created on demand, as prior assignments will not be possible.
-
-
-
-
Assignment Lifespan: This option determines whether the client's assignment to the Desktop will persist after the session. Based on the persistence of the assignment, Desktop Pools can be of the following two types:
- Personal: Desktop Pools in which Desktops are permanently assigned to clients (Devices or Users). This means that the same Desktop is provided to the same client (User or Device) at every successful login event. The client's Desktop assignment is always remembered.
-
Floating: Desktop Pools in which assignments do not persist after the session is removed. This means the session can be assigned to a different Desktop at every successful logon event, allowing you to manage resources efficiently. The client Desktop assignment is removed and is not remembered. Floating assignments can be further subdivided into the following two types based on when assignments should be made:
-
On Login: The configuration is shown on the Advanced screen, specifying that the desktop is assigned upon user login.
-
On Connect: Selecting this option will not assign the desktop at the logon event but will happen when the user initiates the connection to the desktop, giving you complete control over the assignment process.
- When the On connect option is selected, the Administrator must choose another option to specify the time limit after which the assignment should be removed after the desktop session is disconnected.
-
Deployment Screen
When the Administrator configures a desktop pool to use the Provisioning as Dynamic, the deployment screen is enabled, and the desktop screen is removed. The deployment screen provides options for the deployment of virtual machines. Let us understand the option available in the Deployment screen and its meaning.
- Source VM: Source VM (gold image) will be copied multiple times to provision multiple Desktops. The following important configurations should be remembered while selecting the Source VM:
- **Source VM Format on Dedicated Session Provider**: The source VM **must** be a **virtual machine** and cannot be a template.
- **VMware Tools (VMware)**, **Integration Services (Microsoft)**, or Nutanix Guest Tools (Nutanix) must be installed on the source VM.
- [**HyWorks Desktop Agent Installation**](../installation/dvm_tools/dvm_tools_installation.md): The source VM should have HyWorks Desktop Agent installed. HyWorks Desktop Agent is required for post-installation virtual machine customization and ensures remote access for new valid users.

- **Source VM Power State:** The source VM should be in a running state, which helps the HyWorks Controller determine the HyWorks Desktop Agent's availability in the Source VM. However, if the administrator knows that all prerequisites are correctly installed and configured in the gold image, then the gold image machine can be kept in a powered-off state as well.

- **Source VM should be a Fresh Installed Image:** The source VM should preferably be a fresh-installed virtual machine. Using a virtual machine created using provisioning as the source VM may result in customization failure since customization can be done only once on virtual machines.
Follow the links Windows Gold Image or Linux Gold Image for detailed information on preparing the Gold Master or source image.
!!! note
    ```
    While selecting a source VM, a warning message will appear if it is in a powered-off state or HyWorks cannot connect to the desktop agent. However, if the Administrator is sure about the selected Desktop (any displayed configuration error can be ignored), click **Continue Anyway** to proceed or click **Cancel** to cancel the Source VM selection dialog and correct the issues on the virtual machine.
    ```
-
Source VM OS: This should be set to Linux or Windows, depending on the operating system of the source VM. Selecting the source VM as Linux will hide the option Dedicated Linux VM Pool from the Advanced configuration tab of the pool wizard and the option Sysprep from the customization wizard.
-
Clone from Snapshot: Select this option if clones should be created from a specific snapshot/checkpoint on the virtual machine. Please note that not all providers support this operation; thus, if the selected provider does not support this, the option will be disabled. Selecting Clone from a snapshot enables the option to choose a snapshot, which provides a list of all available snapshots.
-
Desktop Name Prefix: HyWorks uses the desktop name prefix with appending unique numbers to create desktops on respective Hypervisor.
1.  HyWorks append a hyphen (-) and number in XXXX format, e.g., a prefix as AccVDI; the controller will create VMs with the name AccVDI-0001,AccVDI-0002, AccVDI-0003 and so on.
2. Including the hyphen and number as XXXX adds five (5) more characters to the desktop name, and thus, the administrator must consider that the name of the VM should not exceed the allowed number of characters in the respective dedicated session provider.
Note
``` Providing a prefix with text that will make a duplicate name after appending the number is not validated in the Desktop Pool wizard, resulting in Desktop creation failure.
It's a mandatory field in the Deployment screen; keeping it blank will display a relevant error.
```-
Clone Type: Clone type field in Desktop deployment defines the type of clones created for the source VM. The following two types of clone Desktops can be created:
- Full Clone: A full clone is an independent copy of a virtual machine that shares nothing with the parent virtual machine after cloning. Its ongoing operation is an entirely separate entity from the parent virtual machine.
- Linked Clone: A linked clone is a copy of a virtual machine that shares virtual disks with the parent virtual machine on an ongoing basis. This helps conserve disk space and allows multiple virtual machines to use the same software installation.
-
-
Linked Clones in HyWorks: Linked cloning in HyWorks uses the following mechanism:
1.  When Linked Clones are initiated, HyWorks creates a replica or full clone of the Gold Image (Source VM).

2.  Then, linked clones of Replica VMs are created.

3.  Having a replica VM ensures that linked clones won't be affected if the gold image is modified in any manner. If re-creating all the linked cloned desktops is required, a new replica VM can be deployed from the gold image.
Refer Functioning Support Provider-wise for linked and full clone support with different session providers.
-
Max Desktop Capacity: The count of the maximum number of Desktops to be created using Desktop Provisioning.
The field accepts values from 1 to 1000, but this should be provided wisely as per requirement and available resources on the Dedicated Session Provider.
Once changes are committed, HyWorks Controller will start creating the virtual machine as per the provided number, and in case a Dedicated Session If the provider does not have enough resources, provisioning will fail.
- Desktop Creation Schedule: This parameter defines the schedule of new VM creation; the administrator can choose to provision new desktops in the following two schedules:
1.  **Provision all Desktops now:** Proceeding in the **Desktop Pool** wizard with the schedule Provision all Desktop now will create all Desktops according to the specified Max Desktop Capacity.
2.  **On-Demand:** Create desktops as the demand arrives. While configuring Desktops on demand, the following two **parameters are considered**:

    - **Count of Desktops to Create Now:** Defines how many desktops should be created first. For example, if the **Create Now Desktops** count is 2, then at least two desktops will be created first as part of Desktop Provisioning.

    - **Count of spare Desktops to be provisioned:** Defines how many spare or extra desktops will be kept in the Desktop Pool. The count of spare Desktops to be provisioned\*\* is **2,** which means in this desktop pool, at least two desktops will always be free, and as soon as the count of free desktop count goes to 1, it will start creating a new desktop to maintain the spare Desktop count. In this manner, HyWorks Controller will create desktops to reach **Max Desktop Capacity**.
The administrator can choose any desktop creation schedules as required.
-
Power on Desktop Post Provisioning: Selecting the checkbox will power the virtual machine after cloning is completed, whereas unchecking this option will keep the Desktop powered off after creation.
-
Enable DVM Reset: The option to enable reset options for cloned VMs. If enabled, a restore point will be created for desktop VMs' fresh state, and if needed, DVMs or the whole pool can be restored to a fresh state using the Reset operation.
- Not all providers support this option. Refer to the section [Functioning Support Provider-wise](./dedicated_session_provider_mgmt.md#session-provider-function-capability) for detailed information on provider support. Providers that support non-persistent VMs will also support the option to reset DVMs. - Enable DVM Reset will be default enabled for non-persistent desktops and is not modifiable. -
Preserve MAC Address: This configuration should be enabled if deployment needs to preserve the last assigned MAC address. This setting can be handy when dynamic IP pools are limited, and the same IP range should be utilized.
The feature or option works only for VMware vCenter and Nutanix Hypervisors.
In recompose or recreate operations, HyWorks will remember the last MAC address assigned to the deployed DVM and assign the same MAC address to the VM after re-deployment.
-
Preserve Network (Azure): This configuration should be enabled if deployment needs to preserve the last assigned network interface and IP address. This setting can be handy when dynamic IP pools are limited, and the same IP range should be utilized.
**Working:** - During the cloning pool, HyWorks Controller adds tags in VM, Network, and IP Address objects in Azure. - In Recompose or recreate desktop operation, the Controller sends a flag to preserve the Network Interface while deleting the DVM. - This means the deployed VM will be deleted, but the associated network object will be preserved. - When the HyWorks controller redeploys the VM, it re-associates the preserved network object using the tag names. **Limitations:** - Azure Network will work with the same gold VM only and thus: - If Gold VM is changed, network preserve will not work and will be unchecked. - With the Network preserve option enabled, change in gold VM will not be allowed. - If the clone VM fails (after deleting the VM with network preserve), the Azure network object will be deleted. -
VM Disk Encryption (Azure): This option is enabled for the Azure desktop provider only and encrypts the VM disk post-prep (if enabled).
The following types of disk encryption mechanisms are supported in HyWorks:
    - **Platform Managed Key (Azure's Default)** - Azure uses Server-Side Encryption (SSE) with Platform Managed Key (PMK) as default.

    - **Customer-Managed Key** - A disk Encryption Set is needed for the customer-managed key. The following types of encryptions can be used while creating a Disk Encryption Set on Azure:

    - Customer Managed Key (CMK) only

    - Customer Managed Key (CMK) and Platform Managed Key (PMK) both
To get the Disk Encryption Set ID on Azure Portal, go to Disk Encryption Set and select Disk Encryption Set created earlier > Properties > Resource ID.
- Azure Disk Encryption - On selecting this option, Server-Side Encryption (SSE) with Platform Managed Key (PMK) and Azure disk encryption (ADE) are both used to encrypt VM disks. For ADE, BitLocker is used on the Windows platform, and Crypto is used on the Linux platform. Check Azure for Linux platform support.
For this option, need to configure Encryption Key Identifier and Vault Resource Id.
    - **Encryption Key Identifier**: Azure Key Vault enables Microsoft Azure applications and users to store and use several types of keys (Vault > Keys >Current Version > Key Identifier).
    - **Vault Resource Id**: Azure Key Vault is a cloud service for securely storing and accessing keys. (Vault > Properties > Resource Id).
Currently, HyWorks supports encryption of OS disks only using the Customer Managed Key or Azure Disk Encryption.
Refer to the section for Azure Disk Encryption Details
- Target Locations of Clones VMs: Deployment Settings enables the administrator to define target data stores and resource pools for the cloned desktops and replica VMs.
Deployment settings get dynamically updated as per the selected Clone Type option in the following manner:
    1.  For Linked Clone: The option to choose **Replica VM Deployment Settings** is enabled along with **Cloned VMs Deployment Settings**.

    2.  For Full Clone: The option for **Cloned VMs Deployment Settings** is enabled.
Leaving the Deployment Settings option unchecked will keep all configurations as default, i.e., the same configuration as the gold image.
Considering that Clone Type is selected as Linked Clone, the following configurations will be available:
    - **Replica VM Deployment Settings:** The section can be used to change the location of the replica VM on the dedicated session provider. To change configurations of the replica VM, Click **Change Location.**

    - **Change Location**: Clicking on **Change Location** will open the **Available Datastores** dialog, which can be used to specify a new location for the replica VM.

    The administrator can select the following two location attributes by expanding the resource tree:

        - Resource Pool

        - Datastore
- Cloned VMs Deployment Settings: Like replica VM deployment configurations, datastore and resource pool configurations of cloned VMs can also be modified. To modify the configurations of cloned VMs, Click Cloned VM Deployment Settings.
- This will start displaying the currently applied configurations for cloned VMs(set to Default, which means the same as the gold image). - Click the **Change Location to invoke the Available Datastores** dialog, and follow the steps mentioned in the above section to change configurations of cloned VMs. !!! important ``` Please note that the Available Datastores dialog displays all the available datastores and resource pools but does not evaluate the feasibility of cloned VM deployment on the target datastores or resource pools. The administrator must choose these configurations carefully to avoid provisioning failure. As a thumb rule, the data stores and resource pools should be chosen so that they can read from the replica image. ```-
Deployment Settings Support for dedicated session providers
-
SCVMM Servers: These advanced deployment settings are not supported with SCVMM servers configured as Dedicated Session Providers, though they are shown as enabled. Clicking Change location with SCVMM server configured as Dedicated Session Provider will show the Available Data Stores dialog with the error "No data centers found."
-
Hyper-V Servers: With Hyper-V Servers, the administrator can change the Datastores to the available drive level, but pool selection is unavailable.
-
Changing the Datastore in the case of Hyper-V servers will create a folder with the name Accops-Cloned-VMs in the selected drive and keep Desktops files in a folder named Desktop. As in the below screenshot, where Datastore has been changed to D:\ drive, the newly created Desktops will be located at:
D:\Accops-Cloned-VMs\Desktop Name>.
-
VMware vCenter Server: VCenter Servers present two cases according to supported clone types and accessible ESXi servers.
-
Linked Clones: The option to move replica VMs and cloned VMs is available.
Please note that the wizard will display all ESXi servers' available Resource Pools and Datastores. Still, the administrator should choose target locations carefully so that after completing the pool wizard, provisioning does not fail. -
Full Clone: In the case of full clones with vCenter Server, the administrator can change the Resource Pool or datastore.
-
Nutanix: The current version uses the same configurations as gold master, though options can be shown to change the storage pool.
-
Nutanix Flow Categories: Nutanix Flow allows organizations to deploy software-defined virtual network security without the complexity of installing and managing additional products that have separate management and independent software maintenance requirements.
-
Category Management in HyWorks: This option is enabled for Nutanix (Prism Central) desktop providers if Micro-segmentation is enabled. Categories will be applied after the customization ( Sysprep or Hyprep ) when the new VM is Created or on the recompose pool/Recreate VM.
Following are the options provided to configure flow categories:
- **Not Configured:** Categories will not be configured on VMs from the pool; if any category is applied from the previous setting will be removed. - **Copy from Source VM (Gold Mater):** Categories configured on the selected source VM will be displayed in the Selected Categories dropdown. These categories will be displayed read-only; no changes are allowed. The displayed categories will be configured on VMs from the pool. - **Select Categories:** All the categories available on Nutanix (Prism Central) will be populated in the Selected Categories dropdown. Multiple categories can be selected and configured on the Pool. Selected categories will be applied to pool VMs. !!! note ``` Any changes to pool Category settings will update Categories on VMs (those using pool settings). VMs that use DVM settings will be ignored. [Refer section for Nutanix Flow DVMs Settings](./monitoring_desktops.md/#nutanix-flow-categories) ``` -
-
Customization Screen
The deployment screen ensures the deployment options that affect the new DVM configurations on the Dedicated Session Provider, E.g., the Name of the Desktop, Location, Power State, Count, Etc. However, the newly created Desktops may require some internal system-level customization, which will be specific to each Desktop. For example, the computer names of all new desktops must be different, as must the locale.
Such changes can be made using a customization screen. The administrator can opt to enable or disable customization on the Customization screen.
Before moving to the Customization process or available options, we must learn that a few prerequisites must be met for customization to run successfully.
Customization of the VM can be done via two processes: Sysprep or Hyprep.
- Disabling customization
Disabling customization will create identical desktops regarding computer name, network settings, locale, and product key. This can be a handy option if an administrator can customize new Desktops manually from a Dedicated Session Provider or using an independent tool.
To disable customization, select the option No customization and proceed to the next screen.
- Enabling Customization
Administrators can customize the new copies of the Desktops by selecting the customization type Sysprep or Hyprep in the Customization section of Desktop Pool (the screen will be enabled only when Desktop Provisioning is set to Dynamic).
    - **Sysprep:** The Accops DVM agent on VDI will use the Microsoft Sysprep process to customize the VDI. Depending on the configuration needs, Sysprep will take 3-10 minutes or more.

    - **Hyprep:** The Accops DVM agent on VDI will use the Accops customization process. Hyprep is a quick VM customization process built by Accops. It can take 1-3 minutes.
The following customizations in new clones are possible:
    1.  **Owner Name:** Owner name of the Desktop (Optional).

    2.  **Organization Name:** Organization name of the Desktop (Optional).

    3.  **Computer Name (Prefix):** The computer name of the Desktop. To keep each Desktop identical, the HyWorks Controller will append the provided computer name with a hyphen and a unique number, e.g., XXXX. If new Desktops are provisioned and the computer name is specified as 'ProVM,' then the computer names of five Desktops will be ProVM-0001, ProVM-0002, and so on.

        1.  The customization's computer name (prefix) cannot exceed ten characters long. (\* This field is mandatory if customization is enabled.)

    **HyWorks maintains the same number for the VM and Computer names**.

        2.  **Local Username:** The new local user will be created on the new Desktop (Optional).

!!! warning
    ```
    If you leave the Local Username field blank, ensure that at least one local admin (other than Administrator) user is already available on the gold image. After Sysprep, the administrator user gets disabled, which could lead to a configuration without a local administrator.
    ```

    4.  **Local Password and Confirm Local Password**: Password to be set for the new local user (\* Mandatory field if the local username is provided)

    5.  **Workgroup/ Domain Configurations:**

        1. **Join workgroup** is selected by default and requires entries in the Workgroup textbox.

        2.  **Join Domain**: If new Desktops need to be joined to the existing domain, then this option can be selected, which enables the following fields:

            1.  Domain Name: e.g., accops.com (\* Mandatory if Join a Domain combo box is selected).

            2.  Username: The user with privileges to join a machine to a domain, e.g., the domain admin user (\* Mandatory if the Join a Domain combo box is selected).

            3.  Password and Confirm Domain Password: Password for domain admin user (\* Mandatory if Join a domain combo box is selected).

    6. **DNS Configurations:**

            1.  **Preferred DNS:** Preferred DNS to be configured in network settings (Optional).

            2.  **Alternate DNS:** Alternate DNS to be configured in network settings (Optional).

    7. **AD Path:** This computer should be registered with the full OU path. The provided domain username should have **adequate** rights to create objects in specified OU. (Optional).

    8. **AD Group**: Specify comma-separated active directory groups. Provisioned VMs will be made members of these groups.

    9. **Select Locale:** To configure the new Desktop's local language.

    10. **OS Product Key:** Provide the Volume product key to be applied to the new Desktop. However, if creating multiple VMs, this should be a mass activation key or left blank to activate the OS later manually.
Desktop Pool Management
Administrators can use the VDI > Pools section to:
-
Move desktops to maintenance mode.
-
Reset desktop pool (non-persistent or desktop pools deployed with Enabled DVM Reset option checked).
The Desktop Pool Wizard presents several configurable properties on different screens of the Desktop Pool Wizard; we will try to understand different Desktop Pool concepts and associated fields in this section of the document from the Add Desktop Pool Wizard.
Add Desktop Pool
In the previous section, we shared different screens of the desktop pool wizard and different types of configurations (Common/ important). This section will detail how various types of desktop pools can be added to HyWorks.
Following the classifications of desktop pools in the section Desktop Pool Categorization, the administrator can opt for the following two types of desktop deliveries to end users:
This section will include details for creating several types of desktop pools under these categories:
Creating Desktop Pools of Several Types
The administrator can proceed with the Add Desktop Pool wizard to create the following types of Desktop Pools in HyWorks deployments:
-
Using Existing Desktops (Desktop Provisioning type as None)
-
Device Based
-
User Based
-
-
Using Dynamic Desktop Provisioning (Creating New Desktops with Desktop Pool)
-
Device Based
-
User Based
-
Each type of pool can be a possible deployment scenario in different environments of different organizations. The administrator can choose the best-fit case for the requirement and try creating a pool to fulfill it. In the section below, we will try to understand the process of creating several types of pools.
Using Existing Desktops or Session Providers
This section will cover creating Desktop Pools using Desktops already in the configured Dedicated Session Providers. HyWorks Controller 2.1 supports the Pooling of Dedicated Session Providers only; External Session Providers work without any pools. We will cover the use of External Session Provider Session Providers in a later section of the document.
Device Based - Personal Assignment Lifespan
In any deployment, employees or professionals come to the office premises, log in to their respective desktops in a specific area, and work from there.
Device-based personally assigned pools replicate a similar environment where employees log in from their respective devices and are provided with sessions on their dedicated desktops.
Pre-requisites
-
Appropriate Dedicated Session Provider (i.e., VMware ESXi/ vCenter Server or Microsoft Hyper-V/ SCVMM, Nutanix Prism Element/ Prism Central, Microsoft Azure) is configured and reachable.
-
Devices are registered with HyWorks Controller.
-
A valid authentication server Microsoft AD, Built-in, or Novell eDirectory) is configured—this is Required to validate the user credentials used for login.
Desktop Pool Configurations on different screens
Device-based Permanently Assigned Dedicated Virtual Desktop Pool
| Screen Name | Configuration Attribute --> | Name / Description | Entitlement Type | Desktop Virtualization Type | Select Session Provider | Desktop Provisioning | Assignment Life Span | Connection Profile |
|---|---|---|---|---|---|---|---|---|
| General Screen | Expected Configuration --> | As Required | Device Based | Persistent Virtual Desktop | As Required | None | Personal | As needed |
| Screen Name | Expected Configuration |
|---|---|
| Desktop Screen | Search, select, and add desktops as selected dedicated session providers require. |
| Devices Screen | Search, select, and add devices required per the available registered devices list. |
| Desktop Assignment Screen | As per requirement: 1. Auto-assigned (if needed) or 2. Manually assign desktops to devices from the desktop pool wizard or desktop screen. |
| Advanced Screen | Configure as per requirement. |
Pool creation is completed, and the user who logs in with specific endpoints will get the configured desktops.
Device-Based - Floating Assignment Lifespan
In the above section, we have created a Device-based, personally assigned desktop pool to keep the assignments forever.
However, there could be deployment requirements where the user’s location and, thus, the device is fixed. Still, it does not matter which desktop has been assigned to the device, considering all desktops have the same configurations and the same users log in from the devices. For example, a hospital where users (doctors) log in with a common username, 'doctor,' to access their desktop, which does not have any local data, instead working on a web-based application.
In such scenarios, a temporary Desktop Pool can be very handy. Follow the below steps to create a temporary Desktop Pool:
Pre-requisites
-
Appropriate Dedicated Session Provider (i.e., VMware ESXi/ vCenter Server or Microsoft Hyper-V/ SCVMM, Nutanix Prism Element/ Prism Central, Microsoft Azure) is configured and reachable.
-
Devices are registered with HyWorks Controller.
-
A valid authentication server (Microsoft AD, Built-in, or Novell eDirectory) is configured—this is Required to validate the user credentials used for login.
Desktop Pool Configurations on different screens
Device-based Temporarily Assigned Dedicated Virtual Desktop Pool
| Screen Name | Configuration Attribute --> | Name / Description | Entitlement Type | Desktop Virtualization Type | Select Session Provider | Desktop Provisioning | Assignment Life Span | Connection Profile |
|---|---|---|---|---|---|---|---|---|
| General Screen | Expected Configuration --> | As Required | Device Based | Persistent Virtual Desktop | As Required | None | Floating | As needed |
| Screen Name | Expected Configuration |
|---|---|
| Desktop Screen | Search, select, and add desktops as selected dedicated session providers require. |
| Devices Screen | Search, select, and add devices as per requirement from the list of available registered devices. |
| Desktop Assignment Screen | Auto assigned (Must) Note: Manual assignments in the temporary pool are retained only until the first login and are erased after logout. |
| Advanced Screen | Configure as per requirement. Choose if the desktop should be assigned on logon or connection for the floating assignment. |
The pool creation is completed, and the user logging in from the configured devices will be provided with the appropriate Desktop session as per the below examples:
User Based - Personal Assignment Lifespan
Consider a deployment scenario where a field employee used to visit different offices all the time and rather than carrying any hardware (Laptop, etc.) with them to different offices due to security reasons, but the employees need to connect to their desktops only.
In such a scenario, a user-based dedicated pool can be helpful. In this pool, desktops are assigned to users, and irrespective of device, the user is provided with a session of the same desktop.
The below section will guide you on creating a user-based personally assigned desktop pool.
Prerequisites
-
The Appropriate Dedicated Session Provider (e.g., VMware ESXi/ vCenter Server, Microsoft Hyper-V/ SCVMM, Nutanix Prism Element/ Prism Central, Microsoft Azure) is configured and reachable.
-
A valid authentication server (Microsoft AD, Built-in, or Novell eDirectory) is configured—this is Required to validate the user credentials used for login.
-
All required users exist on the authentication server.
Desktop Pool Configurations on different screens
User-based Permanently Assigned Dedicated Desktop Pool
| Screen Name | Configuration Attribute --> | Name / Description | Entitlement Type | Desktop Virtualization Type | Select Session Provider | Desktop Provisioning | Assignment Life Span | Connection Profile |
|---|---|---|---|---|---|---|---|---|
| General Screen | Expected Configuration --> | As Required | User Based | Persistent Virtual Desktop | As Required | None | Permanent | As needed |
| Screen Name | Expected Configuration |
|---|---|
| Desktop Screen | Search, select, and add desktops as selected dedicated session providers require. |
| Users Screen | Search, select, and add users as per requirement from the list of available users. |
| Desktop Assignment Screen | As per requirement: 1. Auto-assigned (if needed) or 2. Manually assign desktops to users from the desktop pool wizard or desktops screen. |
| Advanced Screen | Configure as per requirement. |
User Based - Floating Assignment Lifespan
Consider a deployment scenario where field employees used to visit different offices all the time and rather than carrying any hardware (Laptop, etc.) with them to different offices due to security reasons and The desktops need not be specific to employees.
In such a scenario, a user-based dedicated pool can be helpful. In this pool, Desktops are assigned to users, and irrespective of device, the user is provided with a session on a different Desktop.
The section below will guide you on creating a user-based temporary assigned Desktop Pool.
Prerequisites
-
The Appropriate Dedicated Session Provider (e.g., VMware ESXi/ vCenter Server, Microsoft Hyper-V/ SCVMM, Nutanix Prism Element/ Prism Central, Microsoft Azure) is configured and reachable.
-
A valid authentication server (Microsoft AD, Built-in, or Novell eDirectory) is configured—this is Required to validate the user credentials used for login.
-
All required users exist on the authentication server.
-
Endpoints are configured correctly to log in to the controller.
Desktop pool configurations on different screens
User-based Floating Assigned Dedicated Desktop Pool
| Screen Name | Configuration Attribute --> | Name / Description | Entitlement Type | Desktop Virtualization Type | Select Session Provider | Desktop Provisioning | Assignment Life Span | Connection Profile |
|---|---|---|---|---|---|---|---|---|
| General Screen | Expected Configuration --> | As Required | User Based | Persistent Virtual Desktop | As Required | None | Floating | As needed |
| Screen Name | Expected Configuration |
|---|---|
| Desktop Screen | Search, select, and add desktops as selected dedicated session providers require. |
| Users Screen | Search, select, and add users as per requirement from the list of available users. |
| Desktop Assignment Screen | Auto assigned (Must) or Note: Manual assignments in floating desktop pools are retained only for the next login and are cleared after logout. |
| Advanced Screen | Configure as per requirement. Choose if the desktop should be assigned on logon or connection for the floating assignment. |
The pool creation is completed, and the user logging in from the configured devices will receive the appropriate Desktop session.
Desktop Pool of Physical Desktops
Physical desktops configured in HyWorks can be served using the following configuration:
Prerequisites
-
An appropriate physical PC dedicated desktop provider is added to HyWorks.
-
Physical desktops are added in physical desktops.
-
All added desktops are powered on and reachable from HyWorks/ client on the given host address and port.
-
Desktops are pre-configured for remote access of user (Assumption: Physical desktops will not be having HyWorks Desktop agent installed)
Desktop pool configurations on different screens
- Add a desktop pool as per the below example configuration
| Screen Name | Configuration Attribute --> | Name/ Display Name/ Description | Entitlement Type | Desktop Pool Type | **Select Session provider assignment | Assignment Life Span | Connection Profile | RDP Port | Active/ Maintenance Mode |
|---|---|---|---|---|---|---|---|---|---|
| General Screen | Expected Configuration --> | As Required | User/ Device based | Physical Desktop | Physical PC (Added in HyWorks) | Floating/ Personal | As needed | Default 3389 (Configure) | As needed |
| Screen Name | Expected Configuration |
|---|---|
| Desktop Screen | Search, select, and add desktops as selected dedicated session providers require. |
| Users/Devices Screen | Search, select, and add users/devices as needed from the available registered users/devices list. |
| Desktop Assignment Screen | Auto Assigned (Must) Or They manually assign desktops to users from the desktop pool wizard or desktop screen. |
| Extended Screen | Configurations for filtering IPs of desktops. Configure as per requirement. |
| Advanced Screen | Configure as per requirement. |
-
Save the desktop pool.
-
All added desktops will now be visible on the Desktop VMs page.
-
On login, users will be assigned to respective physical desktops.
Using Dynamic Desktop Provisioning
In the above section, we used existing desktops from selected dedicated session providers; now, there could be a scenario where all new desktops need to be created. For example, an institute that needs new Windows 7 Desktops with a Java development environment for a whole new classroom: in such a case, the administrator can prepare a Gold image with the Windows 7 operating system and then use dynamic Desktop provisioning to deploy new Desktops in HyWorks to fulfill requirements.
Now that we have understood the kind of deployments where dynamic Desktop provisioning might be required let us move to the section on creating several types of Desktop Pools, which will use Desktop Provisioning in the Desktop Pool wizard to deploy new Desktops.
As explained in the above sections, Desktop Provisioning will deploy all new Desktops with similar configurations by cloning (copying) the source VM, so Desktop assignment won't be required as all the Desktops are the same. Considering the above fact, the Desktop Assignment screen is not provided in Desktop Pools with dynamic Desktop Provisioning.
Below are a few examples of creating several types of Desktop Pools, having Desktop Provisioning enabled:
Persistent Virtual Desktop: Device-Based, Personal Assignment Lifespan, Dynamic Provisioning
Create a desktop pool in which desktops will be provided with clone-type Linked Clones, and desktops will be permanently assigned to devices.
Prerequisites
-
An appropriate Dedicated Session Provider, i.e., vCenter Server/ SCVMM, is configured (Only vCenter Server or SCVMM supports Linked Clones).
-
vCenter Server has a source VM that is ready to create multiple linked clones of it.
-
Devices are registered with HyWorks Controller.
-
A valid authentication server (Microsoft AD, Built-in, or Novell eDirectory) is configured—this is Required to validate the user credentials used for login.
Desktop Pool configurations:
Device-based Personally Assigned Deployed Desktop Pool
| Screen Name | Configuration Attribute --> | Name / Description | Entitlement Type | Desktop Virtualization Type | Select Session Provider | Desktop Provisioning | Assignment Life Span | Connection Profile |
|---|---|---|---|---|---|---|---|---|
| General Screen | Expected Configuration --> | As Required | Device Based | Persistent | vCenter Server/ SCVMM | Dynamic | Personal | As needed |
| Screen Name | Configuration Attribute --> | Select a source VM | Desktop Name Prefix | Clone Type | Desktop Creation Schedule | Power on Desktop | Deployment Configurations | Enable DVM Reset |
|---|---|---|---|---|---|---|---|---|
| Deployment Screen | Expected Configuration --> | Gold Image to be cloned | As needed | Linked Clone | On Demand. Provision Now -# as needed Spare Desktop Count - #, as needed |
As needed | As needed | As needed |
| Screen Name | Expected Configuration |
|---|---|
| Customization | Configure as per requirement. Note: Customization requires some prerequisites in the Gold image machine; please check these configurations in the respective sections of this document. |
| Devices Screen | Search, select, and add devices as per requirement. |
| Advanced Screen | Configure as per. |
Important
-
As linked clones are supported with vCenter Server and Microsoft SCVMM only, the selected dedicated session provider must be vCenter Server. If it is an ESXi or Hyper-V, then the Linked Clone option will not be enabled in the Deployment Screen.
-
the Desktop Assignment screen will not appear in the Dynamic Desktop Provisioning pool, as all the desktops are going to have the same configurations. Therefore, any desktop can be assigned to any client (device or user).
Details in Desktop Pools Tab of Deployed Dedicated Virtual Desktop Pool
The pool creation is completed, and now Desktop provisioning is started, which can be first observed in the Desktop Pools tab: initially, the Desktop Pool status will be Cloning Desktops when Desktop Cloning is in progress, and as soon as Desktop Cloning is completed, the status will be ready.
Another important thing to observe is that, according to the provided Desktop Creation Schedule, only 2 Desktops were created first.
Details in Desktops Tab and Flow of Client Assignments to Clients
Once the deployed dedicated desktop pool wizard is finished, the Desktops tab can be used to see the provisioning progress and understand the Desktop Creation schedule.
-
Desktop Provisioning Start: New Desktops are cloned one by one, and once the provisioning starts, the Desktops to be created first will have the following status:
-
The first Desktop for which cloning is started will be displayed as Creating Desktop.
-
Other Desktops to be provisioned later will be displayed with the status Pending Desktop Creations.
-
-
Desktop Provisioning: Create Now Completed: Initially, the controller will create desktops equal to the count provided in field No of Desktops to create now in the Desktop Creation schedule. All the Desktops will be displayed with the Status as Powered On (This does not mean that desktops are ready; there will be more processes in the backend to complete the desktop provisioning).
-
Customization Process: Customization will happen in the following manner:
-
Initially, desktops will be marked with the Customization Info flag as Required, which means customization will be required on this Desktop. To see the Desktop’s detailed status, click its name in the Desktops VMs tab; the Desktop Detail dialog will display all the information about the Desktop.
-
HyWorks Controller will wait for the new Desktops IP to be detected, and once it can get the IP of the new Desktop, it will try communicating with it.
-
Once Communication is established, Customization(Sysprep or HyPrep) will be started on the new Desktop, and flag SYSPREP Info will be marked as running, suggesting that customization is in progress. The new desktop will be rebooted and configured for customization as needed.
-
The Sysprep Info flag will be marked as Completed, which means Desktop customization is completed.
-
The Desktop Agent status should now be Responding with Desktops. The DNS Name should display information to help identify whether the Desktop has been customized correctly. For example, we configured the Computer Name as DesktopLCWIn7 and the domain as accops.com, so the DNS name of the new Desktop after provisioning should be 'DesktopLCWin7-0001.accops.local'.
-
Now, provisioning is completed for the first set of desktops as per the specified Create Now Desktops count, but the desktops assignment remains.
Case Study (User assignment):
-
The assignment will happen when a valid user from one configured device logs in or the administrator manually assigns the device from the tab.
-
Let us try to understand the Auto Assignment and Desktop Creation Schedule process with an example:
-
We have provisioned Desktops as per the below configurations: Maximum Desktop Capacity as 5, Desktop Creation Schedule as On Demand, where 2 Desktops have been created now and 2 Desktops are to be kept in spare. The configured devices in Desktop Pools are Device-1, Device2....Device5.
-
In the first step, as per the above details, the HyWorks Controller will create and customize 2 Desktops, say Desktop1 and Desktop2, and keep them unassigned.
-
When a valid user from the configured authentication server logs in from Device-1, the HyWorks Controller will look for the ready Desktop and assign it to Device-1. The assignment will also be remembered, so if the user from Device-1 logs in again, the same Desktop-1 will be presented.
-
As per configuration, HyWorks Controller must keep at least 2 Desktops in spare, and once Desktop-1 is assigned to Device-1, free Desktop count as 1. The HyWorks Controller will start provisioning one more Desktop to keep spare Desktops as 2.
-
-
Now, if the admin assigns or the user logs in from Device-2, the second Desktop will be assigned to this device. HyWorks Controller will trigger the creation of another Desktop, which will then be provisioned and customized per the provided settings.
The process of provisioning new desktops will continue until the maximum desktop capacity is reached, which means that the HyWorks Controller has provisioned all five desktops. Now, login from Device-4 and Device-5 will be assigned to Desktop-4 and Desktop-5, but the HyWorks Controller will not provision any new Desktop.
-
Persistent Virtual Desktop: User-Based, Floating Assignment, Dynamic Provisioning with Enabled DVM Reset
Create a desktop pool in which Desktops will be provisioned with clone type Full Clones, and desktops will be assigned to users.
Case Study Configure desktop creation schedule
Prerequisites
-
An Appropriate Dedicated Session Provider, e.g., VMware vCenter Server or Microsoft Hyper-V/ SCVMM, Nutanix Prism Element/ Prism Central, or Microsoft Azure, is configured (These Dedicated Session Providers support Full Clones).
- The Dedicated Session Provider has a source VM ready for creating multiple linked clones of it.
-
A valid authentication server [(Microsoft AD, Built-in, or Novell eDirectory) is configured—it is required to validate the user credentials when the user logs in.
Desktop pool configurations:
User-based Floating Assigned Deployed Desktop Pool
| Screen Name | Configuration Attribute --> | Name / Description | Entitlement Type | Desktop Virtualization Type | Select Session Provider | Desktop Provisioning | Assignment Life Span | Connection Profile |
|---|---|---|---|---|---|---|---|---|
| General Screen | Expected Configuration --> | As Required | User Based | Persistent | vCenter Server/ SCVMM/ Hyper-V/ Nutanix/ Azure | Dynamic | Floating | As needed |
| Screen Name | Configuration Attribute --> | Select a source VM | Desktop Name Prefix | Clone Type | Desktop Creation Schedule | Power on Desktop | Deployment Configurations | Enable DVM Reset |
|---|---|---|---|---|---|---|---|---|
| Deployment Screen | Expected Configuration --> | Gold Image to be cloned | As needed | Full Clone | Create All Desktops Now | As needed | As needed | Checked |
| Screen Name | Expected Configuration |
|---|---|
| Customization | Configure as per requirement. Note: Customization requires some prerequisites in the Gold image machine; please check these configurations in the respective sections of this document. |
| User Screen | Search, select, and add users, groups, or OUs as per requirement. |
| Advanced Screen | Configure as per requirement |
Login and Assignment Flow
-
We have provisioned a total of 3 Desktops, and all Desktops will be free initially.
-
Once User-1 logs in from device-1, it will be assigned to either of 3 available Desktops, say Desktop-1.
-
If User-2 logs in with Desktop-1 already in session, User-2 will be assigned Desktop-2 or Desktop-3, and if User-3 logs in with only Desktop-3 remaining, it will be provided with a session of Desktop-3.
-
If any other user logs in while all Desktops are already in use, the user will be displayed an appropriate error message stating that no free Desktop is available.
-
All assignments will be removed once users log out of the session on their respective desktops.
-
On the next logon, the same process will be repeated, and users will be assigned automatically according to the availability and readiness of the desktops, but the old assignment will not be guaranteed.
User-based - Floating Assignment, Dynamic Provisioning Non-persistent
Create a non-persistent desktop pool with floating assignments for users.
Prerequisites
-
An Appropriate Dedicated Session Provider, e.g., VMware vCenter Server, Microsoft SCVMM, or Nutanix Prism Element/ Prism Central, is configured (These Dedicated Session Providers support non-persistent desktops).
- The dedicated session provider has a source VM that is ready to create multiple linked clones of it.
-
A valid authentication server (Microsoft AD, Built-in, or Novell eDirectory) is configured, which is required to validate the user credentials used for login.
Desktop pool configurations:
User-based Floating Assignment Life-span Deployed Virtual Desktop Pool
| Screen Name | Configuration Attribute --> | Name / Description | Entitlement Type | Desktop Virtualization Type | Select Session Provider | Desktop Provisioning | Assignment Life Span | Connection Profile |
|---|---|---|---|---|---|---|---|---|
| General Screen | Expected Configuration --> | As Required | User Based | Non-persistent Virtual Desktop | vCenter Server/ SCVMM/ Nutanix | Dynamic | Floating | As needed |
| Screen Name | Configuration Attribute --> | Select a source VM | Desktop Name Prefix | Clone Type | Desktop Creation Schedule | Power on Desktop | Deployment Configurations | Enable DVM Reset |
|---|---|---|---|---|---|---|---|---|
| Deployment Screen | Expected Configuration --> | Gold Image to be cloned | As needed | Linked Clone | Create All Desktops Now | As needed | As needed | Default Checked |
| Screen Name | Expected Configuration |
|---|---|
| Customization | Configure as per requirement. Note: Customization requires some prerequisites in the Gold image machine. Please check these configurations in the respective sections of this document. |
| Users Screen | Search, select, and add users, groups, or OUs as per requirement. |
| Screen Name | Configuration Attribute --> | Power action when user logs-off | Other advanced configurations |
|---|---|---|---|
| Advance Screen | Expected Configuration --> | Shutdown/Power off/Restart (Choose as per need) | As per need |
Non-persistent Desktop Pool:
A non-persistent desktop pool erases all changes made by a user in the session; thus, a fresh VM is presented to the user on the next login.
How does it work:
-
HyWorks first deploys and customizes VMs as per deployment settings.
-
Once the VM is in a ready (Fresh) state, HyWorks creates a restore point representing the fresh state.
-
When the user logs in, the desktop will get assigned to the user.
-
On user logout, HyWorks reverts the desktop to its fresh state using the restore point created.
- When the user logs off, the restored VM will be kept in the power state, as per the configuration done for Power Action.
Login and Connect to Assigned Desktop
The last step of Desktop deployment is user login from respective clients.
To verify if the pool is adequately configured, administrators can get users to log in from appropriate devices to confirm if only assigned Desktops are provided. Consider the examples below:
-
Device-based personally assigned pools with assignments are done manually as follows
-
Pool Configuration:
-
Desktop-1 (Responding state) assigned to Device-1.
-
Desktop-2 (Responding state) assigned to Device-1.
-
-
Login Process:
-
Login from Device-1 with user credentials on successful authentication will configure Desktop-1 for remote access and will provide a session on Device-1.
-
In the same manner, login from Device-2 will provide a session of Desktop-2.
-
-
-
User-based pool with floating auto-assignment
-
Pool Configuration
-
Users - User-1 and User-2 are configured as clients in the pool.
-
Desktops - Desktop-1 and Desktop-2 are configured in the pool. Now, if User-2 attempts to log in when a desktop session of Desktop-1 is running, the response state is as follows:
-
-
-
Login Process:
-
Login from any registered devices with user-1 credentials will provide a session of any of the Desktops, I.e., Desktop-1 and Desktop-2. Assume a session of Desktop-1 is provided to User-1.
- Now, if User-2 attempts to log in when a desktop session of Desktop-1 is running, then a session of Desktop-2 will be provided to User-2. -
Once desktop sessions are ended, assignments will be removed, and the next login from User-1 or User-2 credentials will randomly provide a session of any of the Desktops. For example, User-1 can be provided with a session of Desktop-2 or Desktop-1.
-
Now that the administrator has verified that the Desktop Pool is successfully configured and users are able to connect to their respective Desktops, the administrator can happily work on other tasks. At the same time, the HyWorks Controller handles user access configuration and other relevant tasks.
Important
Desktop Pool creation is managed up to the Desktop to Client (Devices/Users) assignment level; the overall success of the session depends on various other factors that must be addressed for a successful HyWorks deployment.
A few such factors are:
-
{{ accops_products.HyWorks_DVMTools }} installation on target Desktops ensures RDP enabling for logged-in users and several other user configurations.
-
Appropriate authentication server configuration and user credentials
-
Appropriate RDP Security Protocol and Connection Profile configurations on devices/clients/desktop pools.
Edit Desktop Pool
Edit Desktop Pool wizard presents different editable options to administrators according to the type of pool being modified.
This section will provide details of the pool editing process and modifiable options for several types of Desktop Pools.
How to Edit a Desktop Pool
To edit a pool, the following steps should be followed:
-
Go to VDI > Pools page.
-
Select the desktop pool that needs modifications.
-
Click Edit. It will open the Edit Desktop Pool wizard.
-
Update the configurations as per requirement in General, Desktops (for pools using existing desktops), Deployment/Customization (for pool using dynamic provisioning), Users/ Devices, Desktop Assignments (for pools using existing desktops), Client Groups or Advance screens.
-
On Summary screen, verify if updated information is displayed.
-
Click Finish to complete the pool editing process.
Editing Desktop Pools of Distinct Types
This section will describe the modification process for desktop pools of several types and the options that can be edited in the Edit Desktop Pool wizard.
Editing Desktop Pool Having Existing Dedicated Desktops
The following configurations can be modified for desktop pools with existing desktops:
-
General Configuration:
- Name/ Description. - Assignment Life Span. -
Connection Profiles.
- Desktops: - Add More Desktops. - Remove added Desktops. -
Clients:
- Add/ Remove Clients (Users/Devices). -
Change Assignments
- Change Assignment Type from Manual to Auto-assignment or vice versa. - Change mapping of desktops to clients. -
Client Group
- Change access policy from **Unrestricted access** to **From specific client groups only** or vice versa. - If the client group is already selected, then move client groups from restricted to allowed and vice versa. -
Update Advance Options
Editing Desktop Pool having Provisioned Dedicated Desktops
The Edit Desktop Pool wizard, which uses Dynamic Desktop Provisioning to provision new desktops, presents the following options to the administrator:
-
Stop Provisioning.
-
Modifying other pool configurations: The following editable options are available for a desktop pool with dynamic desktop provisioning:
-
General Information
- Name. - Description. - Assignment Life Span. - Stop Provisioning (\* Only when provisioning is in progress). -
Deployment Tab
- Recompose - Source VM. - Desktop Name Prefix. - Clone Type. - Max Desktop Capacity. - Power on Configuration.-
Advance Options.
-
Without Recompose
-
Change Max Desktop Capacity.
-
Power on Option.
-
-
-
Customization
-
Desktops
- Remove Provisioned Desktop from Pool. -
Devices/ Users
- Add/ Remove new clients (Devices/ Users). -
Client Group
- Change access policy from **Unrestricted access** to **From specific client groups only** or vice versa. - If the client group is already selected, then move client groups from restricted to allowed and vice versa. -
Advance Options.
-
Stop Provisioning
Launching the Edit Desktop Pool wizard when desktop provisioning is in progress presents the option to Stop Provisioning.
To stop provisioning, the following steps can be followed:
-
Go to VDI > Pools page.
-
Select the Desktop Pool on which Desktop Provisioning is in progress (Can be identified by its Status in Desktop Pool-- Status should be Cloning Desktops).
-
Click Edit. It will open the Edit Desktop Pool wizard.
-
Click Stop Provisioning.
-
Confirm the action by clicking Stop in the Confirm Action dialog.
-
Desktop provisioning will be stopped:
- Any cloning task (currently in progress) will be completed and will not be canceled. - HyWorks Controller will not provision any new Desktops. - Desktop Pools status will be changed to **Cloning Desktops Cancelled**. -
Appropriate Log entries will be created for the action.
Warning
Sometimes, 'Stop Provisioning' may leave some residual Desktops in the respective Dedicated Session Provider, and the administrator will be required to clean up such Desktops from Dedicated Session Providers manually.Recompose
As the term suggests, if administrator needs to re-provision all deployed desktop, recompose of provisioned desktop can be initiated by selecting Recompose checkbox and modifying all deployment options as allowed.
Recompose in HyWorks, allows administrator to re-provision all the desktops and at the same time keeps the assignment and other options intact for the desktop pool.
Recompose Candidates
Recompose should be done on the desktop pools where provisioning is completed. Recomposing desktop pools with provisioning in progress is not possible, as no actions are allowed with provisioning in progress.
Recompose Mechanism for Distinct Types of Clones
-
Linked Clone Provisioned Desktop Pool
On initiating Linked Cloned Provisioned Desktop Pool, following changes will be done:
-
All linked cloned desktops will be deleted
-
Replica Image will be deleted
-
New replica image will be created from the specified gold image
-
New desktops (linked cloned) will be provisioned
- The configurations of old desktops will be retained, and new desktops will have same configurations i.e. VM Name, Computer Name, client assignments etc.
-
-
Full Clone Provisioned Desktop Pool
With desktop pool having full cloned provisioned desktops, following changes will be done:
-
All provisioned desktops (full cloned) will be deleted
-
New desktops (Full Cloned) will be provisioned
- The configurations of old desktops will be retained, and new desktops will have same configurations i.e. VM Name, Computer Name, client assignments etc.
-
Recompose -- How To
Follow the below steps to recompose a provisioned desktop pool:
-
Select a desktop pool having provisioned desktops with all provisioning tasks are done
-
Modify general configurations (If needed)
-
On Deployment screen, select checkbox Recompose
- Select Recompose Type as All VMs Now (Forceful) or Only Free VMs (Graceful)
-
Modify all the available options with recompose enabled. With Recompose enabled, only following configurations can be modified:
-
Deployment Configurations:
-
Source VM: Administrator can select any other gold image for provisioning
-
Clone from Snapshot: If snapshot pointer to be changed, new snapshot or current state can be selected
-
Desktop Name Prefix: Administrator can choose to change the Desktop Name Prefix
-
Clone Type: If selected dedicated session provider is a vCenter Server/SCVMM then administrator will also have option to change the Clone Type
-
Power on Desktop Post Provisioning Configuration: If needed, power on configuration can be changed
-
Deployment Settings: Administrator will also be able to modify the deployment settings for cloned desktops and replica image (only applicable if Clone Type is Linked Clone)
-
-
Customization Configurations:
- All configurations can be modified as needed
-
Other configurations:
- Modify as needed
-
-
Finish the Edit Desktop Pool wizard
-
All provisioned desktops will be deleted
-
HyWorks Controller will start provisioning new Desktops as per new deployment options
Recompose Example
Let us try to understand recompose process using an example.
-
Configuration: Desktop Pool-1 has been created using Dynamic Desktop Provisioning where 5 desktops were created (say Win7-Org-1 to Win7-Org-5)
a. The provisioned desktops are in use and assigned to devices
-
Recompose is needed and in recompose the desktop pool has been modified to change desktop name as Recompose. Now the desktops will be recomposed with new name, but the assignments will be retained
-
Desktops VMs tab will display information on provisioning of new Desktops
a. Observe that assignments are retained.
Note
-
Initially Desktops VMs tab may display Desktops names with old names but eventually old Desktops will be deleted and new Desktops as per new deployment options will be created
-
Recompose, keeps the configurations of desktop pool same as before but the count cannot be modified, while recomposing the pool.
-
Recompose, in current version does not create desktops in sequential order
-
-
Appropriate Log entries will be displayed in Logs tab for all recompose tasks.
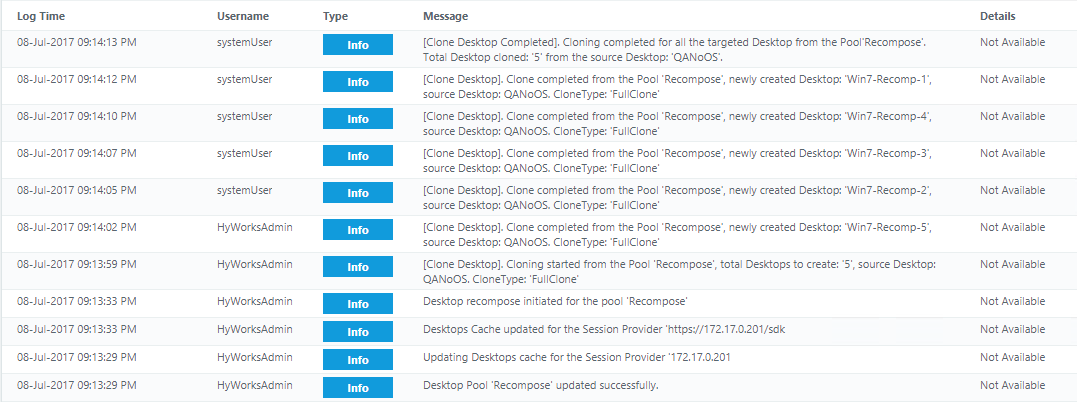
Recompose v2: Graceful Recompose in HyWorks v3.4-SP1 or Later
Accops HyWorks provides a recompose option for deployed desktop pools, allowing administrators to re-provision all desktops while preserving the assignment and other configurations.
In earlier versions, recomposing a desktop pool involved deleting all VMs and creating new ones, leading to downtime for users as they had to wait for desktops to become available or force the recomposition. The latest version of HyWorks Controller supports VM recreation for free VMs while preserving configurations. Occupied VMs are recreated once they become available, allowing administrators to initiate a recompose operation on a pool even when some VMs are connected without disrupting running sessions.
Supported in version: HyWorks Controller v3.4-SP1 or later
Connector Support: Graceful recompose and Revert to version are supported with below session providers:
- vCenter (Full Clone only)
- Azure
- Nutanix
Challenges in Previous Recompose:
- The recomposition requires 100 % downtime.
- The IT Admin needs to monitor the recompose process actively.
- There was no option to revert to previous images and pool settings.
- There was no selective rollout of VMs.
Advanced Features in Latest HyWorks Recompose:
-
Options to recompose a specific number of desktop VMs.
-
Version management: All VMs can be associated with a specific image version.
-
Reverting to a specific version: Option to revert to any previous VM versions.
Benefits for Administrators:
-
Selective rollouts for improved flexibility.
-
Reduced monitoring requirements.
-
Easy rollback to previous versions.
-
Version management for better identification.
New Recompose Options
The new recompose offers the following options for administrators:
-
All VMs Now (Forceful): This option functions similarly to earlier versions, where all VMs are deleted upon initiating the recompose, and new VMs are created. To initiate forceful recompose:
-
Edit a desktop pool
-
Go to the Deployment tab.
-
Enable checkbox for Recompose checkbox.
-
Select Recompose type as All VMs Now (Forceful)
-
Save the pool.
-
This option is supported by all session providers that support dynamically provisioned desktop pools.
-
Only Free VMs (Graceful): This feature is integrated into the latest HyWorks Controller and offers two recompose rollout options:
-
All Free VMs: All VMs that are not in use are instantly deleted and recreated, while occupied VMs are redeployed once they become available.
-
Edit a desktop pool.
-
Go to the Deployment tab.
-
Enable the Recompose checkbox, select the Recompose type as Only Free VMs (Graceful), and select the Recompose rollout type as All Free VMs.
-
Save the pool.
-
-
Limited (Specified no of VMs): It provides an option to redeploy only a specific number of VMs, and for redeploying the VMs, first, it checks for the free VMs and then redeploys VMs as per the number configured. For initiating graceful recompose with recompose rollout type as Limited (Specified no of VMs):
- Edit a desktop pool.
-
Go to the Deployment tab and enable the checkbox for Recompose.
-
Select the Recompose type as Only Free VMs (Graceful), select the Recompose rollout type as Limited, and provide the number per the requirement.
-
Save the pool.
-
Note
- For graceful recompose, it is mandatory to select "Clone from checkpoint."
- The checkpoint feature is available in Azure providers, while administrators of other providers must create snapshots/checkpoints from their hypervisor management portals.
Version
In desktop pools, the "Version" now represents a specific set of configurations associated with the deployment. This version is linked directly to the following pool configurations:
-
Desktop customization
-
Gold Master
-
Gold Master (Snapshot/Checkpoint)
-
VM Name Prefix
Move to Version
The latest HyWorks Controller introduces the Move to Version functionality to maintain recompose history and enable future VM redeployment based on previous configurations. Administrators can revert VMs or the entire pool to any earlier version.
-
Move to Version from Pool Page: For redeploying the whole pool:
- Select the desktop pool and click on the Move to Version button.
- Current and previous version details will be displayed in a pop-up window.
- Select the version details to which all VMs from the pool should be moved.
- Optional: If applicable, select and update the domain password for the selected version before moving. For more details, see the Update Domain Password section.
- Click the Move button, and all VMs from the pool will be moved to the selected versions.
-
Move to Version from VMs Page:
- On the VMs page, select one or more VMs to be moved to a specific version and click the button.
- Choose Recompose Type as Only Free VMs (Graceful) or All VMs Now (Forceful)
- Select the version and click the Move button to redeploy a particular VM(s).
- Optional: If applicable,select and update the domain password for the selected version before moving. For more details, see the Update Domain Password section.
-
Move to Version from Fix Desktop Page:
- On the Fix Desktop page, if the selected desktop is valid for an update password, the Update Credentials tab will be visible as there won’t be the versions pop-up to select versions.
Update Domain Password
Feature Overview: Update Domain Password in HyWorks Management Console
Introduction
The Update Domain Password feature in the HyWorks Management Console allows administrators to update the domain password stored in a specific version of a virtual machine (VM) or pool. This feature is crucial for maintaining the integrity and accessibility of virtual environments when domain passwords are changed or expired.
Feature Description
When moving VMs or pools to a previous version, administrators are presented with an option to update the domain password stored in that version. This feature is only available for applicable VMs or pools and ensures that the stored password is synchronized with the current domain credentials. It is important to note that this update only affects the versions saved in the HyWorks database, not the actual domain.
Key Components:
- Domain Username: The username stored in the version (read-only).
- Domain Password: The new domain password to be stored.
- Confirm Domain Password: Field to re-enter the new domain password for confirmation.
- Buttons:
- Test: Validates the new password before it is saved.
- Save: Saves the updated password across all applicable versions of the pool.
This feature was introduced to resolve the issue where previously, if the domain password was changed or expired, the only option was to recompose the pool.
Use Cases
- Password Synchronization: Ensures that the stored version passwords remain up to date with the actual domain, preventing access issues.
- Security Compliance: Helps in maintaining compliance by allowing quick updates to passwords across stored versions after a domain password change.
Accessing the Update Domain Password Feature
To access the Update Domain Password feature:
- During Move to Version:
- Initiate the Move to Version process for a VM or pool.
- After selecting the desired version, check if the Update Domain Password option is available.
- If visible, proceed to update the domain password as needed.
- Fix desktop:
Using the Update Domain Password Feature
Step-by-Step Guide
- Select a Valid Pool: Ensure the pool is either domain-joined or has versions. The feature is only applicable to these types of pools.
- Select a Version: During the Move to Version process, choose the desired version.
- Update Credentials: If applicable, an Update Credentials tab will appear.
- Note: If the domain password is not updated, the existing password in the version will be used.
- Check Box: Select Update Domain Password to proceed.
- Fields and Buttons:
- Domain Username: Read-only, displaying the username saved in that version.
- Domain Password: Enter the new password.
- Confirm Domain Password: Re-enter the password for confirmation.
- Test: Optionally test the new password to ensure it is correct.
- Save: Save the updated password. This action will update the password across all relevant versions.
Note
- The test will fail if the user is not part of the registered authentication server.
- Repeated failed attempts may block the user in the directory, depending on the applied policies.
- The Update Password feature updates the password in the versions, not on the actual domain.
Best Practices
- Regular Updates: Update stored passwords promptly after any domain password changes to prevent access issues.
- Testing: Always test the new password before saving to ensure it is correct and prevent account locks.
Troubleshooting
- Failed Test: Ensure that the user is part of the registered authentication server before attempting to test the password.
- Access Issues: Verify that the correct username and password are being used, and that the update was applied to all relevant versions.
Frequently Asked Questions (FAQs)
-
Q: Does updating the domain password affect the actual domain?
- A: No, the update only applies to the stored versions in the HyWorks database.
-
Q: What happens if I don't update the password?
- A: The version will use the previously stored password, which may lead to failure of domain join of the machines.
Conclusion
The Update Domain Password feature is an essential tool for maintaining synchronization between stored version credentials and actual domain passwords. By ensuring passwords are up-to-date, administrators can prevent access issues and maintain security compliance.
Version History
- Version ?? - Initial Release, August 2024.
Process to Recompose Selective VMs
If it is needed to apply the recompose to only selective VMs, the following process can be followed:
-
Edit the desktop pool.
-
In Deployment tab > Enable checkbox for Recompose checkbox.
-
Select the Recompose type as Only Free VMs (Graceful), select the Recompose rollout type as Limited to, and provide the number as "0" per the requirement.
- Select the appropriate snapshot/image to be associated with the version. (if needed)
-
Save the pool. This will help create a version without pushing upgrades to any VMs.
-
Now go to the Desktops page and filter out desktops from the pool updated in the above step.
-
Select one or more desktops and click on Move to version.
-
In the Move to Version window, a list of versions will be displayed with details like (Version Number, Gold Master Name, Snapshot Name, Date, and Time).
-
Select the version.
-
Click on Move.
-
-
The selected VM(s) will now be recomposed and moved to the selected version.
-
Desktop pages and logs can be checked to check the progress and status of the tasks.
Other modifications in Provisioned Desktop Pool without Recompose
In Edit Desktop Pool wizard for desktop pool with provisioned desktops, administrator can also modify other deployment options without recomposing the desktop pool. Following options are editable in such desktop pools:
-
Deployment Screen: Only following configurations are editable in Deployment screen:
-
Max Desktop Capacity
-
Desktop Creation Schedule (If it was enabled while creating desktop pool)
-
Deployment Settings
-
-
All other screens provide editable options as specified in above sections.
The edit process remains same as specified in above section.
Delete Desktop Pool
The administrator can delete a Desktop Pool from HyWorks deployment using the following steps:
-
Select Desktop Pool from the Desktop Pools tab.
-
Click Delete.
-
Deleting options for provisioned desktop pools or desktop pools with existing desktops.
1. If it's a provisioned desktop pool, the Confirm Action dialog will be displayed, showing the checkbox to **Delete the desktops (if any) that have been deployed by this pool.** 2. Keeping the option checked will also delete all provisioned desktops from the dedicated session provider. 3. Unchecking the checkbox will delete the desktop pool and all configurations from HyWorks, leaving the desktops on the dedicated session provider. For Desktop Pools (Using existing Desktops), the Confirm Action dialog will not have a checkbox for deleting the desktops; thus, confirming the pool deletion only deletes the desktop pool configuration from the HyWorks Management Console. -
Enter the minimum of the first five correct characters from the pool name to confirm the delete action.
-
Click Delete on the Confirm Action dialog.
-
The Desktop Pool will be deleted, and all associated Desktops will be removed from the Desktops VMs tab.
Add to Maintenance
A desktop pool can be moved to maintenance mode to perform maintenance activities. In maintenance mode, the desktop pool will be processed by HyWorks Controller, but users cannot access desktops from the pool.
To enable maintenance mode in a desktop pool:
-
Select the desktop pool from the list.
-
Click Add to maintenance.
-
On the Confirm Action dialog box, Click OK
-
Desktop pool will move to maintenance mode. HyWorks will continue to process in the backend, but end-users cannot access virtual desktops from the pool.
Reset Desktop Pool
For non-persistent desktop pools or deployed desktop pools that are enabled with the DVM Reset option, the administrator can use Reset to reset all desktops in a desktop pool.
To reset a desktop pool, follow the below steps:
-
Select the desktop pool from the list.
-
Click Reset.
-
On the Confirm Action dialog box, Click Reset.
-
All desktops in the desktop pool will be reverted to their respective restore point.
Desktop Pools Page and Available Information
Once Desktop Pools are created by providing appropriate details in the Add Desktop Pool wizard, the Desktop Pools page is refreshed and displays the following information of configured Desktop Pools using different columns.
-
Pool Name and Display Name: Desktop Pool Name and Display Name as provided in General screen
-
Pool Type and Entitlement Type: Pool Type (persistence or non-persistent) and Entitlement Type (user-based or device-based) as provided in the General screen
-
Provider/Team Name and Type: Name of session provider or session host team and type of session provider.
-
Desktop Provisioning and Connection Profile: Desktop Provisioning configuration as Deployed for dynamic else, None. the Connection Profile if configured else, None.
-
Assignment Life Span/ DVM Persistence:
- Lifespan as Personal or On demand - DVM Persistence as Persistent or Non-persistent -
Desktops Ready
- Total number of ready Desktops - Not applicable (NA) for Microsoft RDS Server Desktop Pools -
Desktops in Use
- Desktops already assigned or being used in session - Not applicable (NA) for Microsoft RDS Server Desktop Pools -
Free Desktops
- Unassigned Desktops in Pool, available for assignments and connection -
Status
- Ready (Default fonts) - Ready in maintenance (Orange Font) - Cloning Desktops (If provisioning is in progress) - Cloning failed - Recomposing -
Status - Information(i)
- Maintenance symbol. - Pool cloning, recomposing, cloning failed information displayed on mouse over on symbol. -
Active
- If Desktop Pool is active or not
Important Aspects of Desktop Delivery in HyWorks
In this section, we will try to learn some important aspects that can be used while deploying desktops:
Provisioning and Customization Process in HyWorks
Details about prerequisites for desktop customization and flow will be provided in this section:
Desktop Customization Pre-requisites and Limitations
-
The source VM must have Hypervisor tools installed (For VMware ESXi/vCenter server VMware tools, for Microsoft Hyper-V/SCVMM integration services setup, and Nutanix, Nutanix Guest tools should be installed)
-
The source VM must have HyWorks Desktop Agent installed to initiate the customization
-
The source VM must be a freshly installed virtual machine in which customization is not run earlier. A single Desktop cannot be customized twice.
- Applicable for Sysprep only; for Hyprep, it is expected to work fine as there is no restriction). Thus, if the source VM is already customized once, the clones, i.e., new Desktops, will not be able to run customization. - The source VM should not have an expired product key, as customization may get interrupted due to the activation notification thrown in between. - The source VM should be configured with DHCP network settings, as all clones will be created with the same network settings, causing IP conflict and affecting communication between HyWorks Controller and Desktop Agent. VM Auto sleep and power options must be disabled. -
When joining cloned VMs to the domain:
- Specified credentials should have adequate rights to create objects on the target OU (if specified) or the domain controller.

- Cloned VMs must be able to communicate with a domain controller to move it to a specified domain (specify DNS servers or DNS servers are provided by DHCP).
The flow of events for desktop customization
The Desktop Customization in HyWorks deployment is done using the following flow sequence:
-
Once all the customization attributes are correctly configured and the administrator commits to the pool changes by completing the Desktop Pool Wizard, HyWorks Controller will mark that the new Desktops require customization. (This can be observed in the Desktop Details dialog -> SYSPREP Info.)
-
The source VM will be powered off and cloned multiple times as specified. New Desktops will be created as per the provided deployment options.
-
If configured, desktops will be powered on automatically or require manual power on from the administrator if Power on Desktop Post Provisioning is not enabled.
-
After the Desktops are powered on, the HyWorks Controller will try to communicate with the HyWorks Desktop Agent on each Desktop.
!!! note ``` This step requires the source VM to have hypervisor tools and HyWorks Desktop Agent installed. ``` -
Until step# 4, new Desktops are replicas of the source VM. Desktop details will display the attribute SYSPREP Info as Required, which specifies that the new Desktop will require customization.
-
Once the HyWorks Controller can communicate with the HyWorks Desktop Agent on new Desktops, it will share the customization details with each
Desktop. -
Desktops will be rebooted and will run setup to customize the Desktop as per provided parameters (This step may take several minutes depending on the hardware, software resources, and network settings).
-
Once the setup is completed, as inputs provided in the pool customization tab, all new Desktops will have a unique name, a local user with a provided password, joined with a specified domain or workgroup, set with specified locale, and activated with the provided OS Product key.
The Desktop status will start displaying as Responding in the Desktops VMs tab with the Sysprep Info attribute showing as completed.
HyPrep and Sysprep for Desktop Customization
The latest HyWorks DVM Tools support the following two methods of preparing cloned systems for usage in deployment:
-
Sysprep: Sysprep (System Preparation) prepares a Windows installation (Windows client and Windows Server) for imaging, allowing you to capture a customized installation. Sysprep removes PC-specific information from a Windows installation, "generalizing" the installation so it can be installed on different PCs.
- Applicable for Windows systems only -
Hyprep: Accops own system preparation tool with faster processing.
Hyprep can be used for fast deployment.- Default for Linux systems. - Can be used for Windows systems. - Does not change the Security Identifier (SID). - Requires object(Computer) creation and deletion privileges for the user being used to join the domain.
How to use Hyprep
In the latest HyWorks Controller, desktop customization can be controlled from HyWorks Controller Management Console > Add Desktop Pool > Dynamic > Customization screen.
-
To use Hyprep, set Customization as Hyprep.
-
To use Sysprep, set Customization as Sysprep.
-
To use identical machines as source VM, keep Customization as No customization.
The older HyWorks Controller v3.2 does not provide the option to use Hyprep from the management console. However, Hyprep can be enabled on gold images using registry settings.
To enable Hyprep:
-
Connect to gold image with the user having administrator privileges.
-
Open the registry editor.
-
Go to HKLM\SOFTWARE\Accops\DVMAgent.
-
Change the registry value of USEHYPREPTool to true.
-
Now, the clone machine will be customized using Hyprep.
-
Keeping it as false will continue to use Sysprep as the default system preparation tool.
HyWorks Fallback Model for Delivering Best Available VM to User
The logical fallback model best fits desktop pools with floating assignments, where desktop assignments are removed on user logout, and a new user is assigned to the desktop as per availability. Within the desktop pool, a desktop may have the following status:
-
[Priority# 1] Powered on, IP (Network) available, DVM Agent installed and responding.
-
[Priority# 2] Powered on, IP (Network) available, DVM Agent not installed or unreachable.
-
[Priority# 3] Powered on, IP (network) unavailable.
-
[Priority# 4] Powered off or suspended.
Considering the above priority model, HyWorks’ behavior in different use cases can be defined as below:
-
HyWorks checks desktop availability on the above order only and provides the desktop that is best fit for the user. For example, if a pool has 4 VMs with only one VM in the powered-on state with IP and agent in the reachable state, HyWorks will provide that desktop to the user.
-
Another logic added to the above fallback model, where HyWorks will try to provide a fresh or not accessed VM to the user unless all priority VMs are exhausted, and every priority level works as a bucket for end-users. Consider the following examples:
1. A desktop pool with 3 VMs having agent responding, powered on state with IP, then if user-1 connects, VM-1 will be assigned to the user if user-1 logs out and VM-1 is released (All VM-1,2 and 3 are available). If a new user, user-2, requests desktops, then HyWorks will try to provide VM-2 or VM-3.

2. If all VMs (VM-1,2 and 3) are currently in use and user-1 (accessing VM-1) logs out and releases VM-1. A new user, user-4, requests desktop access, then HyWorks will try to provide access to VM-1 only. However, it has been recently released and belongs to the highest priority bucket.
Network Ready Desktops
In some cases, users may use software affecting local networks (e.g., full tunnel VPN clients), and the respective machines may not remain usable after usage. Ideally, in such situations, on user logout, machine power policies should be set to reboot, but in some cases, HyWorks did not get notified, and DVMs may remain unusable.
In such cases, the number of VMs available to end-users may continue decreasing, and thus, it is important to assign only those VMs to users that are ready for connection.
To overcome such situations, HyWorks can be enabled to check the reachability of all DVMs in a desktop pool explicitly on a specific network (RDP) port, and only those VMs will be provided with access, which are found available on the network.
Now, in the previous section, the priority order is already defined, which now will be changed as below:
-
[Priority# 1] Powered on, IP (Network) available, DVM Agent installed and responding.
-
[Priority# 2] Powered on, IP (Network) available, DVM Agent not installed or unreachable.
This means HyWorks will not provide access to any desktops that are not reachable, avoiding any circumstances where users will be provided access to desktops that cannot be accessed.
Provider Failsafe Policies
As HyWorks supports connecting to hypervisor management layers (e.g., VMware vCenter servers, managing multiple ESXi servers, Microsoft SCVMM, managing Hyper-V servers), management servers may be down through backend hypervisors, and virtual machines hosted on those hypervisors are running fine on them.
In such cases, HyWorks is configured to use cached values of DVMs' power and network status and provide clients with access (wherever applicable).
The feature does not guarantee that all users will be provided error-free access to assigned VMs, but it serves many users for whom assigned
VMs are in deliverable mode.
Failsafe policies can be controlled from Settings > General > Advance Config; the following configurations are available:
-
Session provider failsafe policy: This suggests whether the failsafe policy should be enabled or not. The default is true, suggesting that failsafe policies are enabled by default.
-
Failsafe Policy Timeout (Min): This suggests how long the controller should continue to server sessions even though the provider is not reachable. The default is zero (0), which means infinite.
What works and what fails with provider failure:
-
HyWorks cannot update the desktop power status or IP address.
-
Any desktops in a running state and connection state will be given access.
-
Any desktop that is not running or ready will be given access as per the fallback model, but the connection may fail.
-
Provisioning will not work.
-
Any power operation initiated by HyWorks will not work.
-
Non-persistent desktops cannot revert to a fresh state on user logout.
-
Adding new desktop pools or new desktops to existing desktop pools will be affected and not recommended.
One Desktop can used in only one desktop pool throughout HyWorks
A Desktop can be configured only in a single desktop pool in HyWorks deployment, and thus, the Available Desktops dialog lists only virtual machines that are not yet configured in any of the Desktop Pools in the HyWorks Controller.
Therefore, if an administrator is not able to see any specific virtual machine in the Available Desktops dialog, then either of the following conclusions can be made:
-
It has already been configured in any existing Desktop Pool
-
The Dedicated Session Provider cache does not have details of this Desktop (This can be resolved by refreshing the Available Desktops list as explained below).
ERR: DVM Details Duplication when Hypervisor and Its Management Server, both configured in HyWorks
As HyWorks supports desktop delivery from Microsoft Hyper-V and Microsoft SCVMM Server, it similarly supports desktop delivery from ESXi servers and VMware vCenter Server. However, if you configure a hypervisor and its management server both as desktop providers, desktop VM details are duplicated, and thus, the configuration may show some problems.
Reason: Every hypervisor keeps a unique ID for each VM, and when a management server connects to the hypervisor, the same unique ID is used.
This unique ID helps maintain VMs' identities even when their names or other attributes are the same.
HyWorks also uses this unique ID to identify VMs uniquely on the desktop provider and maintains its unique IDs for each VM.
Consider a scenario:
-
VM on ESXi (Unique Id: EVM1) is added to HyWorks, HyWorks Id (HVM1).
-
vCenter Managing ESXi is also added (Which has a VM ID the same as ESXi).
-
vCenter has also been added to HyWorks. So, HyWorks will try to add one more VM, such as HVM2, pointing to the same EVM1(duplicate ID).
-
HyWorks will have duplicate IDs for every VM operation and may show failures.
Conclusion:
- Adding a Hypervisor and its managing server as a dedicated session provider in the same HyWorks deployment is not recommended. It may cause failures. Some examples could be:
1.  ESXi server and vCenter Server

2.  Hyper-V and SCVMM Server
Extended Functional Support in Physical PC
The physical desktop pool has some new features that are not provided in other types of desktop pools.
-
IP address or Host name support: When importing CSV desktops, both IP address and hostname can be added, provided host names are resolvable from both HyWorks Controller and clients.
-
Microsoft RDS Delivery without HyWorks Session Host Agent: In a physical desktop, the same host can be added with different Desktop IDs and assigned to users to enable direct access to Microsoft RDS servers. An example
CSV to publish Microsoft RDS Server in Physical PC is given below: -
Add/Update, Desktop ID, Host Address
1, RDS41,192.168.1.4
1, RDS42,192.168.1.4
1, RDS43,192.168.1.4
1, RDS44,192.168.1.4
Assumptions and Limitations in Physical PC
Assumptions:
Some assumptions are there in the case of Physical Desktop:
-
Installing Desktop agents should be done to facilitate remote access and other features like session management, time-outs, etc.
-
Not having a desktop agent will block access to physical desktops, but an administrator must configure remote access for users, and other supported functions will not work.
Limitations:
Limitations of physical desktops are as follows:
-
Power operations from the management console are not supported. (For example, a powered-off physical desktop cannot be powered on by the controller automatically).
-
Power operations cannot be performed by clients as well.
-
Dynamic provisioning cannot be performed on Physical desktops.
Exporting Desktop Pools Details
HyWorks Controller can export CSV of all published desktop pools in the current organization from the management console. To export CSV of desktop pools:
-
Go to HyWorks Controller Management Console > VDI > Pools.
-
Click Export.
-
Select the Encoding type and columns.
-
Click on Export.
-
CSV with details of all desktop pools will be downloaded.
!!! note

    ```
    Use UTF_8 or Unicode encoding while exporting pool data with Japanese characters. Using Shift_JIS or ANSI encoding will result in garbage characters for the entries with Japanese characters.
    ```
Advance Configuration
Refer to the section for Advance Configuration for the pool.