HyWorks Session Host server Installation on a Windows server
The HyWorks Session and Host Server components are necessary on Windows RDS Servers to deliver applications and shared desktops to end users using HyWorks.
The HyWorks Session Host server can be installed using the Session Host installer.
Note
-
Copy the HyWorks setup locally on the target server. Running the HyWorks setup from the UNC path is not supported and will fail.
-
Running the HyWorks setup may also fail during the file extraction if the logged-in user has a roaming profile. Hence, it is recommended to log in with local administrator user credentials.
-
Using a freshly installed Windows operating system is crucial. Attempting to use a pre-existing image with conflicting agents installed by other VDI software suites can cause failures without clear indications of the issues.
The HyWorks Session Host server comprises the following components:
-
Accops HyWorks Session Host
-
Accops HyWorks Monitoring Service
-
HyWorks USB Redirection Driver: Select to install the Built-in USB Redirection Driver for USB redirection use cases.
-
HyWorks USB Cleaner: The module works as a cleanup agent during session disconnections to remove redirected USB devices. Select this option during USB Redirection Driver installation.
-
Accops Session Server Extension
- HyPrint PDF Printer (Must be explicitly selected in the latest setups.) In recent versions, this option is separated and, when chosen, prompts for an explicit dependency on Ghostscript. See more details here.
-
Advance Drive Redirection: For better performance than native drive redirection, select this option. A prompt will appear to confirm internet connectivity for installing the necessary components. Details can be found here.
-
Accops HyShell: Advanced desktop customization tool. After installation, specific settings must be configured to activate this feature fully.
-
Session Recording Module: An internal module for recording sessions, installed by default. The recordings are then transmitted to SRMS (Session Recording Manager Server) for streaming.
-
Accops HyWorks DVMTool-Lite: Integrated with session host setup and gets installed by default.
-
Accops User Experience Manager (AUEM): Component for multiple features like notifications, performance management, system monitoring, etc. This gets installed by default.
Refer to the Accops HyWorks Session Host Server section for details.
Prerequisites
-
.NET 4.7.2(or later): Refer to the Software Requirements section.
-
Microsoft SQL Server Compact Edition v4.0-SP1: Prerequisite for installing the HyWorks Controller or the Session Host Server. SSCE is used by the HyWorks session host agent and the monitoring services to temporarily store specific data.
-
Session host server v3.4.0.16805 or later does not require SQL CE; however, earlier versions require SQL CE 4.0-SP1.
-
If not installed, the setup should prompt you to download it using the Internet. However, it is also possible to install it before invoking the setup.
-
Direct download link: https://www.microsoft.com/en-in/download/details.aspx?id=30709
-
Installation Steps
-
Log in to the Windows Server with user credentials, administrative privileges, and permission to install certificates.
-
Copy the HyWorks Session Host server setup to the Windows server, which will be configured with the HyWorks Session Host server role.
-
Click the installer to launch the Installation wizard.

-
Click Next to proceed with the installation.

-
Accept the terms and click Next to proceed.

-
Change the Installation Directory, if required, and click Next to proceed. The default installation folder is C:\Program Files (x86)\Accops.

-
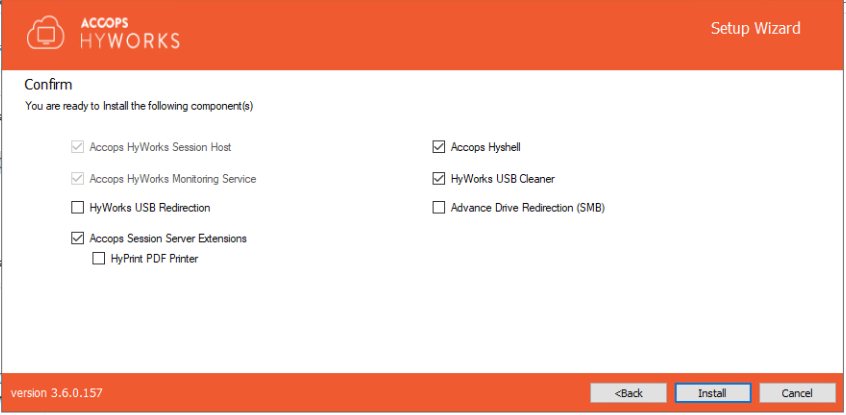
Select the modules to be installed - the latest versions of the session host server setup show options for the admin to install. Select the modules to install, then click Next. Available modules are:
-
Accops HyWorks Session Host: (Auto-selected in latest versions).
-
Accops HyWorks Monitoring Service: (Auto-selected in latest versions).
-
HyWorks USB Redirection Driver (Built-in USB Redirection Driver): If USB redirection using the Built-in USB Redirection Driver is applicable, select this option.
-
HyWorks USB Cleaner: Module to remove attached USB devices on session disconnections. Use this in combination with the HyWorks USB Redirection Driver.
-
Accops Session Server Extensions: Session extensions for HyPrint, Light-speed Printers, Smart File Transfer, Clipboard, Request Redirection, etc. For features to work, compatible client versions should be available.
-
HyPrint PDF Printer: HyPrint PDF printer for PDF-based printing.
- In the latest versions, this option is separated and, when selected, prompts for an explicit dependency on the Ghost script. See more details here.
-
Advance Drive Redirection: Provides better performance than native drive redirection. When this option is selected, a prompt appears to confirm internet connectivity before installing the required components. Details can be found here.
-
Accops HyShell: Advanced desktop customization tool. After installation, certain settings need to be configured to fully enable this feature.
-
-
Click Install to begin installing the HyWorks Session Host.

-
This will start the installation and automatically enable all the required roles, features, and the following components:
-
Microsoft Remote Desktop Services: When installing the HyWorks Session Host server role, the Remote Desktop Server role is installed automatically on port 3389.
-
Selected and default modules of the Accops HyWorks Session Host server.
The current installation state will be displayed on the screen.

-
-
Once the installation process is complete, the system should reboot to allow Windows to make the necessary changes to the system. Click Yes to restart the computer.


The Windows server is now ready with the Accops HyWorks Session Host server role configured.
Installation Logs
HyWorks installation logs can be used for troubleshooting and verification purposes. The installation logs are generated at the following location:
C:\ProgramData\HyWorksSessionHost\Logs - The HyWorks setup may also fail during file extraction if the logged-in user has a roaming profile. Hence, it is recommended to log in with local administrator user credentials. Using a freshly installed Windows operating system.
Post Installation Configurations
Install Ghostscript for HyPrint PDF Printer
Ghostscript is used for PDF-based printing in HyWorks. The latest versions of HyWorks DVM Tools and HyWorks Session Host Server are not packaged with Ghostscript and therefore do not install Ghostscript by default.
Recent setups provide the option to select components during installation. HyPrint is not selected by default. If HyPrint is chosen, the administrator will be prompted to manually install and set up the dependencies.
Attempting to print using the HyPrint PDF Printer on a system without Ghostscript will fail with the error:
"Generating PDF failed!"
This document outlines the steps to install and configure Ghostscript.
Applicable for versions: v3.6 or later.
-
Download the latest version of Ghostscript Setup (64-bit) from its release page:
https://github.com/ArtifexSoftware/ghostpdl-downloads/releases- Last verified version: v10.03.1
-
Run the setup on the server where Session Host or DVM Tools are already installed.
-
If an older version of Ghostscript (e.g., 9.06) is present, the installer will prompt you to remove it. Confirm the action.
-
Allow the installation to complete.
-
-
Configure Ghostscript path:
-
After installation, open Registry Editor.
-
Navigate to:
HKEY_LOCAL_MACHINE\SOFTWARE\Accops\HyPrint -
Locate and update the following registry keys with the full path of the Ghostscript executable:
-
GhostScript_32_Path
(e.g.,C:\Program Files\gs\gs10.03.1\bin\gswin64.exe) -
GhostScript_64_Path
(e.g.,C:\Program Files\gs\gs10.03.1\bin\gswin64.exe)
-
-
Save the registry changes and close the Registry Editor.
-
-
Log out if the user is already logged in.
-
HyPrint should now function from the next user connection.