Printing in Accops
Printing Mechanisms in HyWorks
HyWorks supports the following printing mechanisms:
-
Accops HyPrint PDF Printer
-
Accops EMF Printer
-
Remote Desktop Printer Redirection
-
USB Printer Redirection using additional USB Printer Drivers (Built-in and Enhanced USB Printer Drivers)
-
Accops Legacy Printer
Platform Support
| Printing Type | Endpoint Support | Server Support |
|---|---|---|
| HyPrint PDF Printer | 1. HyDesk Hy1000/Hy4000/Hy6000 2. HyWorks Client for Windows Desktops 3. HyWorks Client for Ubuntu 4. HyWorks Client for MAC OS |
1. Windows Servers (2019/2016/2012R2/2008R2-SP1) 2. Windows Desktops 32/64-bit (Windows 7, Windows 8/8.1, Windows 10) 3. Linux Desktops (xUbuntu 16.0/1, 18.0/1, 20.0/1: As supported for Linux Shared/Personal Desktop Delivery in Accops ) |
| HyPrint EMF Printer | HyWorks Client for Windows Desktops | 1. Windows Servers (2019/2016/2012R2/2008R2-SP1) 2. Windows Desktops 32/64-bit (Windows 7, Windows 8/8.1, Windows 10) |
| Accops Legacy Printer | HyWorks Client for Windows Desktops | 1. Windows Servers (2019/2016/2012R2/2008R2-SP1) 2. Windows Desktops 32/64-bit (Windows 7, Windows 8/8.1, Windows 10) |
| Remote Desktop Printer Redirection | HyWorks Client for Windows Desktops | 1. Windows Servers (2019/2016/2012R2/2008R2-SP1) 2. Windows Desktops 32/64-bit (Windows 7, Windows 8/8.1, Windows 10) |
| USB Printer Redirection (Built-in) | 1. HyDesk Hy1000/Hy4000/Hy6000 2. HyWorks Client for Windows Desktops 3. HyWorks Client for Ubuntu |
1. Windows Servers (2019/2016/2012R2/2008R2-SP1) 2. Windows Desktops 32/64-bit (Windows 7, Windows 8/8.1, Windows 10) 3. Linux Desktops (xUbuntu 16.0/1, 18.0/1, 20.0/1: As supported for Linux Personal Desktop Delivery in Accops) |
| USB Printer Redirection (Enhanced) | 1. HyDesk Hy1000/Hy4000/Hy6000 2. HyWorks Client for Windows Desktops 3. HyWorks Client for Ubuntu |
1. Windows Servers (2019/2016/2012R2/2008R2-SP1) 2. Windows Desktops 32/64-bit (Windows 7, Windows 8/8.1, Windows 10) |
Printers, Configurations & Troubleshooting
HyPrint PDF Printer and Accops EMF Printer
Accops HyPrint PDF Printer:
Accops HyPrint PDF printer is a PDF-based printer that works with both client-side and server-side components. Prints initiated by the HyPrint PDF printer are converted to PDF and are sent to the Client for printing.
Accops EMF Printer:
An EMF-based printing solution creates an EMF copy of the print data and sends it to the Client, which then sends it to the printer present in the Client machine, and the print is initiated.
The following printers are added during the installation of session server extensions:
-
Accops A4 Printer: Used for fixed-sized printing on A4-size paper.
-
Accops Barcode Printer: Used for fixed-sized printing on standard barcode size (100mm x 50mm) pages.
-
Accops EMF Printer: Application selectable paper size for printing.
Installation, Dependencies, and Working Mechanism
Installation:
HyPrint PDF printer and Accops EMF printer are sub-modules of Accops Session Extensions and are installed with their respective components:
-
The Client-side module of the HyPrint/EMF printer is installed with HyWorks Clients.
-
The Server-side module of the HyPrint/EMF printer is installed with DVM Tools or Session Host Server.
Dependencies:
-
HyPrint: For the HyPrint PDF Printer to function correctly, a suitable PDF reader must be installed and configured as the default application for PDF files on the Client side.
-
EMF Printer: There are no external dependencies. The Client component features an EMF print previewer for reading and printing EMF files.
Working Mechanism:
Users will see the HyPrint PDF printer available for printing on their respective hosted application or desktop (shared or personal). When initiating print on the HyPrint PDF printer, the document is converted to PDF and sent to the client-side component. The HyPrint PDF module on the Client side then prints the document according to the user's preferences.
Print Data Flow
(Server) Application > GDI > Virtual Printer > Spooler > Print Processor > Printer Driver > Port Monitor > Encrypted RDP Virtual channels > (User's machine ) > RDP Client > Printing Client > Physical or Document Printer.
Enable HyPrint PDF or Accops EMF Printer
To enable the HyPrint PDF printer:
-
Go to Connection Profile > Local Resources
-
Enable Allow RDP Plugins > Enable Accops HyPrint Printing Plugin
Important
-
Only the HyWorks Client on Windows can use the above flags to enable or disable the HyPrint and EMF printer
-
HyPrint on 'HyWorks Client for Linux' is always enabled and can not be disabled from the connection profile on the controller.
Advance Configurations
On the Server side, all the printing configurations are saved in the registry. These registry keys can be used to update the configurations of specific printers.
-
Registry Path: HKEY_LOCAL_MACHINE\SOFTWARE\Accops\HyPrint Registry Name & Print Type:
- cmdline (PDF) - PDF generator command line parameters. Modify to insert any specific command line attribute for printing.
-
Registry Path: HKEY_LOCAL_MACHINE\SOFTWARE\Accops\LightSpeed Registry Names:
-
lspDrvLogLevel (EMF) - Log level for Print Driver.
-
lspGenPDFLogLevel (EMF) - Log level for PDF Generator.
-
lspIntfLogLevel (EMF) - Log level for Print Driver UI.
-
lspPrnProcLogLevel (EMF) - Log level for Print Processor.
-
lspToolsLogLevel (EMF) - Log level for internal tools.
-
lspViewerLogLevel (EMF) - Log level for EPF Print previewer and Renderer.
-
-
Printer Settings:
-
Registry Path: HKEY_LOCAL_MACHINE\SOFTWARE\Accops\LightSpeed
-
Registry Names:
-
AutoRotate (EMF) - Rotate print job based on print data. Default - Enabled.
-
lspHyLitePrinter (EMF) - Reprint print job to HyLite printer name string. Default - Accops HyLite Printer.
-
lspPDFPrinter (EMF) - Reprint print job to PDF printer name string. Default - HyPrint PDF Printer.
-
lspRePrintToHyLite (EMF) - Reprint print job to HyLite printer. Default - Disabled.
-
lspRePrintToPDF (EMF) - Reprint print job to PDF printer. Default -Disabled.
-
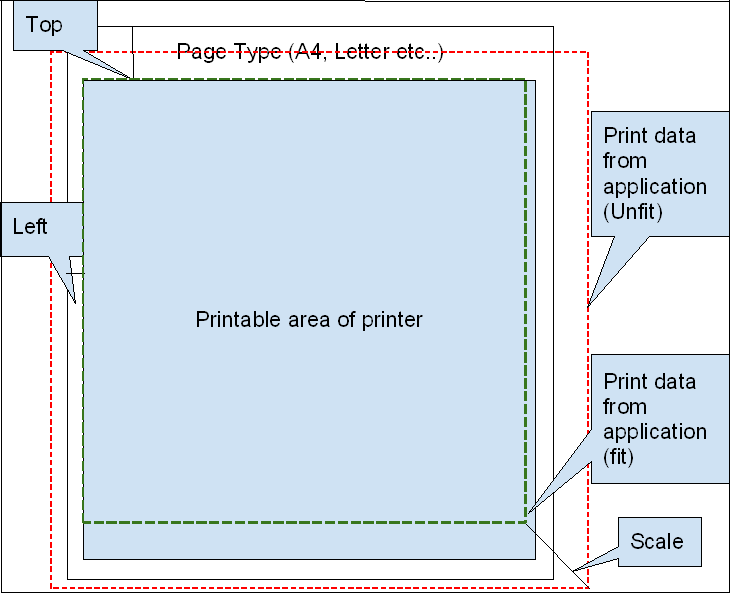
lspViewLeftMargin (EMF) - Adjust the left margin of the print job. Default - Zero (0) points.
-
lspViewPrinterSize (EMF) - Adjust the print job to size as specified by the printer and not by the application. Default - Disabled.
-
lspViewScale (EMF) - Adjust the left margin of the print job. Default 100 %.
-
lspViewTopMargin (EMF) - Adjust the top margin of the print job. Default - Zero (0) points.
-
OpenOrPrint (EMF) - Print job processing on the user's machine. Print (1) or Open (2) or Both (3). Default - Print.
-
PDFPrintQuality (EMF) - If PDF is generated, adjust PDF generation quality. Default - 300 dpi.
-
-
-
Configurable Advance Settings on Client (User's machine):
-
Common Settings:
-
Registry Path: HKEY_CURRENT_USER\Software\Accops\HyPrint
-
Registry Name & Print Type:
-
UseBuiltinPDF (PDF) - Use a built-in PDF renderer for printing. By default, it is Disabled.
-
UseEncodedPDF (PDF) - Use simple encoding for the PDF received as the print job (the PDF cannot be opened or viewed). By default, it is Disabled.
-
-
-
Registry Path: HKEY_CURRENT_USER\Software\Accops\LightSpeedClient
-
Registry Names & Print Type:
-
AutoRotate (EMF) - Rotate print job based on print data. Default - Enabled.
-
lspViewerLogLevel (EMF) - Log level for EPF Print Previewer and Renderer.
-
lspViewLeftMargin (EMF) - Adjust the left margin of the print job. Default - Zero (0) points.
-
lspViewPrinterSize (EMF) - Adjust the print job to the size specified by the printer and not by the application. Default - Disabled.
-
lspViewScale (EMF) - Adjust the left margin of the print job. Default - 100 %.
-
lspViewTopMargin (EMF) - Adjust the top margin of the print job. Default - Zero (0) points.
-
-
-
Size modification to map the user printer (Available on the server for all users, also available on the user device).
Add a New EMF Printer
Follow the steps below to add a new printer with a custom size:
Command to Add New Printer
AddPrinter.exe 1 "Accops NewBarcode Printer" size=1000x500 res=203 type=1
Arguments:
-
Argument# 1: Set as 1 to add and 2 to delete a printer.
-
Argument# 2 Name: Specify the name in double inverted commas.
-
Argument# 3 size: To specify size, e.g., 1000x500, for Custom size, follow the below calculation method: Number of inches 2.54100. e.g., If a paper of size 5x3 has to be specified, it will be 52.54100=1270 and 32.54100=761, i.e., 1270x761.
-
Argument# 4 res: Specifies resolution, e.g., 300dpi.
-
Argument# 5 type: Type to specify if the application can change the page size, Barcode, and A4 Printer.
Troubleshooting Accops HyPrint/ EMF Printers
-
Log Location:
-
Client side: %temp%\Accops\VirtChannels
-
Server side: C:\Windows\Temp\Accops\HyPrint
-
-
Print not coming on the configured printer on the Client side:
-
Check the client-side logs for analysis.
-
Failed to print file with error code [1155], return value [31]:
-
Verify if the appropriate PDF reader is installed or not.
-
Verify if the installed PDF reader is set as the default program for PDF files.
-
-
-
For any other error codes, search the internet for more information.
-
-
Error: Printing [Document Name] - Channel creation failed!! - Usually, this error occurs when the HyPrint server module cannot communicate with the HyPrint client module. Verify the following areas to understand the cause of failure:
-
Check if the Accops HyPrint Printing Plugin is enabled in the connection profile - Local Resources.
-
On the client side, verify that the Accops Session Server Extensions are installed and that the necessary files are available at the appropriate locations.
-
Windows Client: C:\Program Files\Accops\AccopsRDPExtensionClient
-
Windows Client On-demand: %localappdata%\Accops\AccopsRDPExtensionClient
-
-
On the client side, verify that the session extensions are registered successfully. Check if the registry has the correct path of server extensions:
- Windows Client:
-
HKEY_LOCAL_MACHINE\SOFTWARE\Microsoft\Terminal Server Client\Default\Addins\hyprint
- HKEY_LOCAL_MACHINE\SOFTWARE\Microsoft\Terminal Server Client\Default\Addins\hyprn32
-
Windows Client On-demand:
- hyprint and hyprn32 sub-keys should be present under this registry key - HKEY_CURRENT_USER\Software\Microsoft\Terminal Server Client\Default\AddIns
-
Accops Legacy Printer
Accops legacy printer is a printing solution for Windows and Unix-based operating systems, supporting applications that print on text-based printers or use legacy DOS-based printers. (Text stream directed to Parallel ports, e.g., LPT1:, LPT2:.)
Accops Legacy printing solution creates pass-through printers and virtual ports in user sessions to capture prints. Print data generated from text-based printers or legacy DOS-based printing is raw data and doesn’t require any processing in the operating system; this data is passed to the printer in its raw form (unprocessed).
-
Printer & Driver: Accops Legacy Printer / Generic / Text Only - based on Text driver from Microsoft.
-
Ports: LPT1 and LPT2, configurable up to LPT8.
Client-side Behavior
The following fallback model is used to receive print commands and functions:
-
In the case of one LPT1 printer, the dialog to choose a printer is not displayed, and the print command is sent directly to the LPT1 printer.
-
In the case of two LPT printers, if one of them is set as the default printer, then the print is directed to the default LPT printer, and the dialog is not displayed.
-
In the case of two or more LPT printers, none of which is the default printer, a prompt appears to select a printer.
Legacy Application Support using Port Mapping (Advanced Configurations)
Applications can send prints to the Accops legacy printer, which will be printed to the respective printers on the client side. However, some legacy applications, designed to print on LPT ports, may not work correctly. Therefore, the advanced configurations below can be used to map LPT ports with the Accops Legacy printer. Once mapped, all the prints initiated in LPT1 will be received by the Accops Legacy printer on the server side.
Advance Configurations:
-
Registry Path: HKEY_LOCAL_MACHINE\SOFTWARE\Accops\LightSpeed\PortMapper
-
Registry Names & Print Type:
-
LPT_Timeout (Text) - Timeout for starting the next print job. Default - 500ms.
-
LPT1 (Text) - Printer name string to which port data will be sent. Default - Accops Legacy Printer.
-
LPT2 (Text) - Printer name string to which print data will be sent. Default - Accops Legacy Printer
-
LPT3 (Text) - Printer name string to which print data will be sent. Default - Accops Legacy Printer.
-
LPT4 (Text) - Printer name string to which print data will be sent. Default - Accops Legacy Printer.
-
LPT5 (Text) - Printer name string to which print data will be sent. Default - Accops Legacy Printer.
-
LPT6 (Text) - Printer name string to which print data will be sent. Default - Accops Legacy Printer.
-
LPT7 (Text) - Printer name string to which print data will be sent. Default - Accops Legacy Printer.
-
LPT8 (Text) - Printer name string to which print data will be sent. Default - Accops Legacy Printer.
-
LPT9 (Text) - Printer name string to which print data will be sent. Default - Accops Legacy Printer.
-
PortMapping (Text) - Number of virtual parallel ports to be created and monitored for print data. Default - 2 (i.e., LPT1 and LPT2).
-
Remote Desktop Printer Redirection
This printing mechanism is supported only for Windows (Client) to Windows (Server) deployments.
To enable Remote Desktop Printer Redirection, allow printer redirection in Connection Profile > Local Resources > Printer (Enabled).
- All printers available on the client side will be redirected within the remote session and displayed with the name Printer Name (redirected X), where X is the user's session ID.
Important Group Policies: The following group policies on the server can be used to enable/disable printer redirection:
-
Computer Configuration\Administrative Templates\Windows Components\Remote Desktop Services\ Remote Desktop Session Host \Printer Redirection
-
Do not allow client printer redirection: Prevent printer redirection.
-
Use the Remote Desktop Easy Print printer first.
-
Do not set the default Client printer to be the default printer in a session.
-
USB Printer Redirection (Built-in/ Enhanced USB Redirection Driver)
Accops HyWorks solution has the following two USB redirection drivers integrated:
-
Built-in USB Redirection Driver: It comes integrated with the HyWorks client and HyWorks DVM Tools. A Built-in USB redirection drive is recommended for personal virtual desktops.
-
Enhanced USB Redirection Driver: Recommended for shared hosted desktops and comes with an independent installer.
Any of these drivers, based on the deployment model, can be used to redirect the USB printers to remote desktop sessions.
To enable USB printer redirection:
-
The following flag in the connection profile should be enabled:
- Connection Profile - Local Resources - Redirection of all USB devices
-
The HyWorks client should be installed with the appropriate USB redirection driver and configured correctly from device settings.
Printing with HyLite
Accops HyLite enables users to access corporate virtual desktops and applications from anywhere, using any device, simply through a modern & compatible web browser.
For printing with HyLite as an endpoint, the following mechanisms are supported:
-
HyLite Printer Redirection
-
Using HyPrint PDF Printer
-
Plugin-based Printing
HyLite Printer Redirection
In HyLite printer redirection, when connecting to remote servers, HyLite creates a virtual printer for every user session, which is then redirected to the remote session. When initiating a print command to redirect the HyLite printer, the command is executed on the HyLite device, and a PDF is generated and previewed for the end-user.
The end user then initiates a print command to any locally configured printer.
To enable the HyLite printer, the following configurations need to be enabled:
-
Enable Printing on the HySecure gateway (This will be a global control, and if disabled, HyWorks configurations will be overwritten.)
-
Enable Printer Redirection in the HyWorks Connection Profile.
Using HyPrint PDF Printer
While working with HyLite, users can also utilize the HyPrint PDF printer to generate PDF-based printouts and send them to the browser for printing. In this mechanism, the print command is sent to the HyPrint PDF printer, and an appropriate PDF file is generated. The PDF file is then sent to the HyLite and can be previewed on the browser; the end-user will be able to initiate print from there.
To use the HyPrint PDF Printer in HyLite sessions:
-
Enable drive redirection and Printer redirection in the HyWorks Connection Profile.
-
Enable Shared Drive Redirection, Printer redirection, and option HyPrint PDF Printer redirection in HyLite settings on HySecure Gateway.
Plugin-based Printing
This printing mechanism is supported only on the HyLite, which is used with Windows OS and the Chrome browser.
Using this mechanism, the print files are transferred from the server to the client, and then the client module initiates prints to the configured printer.
Prerequisites:
-
Browser: Chrome.
-
Client Operating System: Windows.
-
The Plugin Installer is stored on the HySecure Gateway for downloading.
-
Location: /home/fes/public
-
Based on user privileges, an on-demand or full plugin installer can be used. The full plugin will require administrative privileges on the client system; the on-demand plugin can be installed without administrator privileges.
-
-
Connection Profile:
- Allow all RDP Plugins - This option should be enabled.
-
HySecure Gateway - HyLite Settings:
-
Enable RDP plugin redirection.
-
Disable HyPrint PDF Printer redirection.
-
-
The internet is enabled on the client’s machine.
Configuration Flow for end-user:
-
The user will log into HyLite and will initiate a connection to the application or desktop (the connection profile will have the plugin enabled).
-
HyLite will evaluate if the accessed remote server requires plugins to be enabled.
-
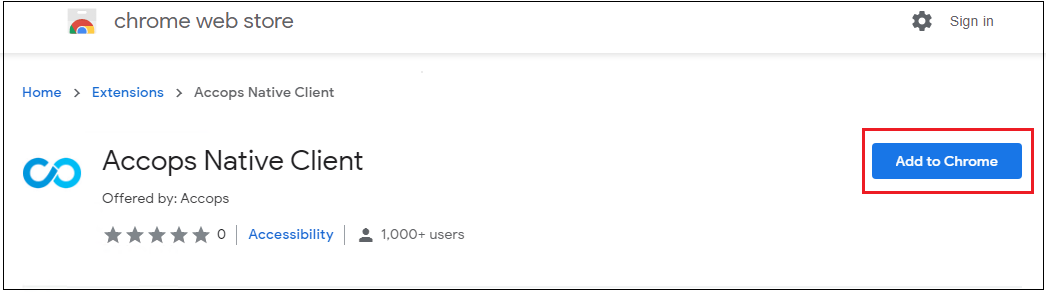
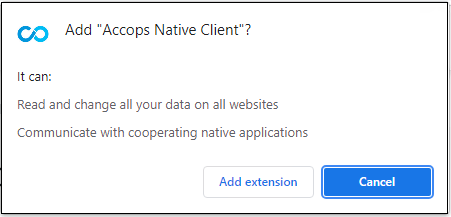
A prompt to install the Google extension will be shown.
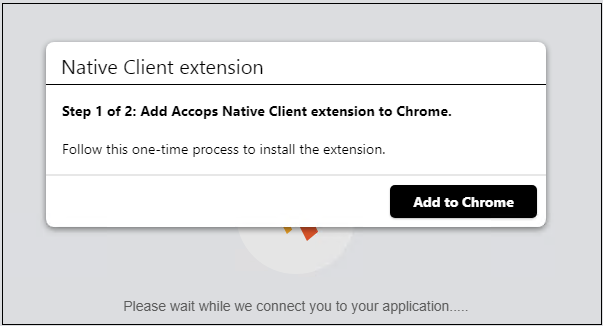
-
Confirm and add the Accops Native Client extension to the Google Chrome browser.
-
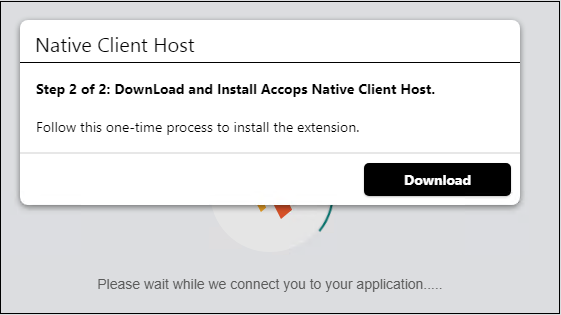
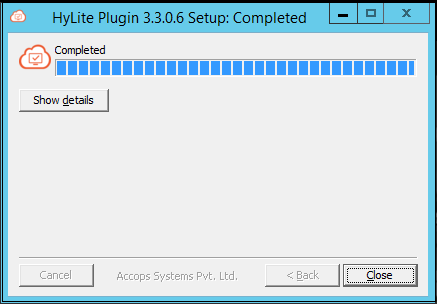
Once the extension is added, the second step will prompt the user to download and install the plugin on their system.
- Download and install the plugin on a user system.
-
The user will now be given access to the virtual application or desktop they accessed.
-
On initiating the print command to HyPrint PDF printer, any of the EMF printers or legacy printers, the actual print will be sent to the plugin on the client side.
- The plugin will initiate the print as per the printer configurations on the client system.