Introduction
The AUEM is designed to address the issue of resource monopolization by individual users on a Shared Hosting desktop (SHD). Implementing this application will ensure a fair distribution of resources and prevent the degradation of user experience due to excessive resource consumption by any single user.
Purpose
This application monitors and regulates resource usage on the SHD, thereby optimizing performance and ensuring a satisfactory user experience for all users accessing the system.
Scope
The application will be responsible for the following tasks:
-
Monitoring resource usage metrics, including CPU, memory, disk space, instance count, and child instance count.
-
Implementing resource usage thresholds tailored to individual users.
-
Enforcing resource usage limits for each user based on established thresholds.
-
Providing real-time alerts and notifications to administrators via ARS when resource thresholds are exceeded.
-
Providing real-time alerts and notifications to users via the AUEM tray when resource thresholds are exceeded.
-
Logging resource usage data for analysis and reporting purposes.
Functional Requirements
Resource Monitoring
The application shall continuously monitor resource usage metrics, including CPU utilization, memory usage, disk space consumption, bandwidth usage, number of instances of an application, no of child instances of an application.
Monitoring shall be performed at regular intervals to capture real-time resource utilization data.
Threshold Configuration
Administrators can define resource usage thresholds for individual users.
Thresholds can be set for each resource metric (e.g., CPU, memory, disk space) as well as for overall resource usage.
Threshold values shall be configurable and adjustable based on system requirements and user demands.
Resource Limit Enforcement
When a user's resource usage exceeds the predefined threshold values, the application shall enforce resource limits to restrict further consumption.
Resource limits may include throttling CPU usage, suspending processes, or restricting access to certain system resources by not allowing a user to launch a new application.
Enforcement actions shall be applied in a manner that minimally impacts other users' access to resources.
Alerting Mechanism
The application shall provide real-time alerts and notifications to administrators and users when resource thresholds are exceeded.
Alerts shall include details of the user, the resource metric exceeded, and the severity of the violation.
Note
This is not implemented in the current phase.
Logging and Reporting
The application shall maintain comprehensive logs of resource usage data, including timestamps, user IDs, and resource consumption metrics.
Logs shall be stored securely and be available for historical analysis and reporting.
Reporting functionalities shall allow administrators to generate usage reports, identify usage trends, and track resource utilization over time.
Note
This feature will not be implemented in the current phase; It will be addressed in the next phase.
Non-functional Requirements
Performance
The application shall be optimized for minimal overhead to ensure efficient resource utilization.
Resource monitoring and enforcement mechanisms shall operate with minimal latency to avoid impacting system performance.
Security
Access to the application shall be secured through authentication mechanisms to prevent unauthorized access.
Resource usage data shall be encrypted during transmission and storage to maintain data confidentiality.
Role-based access control shall be implemented to restrict administrative privileges based on user roles and responsibilities.
Scalability
The application architecture shall be designed to scale horizontally to accommodate increasing numbers of users and resource demands.
Scalability considerations shall be considered to ensure the application can handle growing resource monitoring and enforcement requirements.
User Experience Management Rules
When creating a rule for process optimization, set system thresholds for CPU and memory to trigger optimizations. Target processes based on their resource usage, applying settings to adjust process priority, release memory, and manage processes during session disconnects. Use the "Optimization Exclusions" list to ensure that critical processes are not impacted by these rules.
Primary Details
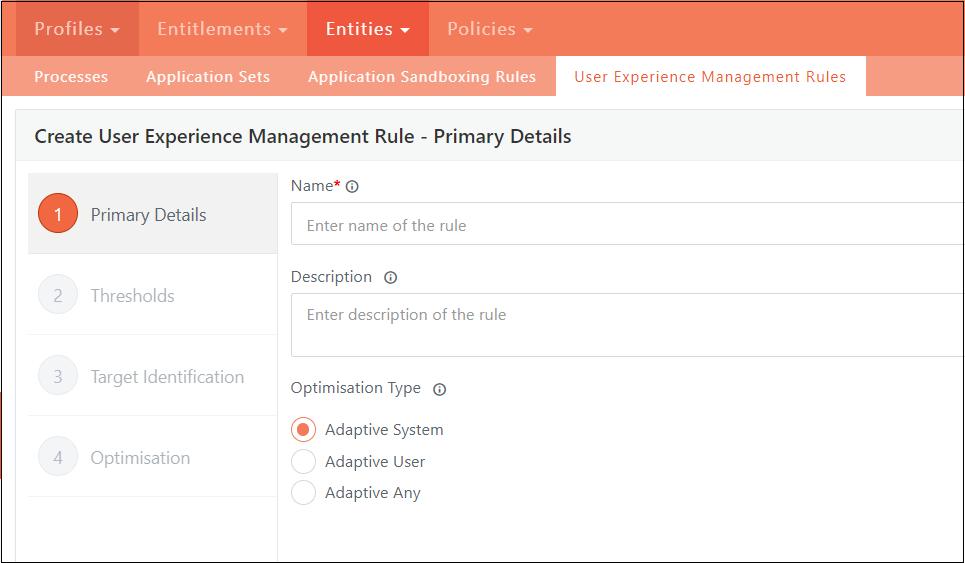
Rule Name
-
Enter a unique name for the rule in the "Rule Name" field.
-
Ensure that this name does not duplicate any existing rule names in the system.
Description
-
The "Description" field is available for providing additional information about the rule.
-
Note that this field is optional and not required for the creation of a rule.
Optimization Type
-
The "Optimization Type" dropdown allows you to select how the optimization should be evaluated.
-
You can choose from the following three types:
-
Adaptive System
-
Adaptive User
-
Adaptive Any
-
Adaptive System
-
When “Adaptive System” is selected, optimization of the user session is done when user resource consumption exceeds user entry threshold values, and overall system resource consumption also exceeds the system threshold.
-
If the system threshold is not reached but a user-specific threshold is breached, no optimization will be performed for that user's session.
Adaptive User
-
If you select "Adaptive User," optimization will be triggered for the user session independently of the system threshold.
-
If a user breaches their specific threshold, the session will be optimized based on configurable parameters.
-
These parameters can be set in the subsequent configuration screens.
Adaptive Any
-
Selecting "Adaptive Any" means that if the system threshold is breached, optimization will be applied to all user sessions without checking individual user thresholds.
-
If the system threshold is not breached, but a user's threshold is, optimization will be applied only to the session of the user who breached the threshold.
Threshold Configuration
Determine which user sessions require optimization by applying the following configuration settings. These settings help identify and prioritize sessions that meet specific criteria for CPU and memory utilization, ensuring that optimization is targeted effectively where it's needed.

System Threshold
Definition
-
The System Threshold refers to the predefined limits for CPU and memory utilization across the entire system.
-
When the system exceeds these thresholds, optimization processes will be triggered according to the selected Optimization Type.
Configuration
-
These thresholds are configurable through the "Advanced Settings" section of the system.
-
Users can adjust CPU and memory limits based on their specific requirements.
Operation
-
The system will utilize the most recent threshold values for evaluating all user sessions.
-
If any changes are made in the "Advanced Settings," the agent will update and apply the new threshold values for all subsequent evaluations.
Availability
This option is not applicable when the Optimization Type is set to "Adaptive User." In this case, system thresholds will not influence optimization decisions.
User Entry Threshold
Definition
-
The User Entry Threshold sets the CPU and memory utilization limits for individual user sessions.
-
When a user's resource usage exceeds these thresholds, optimization will be triggered for that specific session.
Conditional Skipping
-
If the System Threshold is breached and the Optimization Type is set to "Adaptive Any," the User Entry Threshold will be disregarded.
-
In this scenario, optimization will be applied universally, regardless of individual user thresholds.
User Exit Threshold
Definition
-
The User Exit Threshold specifies the point at which restrictions on a user's session should be lifted.
-
This occurs when the user's CPU or memory utilization drops below the set exit threshold values.
Conditional Retention
-
If the Optimization Type is "Adaptive Any," and the user's resource utilization falls below the exit threshold while the system's overall utilization remains above the system threshold, the user will not be exited from the optimization process.
-
In other words, even if the user’s resource usage is within acceptable limits, the session will continue to be optimized until the overall system load decreases.
Target Identification
Determine which processes within a user session require optimization. This involves pinpointing the specific processes that are consuming significant resources and ensuring that optimization measures are applied directly to those processes to enhance overall system performance.
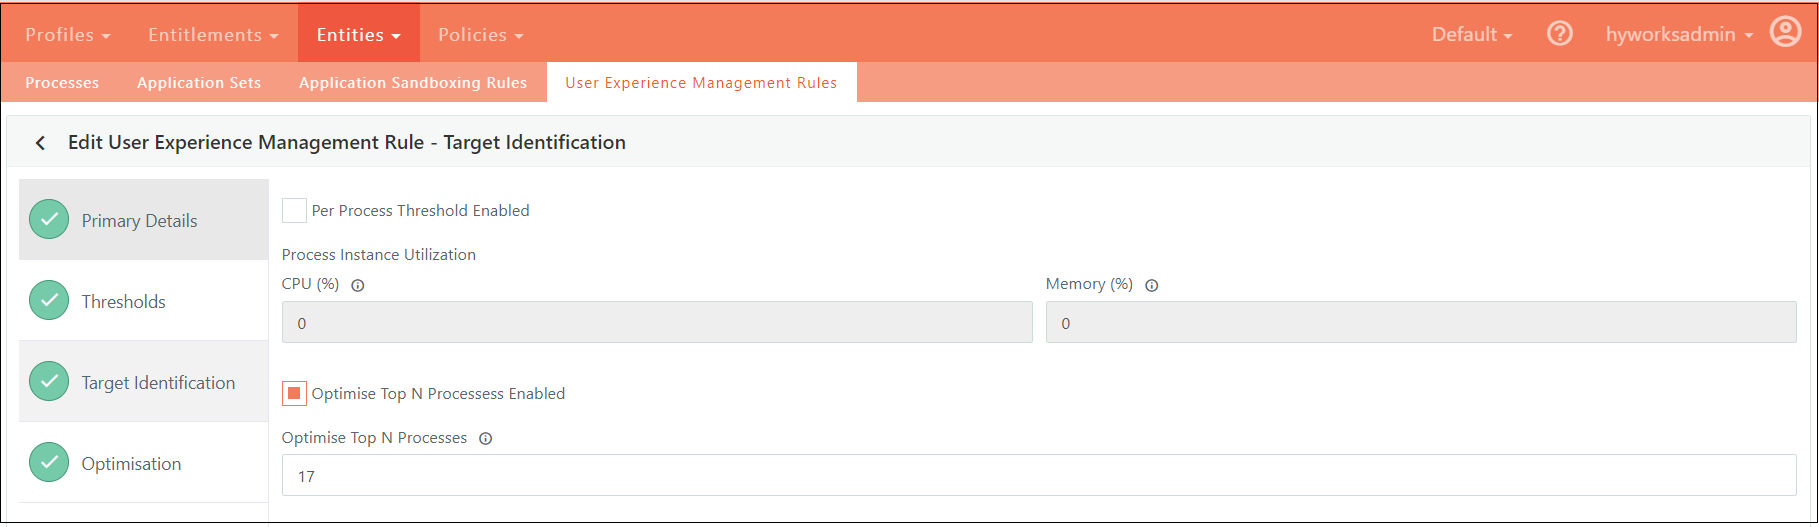
Per Process Threshold Enabled
-
Definition: This feature allows for the identification and targeting of individual processes based on their CPU and memory utilization relative to predefined threshold values.
-
Functionality: Each process within a user session is monitored for CPU and memory usage. If a process exceeds the specified threshold values, it is flagged for optimization.
-
Objective: The goal is to optimize only those processes that are consuming excessive resources, thus improving overall system efficiency.
Optimize Top N Processes
-
Definition: This setting focuses on identifying and optimizing the top "N" processes that use the most CPU or memory within a user session.
-
Functionality: The system will analyze and rank processes based on their resource consumption. The top "N" processes, which are the highest consumers of CPU or memory, will be selected for optimization.
-
Objective: By targeting the most resource-intensive processes, this approach ensures that optimization efforts are concentrated on the processes that have the greatest impact on system performance.
Optimization
Optimization of processes within a user session involves applying various configurations tailored to manage resource usage effectively. Different configurations target specific aspects of resource consumption:
-
CPU Optimization: Some configurations are designed specifically to address CPU utilization. These settings help in reducing the CPU load of processes that exceed predefined limits.
-
Memory Optimization: Other configurations focus on managing memory usage. They are applied to processes that consume excessive amounts of memory, aiming to alleviate memory pressure.
-
Combined Optimization: Certain configurations address both CPU and memory usage simultaneously. These settings provide a holistic approach to optimization, ensuring that processes are managed for overall efficiency in both resource areas.
By applying these configurations, the system can effectively optimize processes based on their resource consumption patterns, improving overall performance and stability.

Block New Process Execution (BNE)
-
Description: When a user session is flagged for optimization, no new processes can be started within that session until the user session is exited from the optimization
-
Administration: Administrators have the option to bypass this restriction for specific processes by using the "Optimization Exclusions" list. This allows selected processes to continue running or starting, despite the overall block.
Limit Process Resource Utilization (LRU)
-
Description: This configuration restricts the CPU and memory usage of processes according to predefined limits.
-
Functionality:
-
If only CPU limits are set (with memory set to zero), only the CPU usage will be restricted.
-
If only memory limits are set (with CPU set to zero), only the memory usage will be restricted.
-
-
Administration: Administrators can exempt specific processes from these restrictions by using the "Optimization Exclusions" list. Additionally, they can adjust the maximum allowable CPU or memory usage for particular processes based on the exclusions configuration.
Reduce Process Priority (RPP)
-
Description: This setting lowers the priority of processes that are consuming high amounts of CPU resources, adjusting their execution priority to below normal levels.
-
Functionality: This optimization specifically targets processes based on their CPU usage. Processes that are primarily memory-intensive will not be affected by this setting.
-
Administration: Administrators can use the "Optimization Exclusions" list to prevent certain processes from having their priority reduced. By doing so, these processes will maintain their current priority levels, ensuring they are not impacted by the priority adjustment.
Release Process Memory (RPM)
-
Description: This optimization reduces the memory consumption of processes identified as high memory users by releasing their working set memory.
-
Functionality: This setting targets processes based on their memory usage and does not affect CPU usage. The memory that is released is specifically the working set memory, which can depend on the operating system's memory management policies.
-
Administration: Administrators can use the "Optimization Exclusions" list to exclude certain processes from this memory reduction. This allows those processes to maintain their current memory usage without being affected by the optimization.
Suspend Process on Session Disconnect (SPD)
-
Description: This configuration suspends all processes within a user session when the session is disconnected, regardless of whether the session is marked for optimization.
-
Functionality: Processes will be suspended upon disconnection and will automatically resume when the session reconnects.
-
Administration: Administrators can use the "Optimization Exclusions" list to exempt certain processes from suspension, ensuring they continue to run or are not suspended during session disconnects.
Release Memory on Session Disconnect (RMD)
-
Description: This setting releases all memory used by processes within a user session when the session is disconnected, even if the session is not flagged for optimization.
-
Functionality: Memory is freed up immediately upon session disconnection, and will be reallocated when the session reconnects.
-
Administration: Administrators can use the "Optimization Exclusions" list to prevent specific processes from having their memory released during session disconnects, allowing these processes to retain their memory allocation.
Periodic Checks
-
Threshold Evaluation Interval: [Value] seconds
-
Description: Defines the frequency at which system and user resource utilization is evaluated to determine if set thresholds have been exceeded. This interval dictates how often the system checks resource usage against configured limits.
-
Configuration Details: This setting is managed through advanced configurations. The agent will utilize the most recently received threshold evaluation interval. If this value changes, the agent will automatically update its evaluation schedule to align with the new time window, ensuring ongoing accuracy in resource monitoring and optimization.
Resource Policies
Primary Details
This section covers the essential elements of policy configuration, including naming, description, rule type, and user experience management. It also explains how to enable or disable the policy, as well as how to prioritize it when multiple policies are applicable. By setting these primary details, you ensure that the policy is correctly identified, mapped, and applied to enhance user session performance and management.
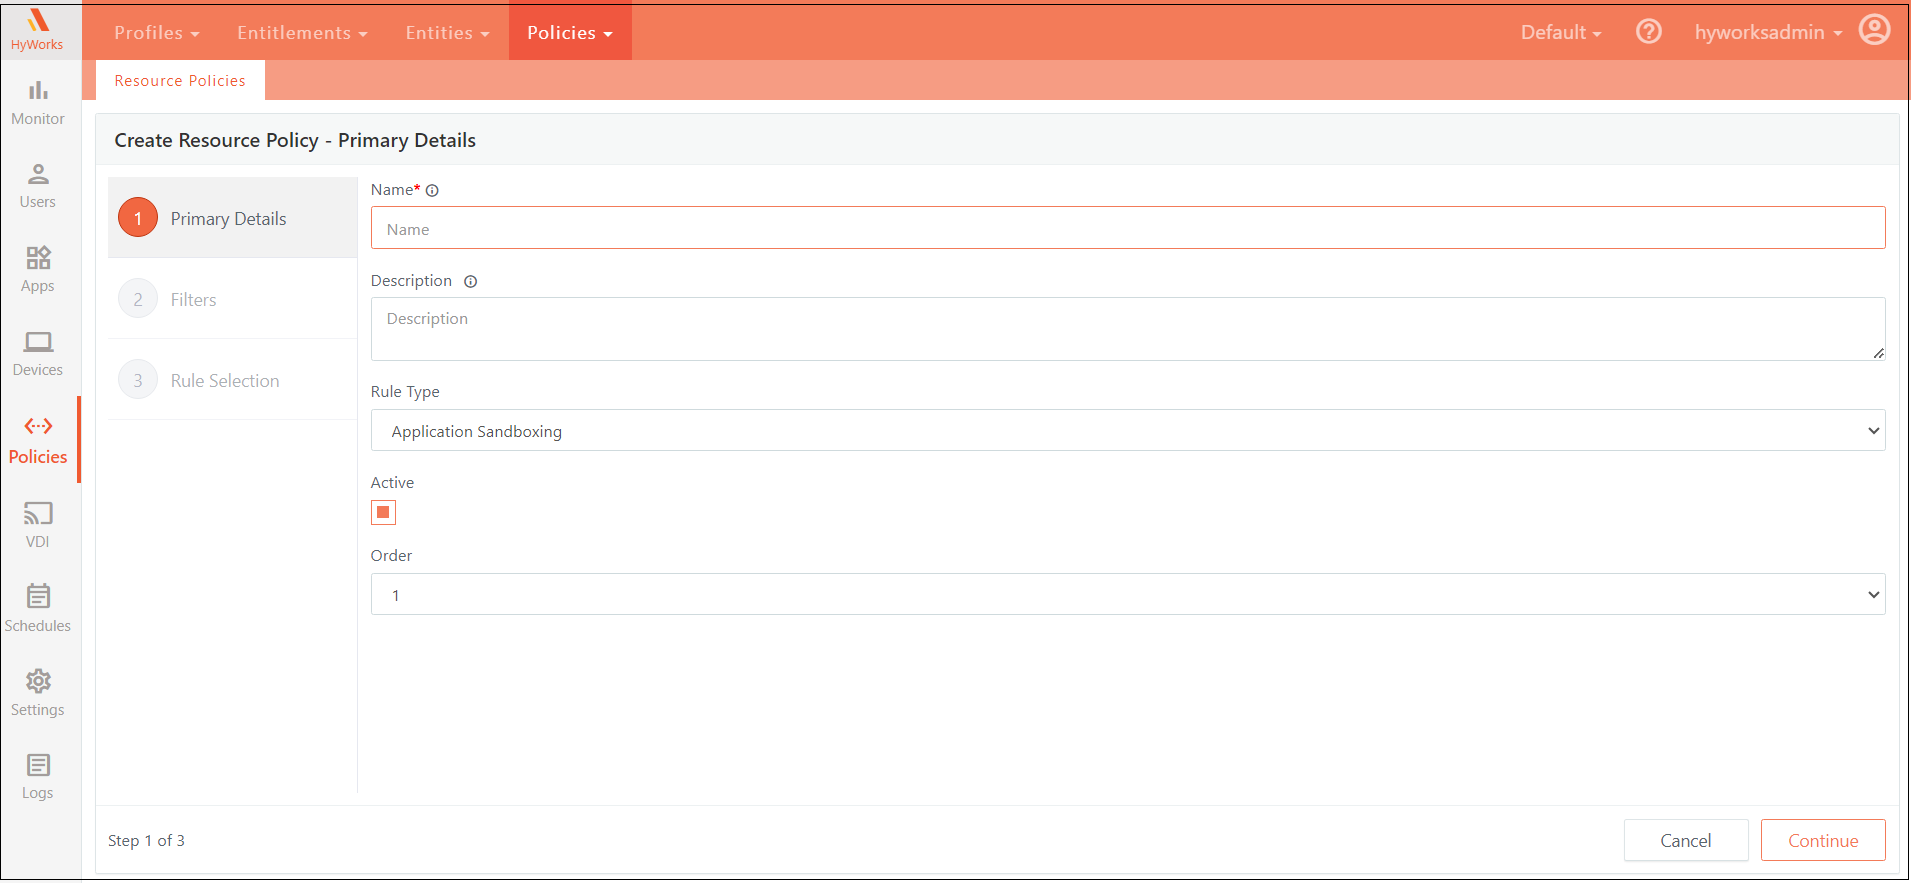
Name
Assign a unique name to the policy that will be used to identify and map it. Ensure that the name is not duplicated across existing policies.
Description
Provide an optional description for the policy. This field can be used to give additional context or details about the policy's purpose or scope.
Rule Type
Specify the type of policy being created. This classification helps in mapping the policy to the appropriate category or function within the system.
User Experience Management
- This section is used to define the rules for optimizing user sessions. It focuses on enhancing user experience by managing resource allocation and performance.
Active
This toggle enables or disables the policy. When disabled, the policy will not be applied to any user, regardless of other criteria.
Order
Determines the priority of this policy when multiple policies apply to a user. The order setting ensures that policies are applied in the correct sequence based on their priority.
Policy Filters
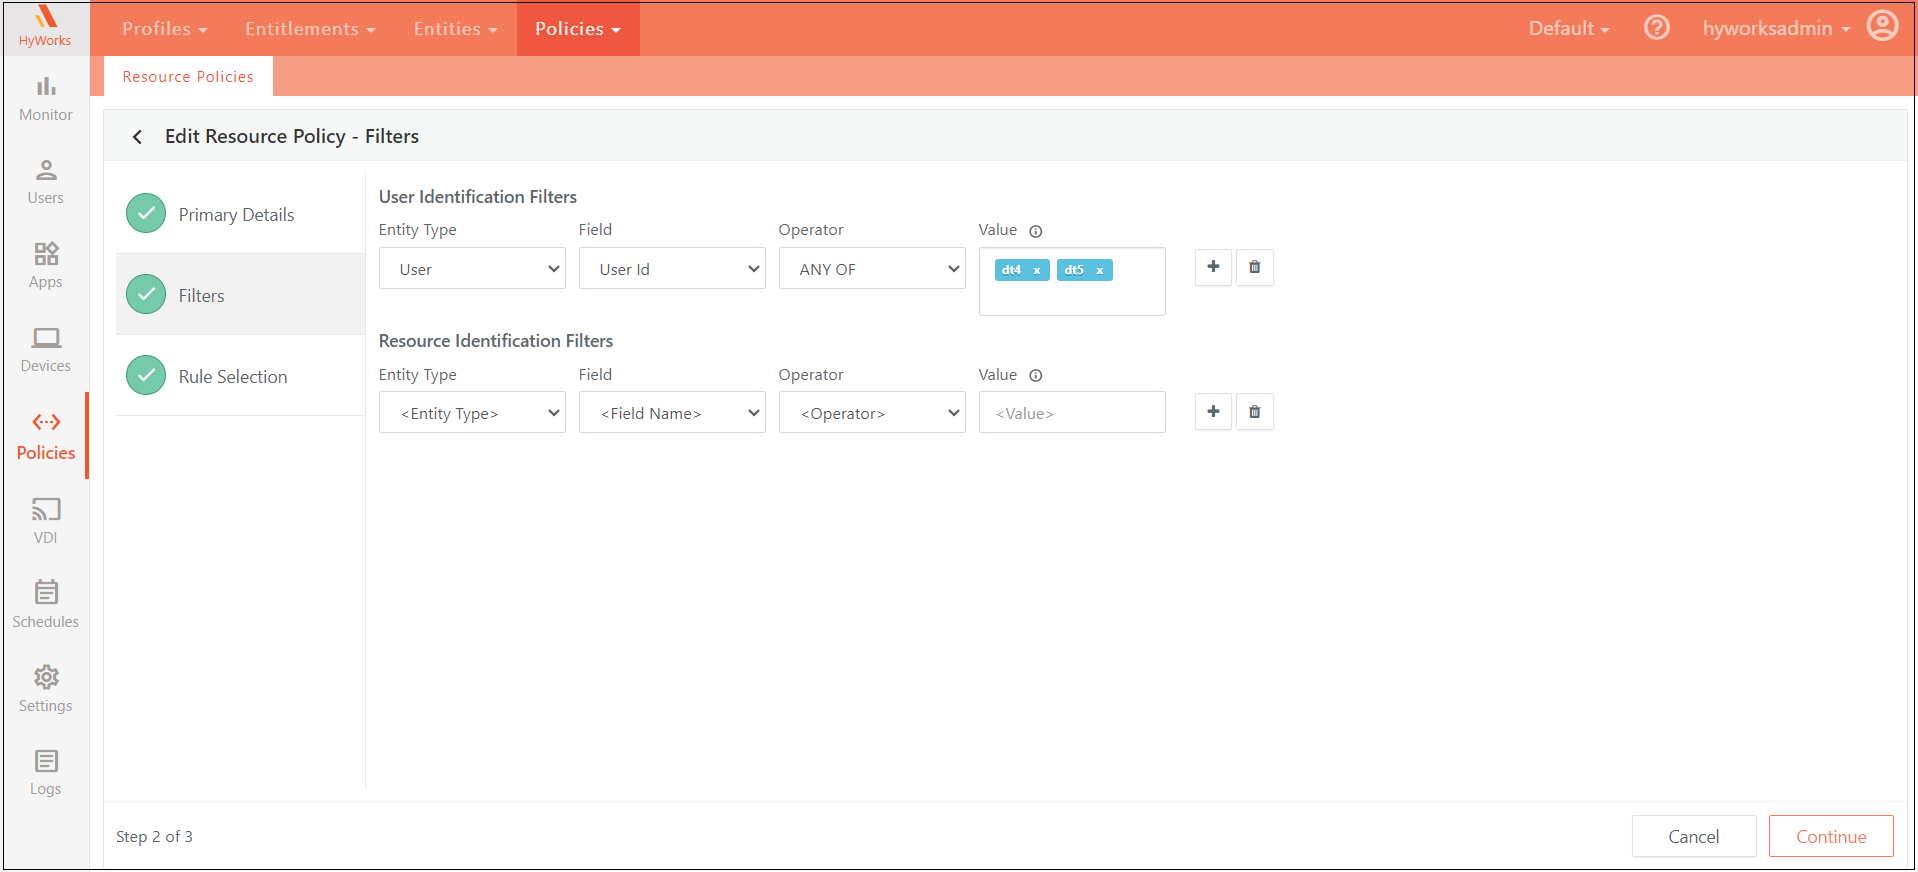
Define the specific conditions that determine when a policy should be applied. These conditions can be configured using User Identification Filters or Resource Identification Filters. Users have the flexibility to create complex, nested conditions by combining multiple criteria with logical AND/OR operators. Conditions can be nested up to two levels, allowing for detailed and precise policy application. When multiple criteria are defined, all specified conditions must be met for the policy to be applicable.
User Identification Filters
-
Purpose: Set criteria based on user attributes to apply the policy.
-
Attributes:
-
User ID: The username of the logged-in user. Specified user IDs must be valid Account Name of users from the authentication server configured for the current organization. This field is case-sensitive.
-
User Groups: The groups to which the logged-in user belongs. Specified user groups must be the names of user groups from the authentication server configured for the current organization. This field is case-sensitive.
-
Organizational Unit: The organizational unit associated with the logged-in user. The specified organizational unit must be a valid distinguished name (DN) of an OU from the authentication server configured for the current organization. This field is case sensitive.
-
Resource Identification Filters
-
Purpose: Specify criteria based on the resources that a user attempts to access.
-
Resource Types:
-
Desktop Pools
-
Session Providers
-
Session Teams
-
This structure allows for precise control over policy application, ensuring that policies are enforced only when all specified conditions are satisfied.
Rule Selection
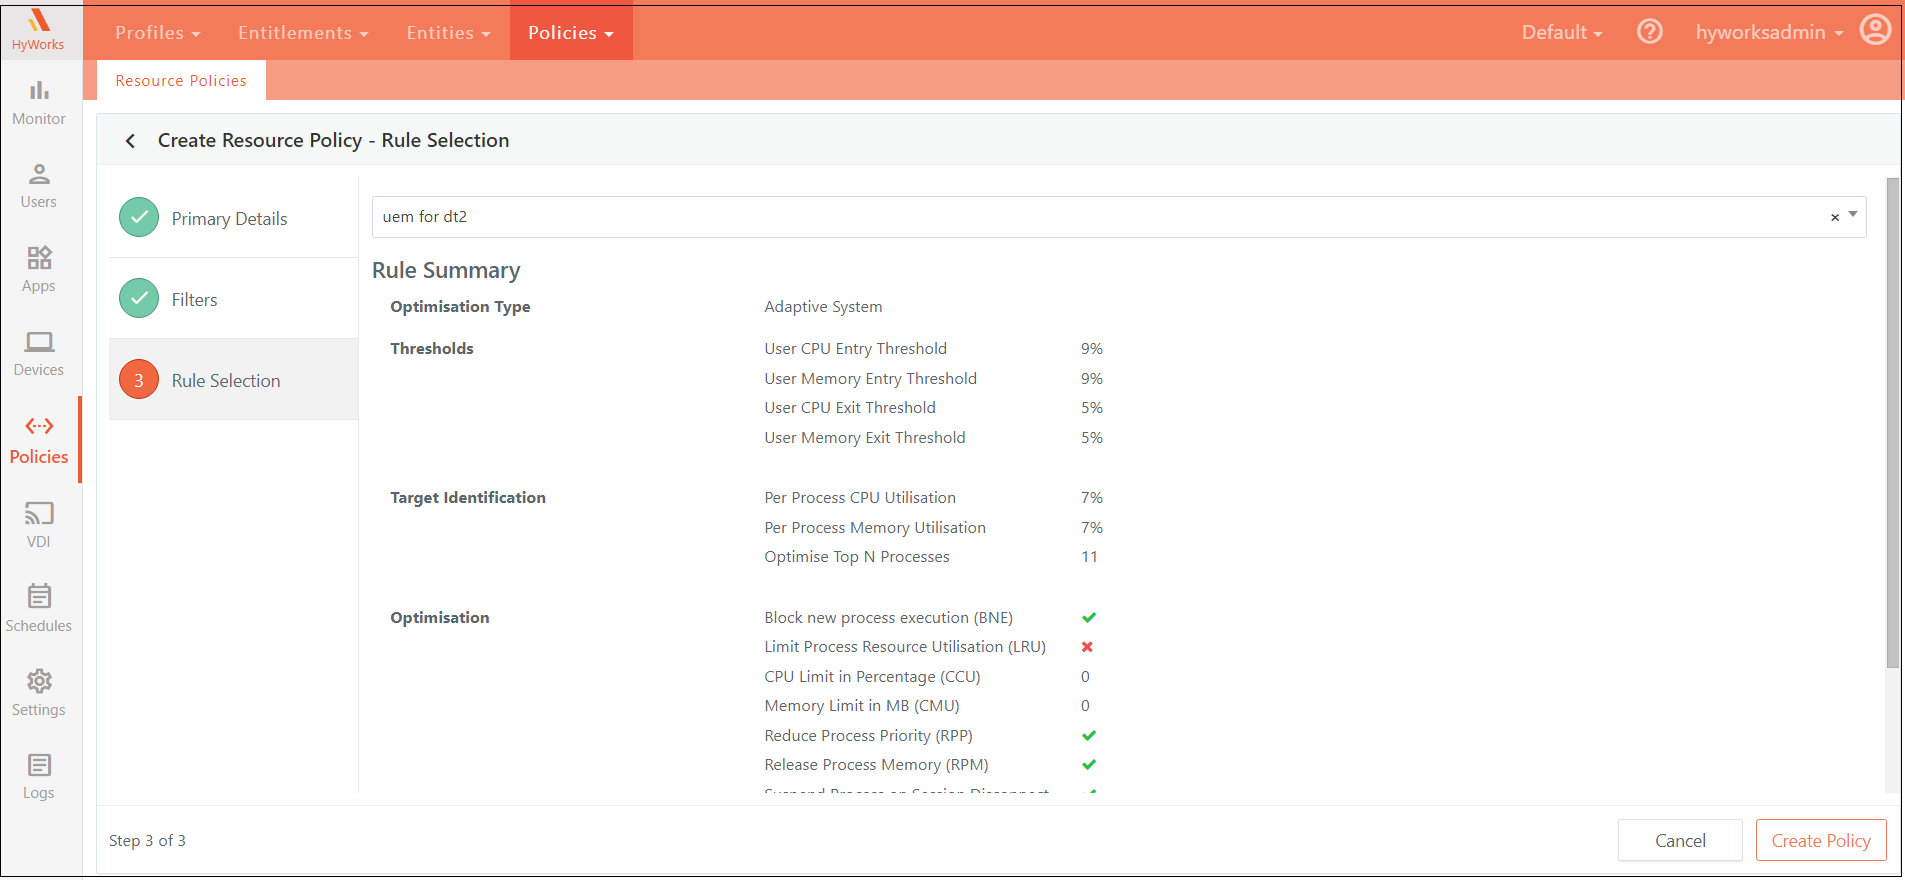
Select the specific rule that should be applied to a logged-in user who meets the criteria defined in the previous step.
All available rules are listed under the "User Experience Management Rules" section. The UI will display these rules, allowing you to select the appropriate one to apply to users who match the specified conditions.
Once a rule is selected, a summary of that rule will be displayed, providing a quick overview of its key details. For more in-depth information about the selected rule, you can refer to the "User Experience Management Rules" section, where detailed descriptions and configurations are available.
Advance Setting configuration
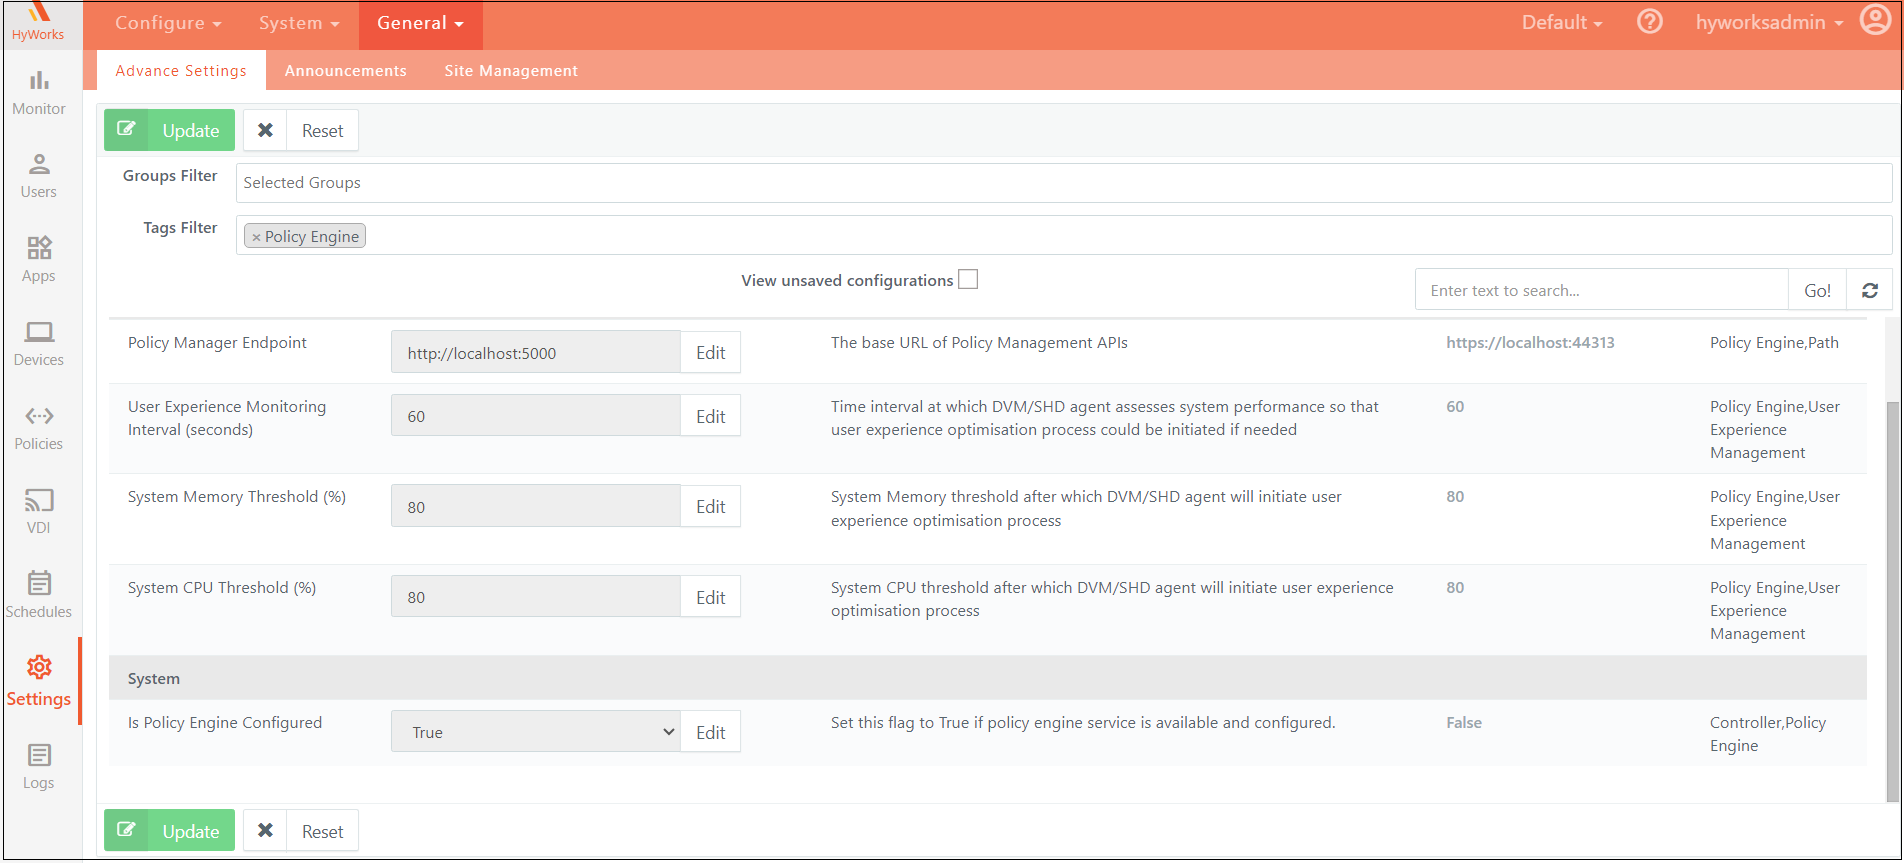
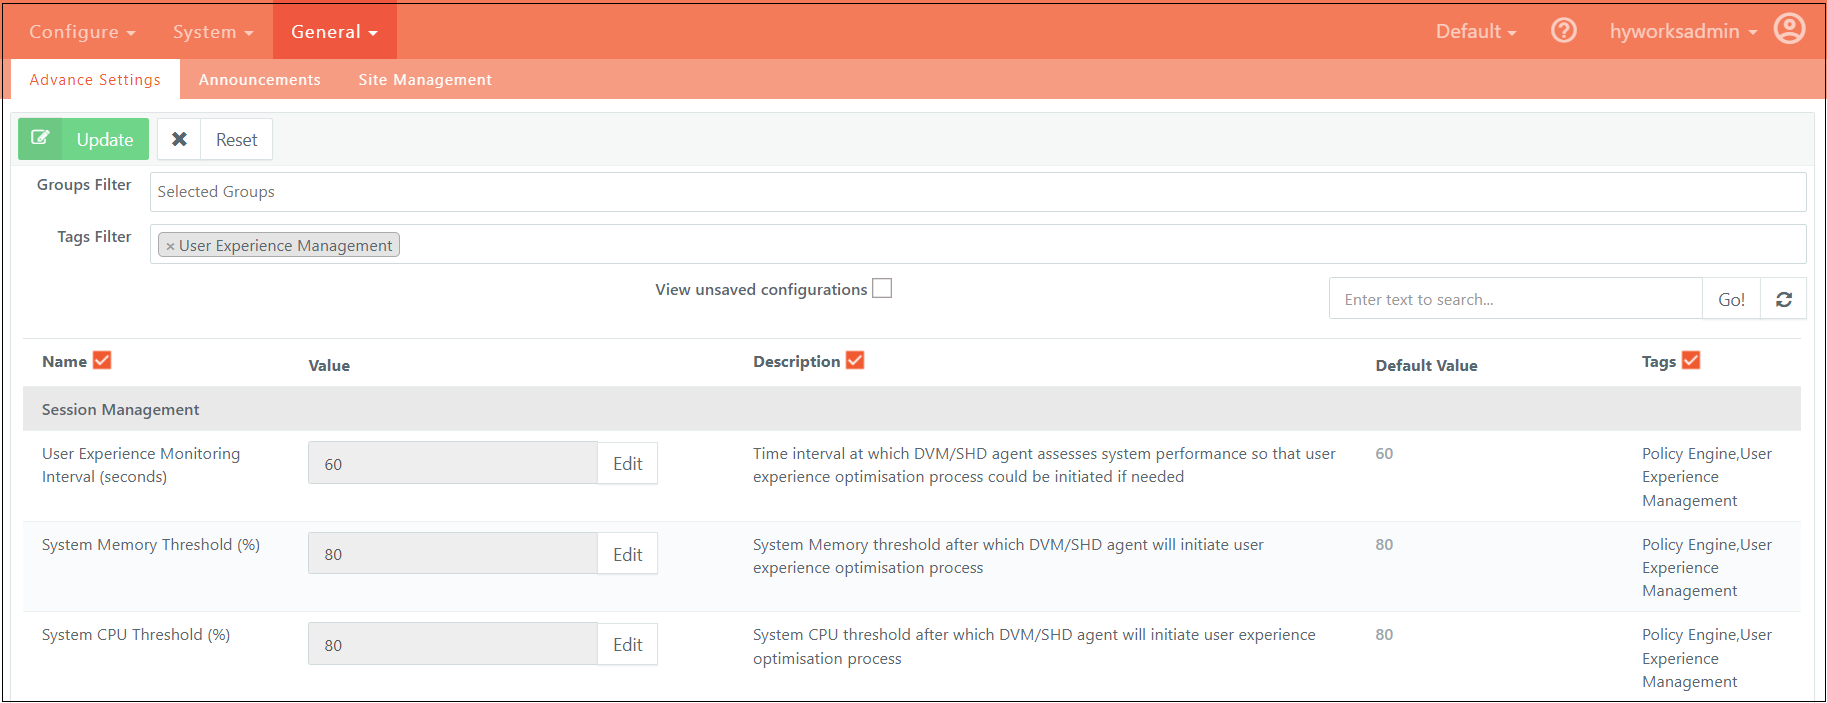
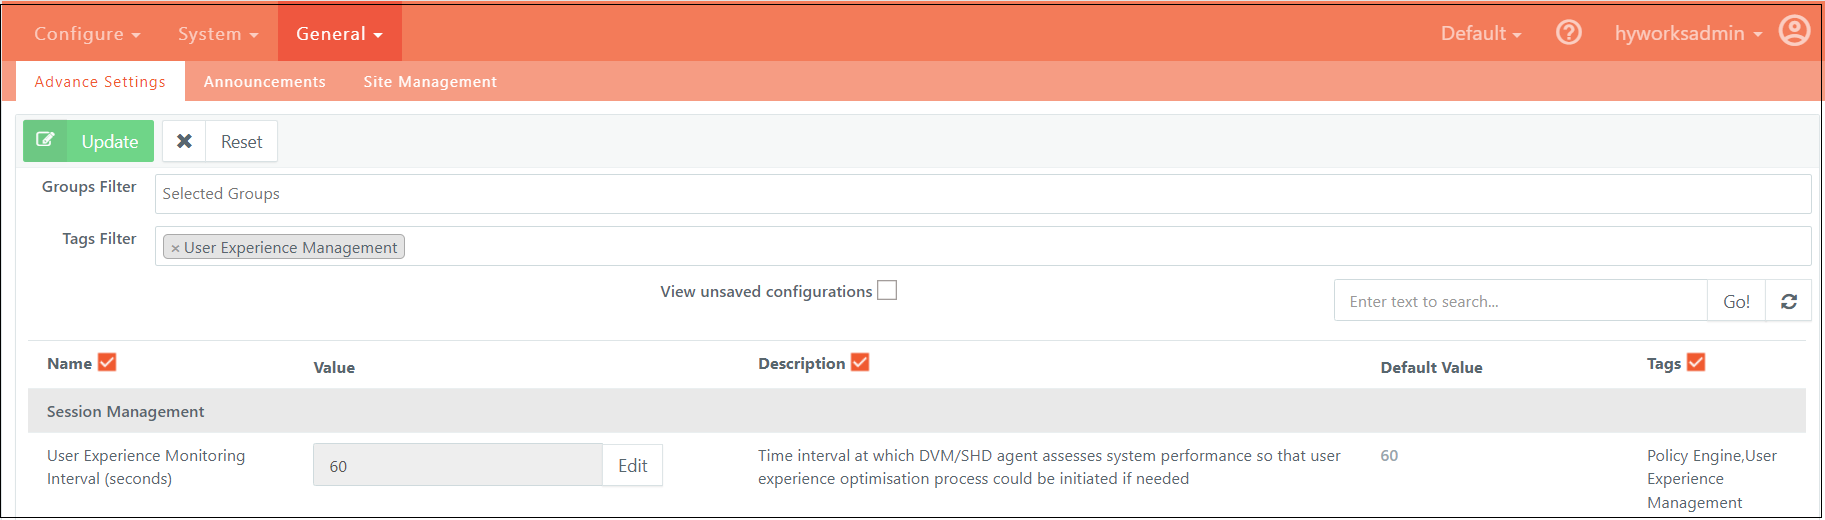
Advance Settings for Policy Engine can be filtered out using the tag “Policy Engine”. Below is a brief description of each of the advanced settings:
-
Policy Manager Endpoint: Base URL of HyWorks Policy Manager API service.
-
User Experience Monitoring Interval (seconds): Interval at which the AUEM agent will try to optimize user experience on the Session Host server.
-
System Memory Threshold (%): Session Host server memory usage above which the AUEM agent will start optimizing user experience.
-
System CPU Threshold (%): Session Host server CPU usage above which the AUEM agent will start optimizing user experience.
-
Is Policy Engine Configured: This is a feature flag that could be used to enable/disable the Policy Engine feature.
Management Console configuration workflow
-
Admin will create a Process Clamping rule with the required configurations.
-
Admin will create a Policy and configure it to apply the Process Clamping rule to required users/user groups/OUs/pool/team.
-
When the user logs in to SHD, the process clamping policy gets sent to the SHD server.
-
DVM agent will act upon the clamping rule specified.
Policy engine
Policy engine uses Open Policy Agent (OPA) and Open Policy Administration Layer (OPAL) for policy evaluation. As part of policy engine, several services work together using the features provided by OPA and OPAL to provide a robust policy evaluation framework.
Policy engine components
The policy engine uses several components that have been docked for deployment. Below is a list of all the components of policy engine:
- HyWorks Policy Management API: Single API endpoint used by HyWorks Management Console, DVM agents etc. to interact with OPAL Policy engine. By default, this API is exposed externally on port number 38901 over ssl configured using nginx. Currently used docker image hyworks/policy-manager-API:v20240926T1201.
Policy Data API is used by HyWorks Policy Management API to push policy updates to OPAL Server and OPAL client via Policy Update Queue.
OPAL Client is used by HyWorks Policy Management API to evaluate policies as per input parameters.
-
Policy Data API: API used by HyWorks Policy Management API to push policy updates to OPAL Server and OPAL client. By default, this API endpoint is exposed on port 5120. Currently used docker image policymanagement:1.0.
-
OPAL Server: Coordinator to keep OPAL clients updated. Currently used docker image permitio/opal-server:0.7.12.
-
OPAL Client: OPA execution layer that serves policy requests. By default, this API endpoint is exposed on port 8181. Currently used docker image permitio/opal-client:0.7.12.
-
Policy Update Queue: Queue to make sure updates are not lost. This has been implemented using RabbitMQ. Currently used docker image rabbitmq:3-management.
-
Policy Queue Listener: Listener that subscribes to Policy Update Queue and persists updates to DB. Currently used docker image queue_provider:1.0.
-
MongoDB: Persistence for policies. Currently used docker image mongo:3.7.
-
Redis 7.4.0-alpine: Redis is used only when Policy engine is run in cluster mode. OPAL server uses redis to sync between all instances of the cluster. Currently used docker image redis:7.4.0-alpine .
-
Nginx: Nginx is used for ssl offloading for HyWorks Policy Management API.
Policy evaluation workflow
Policy evaluation is a process used to compute what rules must be applicable for a given set of input parameters.
For policy evaluation, various parameters specified in the input are compared against policy filters configured in all the policies of that specific rule type. If the parameters specified in the request match against all the filters configured in a policy, then the rule(s) configured in the policy will be applicable. Currently policy evaluation is supported for User Experience Management rule.
Below is a brief description of the end-to-end policy evaluation workflow:
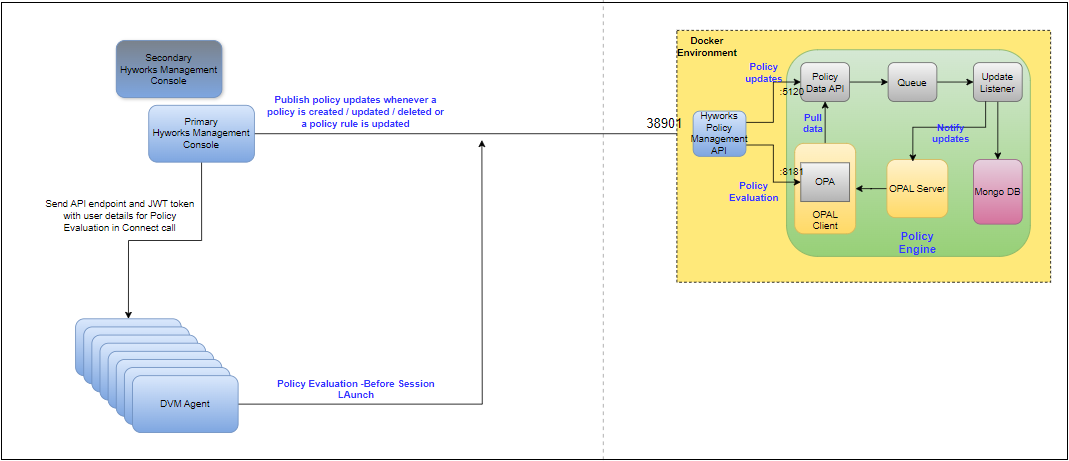
1. Whenever an admin creates/updates/deletes a Resource Policy or updates any Policy Rule (e.g. User Experience Management rule), these updates are processed by HyWorks Policy Management API. After updating its database, HyWorks Policy Management API also publishes the entire set of policy and policy rules data to Policy Data API.
2. Policy Data API pushes these updates to Policy Update Queue (RabbitMQ).
-
Policy Update Listener listens to Policy Update Queue and whenever there are any policy update messages, it updates the data in Mongo DB and OPAL Server.
-
OPA Server sends these updates to all connected OPAL Clients over WebSocket's.
-
Now when a user logs in to HyWorks client and access SHD server, Controller sends HyWorks Policy Management API endpoint URL along with a JWT token, which contains various user details to the DVM agent. DVM agent makes an API call to the HyWorks Policy Management API to evaluate what policy should be applicable to the user based on parameters specified in the JWT token.
-
HyWorks Policy Management API internally calls the OPAL client to evaluate what policies will be applicable to the user and then returns the response to the DVM agent.
-
Based on the policy received in response, the DVM agent periodically optimizes the SHD server resource consumption.
Conflict Resolution in Policy Evaluation
At a high level, a policy is considered a match when all filters specified in a policy match the parameters specified in the input. Because of this, it is possible that there are multiple policies that match a given set of input parameters. When that happens, the system needs to decide which policy should be applicable. The system does this by using the conflict resolution process. Below is a brief description of the conflict resolution process.
Each of the fields in policy filters has been assigned a specificity score (as mentioned in the table below).
| Field | Specificity Score |
|---|---|
| User Id | 100 |
| User Groups | 10 |
| Organizational Unit | 1 |
| Domain | 1 |
| Desktop Pool | 1 |
| Server | 1 |
| Server Team | 1 |
For all policies that match the given set to input parameters, the system calculates their specificity scores by adding up specificity scores of all matching policy filters. The policy with the highest specificity score will be applicable for the given set of input parameters. In case there are multiple polices with the same specificity score then, the policies are sorted by Order field of the policy in ascending order and the first one is applicable.
Deployment
Overview
Policy engine deployment can be done in 2 different modes – Standalone mode (Figure 1), 2 VM Active-Passive Standalone mode (Figure 2), and Cluster Mode (Figure 3) based upon your use case.
Standalone Mode
This is the simplest of all the available deployment modes. As shown in Figure 1, all services needed for policy engine are installed on a single VM. In case any of the service goes down, policy engine will not be functional.
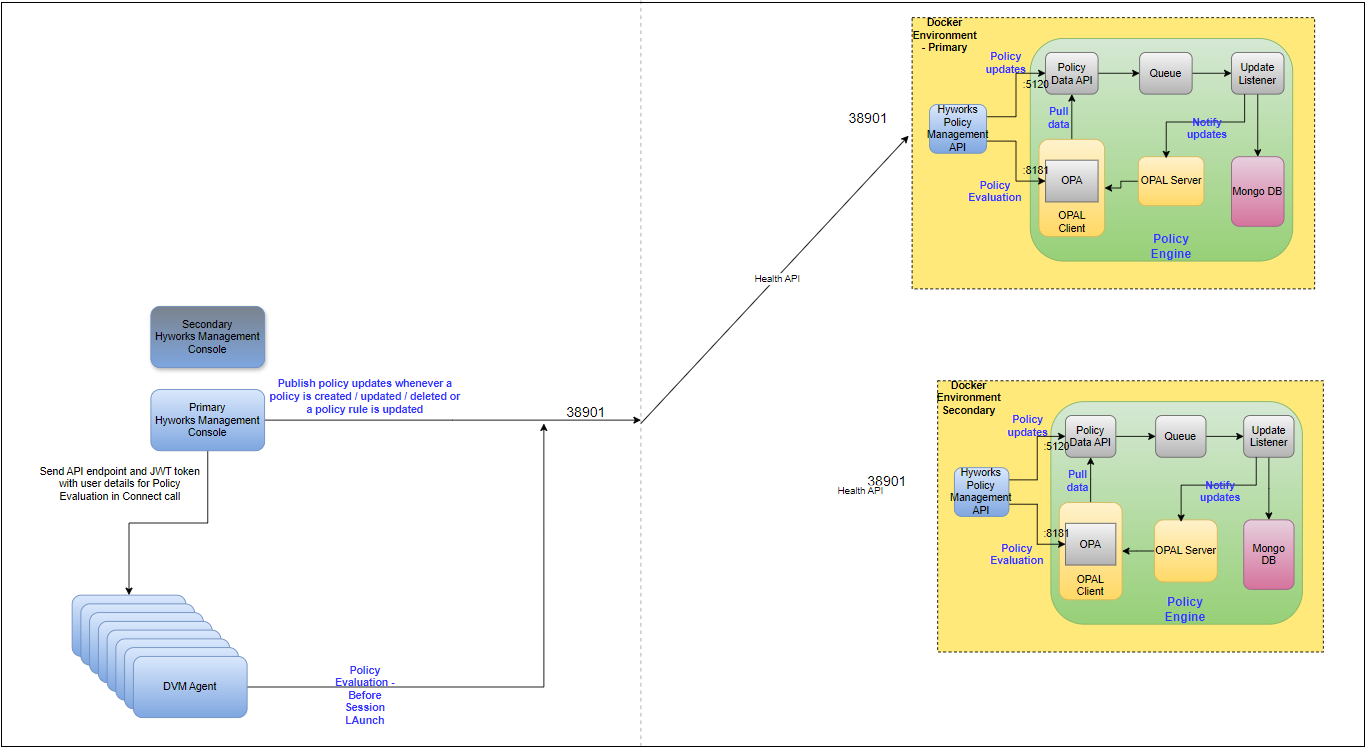
2 VM Active-Passive Standalone mode
2 VM Active-Passive Standalone mode is a slightly better version of Standalone mode which allows for manual failover. As shown in Figure 2, all services needed for policy engine are installed on 2 VMs but only one of the VMs is powered on at a time. Whenever failover is performed, HyWorks Policy Management Api fetches the latest policies from its database and publishes the data to Policy Data Api. To use this mode, check UPDATE_OPAL_DATA_ON_SERVICE_START in Deployment Configurations
Cluster Mode
In cluster mode, all services needed for policy engine are installed on 3VMs and in clustered mode. Since all 3 VMs are active, the setup provides high availability and some level of fault tolerance.

Hardware pre-requisites
For deploying Policy engine in standalone mode, you will need a single VM and for cluster mode you will need 3 VMs with a bare minimum of below mentioned hardware specification
- CPU: 2 vCPU
- RAM: 3GB
- HDD: 50GB
Software pre-requisites
- Oracle Linux 9.4
- Docker and docker-compose
Deployment Steps
Below is the list of all the steps required to get your policy engine deployment up and ready
- Docker installation
- Get deployment files
- Update deployment configurations
- Update service configurations
- Run policy engine services
Subsequent sections provide details of the above steps
Docker Installation
Internet connection on the VM is required for docker and docker compose installation on the VM. Internet is required only for first time setup.
Run the below commands to install docker and docker compose
- dnf config-manager --add-repo https://download.docker.com/linux/centos/docker-ce.repo
- dnf install docker-ce
- systemctl start docker
- systemctl enable docker
- dnf install curl
- curl -L https://github.com/docker/compose/releases/download/1.25.4/docker-compose-uname -s-uname -m -o /usr/local/bin/docker-compose
- ln -s /usr/local/bin/docker-compose /usr/bin/docker-compose
Once you have installed docker and docker compose on all your VMs, you will need to copy the files required for deployment to all your VMs as outlined in the next section.
Get deployment files
Copy all the files provided by Accops which are required for deployment of the policy engine to the required VMs
Folder structure
A tree view of the folder structure of the deployment folder is shown below:
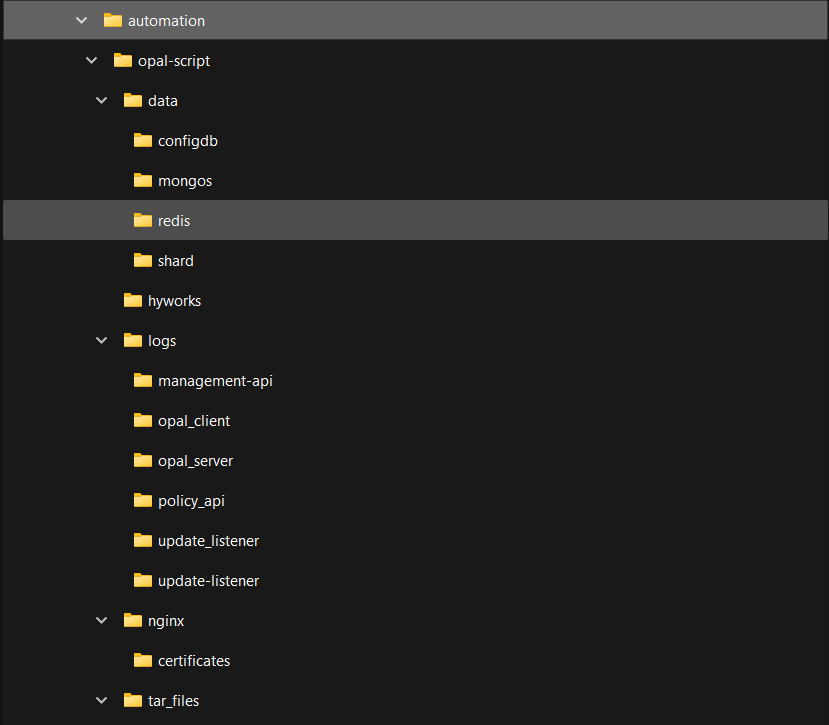
Locations for various files that you may need to use are mentioned below
- .env, deploy.sh, cleanup.sh files are located at the root level
- docker-compose-standalone.yml and docker-compose.yml files are in automation/opal-script/ folder
- log files of all services are in automation/opal-script/logs/ folder
- certificates for ssl configuration of HyWorks Policy Management Api are in automation/opal-script/nginx/certificates/ folder
Log files
Location of log files of all the services is mentioned below
- Policy Data Api: automation/opal-script/logs/policy_api/
- OPAL client: automation/opal-script/logs/opal_client/
- OPAL server: automation/opal-script/logs/opal_server/
- Update listener: automation/opal-script/logs/update_listener/
- HyWorks Policy Management Api: OPAL client: automation/opal-script/logs/hyworks_policy_manager_api/
- Nginx: automation/opal-script/nginx/error.log
Now you can proceed with updating your deployment configurations as mentioned in the next section
Deployment configurations
Configurations related to the deployment can be specified in a file called .env which is located at the root level of copied folder. In case this file is not visible, make sure that hidden files options for your file explorer or terminal command are enabled. Below is a brief description of all the configurations available in the .env file
- CLUSTER_MODE: This is to choose either cluster mode (1) or standalone (0).
- HOST_IP: This is the ip of the machine the script is running on.
- IS_PRIMARY: This should be set to 1 in the first machine and 0 on the rest.
- IS_LAST_MACHINE: This should be set to 1 on the last machine the script runs on.
- PRIMARY_NODE_IP: This is the ip of the first machine the script runs on. For the first machine this value will be the same as HOST_IP
6. OTHER_NODE_1 / OTHER_NODE_2: These refer to the other 2 machines that are part of the cluster. On the primary machine these will have 2 different ips but on other 2 machines only one of them needs to be configured as the primary machine ip will be picked from PRIMARY_NODE_IP.
- UPDATE_OPAL_DATA_ON_SERVICE_START: In some cases, we might need to update policies and rules data in OPAL when HyWorks Policy Management API starts. By default, its value is set to false which means Policy Manager API will not update policies and rules data in OPAL on service start. For single VM standalone and cluster modes, it is recommended to keep this setting to its value to false.
It is recommended to change this setting to true on a 2 VM Active-Passive Standalone mode setup.
- UPDATE_RETRY_COUNT: This is the maximum number of attempts made by HyWorks policy management api for updating policies on service start. The default value is 3
- UPDATE_RETRY_INTERVAL_IN_SECONDS: This is the interval in seconds between retries. The default value is 30 s.
- DATA_API_IP: Specify IP or FQDN of Policy Data Api. For standalone mode, the default value (management_api) will work. For cluster mode, specify the IP or FQDN of your load balancer here
- DATA_API_PORT: Specify port number of Policy Data Api
- EVALUATION_API_IP: Specify IP or FQDN of Policy Evaluation Api. For standalone mode, the default value (opal_client) will work. For cluster mode, specify the IP or FQDN of your load balancer here
- EVALUATION_API_PORT: Specify port number of Policy Evaluation Api
- PRIMARY_CONTROLLER_IP: Specify IP address or hostname of primary controller. This configuration is mandatory
- PRIMARY_CONTROLLER_PORT: Specify port number of primary controller. This configuration is mandatory
- SECONDARY_CONTROLLER_IP: Specify IP address or hostname of secondary controller. This configuration can be left blank if your setup does not have a secondary controller
17. SECONDARY_CONTROLLER_PORT: Specify port number of secondary controller. This configuration can be left blank if your setup does not have a secondary controller
- MQ_HOSTNAME: Specify IP address or hostname of RabbitMQ used for HA notifier
- MQ_PORT: Specify port number of RabbitMQ used for HA notifier
- MQ_USERNAME: Specify username of RabbitMQ used for HA notifier
- MQ_PASSWORD: Specify encrypted password of RabbitMQ used for HA notifier.
Note
Contact Accops Support to get the encrypted password.
After you have updated your deployment configurations, you must update service configurations for HyWorks Policy Management API as outlined in the next section.
Service configurations
When deploying the policy engine, while most of the services work well with their default values and don’t need any change, certain configurations of HyWorks Policy Management Api need to be updated to integrate Policy engine with your HyWorks controller. Service configurations for the two deployment modes mentioned in the Overview section, use different configuration files as mentioned below
· Standalone mode: docker-compose-standalone.yml
· Cluster mode: docker-compose.yml
These files can be found inside the automation/opal-script folder inside your copied folder.
Configurations for HyWorks Policy Management Api that need to be updated can be found in the above configuration files under the section called hyworks_policy_manager_api. Below is a brief description of all the settings that need to be updated
- EdcMQ__SslEnabled: Boolean used to specify if HA notifier RabbitMQ uses SSL
HyWorks Policy Management Api uses the same database as the Controller. Sometimes it is possible that it is not able to access database details which it has received from controller since it contains a hostname. For such cases, you might have a specify hostname to IP mapping in the section called hyworks_policy_manager_api/extra_hosts in the format
:
Refer below screenshot for reference:
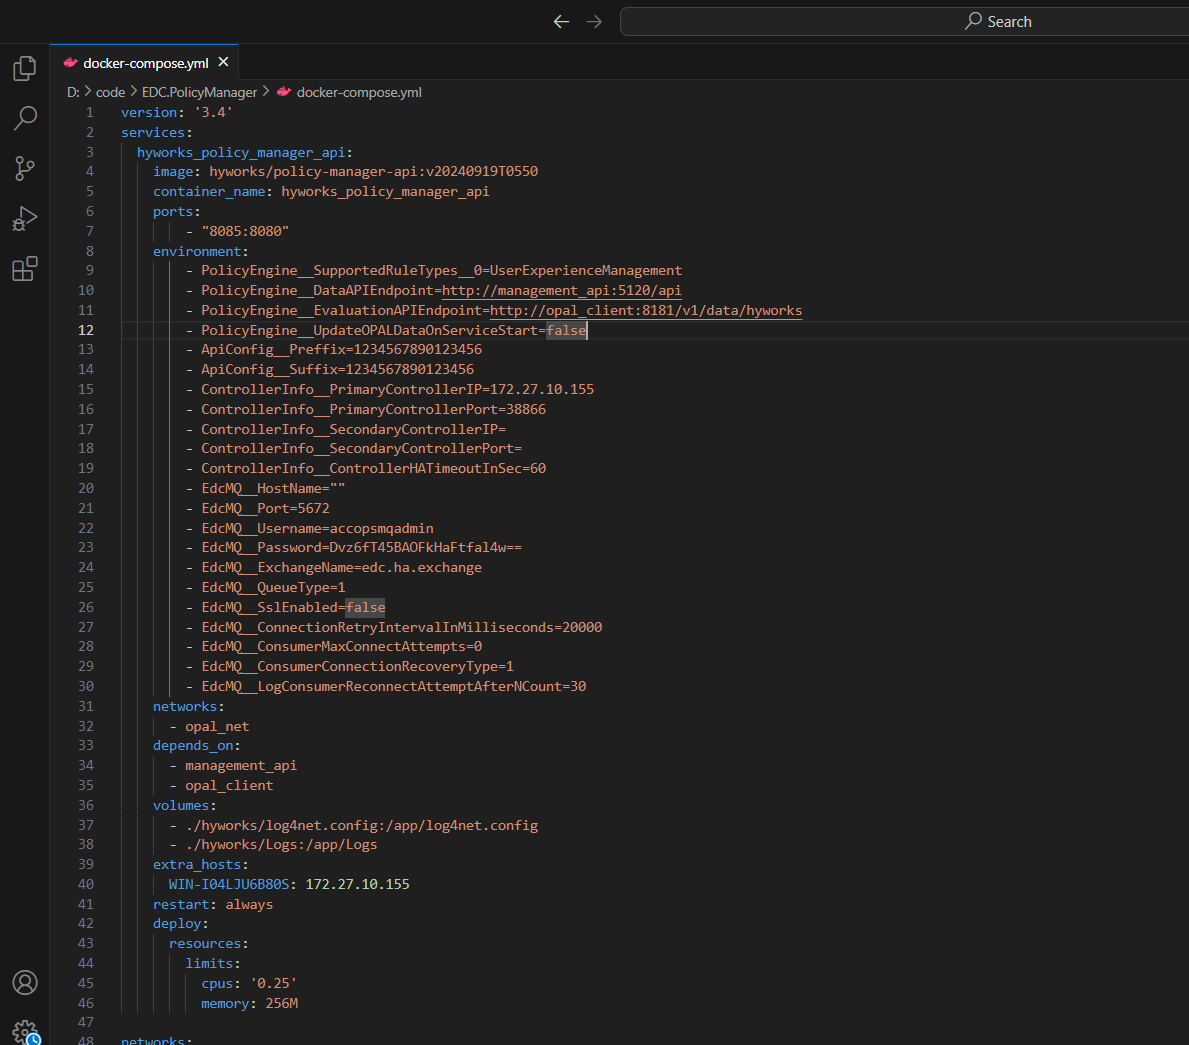
- When you use the default configurations HyWorks Policy Management Api gets exposed over ssl using self-signed certificates provided with the deployment files. In case you want to use your own certificates, refer section Change SSL certificates
Once all the configurations have been updated you can proceed with running the policy engine services. Steps for running policy engine services are slightly different for the two deployment modes as outlined in the next 2 sections.
Run Policy engine services – Standalone mode
Running policy engine services in standalone mode is very simple. Below are the steps for the same
- Login to your VM
- Open a terminal window
- Navigate to automation folder in your copied folder
- Run the script deploy.sh by executing below command
sh deploy.sh
- In case you need to start all containers from scratch, you can run the script cleanup.sh and subsequently run script deploy.sh once again
Run Policy engine services – 2 VM Active-Passive Standalone mode
Steps to run policy engine services are same as Standalone mode. Once both VMs are setup, one of the VMs can be powered-off. When failover needs to be done, power-on the stand-by VM and update the Policy Manager Endpoint advance setting in HyWorks Management Console to point to the stand-by VM
Run Policy engine services – Cluster mode
Running policy engine services in cluster mode is a little more involved. Below are the steps for the same
- Login to all the 3 VMs
- Open terminal window on all 3 VMs and navigate to automation folder
- Go to your primary server and run the script deploy.sh and wait for the script to complete
- Go to node 1 and run the script deploy.sh and wait for the script to complete
- Go to node 2 and run the script deploy.sh and wait for the script to complete
- In case you need to start all containers from scratch, you can run the script cleanup.sh and subsequently run script deploy.sh once again
On the first machine, the script enables clustering for the mongo containers and every subsequent machine that runs the script joins the cluster.
The script installs OPAL server along with its redis backbone on every machine that it runs on and then joins all the redis instances while executing on the last machine. This way all OPAL servers remain updated with each other by taking on the redis backbone.
Now you will need to add HyWorks Policy Management Api (port: 38901), Opal client (port: 8181) and Policy Data Api (port: 5120) of all 3 VMs to your load balancer. Steps for the same can be found in your load balancer documentation
Change SSL Certificates
Sometimes you might want to use your own certificates for hosting HyWorks Policy Management Api instead of the default self-signed certificates or your certificates might have expired, and you want to use new certificates. In such cases, follow below mentioned steps to change the ssl certificates used for hosting HyWorks Policy Management Api
- Copy the pem file of your certificate to automation/opal-script/nginx/certificates/ folder
- Copy the pem file of your certificate private key to automation/opal-script/nginx/certificates/ folder
- Now you’ll need to update the paths of ssl certificates in automation/opal-script/nginx/nginx.conf file
- Open nginx.conf file in a text editor
- Change the name of file mentioned in the directive ssl_certificate to the name of your new certificate file. For ex if your new certificate file name is new-cert.crt, change the ssl_certificate directive to
ssl_ceritificate /etc/nginx/certificates/new-cert.crt;
- Change the name of file mentioned in the directive ssl_certificate_key to the name of your new private key file. For ex if your new certificate file name is new-private-key.key, change the ssl_certificate directive to
ssl_ceritificate_key /etc/nginx/certificates/new-private-key.key;
- If your private key is password protected, then delete the existing value inside automation/opal-script/nginx/global.pass file and specify your private key password in this file
Now when you will start your services next time, new ssl certificates that you have added should be used
Policy engine benchmarking
- VM Size VMs for upto 100CCU deployment
o Oracle Linux VM with 2vCPU, 3GB RAM, 100 GB HDD
o First benchmark with Single VM
o Second benchmark with three VM with load balancer
o Results – Link
- HFCL 100 CCU - peak traffic
o 1.66 logins per ie. 2 logins per minute.
- Desktop Connect per Peak hour
o Normal network - Max 250 desktop connects
§ 4.16(250/60 mins) i.e. 5 Desktop connect per minute
o Bad network can be more 250 desktop connects
§ So benchmark where Policy fails
-
- Application Connect (Take to taken latter) per Peak hour
o Normal network - Max 750 application connects
o 13 Connect Applications per Minute
Feature Development plan
Phase 1 - Done
· Adaptive
o System
o User
o Any
· Block applications based on the instances.
· Sampling
· Advance Setting- Configuration controller
Phase N – Pending
· Static
· User Notifications
o Notify Actions
o Notify that Policy – couldn’t applied.
· Policy Page Enhancement
· Reporting & Monitoring via ARS
· Details features to be planned
o Link