HyWorks Controller Installation in Maintenance Mode
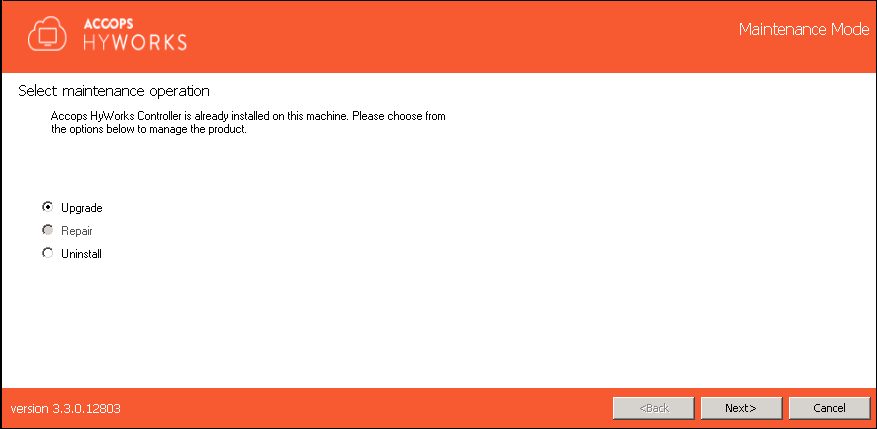
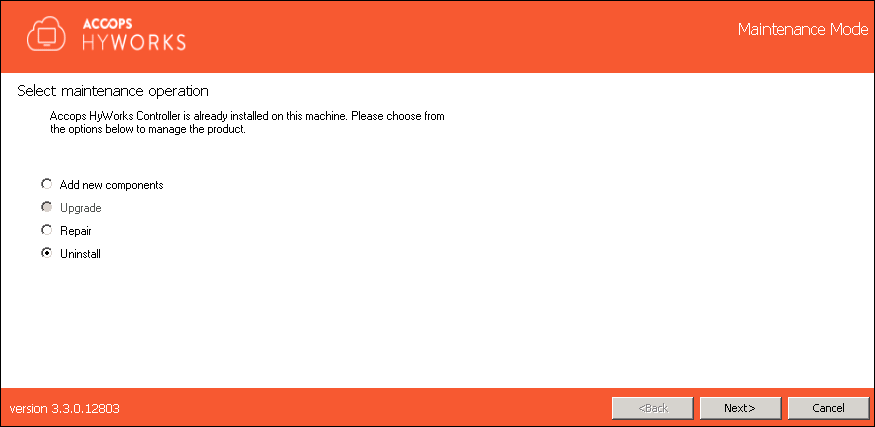
Re-running the HyWorks Controller setup or invoking it from the Control Panel > Installed programs list opens the Installer in Maintenance mode and provides the following options based on the existing configuration in use:
-
Add New Components
-
Upgrade
-
Repair
-
Uninstall
Note
- Copy the HyWorks setup locally on the target server. Running the HyWorks setup from the UNC path is not supported and will fail.
- Running the HyWorks setup may also fail during the file extraction if the logged-in user has a roaming profile. Hence, it is recommended to log in as a local administrator.
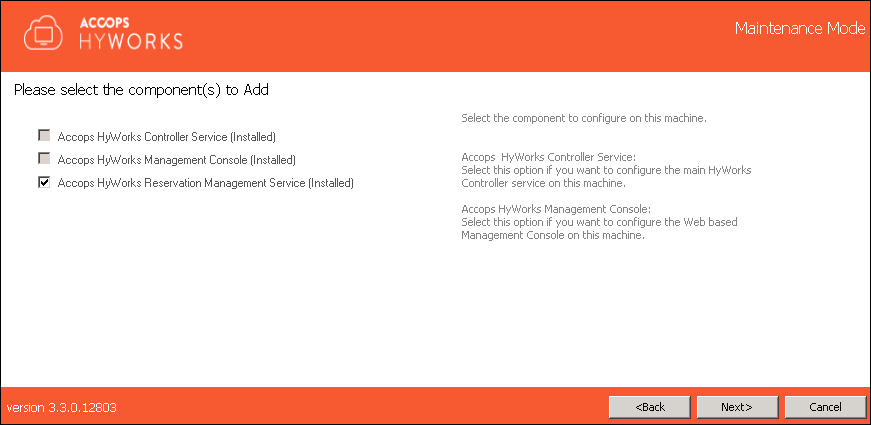
Add New Components
Suppose an Administrator has installed only one of the Accops HyWorks Controller components, i.e., the Accops HyWorks Controller Service or the Accops HyWorks Management Console. In that case, re-running the installer will allow the addition of new components. This will enable the installation of the remaining components of the Accops HyWorks Controller. Use the steps given below to add new components to the Accops HyWorks Controller:
-
Log in to the Windows Server as a Local Administrator.
-
Copy the Accops HyWorks Controller installer to your machine.
-
Launch the Installation wizard and select the option Run as Administrator.
-
If the Accops HyWorks Controller installer detects an existing installation, it will open in Maintenance mode, and the setup will provide the following possible options:
-
Add New Components
-
Upgrade (enabled if running a newer installer)
-
Repair (Enabled if running the same installer setup)
-
Uninstall
-
-
Select the Add New Components and click Next.

-
The screen will provide a list of installed and available components. Only those components which have not been installed previously can be selected for installation, for example:
-
If the Controller Service and Management Console are installed, the option to install the Session Host Server will be displayed.
-
If the Accops HyWorks Controller Service was previously installed, the Add New Components wizard would enable the Accops HyWorks Management Console and Session Host Server.
-
If the Accops HyWorks Management Console was installed previously, the Accops HyWorks Controller and Session Host Server will be enabled in the Add New Components wizard.
-
-
Follow the on-screen instructions or refer to the steps for a fresh installation.
Upgrade HyWorks Controller
Note
-
Upgrading from HyWorks v2.5 with the Embedded DB is not supported in HyWorks v3.3 or later. Only Microsoft SQL Server is supported for databases in later versions.
-
Before upgrading any production or evaluation deployment, conduct a thorough analysis. Contact Accops Support for assistance.
The upgrade flow is enabled only when the Accops HyWorks Controller installation is initiated on a system where an older version of the HyWorks Controller already exists.
-
Log in to the Windows Server as local administrative.
-
Copy the Accops HyWorks Controller installer to your machine.
-
Launch the Installation wizard and select Run as Administrator.
-
If the Accops HyWorks Controller installer detects an existing installation, it will open in Maintenance mode, and the setup will provide the following possible options:
-
Upgrade ( enabled if running a newer installer)
-
Repair (Enabled if running the same installer setup)
-
Uninstall
-
-
Select the Upgrade and click Next.
-
Choose the component to be upgraded and click Next.
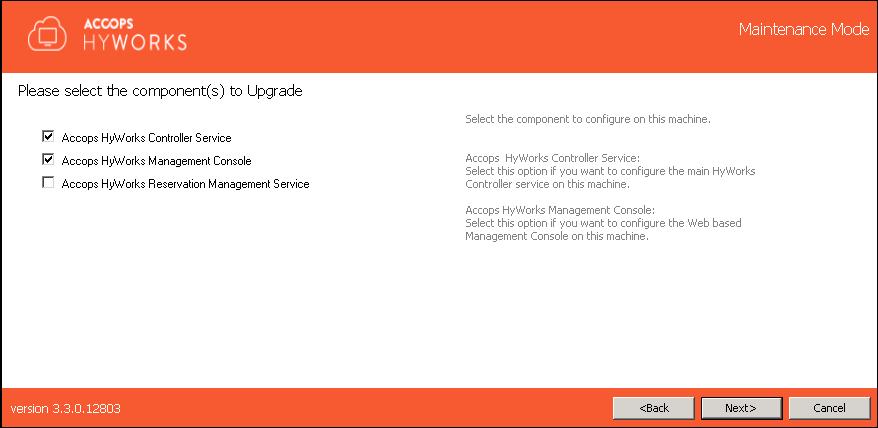
Note
-
Multiple components can be selected simultaneously.
-
It's best to upgrade the HyWorks Controller Service simultaneously for a new Management Console, as a new Management Console requires an equivalent or compatible HyWorks Controller Service.
-
Upgrade the HyWorks Session Host according to the recommended release guidelines and available versions.
-
-
Configure the same Service Log on Credentials as before (recommended) and click Next to proceed.

-
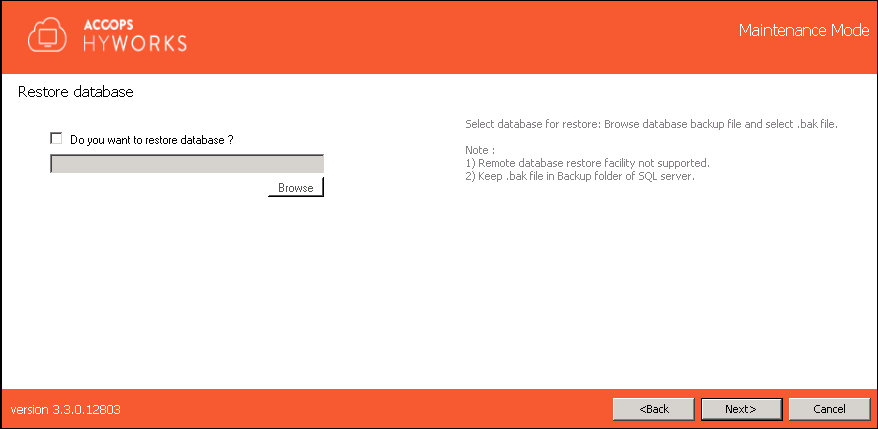
Skip the Restore Database screen by clicking Next. Upgrading with the Database Restore feature is not supported.
-
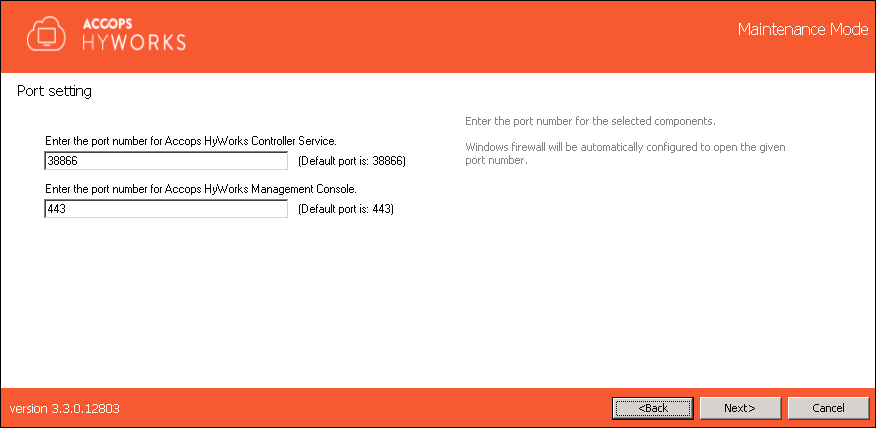
During the upgrade, proceed without changing the ports and click Next. It is recommended not to change ports, as it may affect the existing HA configurations and prevent the Management Console from communicating with the HyWorks Controller Service.
-
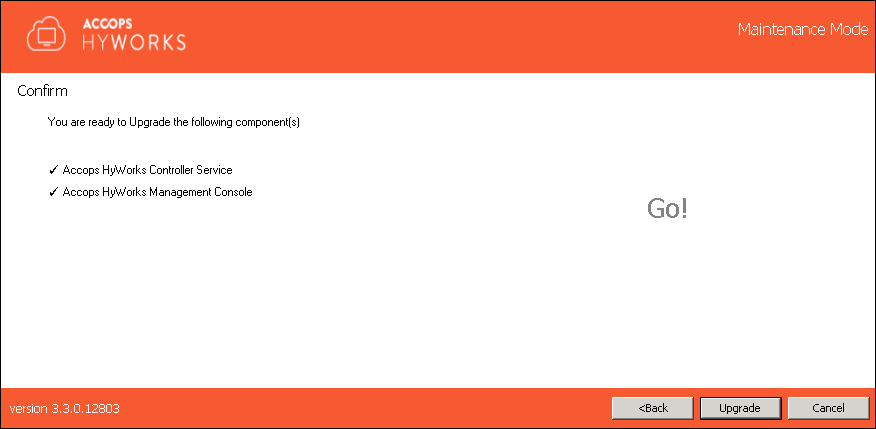
Click Upgrade to start the upgrade process.
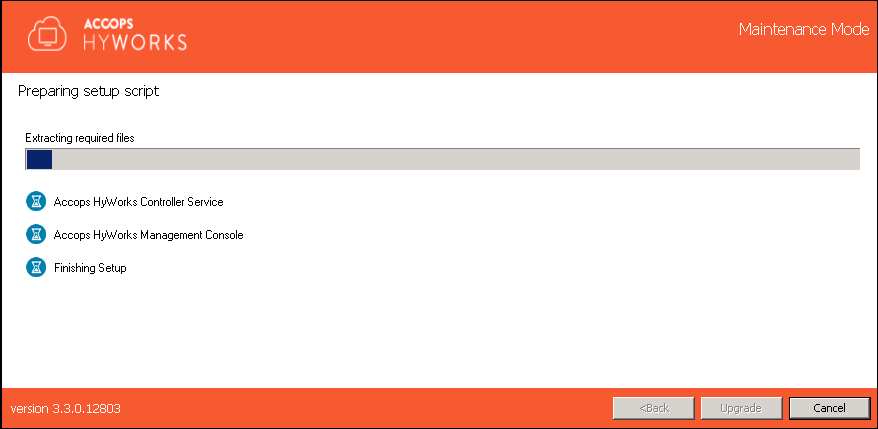
-
The progress of the upgrade will be displayed on the screen.
-
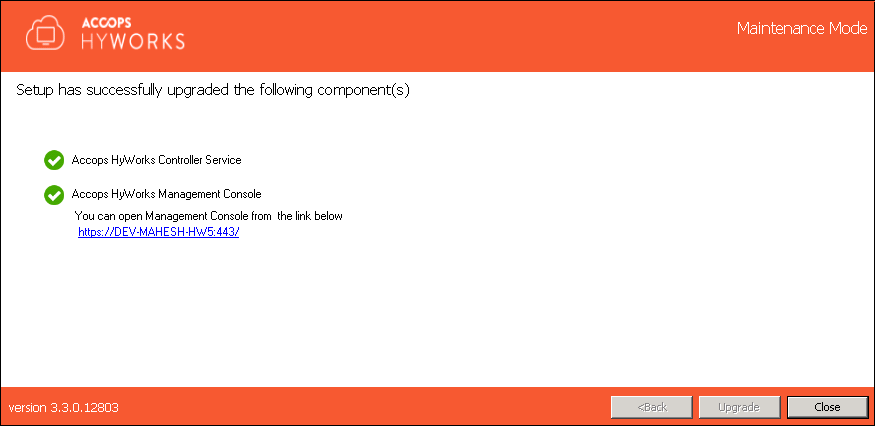
Once the upgrade is complete, the page displays the individual components' status and links to the Management Console.
Upgrade the HyWorks Controller in a Cluster Environment
The upgrade flow for standalone and cluster environments is similar to the above steps. However, in the clustered environment, the upgrade follows the specific server upgrade sequence to avoid issues and minimize downtime.
Two-node Active-Passive Cluster
Downtime Required: Yes, minimal for the duration of the upgrade and switching.
-
Log in to the HyWorks Controller Management Console of the primary HyWorks Controller as a Super administrator.
-
Go to the Server > HyWorks Controller.
-
Select the server (currently in secondary mode) and click Change mode.
-
Select the Maintenance option to change the second HyWorks Controller's mode to maintenance. In Maintenance mode, the HyWorks Controllers will not synchronize.
-
Connect to the second HyWorks Controller as a local administrator and upgrade as per the specifications in the Upgrade HyWorks Controller section.
-
Once the second server is upgraded and becomes accessible in the Management Console:
-
Go to Server > HyWorks Controller.
-
Click the Change mode after selecting the Primary HyWorks Controller.
-
Select Maintenance to change the second HyWorks Controller mode into Maintenance mode.
-
Both the HyWorks Controller servers should now be in Maintenance mode.
-
-
Select the second server (recently upgraded) and configure it as the Primary using the Change Mode option.
-
Connect to the primary HyWorks Controller with user credentials and local administrator privileges and upgrade as per the specifications in the Upgrade HyWorks Controller section.
-
Once the previous primary HyWorks Controller becomes accessible in the Management Console, change its node to secondary.
-
Both HyWorks Controllers will be upgraded and running.
Multi-node Cluster with HyWorks Managed Database High Availability
Downtime Required: Yes, high, as all nodes will be put into maintenance.
For clustered environments having multi-node HyWorks managed database high availability, the following sequence should be followed for effective upgrade:
-
Administrators can configure all (management and session nodes) to be in maintenance mode from the management console of any management server.
-
Upgrade Primary HyWorks Management nodes to the latest version first.
-
Upgrade Secondary HyWorks Management nodes to the latest version.
-
Upgrade all session nodes to the latest version one by one.
Important
-
The management nodes must be upgraded first and not the session nodes; upgrading the session node first may result in abrupt behavior by session nodes post-upgrade and may corrupt the deployment.
-
Once two management nodes and at least one session node are upgraded, they can be removed from maintenance mode to enable production usage.
Multi-node Cluster with SQL Managed Database High Availability
Downtime Required: Yes, high as all nodes are to be put into maintenance.
For clustered environments having multi-node HyWorks managed database high availability, the following sequence should be followed for effective upgrade:
-
Administrators can configure all (management and session nodes) to be in maintenance mode from the management console of any management server.
-
Upgrade Primary HyWorks Management nodes to the latest version first.
-
Upgrade secondary HyWorks Management nodes to the latest version.
-
Upgrade all session nodes to the latest version one by one.
Important
-
The management nodes must be upgraded first and not the session nodes; upgrading the session node first may result in abrupt behavior by session nodes post-upgrade and may corrupt the deployment.
-
Once two management nodes and at least one session node are upgraded, they can be removed from maintenance mode to enable production usage.
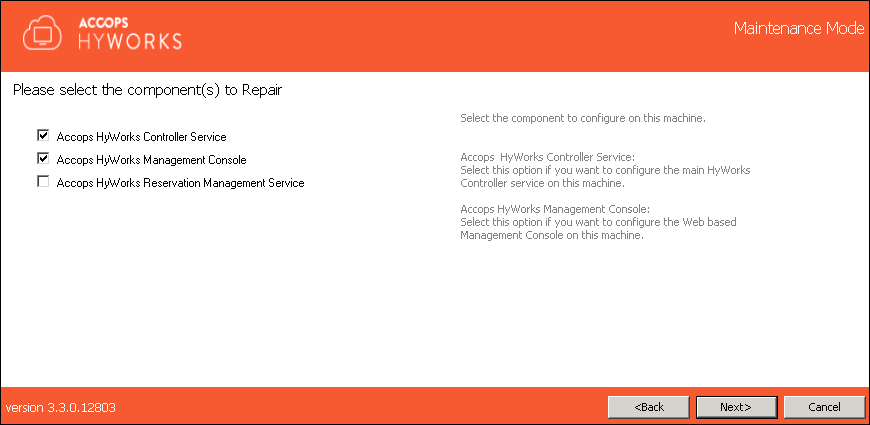
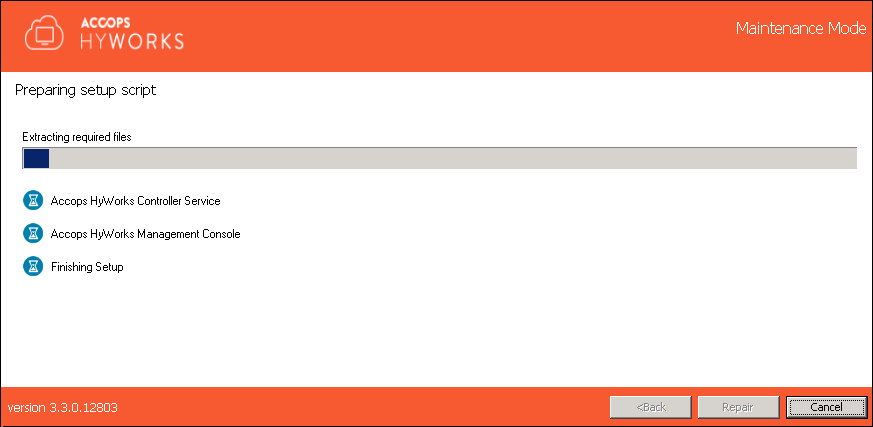
Repair
The repair installation flow will only be enabled when the system has at least one of the Accops HyWorks Controller components installed, and the Administrator runs the same installer setup as the installed version.
-
Log in to the Windows Server as a user with local administrator privileges.
-
Copy the Accops HyWorks Controller installer to your machine.
-
Launch the Installation wizard and select Run as Administrator.
-
If the Accops HyWorks Controller installer detects an existing installation, it will open in Maintenance mode, and the setup will provide the following possible options:
-
Add New Components
-
Upgrade (Enabled, if running a newer installer)
-
Repair (Enabled, if running the same installer setup)
-
Uninstall
-
-
Select Repair and click Next.

-
Choose the components that are to be upgraded and click Next.
-
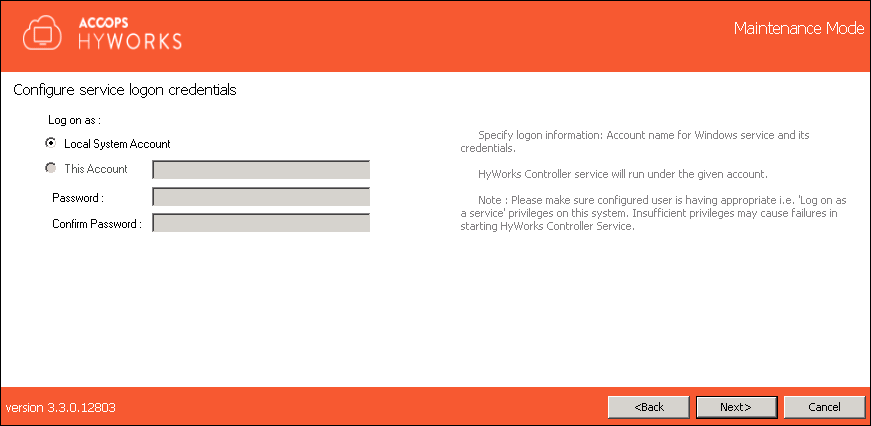
Configure the Service Logon Credentials and click Next.
Note
- Service login credential configurations must be kept the same as before (i.e., the credentials should be the same ones using which the HyWorks Controller service was installed and configured)
-
Click Next to proceed.
-
If you need to restore the database, click the "Do you want to restore database" option and browse to select the database backup file.
-
For the HyWorks Controller with SQL Server database, the file should use the .bak extension.
Note
- HyWorks creates a backup file in the compressed format. To restore, extract the backup file and move it to the SQL Server > Backup folder. The default location of the SQL Server (x64) backup folder is as follows:
C:\Program Files (x86)\Microsoft SQL Server\MSSQL11.SQLEXPRESS\MSSQL\Backup
Refer to the HyWorks Backup and Restore section for instructions on restoring the HyWorks Controller using the backed-up database.
-
-
Change the port numbers, if required, and click Next.
Warning
Changing ports will impact
-
All the existing sessions will be disconnected.
-
All registered devices (configured to connect to the Controller using manually provided IPs) must be reconfigured to use the new port.
-
-
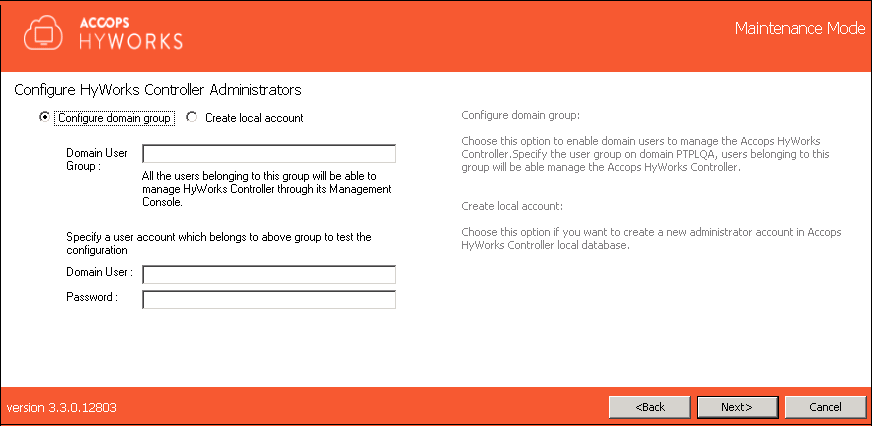
Configure the HyWorks Controller Administrators. The following types of Administrators can be configured:
-
Domain Group Configuration: For configuring a Domain User group, the following conditions must be met:
-
The system must be in the domain.
-
The user is logged in using the domain credentials.
-
The following inputs must be provided correctly:
-
Domain User Group name.
-
The credentials of one of the user accounts belong to the specified domain user group.
-
-
-
Local User Configuration: To create a local user Administrator, provide the username (the default is HyWorksAdmin) and an appropriate password.
Warning
-
In step #7, the Repair mode entails reconfiguring the HyWorks Administrators. It can also be used to update the HyWorks Administrator password if lost.
-
During the repair/upgrade, the existing configuration files will be reset. Any configuration changes made to the HyWorks Controller using configuration files will be lost. You will need to re-configure and restart the service to apply the changes.
-
-
Click Next to proceed with the configured user group.
-
-
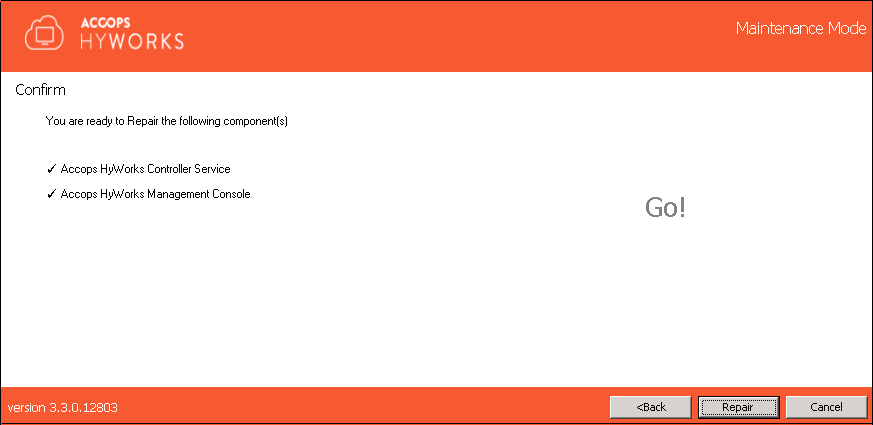
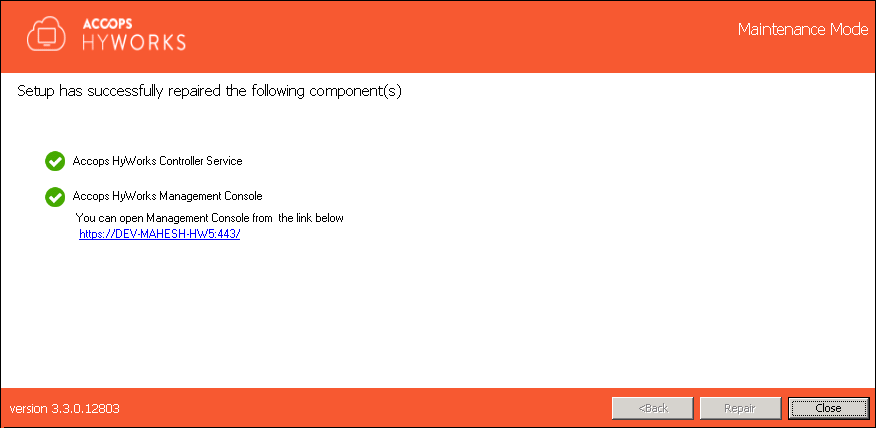
Click Repair to confirm the operation and wait for the Repair operation to complete.
-
Once the Repair operation is complete, the Administrator will be navigated to a screen displaying information related to the repaired components, the status of the Repair operation, and a link to access the Accops HyWorks Management Console. Click Close to exit from the Installation wizard.
Uninstall
The Uninstall flow will be enabled when the system already has an existing installation of the Accops HyWorks Controller, and the Administrator re-runs the same or a newer installation. To uninstall one or more components, follow the steps listed below:
-
Log in to the Windows Server as a user with local administrator privileges.
-
Copy the Accops HyWorks Controller installer to your machine.
-
Launch the Installation wizard and select Run as Administrator.
-
If the Accops HyWorks Controller installer detects an existing installation, it will open in Maintenance mode, and the setup will provide the following possible options:
-
Add New Components
-
Upgrade (Disabled if running the same installer setup, enabled if running a newer installer)
-
Repair (Enabled if running the same installer setup, disabled if running a newer installer)
-
Uninstall
-
-
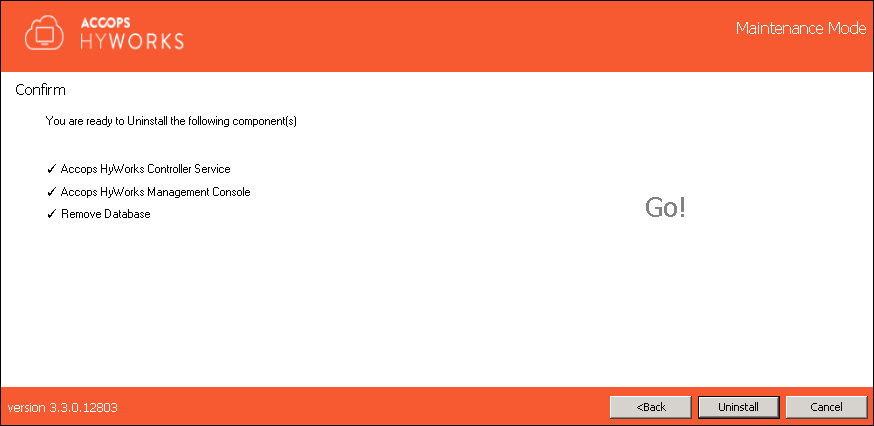
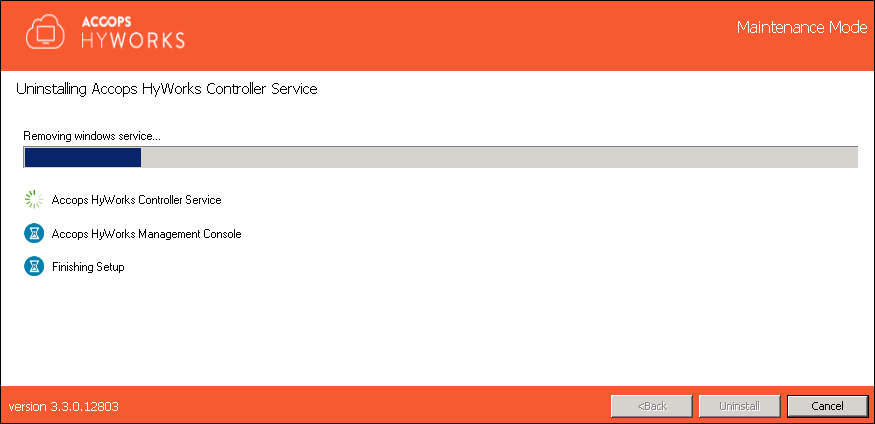
Select Uninstall and click Next.
-
Select the components that need to be uninstalled and click Next.
-
The Remove Service Database option enables the Administrator to remove the database created during the HyWorks Controller installation.
-
The Remove Log Database will remove the logs database from the specific instance of the SQL Server. To keep the logs, uncheck this option.
Note
If the Remove Database is not checked, the re-installation process for the HyWorks Controller with the same database server will use the existing database file.

-
-
Click Uninstall to confirm the operation.
-
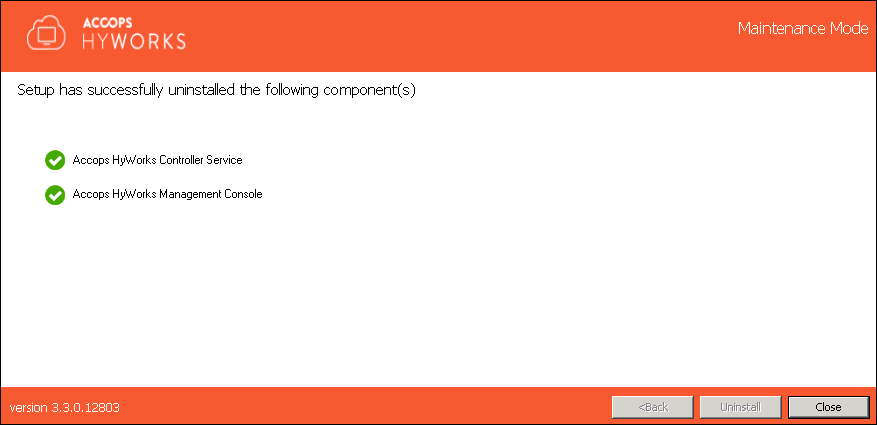
Once the process is completed, the screen will display information on the uninstalled components and their respective status.
-
Click Close to exit the installation wizard.
Limitations:
-
Upon the removal of the HyWorks Controller, the following Windows roles and features will not be uninstalled to avoid affecting the users that are currently logged on:
-
Web Server (IIS): In case the HyWorks Controller Management Console is uninstalled.
-
Remote Desktop Session Host: In case the HyWorks Session Host Server is uninstalled.
-
HyWorks Hotfix Installation
One or multiple hotfixes can be released for HyWorks server components (Controller, Management Console, Licensing Service, Upgrade Service, Reservation Management Service). This section will provide detailed information on how to apply hotfixes on Controller setups:
Important
-
Always back up your files before using the HyWorks Controller hot-fix patcher to prevent data loss. Take snapshots of the HyWorks controller servers before upgrading for a quick rollback if needed.
-
When repairing the HyWorks Controller, new files will be replaced with the previous major version, essentially reversing any hotfixes.
-
If a repair is carried out for any other reason, reapply the latest hot-fix patch.
Two-node Active-Passive Setup
For a two-node active-passive setup, the following process can be followed to apply hot-fixes patches on controller servers:
-
Login into the HyWorks Controller Management Console of any of the HyWorks servers.
-
Move the secondary HyWorks Controller server (e.g., hwsctrl-02) into maintenance mode (Settings > System > Controllers).
-
Connect to the secondary HyWorks Controller server (e.g., hwsctrl-02) using a remote or console session with administrator user credentials.
-
Download and copy the respective hot-fix patch on this (secondary) controller server (e.g., hwsctrl-02).
-
Run the patcher setup and follow the Patch Installation Process to complete the patcher installation.
-
Once the installation on the secondary server (e.g., hwsctrl-02) finishes, move the primary HyWorks Controller (e.g., hwsctrl-01) to maintenance mode.
-
Make the upgraded secondary controller (e.g., hwsctrl-02) the new primary server.
-
Connect to the old primary HyWorks Controller server (e.g., hwsctrl-01) using a remote or console session with administrator user credentials.
-
Download and copy the respective hot-fix patch on this old primary HyWorks Controller server (e.g., hwsctrl-01)done
-
Run the patcher setup and follow the Patch Installation Process to complete the patcher installation.
-
Once the installation on the old primary server (e.g., hwsctrl-01) finishes, make it secondary.
-
Now, patch installation is completed, but controllers have switched roles and can be moved back to their original modes from the management console (if needed).
Multi-node Setups
In multi-node setups, the patch can be applied first on management nodes and then on session nodes as per the steps given below:
Management nodes
Note
-
During management node patch installation, running or upcoming sessions are not affected as management nodes do not participate in session delivery. However, it is recommended to schedule a small maintenance window for applying the patch.
-
Take snapshots for quick rollback.
-
Access the HyWorks Management console and go to Settings > System > Controllers.
-
Select the Secondary Controller (e.g., Management2), click the Change Mode button, select Maintenance, and click on Change Mode.
-
Now follow the Patch Installation Process to install the patch on the secondary management node (e.g., Management2).
-
After successfully installing the patch on the secondary management node (e.g., Management2), go to the management console, select Secondary (Management2), currently in maintenance mode, click the Change Mode button, choose Change mode as Primary, and click Change Mode.
-
Select the Primary management node (e.g., Management1), click the Change Mode button, select Change mode as Maintenance, and click on Change Mode.
-
Now follow the Patch Installation Process to install the patch on the primary management node (e.g., Management1).
-
Select Primary (Management1), which is in Maintenance, and click the Change Mode button. Then select Change Mode as Secondary and click Change Mode.
Broker Nodes
Note
-
The broker nodes should be behind a load balancer with proper health probe configurations. Ensure that the load balancer does not monitor the HyWorks Controller port. The broker node will not accept any requests in maintenance mode.
-
During maintenance, remove the broker node from the load balancer configuration if it uses TCP port monitoring. After successfully applying the patch, add or enable it again.
-
Once the installation on Management nodes is completed, the patch installation process on Broker nodes can be started.
-
Access the HyWorks Management console and go to Settings > System > Controllers.
-
Select one Broker node (e.g., Broker1) and, click the Change Mode button, select Change mode as Maintenance, and click on Change Mode.
-
Now follow the Patch Installation Process to install the patch on the Broker node.
-
On the management console, select the Broker node (Broker1) in Maintenance and click the Change Mode button. Then, select Change Mode as Active and click on Change Mode.
-
Follow the above steps to install the patch on all the broker nodes individually.
Patch Installation Process
The patch can be installed following the below steps. These steps would be similar to installing the patch on all the nodes:
-
Take remote/console access to the controller node with user credentials with local administrator privileges.
-
Copy the Patch Installer on the server. If the file is blocked,
-
0unblock the exe.
-
Run the installer, click Next, accept the License Agreement, then click Next on the Choose Component window and click on Install on the Choose Install Location window.
-
The installation process will start, and the patch will be installed in a few minutes.
Patch Installation Logs
For patch installation verification, patch installation logs can be checked at the following location:
C:\Program Files (x86)\Accops\HyWorks Patcher\
\ > Text log file with name format as "patcher time date.” E.g. C:\Program Files (x86)\Accops\HyWorks Patcher\Hotfix 20102023\patcher 10.17.49 2023-10-23.txt
Health Probe APIs
HyWorks Controller health probe APIs are documented here: Health Probe APIs for Load Balancer Configuration.
Installation Logs
HyWorks installation logs can be used for troubleshooting and verification purposes. Installation logs are created at the following locations:
%appdata%\HyWorksController\Logs