System Performance Improvements
Customizations to Improve System Performance
To improve overall system performance, enable or disable the features listed below. These customizations should be used carefully, as disabling/enabling one or many features may conflict with user requirements.
Disable the Screen Saver on DVMs (Desktop Virtual Machines)
Disabling the screen saver on DVMs will help improve the overall performance of the DVM and might also improve the RDP performance. To disable the screen saver, go to Start > Control Panel > Appearance and Personalization > Change screen saver and select None from the Screen saver drop-down list.
Disable IPv6
IPv6 is enabled by default on VMs and can be disabled if the processes or applications are not using the IPv6 schema. Disabling the IPv6 may help in improving the overall DVM performance. To disable the IPv6, refer to the following Microsoft KB article: https://support.microsoft.com/en-us/kb/929852
Disable Windows Updates
Keeping the Windows updates off can help in improving the overall performance. To disable Windows updates (Windows 7 or Windows 8.1) VMs:
Go to Start > Control Panel > System and Security > Windows Update > Change settings and click Never check for updates.
Note
-
The steps are for Windows 7 and Windows 8.1. Similar configurations will also be needed for newer operating systems.
-
Clarification: Disabling Windows updates is not intended to stop critical system updates. Instead, it should be managed to ensure that updates are pushed during non-working hours without affecting system performance.
Disable Power Management
Power management should be disabled to improve the system’s overall performance. Select Control Panel > Hardware and Sound > Power Options > Show Additional plans to disable it and choose High Performance.
Disable Auto Sleep
Auto Sleep should be disabled to improve the system's overall performance. To disable power management, go to Windows Settings > System > Power & Sleep and choose Never in the Sleep drop-down menu.
Increase Virtual Memory
Windows use virtual memory as RAM. As such, increasing it can help in improving the overall VM performance. Follow the steps given below to increase the virtual memory:
-
Go to Start > Control Panel > System and Security > System.
-
Click Advanced system settings.
-
Go to Performance > Advanced and click Settings.
-
Go to Virtual Memory > Advanced and click Change.
-
Specify the custom size of the virtual desktop's virtual memory.
Disable Remote Assistance
If the feature is not being used, then keeping it disabled can help improve the overall VM performance. Follow the steps given below to disable remote assistance:
-
Go to Start > Control Panel > System and Security > System.
-
Click the Remote Settings link.
-
In the Remote Assistance > System Properties, Clear the Allow Remote Assistance connections in this computer check box and click OK.
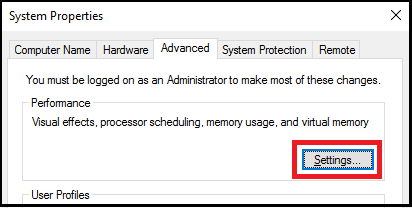
Using a mix of Visual Effects and Performance
The Windows operating systems come with many visual components, and the users may not use all or any of them. As such, these configurations should be wisely configured to achieve a balanced performance and visual experience. Follow the steps given below to change the visual experience configurations:
-
Open the Start menu, right-click on Computer, and select Properties.
-
Click Advanced System Settings.
-
Go to System Properties > Advanced and click Settings.
-
To disable all the visual experience features, select Custom to choose your settings.
Disable Network Discovery
Follow the steps given below to disable the network discovery:
-
Go to Start > Control Panel > Network and Internet > Network and Sharing Center.
-
Click the Change advanced sharing setting link.
-
Select the Turn-off network discovery.
Disable Windows Defender
If the system uses a different Anti-virus than the Windows Defender, the Windows Defender should be disabled to have only one such program scanning the system. Follow the steps given below to disable the Windows Defender:
-
Go to the Start menu and type Defender to search for the Windows Defender.
-
Click the Windows Defender application.
-
Select Tools > Options from the Settings section.
-
Select the Administrator and clear the Use this program.
-
Click Save and Yes when prompted to make the change.
Disable Scheduled Disk Defragmentation
Follow the steps below to disable the scheduled disk defragmentation to improve the system's overall performance.
-
Go to the Start menu and type dfrgui to locate the defragmentation utility.
-
In the Optimize Drives window:
-
Select the drive and click the Change Settings Configure schedule.
-
Clear the Run on a schedule in another Optimize Drives window and click OK.
-
Note
We recommend to disable Scheduled defragmentation for the Linked Clones. Refer to the VMware article for details:
Disable 'NOT REQUIRED' Services
Many system and application services are not used frequently, and it is advisable to disable them. This helps improve system performance.
Disable Indexing Service
Indexing service makes the Windows search faster. If the Windows search is not being used often, it's better to disable it and improve the overall performance of the VM.
-
Click Start, type services.msc, and press Enter.
-
Locate the Windows Search service in the list of services, right-click it, and choose Properties.
-
In the General > Startup type, select the Disabled" from the dropdown list. Click Apply > OK to save the setting.
-
If the service is already running, stop it.
-
Reboot the system.
Smart Card Device Enumeration Service
Locate and disable the Smart Card Device Enumeration Service using the same process described to Disable the Indexing Service.
Other Services
As specified in the above sections, the user should identify services that are not used and should disable them manually to improve system performance.