Shared Hosted Desktop Delivery
To provide shared hosted desktop access to end-users, session host servers can be used in shared hosted desktop pools. This section will provide detailed information on how shared hosted desktops can be delivered and managed in HyWorks Controller.
Creating a Shared Hosted Desktop Pool
There are two ways to deliver a Shared Hosted desktop pool:
-
Existing Session Host Servers:
- Configure the existing session host server in HyWorks
- Map these servers to session teams
- Create a pool from the session team
-
Provisioned Session Host Server:
- HyWorks can deploy Session host servers like dedicated desktops by provisioning on session providers like VMware vCenter Servers, Microsoft Hyper-V servers, etc.
- Select Desktop Pool Type as Share Hosted Desktop or Non-persistent Shared Hosted Desktop and Provisioning type as Dynamic, then select session provider where source VM is deployed.
- Select the Pre-configured session host server gold image and fill in all the required details on the deployment and customization tab.
- All provisioned session host server(s) and the associated team are managed by HyWorks.
- The Session Team will dynamically create an SHD Pool. It is called Managed Session Teams.
- All cloned VMs are added as a Shared Session Provider into the created Session Team (Managed Teams).
- This session team can not be deleted because it is managed by the SHD Pool.
- On SHD Pool deletion, the Managed session team and provisioned Shared Session Provider will get deleted automatically.
- The Managed Session Team name will be the same as the SHD Pool name.
HyWorks supports shared hosted desktop deliveries from a load-balanced team of session host servers and will require the following configuration in HyWorks:
Prerequisites
-
Reachable Shared Session Provider i.e. HyWorks Session Host Server is configured
-
Authorization/Authentication Server is configured (If a User-based pool needs to be created) and post pool creation for authenticating the user session.
-
Registered Devices in HyWorks Controller (If a Device-based pool needs to be created): As shown in the image below the devices are registered and renamed for better identification.
Shared Hosted Desktop Pool Creation
Considering that all session host servers are configured with session teams, follow the steps listed below to create a shared hosted desktop pool:
-
Login to HyWorks Controller Management Console.
-
Go to VDI > Pools.
-
In Pools, click Add New Pool.
-
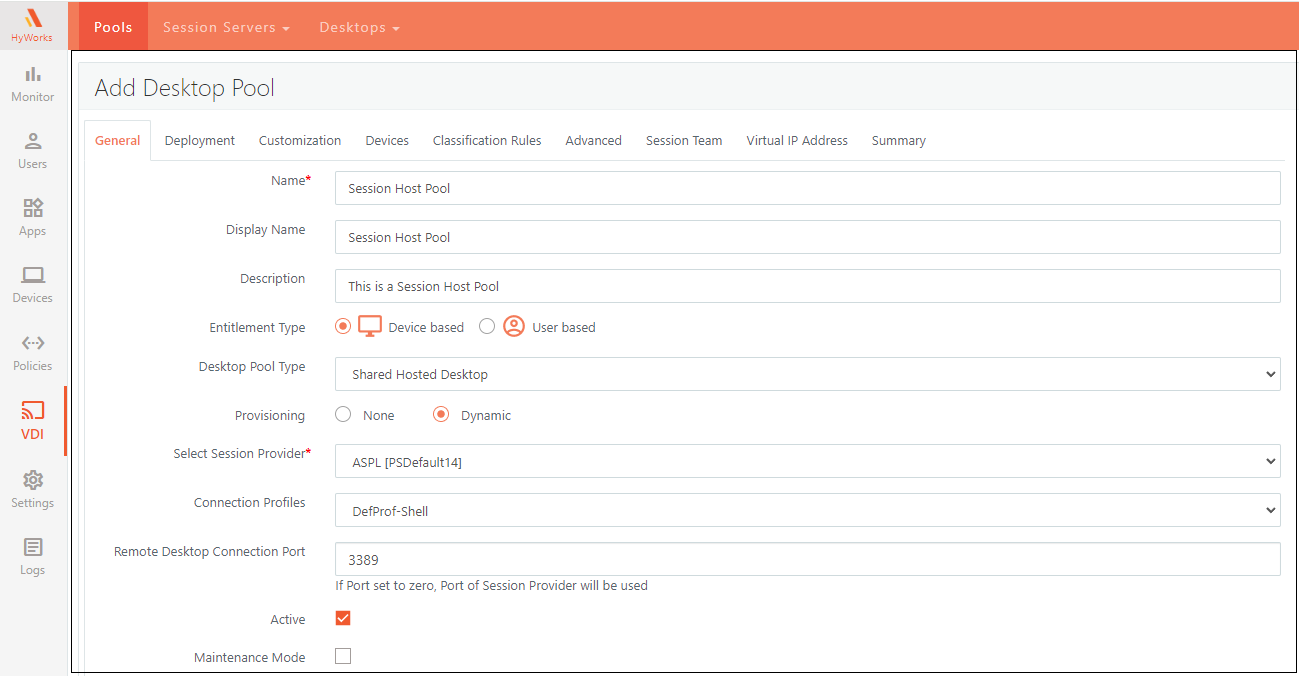
In the General tab, provide the following details:
-
Name: Enter a logical name for the Desktop Pool which will be used for identification.
Note
- Two desktop pools with the same name cannot exist in the HyWorks organization.
- Only the following special characters are supported: \ _ SPACE (){} \ # @ : -
-
Display Name: Enter a display name for the Desktop Pool which will be used by the client while accessing the pool.
-
Description: Enter the description if needed.
-
Entitlement Type: Defines the type of clients to be configured and given access to a desktop session. A Desktop in HyWorks deployment can be associated with a device or a user. Desktop Pools in HyWorks can be of two types:
-
Device Based: Desktop Pools in which Desktops are assigned to devices and thus any valid user login from the device always gets the session of the same Desktop which is assigned to the device from where the user is logging in.
-
User Based: Desktop Pools in which Desktops are assigned to users and thus a valid user logging in from any device or location gets the session of the same Desktop which is assigned to this user.
Entitlement Type selection also enables the corresponding client type screen in the Desktop Pool wizard, e.g. Selecting Entitlement Type as Device based will enable the Devices screen, whereas selecting Entitlement Type as User based will enable the user’s screen (For configuring users as clients).
-
-
Desktop Pool Type: Select as Shared Hosted Desktop.
-
Provisioning:
-
Dynamic: Set provisioning as Dynamic to dynamically provision the session host servers, this will enable the option to select a session provider on which the source session host server image is available and new servers will be provisioned. Select Session provider: Select a dedicated session provider for provisioning.
-
None: Set Provisioning as None, if manually created session team is to be used and session host servers are already prepared. This will enable the option to select the Server Team. Select Server Team: Select any of the session server teams to create a shared hosted desktop pool.
-
-
Connection Profiles: Select the connection profile for the pool from the dropdown.
-
On specifying the connection profile, the desktop connection will be provided as per the configured profile.
-
On specifying the connection profile as None, the applicable connection profile will be derived as per the Connection Profile fallback model. For more details on this, refer to Connection Profiles.
-
-
Remote Desktop Connection Port: Enter the Port number on which the remote sessions will be made from the client.
-
Active/ Inactive Pools: A Desktop Pool can be made active/inactive from the Add/Edit Desktop Pool wizard. When the user logs in, only the active pools are searched for assignments. The inactive pools are ignored while providing Desktops to clients (devices or users).
-
Maintenance Mode: A shared hosted desktop pool can be put into maintenance mode to avoid any access from users during the configuration period. However, the maintenance mode is more significant for dedicated desktop pools.
-
-
Click Next.
-
Configure Clients in Desktop Pool: The clients in Desktop Pools can either be a device or user, this is determined by the Entitlement Type attribute in General Settings of the Add Desktop Pool wizard.
-
Device based: Click Add Device and add the devices.
-
User based (Recommended): Click Add. Select multiple users, groups, and OUs from the configured authentication server.
-
-
Click Next.
-
Configure the Classification Rules, to restrict shared hosted desktop access to only those users connecting from a specific LAN, WAN, or MAC. Refer to the Classification Rules section To enable access to restricted classified client groups only.
-
Select access policy as, From specific client groups only.
-
Select client groups and move to the allowed list.
-
-
Click Next.
-
On the Advanced tab, configure the Desktop Display Name on the client.
-
Click Next.
-
On the Extended tab, configure the Enable IP Address Filter to filter the IP addresses on Session Host Servers if SHD has multiple IPs. This will enable communication with the Desktop and the session host agent. The tab will be enabled only when provisioning is set as dynamic.
-
Click Next
-
On the Session Team tab, configure the team and load balancing related settings. These settings are automatically applied to the Session Team.
-
Team name: Logical name for the Session Team is taken from the pool name automatically.
-
Load balancing type: Select the Load Balancing Type for this team. Available options are Weighted Round Robin, Weighted Least Connection, and Adaptive.
-
Max Session Allowed per Server: Maximum limit of sessions allowed per server, these settings add limits to each server from the team.
-
Power Management Mode: Disabled - Power management and monitoring will be disabled, Monitor - Monitoring resources, Enforce - SHD power state will be managed , as per defined rules.
-
Limit session: Enable or disable to restrict session from CPU usage and RAM. No more sessions will be provided on reaching the maximum limit.
-
Idle capacity manage when disaster recovery not active : Set Idle capacity for the session team if all sites DR is disabled which is the associated pool. For more information - Site Management.
-
Minimum powered on VM(%): Minimum value for powered on VM if DR is disabled then this number of VMs will be in powered on state.
- Minimum provisioned on VM(%): Minimum value for provision on VM if DR is disabled then this number of VMs will be in provisioned on state.
-
-
Click Next.
-
On the Virtual IP Address tab, configure the virtual IP address settings for the pool, the shared hosted desktop session will be delivered with the virtual IP address if it is enabled. Refer to the Virtual IP Address section for more details.
- Enable session virtual IP address: Select this box to enable session virtual IP address support.
- User Virtual IP Assignment: Session virtual IP address life span can be temporary or permanent. The permanent option will reserve the same IP address for all user sessions in the future and the temporary option will give a different virtual IP address on every logon.
- If no virtual IP address available: Block session or allow session with server IP address, when virtual IP address is not available for new session or session virtual IP address setting is not enabled on the team.
-
Apply virtual IP address to: Option to Specify, if virtual IP address should be specified to all processes or only for the specific processes. All Processes: Session virtual IP address will be applied to all processes within a session. Specified processes: Included: Virtual IP address will be assigned to only specified processes. Specify the comma-separated process list. Excluded: Specified processes will not be assigned any virtual IP address. Specify the comma-separated process list.
-
Process list to be: Option to choose if the list of processed should be inclusions or exclusions.
- Specify the process list: List of comma-separated processes to be included or excluded. A maximum of 50 processes can be defined and each process should be less than 255 characters.
- Session virtual IP address on team: Session virtual IP address set on team, if not set on team, then Block session or Allow session with server IP address action will be taken as per above setting.
-
Click Next.
-
On the Summary tab, reverify all the configurations from different tabs.
-
Click Finish.
Important
- One session host server team can be used only once in HyWorks deployment and hence only one shared hosted desktop pool created for one session host server team.
Managing Shared Hosted Desktop Pools
Viewing added desktop pools
View the list of desktop pools from Configuration > Workspace > Desktop Pools. Page displays the following information:
- Pool Name and Display Name
- Pool Type and Entitlement Type
- Provider/Team Name and Type
- Desktop Provisioning and Connection Profile
- Assignment Life Span/ DVM Persistence
- Desktops Ready
- Desktops in Use
- Free Desktops
- Status
- Active
Modifying Shared Hosted Desktop Pool
-
Select shared hosted desktop pool.
-
Click Edit and update the required information.
-
Click Finish.
Delete Shared Hosted Desktop Pool
Once the shared hosted desktop pool is not in use, it can be deleted from the HyWorks Controller.
-
Selected shared hosted desktop pool.
-
Click Delete and confirm the action. The pool will be deleted with associated objects as mentioned below:
- On deleting Provisioned Shared Hosted Desktop Pool: Associated managed server team and all provisioned session servers will get deleted.
- On deleting un-provisioned shared hosted desktop pool: Team and associated session servers will not be deleted. Only the desktop pool entity will be removed from the HyWorks controller.
Shared Hosted Desktop Session Management
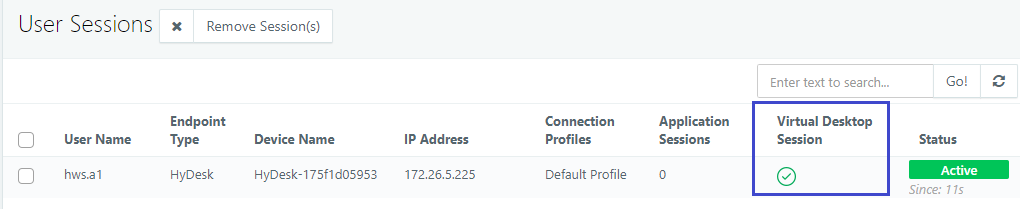
Shared Hosted Desktop access details in User Sessions
Whenever a user connects to HyWorks and accesses any shared hosted desktops, it is reflected on the User Sessions page, e.g. a user has initiated a shared hosted desktop then Virtual Desktop Session column will show as checked.
Desktop Sessions Detailed View and Management
To view and manage shared hosted desktop sessions, go to Monitor > Live Sessions > Desktops section. It will display the following details:
| Field Name | Description |
|---|---|
| Username | Displays the username of the logged-in user. |
| Device Name | Displays the name of the device, if the user has logged in from HyDesk or HyWorks Client, NA if the user has logged in from HyLite. |
| IP Address | Displays the IP address of the machine from where the user has logged in. In the case of HyLite, IP address information is shown as NA. |
| Session Id | Displays the remote Session ID on the Session Host Server. |
| Pool Name | Displays the name of the desktop pool from where the sessions are coming. |
| Pool Display Name | Display the Name of the desktop pool shown to the end-users on logon. |
| Desktop Name | Displays the Name of the session host server from which the session has been provided. |
| Desktop IP Address | Displays the IP Address of the session host server from which the session has been provided. |
| Connection Profile | Displays the Connection profile as applied on this shared hosted desktop session. |
| Status | Displays the Status of the desktop session (Connected/ Disconnected/ Idle). |
| Remote Control | If Remote Control is enabled for shared session hosts, a button will be shown. |
| Virtual IP Address | Virtual IP address assigned to the desktop session. If not enabled, then it will display as Not available. |
- Remove VDI Session
To remove shared hosted desktop session:
-
Select desktop session.
-
Click Remove Session(s).
-
In Confirm Action dialog, click on the Remove button.
-
The user’s shared hosted desktop session will be removed from HyWorks as well as from the respective session host server.
- All user's unsaved data in shared hosted desktop sessions will be lost.
Advance Configuration
Refer to the Advance Configuration for pool section.