Integration in HyWorks/ HyLabs
Assuming all prerequisites are configured correctly (Microsoft Azure is configured into HyWorks as connector with all appropriate permissions.), this document will provide details of how to proceed with configurations in HyLabs for deliveries single or multi-session desktops via HyLabs.
Delivering AVD via HyLabs
For delivering AVD single session or multi-session desktops via HyLabs, following process to be followed:
Create AVD Enabled Provisioning Profile
Assuming all specified prerequisites are configured and the Gold Master VM is ready on Azure, the first step to deliver AVD-based HyLabs is to configure the Provisioning Profile in HyLabs:
-
Access the HyLabs portal with user having HyLabs admin rights.
-
Navigate to the Provisioning Profile section.
-
Create a new provisioning profile by clicking Add Provisioning Profile.
-
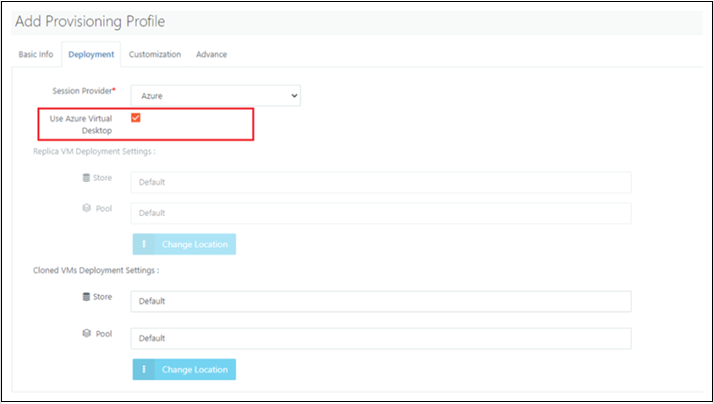
Enable the Use Azure Virtual Desktop option.
-
Navigate to the Advance tab.
-
Save the provisioning profile.
Adding Gold Master in HyLabs
After creating the Provisioning Profile, create the Gold Master specifically configured for AVD.
Adding Single Session Gold Master
-
Access the HyLabs admin portal.
-
Navigate to the Gold Master section. Click on the Add button to open the Add Gold Master wizard.
-
In the Usage tab:
-
Select Session Type as Single Session.
-
Set other options (E.g., Assign To/Description/GM Limits RDP Ports, etc.) as per the requirement.
-
-
Click Next to go to the Session Provider tab.
-
Select Session Provider as the Azure connector added.
-
The Provisioning Profile should be selected as the one that has AVD enabled (Refer to the provisioning profile creation section for more details).
-
-
Search and select the appropriate Gold Master created for AVD-based HyLabs delivery.
-
Other pages can be reset (Course selection/Snapshot/Access Policy, etc.) with configurations based on the requirements.
-
Click the Save button to finish adding the Gold Master.
-
AVD-enabled Single-session Gold Master will now be available in HyLabs for deployments.
Adding a Multi-Session Gold Master
-
Access the HyLabs admin portal.
-
Navigate to the Gold Master section. Click on the Add button to open the Add Gold Master wizard.
-
In the Usage tab:
-
Select Session Type as Multi-Session.
-
Set other options (E.g., Assign To/Description/ RDP Ports, etc.) as per requirement.
Note
GM limits do not apply to multi-session AVD-enabled gold Masters, hence limit configurations will appear disabled.
-
-
Click Next to go to the Session Provider tab.
-
Select Session Provider as the Azure connector added.
-
The Provisioning Profile should be selected as the one which is having AVD enabled (Refer to the provisioning profile creation section for more details).
-
-
Other pages (Course Selection, Snapshot, etc.) can have configurations as per requirements.
-
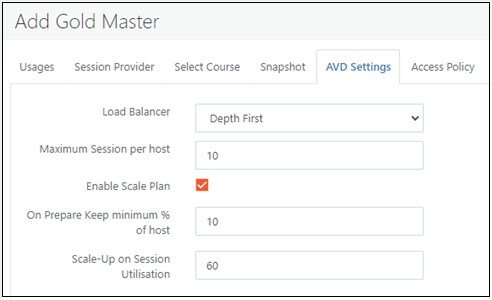
Click Next to go to the AVD Settings page, which has the following configurations:
-
Scale Plan Load Balancer Algorithm: Choose between Breadth First and Depth First load balancing algorithms for optimized session distribution.
-
BreadthFirst: Distributes new user sessions across all available session hosts.
-
DepthFirst: Distributes new user sessions to session hosts with the highest number of connections below their maximum session limit threshold.
-
-
Max Session per AVD Host: Set the maximum number of concurrent user sessions per session host.
- Ensure efficient resource allocation by setting an appropriate max session limit based on deployment configuration and VM capacity.
-
Enable AVD Scale Plan: Toggle option to enable or disable scale plans specifically for AVD reservations. Set to true to activate scale plans for AVD reservations, and false to deactivate them.
-
On Prepare Keep Minimum % of Host: This setting ensures that a minimum percentage of the host is kept prepared and ready for new sessions, reducing wait times for users.
-
Scale-Up on Session Utilization: This parameter defines the threshold of session utilization that triggers the scaling up of resources to accommodate additional sessions.
-
-
-
Click the Save button to finish adding the Gold Master.
-
AVD-enabled Multi-session Gold Master will be now available in HyLabs for deployments.
Deploy AVD Enabled Reservation
Once the Gold Master course is ready, proceed with the reservation process for AVD:
-
Navigate to the Reservation section within HyLabs.
-
Initiate a new reservation and specify it as a Course reservation.
-
Select the course that has been assigned AVD multi-session.
-
Choose the Gold Master where the session type is set as a single session or multi session, and the provisioning profile as AVD enabled.
-
Add schedule and other relevant details.
-
Save the reservation settings.

AVD Supported Reservations
-
Course Reservation
-
Single Session
-
Multi Session
-
-
Self-Study Reservation
-
Single Session
-
Multi Session
-
Scale-plan enabled
-
Scale-plan disabled
-
-
-
Course Self-study Reservation
- Single Session
Advance Settings in HyWorks for AVD Scale Plan
Following are the advanced settings for the AVD scale plan:
-
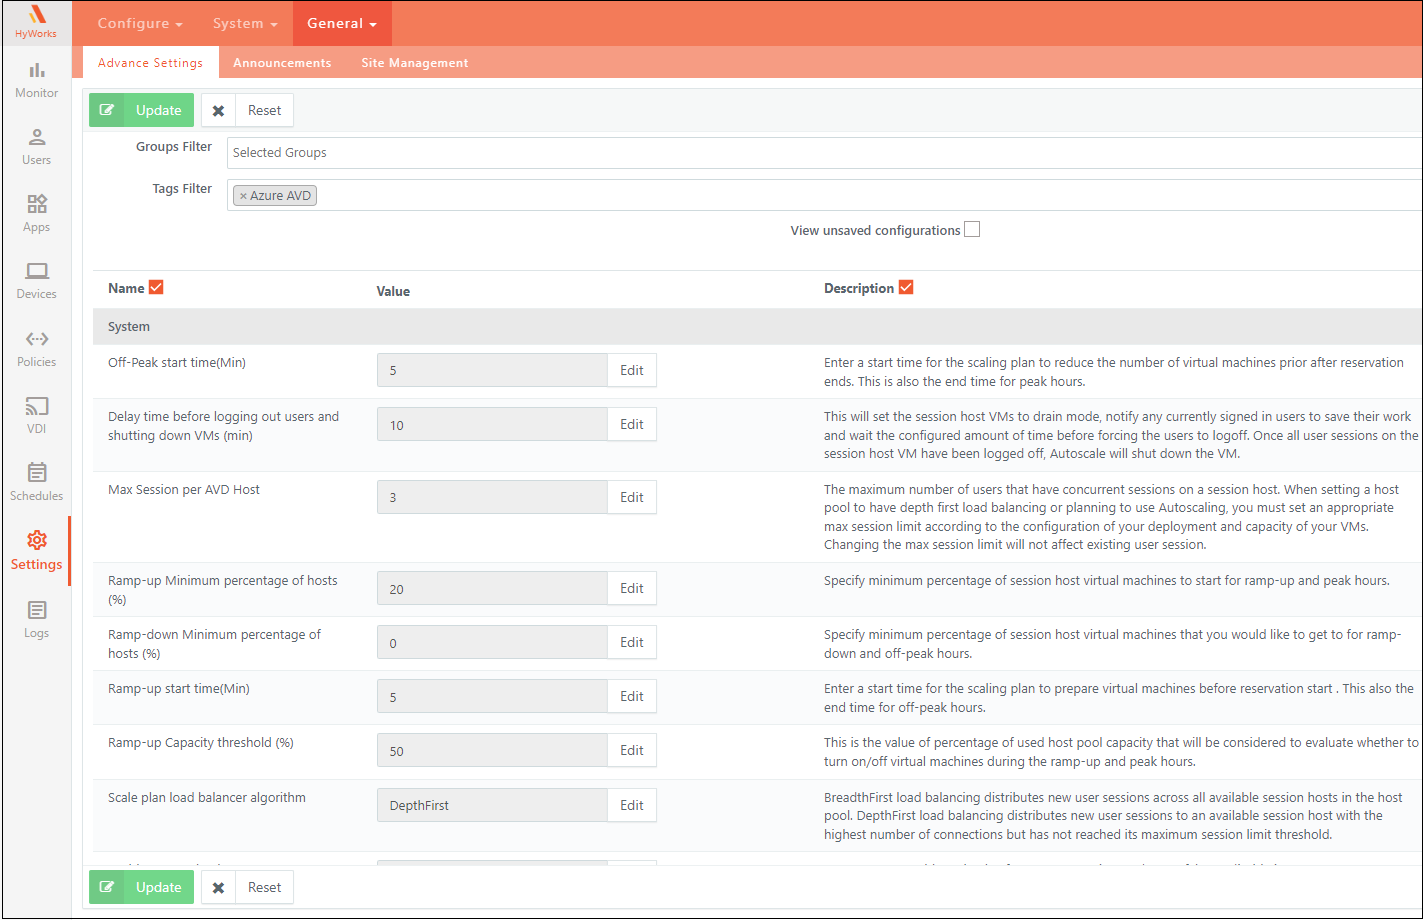
Ramp-up Start Time (Min): Define the start time for the scaling plan to prepare virtual machines before the reservation starts. Also marks the end time for off-peak hours.
-
Ramp-down Capacity Threshold (%): Determine the percentage of used host pool capacity to evaluate whether to turn off virtual machines during ramp-down and off-peak hours.
-
Delay Time Before Logging Out Users and Shutting Down VMs (Min): Configure the duration before logging out users and shutting down VMs in drain mode. Usage: Allows users to save their work gracefully before being logged out, ensuring a smooth transition.
-
Off-Peak Start Time (Min): Set the start time for the scaling plan to reduce the number of virtual machines after the reservation ends. Also marks the end time for peak hours.
Benefits:
-
Dynamic Scaling: Automate scaling operations based on demand, optimizing resource utilization and cost-efficiency.
-
Fine-tuned Session Management: Customize session distribution and shutdown processes for improved user experience and resource efficiency.
-
Improved Performance: Proactively prepare virtual machines before peak hours and reduce resources during off-peak hours, ensuring optimal performance and cost savings.
HyWorks Advance settings for AVD scale plan:
-
Navigate to the Settings option on the main menu.
-
Then navigate to the General sub-menu.
-
Next, select the Advanced Settings tab.
-
Click the Tags Filter dropdown and select Azure AVD.
Known Limitations
-
Sessions initiated through AVD are not controlled by the controller, which means session timeouts and other connection profile settings do not apply within the AVD session.
-
There is no direct communication between the controller and the agent, so features like printing, shared drive mapping, and clipboard functionality may not work through Accops.
-
The Gold Master Limit is not supported for multi-session courses and self-study Gold Masters.
-
Multi-session course reservations do not support self-study courses.
-
For multi-session AVD reservations, HyWorks creates a pool as a Persistent Virtual Desktop with Desktop Pool Type and assigns a Personal Desktop as the Assignment Life Span, as HyLabs does not manage session teams for these multi-session AVD reservation pools.