PCoIP Hosts Installation and Configuration on Virtual/Physical Desktops
The PCoIP hosts capture and securely deliver the host machine's pixel output to PCoIP clients. This technology ensures the efficient and secure transmission of graphical data from the host to the client device, preserving high performance and visual output quality.
The PCoIP agents can be deployed to a Gold/Master Image for Dedicated Session Delivery.
Gold/Master Virtual Desktop preparation requires the following:
PCoIP Host Agent Installation
The graphics agents are installed on host machines to manage communication and data transfer between the host and the PCoIP clients. They handle the encoding and decoding processes needed to convert graphical data into a format suitable for network transmission, making remote access efficient and high-quality.
PCoIP has two types of agents that can be installed on the host machine:
- Graphics Agent
- Standard Agent
Graphics Agents
Graphics Agents are specialized software components that deliver high-performance graphics via PCoIP technology.
Note
Use this agent ONLY if your VDI has an attached graphics card with a valid license.
Installation of Anyware Graphics Agent for Windows
Supported PCoIP Host OS
- Windows 11: 22H2, 23H2
- Windows 10: 22H2, 21H2
- Windows Server: 2019, 2022 (Single User Session only)
Supported PCoIP Host Graphics Agent
Installation Steps
- Install GPU Drivers
- Download Graphics Agent for Windows
- Install the agent
- Licensing the Agent
- Configuration Guide
Note
- Before installing the PCoIP Graphics agent, install GPU drivers on the Windows machines.
- The Graphics Agent for Windows installer will need firewall exceptions for the following required PCoIP ports during installation: TCP 443, TCP 4172, UDP 4172, and TCP 60443.
Installation of Anyware Graphics Agent for Linux
Supported PCoIP Host OS
- Ubuntu: 22.04
Supported PCoIP Host Graphics Agent
Installation Steps
- Install GPU Drivers
- Download the Agent for Ubuntu 22.04 Ubuntu 22.04: curl -1sLf https://dl.anyware.hp.com/ircz8PvXy1p64kWz/pcoip-agent/cfg/setup/bash.deb.sh | sudo -E distro=ubuntu codename=jammy bash
- Install the agent
- Licensing the Agent
- Configuration Guide
Note
- Make sure to install GPU drivers on Linux machines before installing the PCoIP Graphics agent.
- (CHECK THIS: IS IT CORRECT FOR LINUX???)The Graphics Agent for Windows installer will need firewall exceptions for the following required PCoIP ports during installation: TCP 443, TCP 4172, UDP 4172, and TCP 60443.
Standard Agents
Standard Agents are software components designed to be installed on host machines. They aid in collecting and transmitting data and execute tasks according to the system's requirements. They cater to more straightforward graphics requirements.
Installation Anyware Standard Agent for Windows
Supported PCoIP Host OS
- Windows 11: 22H2, 23H2
- Windows 10: 22H2, 21H2
- Windows Server: 2016, 2019, 2022 (Single User Session only)
Supported PCoIP Host Standard Agent
Installation Steps
Installation Anyware Standard Agent for Linux
Supported PCoIP Host OS
- Ubuntu: 22.04
Supported PCoIP Host Standard Agent
Installation Steps
- Download the Agent for Ubuntu 22.04: curl -1sLf https://dl.anyware.hp.com/ircz8PvXy1p64kWz/pcoip-agent/cfg/setup/bash.deb.sh | sudo -E distro=ubuntu codename=jammy bash
- Install the agent
- Licensing the Agent
- Configuration Guide
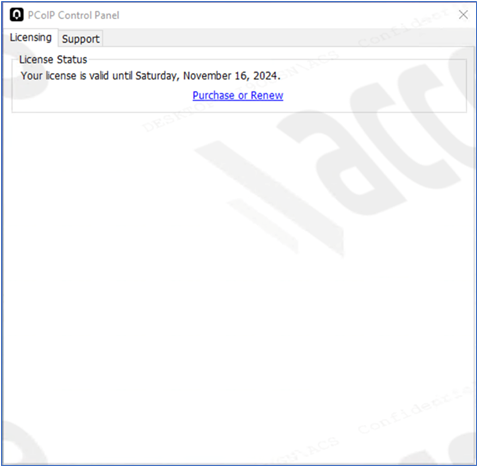
Agent License Configuration
This section covers the configurations of PCoIP Host Graphics/Standard Agent Licensing.
The licensing can be configured via two methods:
- Self-Hosted Offline License Server
- Teradici Cloud Online License Server
Self-Hosted Offline License Server
This licensing is based on importing the GPO Administrative Template to PCoIP Host Gold/Master VM or Domain Controller.
The PCoIP Agent installer includes a set of GPO template files that enable customization of PCoIP session variables to set options or optimize performance.
Note
The GPO files must be imported before use.
To use the admx template:
- Copy the admx file from - C:\Program Files\Teradici\PCoIPAgent\configuration\policyDefinitions\PCoIP.admx to C:\Windows\PolicyDefinitions
- Copy the adml file from - C:\Program Files\Teradici\PCoIP Agent\configuration\policyDefinitions\en-US\PCoIP.adml to C:\Windows\PolicyDefinitions\en-US
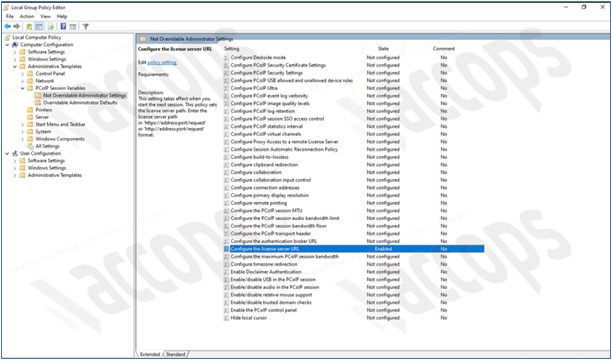
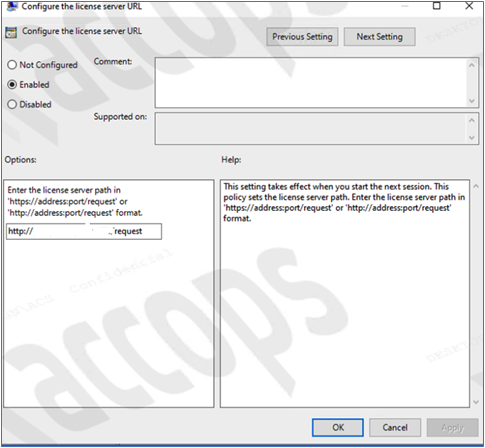
The PCoIP session variables can be modified using the GPO editor.
For instructions, refer to Modifying the Session GPO Variables.
Using the Cloud License Server
This licensing is based on script deployment via GPO to register Anyware Agent & License from Cloud Server.
Follow the steps given below:
-
Place the script and batch file in a shared location:
- Create a file: RegisterPCoIPHost.ps1
- Add the contents below and save it to a network location.
- $scriptPath = C:\Program Files\Teradici\PCoIP Agent\pcoip-register-host.ps1
- $registrationCode = ABCDEFGH12@AB12-C345-D67E-89FG
- powershell.exe -InputFormat None -ExecutionPolicy Bypass -Command & { . '$scriptPath' -RegistrationCode '$registrationCode' }
-
Create a .bat script to execute the above PowerShell and save it on a network location.
- @echo off
- *PowerShell.exe -NoProfile -ExecutionPolicy Bypass -File
- \\FILEServer\doamin.local\script\RegisterPCoIPHost.ps1 For example, here the network location is: \\FILEServer\doamin.local\script\ Ensure both the RegisterPCoIPHost.ps1 and RunRegisterPCoIPHost.bat* files are in a shared location accessible by all computers, such as a shared network drive or a specific folder on the local machine.
-
Create a Group Policy Object (GPO) to run the script at startup:
- Open the Group Policy Management Console (gpmc.msc).
- Create a new GPO or edit an existing one.
- For the startup script, navigate to Computer Configuration > Policies > Windows Settings > Scripts (Startup/Shutdown) > Startup.
- Click Add > Browse and select the batch file RunRegisterPCoIPHost.bat.
- Apply the GPO to the appropriate Organizational Unit (OU) that contains the target computers.
-
To ensure the GPO is applied correctly, verify the script execution by running the gpupdate/force command on the target machines. Additionally, check the Event Viewer for any issues related to script execution.
PCoIP Client Installation and Configuration on End-user System
This section will cover the installation and configuration of the PCoIP client on the end-user system.
PCoIP Software Clients
PCoIP Software Clients are applications that establish PCoIP sessions with remote Windows or Linux desktops. Connections can be made to virtual machines via PCoIP agents and to remote workstations via Remote Workstation Cards.
Anyware Software Client for Windows
Supported Operating Systems
- Windows 11
- Windows 10
- Windows 10 IoT 21H2
Supported PCoIP Client
Installation Guide
Anyware Software Client for Linux
Supported Operating Systems:
- Ubuntu 22.04
- Ubuntu 20.04
Supported PCoIP Client
- Repository Setup Script:
- Ubuntu 22.04: curl -1sLf https://dl.anyware.hp.com/ircz8PvXy1p64kWz/pcoip-client/cfg/setup/bash.deb.sh | sudo -E distro=ubuntu codename=jammy bash
- Ubuntu 20.04: curl -1sLf https://dl.anyware.hp.com/ircz8PvXy1p64kWz/pcoip-client/cfg/setup/bash.deb.sh | sudo -E distro=ubuntu codename=focal bash
Installation Guide
Accops Workspace PCoIP Client Installation and Configurations on End-user System
Currently, Accops supports desktop delivery over PCoIP on the following two types of end-user systems:
-
Windows-based desktops thin client version 3.2.8.472 or later with PCoIP (A different variant of Workspace client is released with PCoIP integration). Download link: Download Accops Workspace PCoIP Client
-
Ubuntu client PCoIP version V331063 or later is supported. Download link: Ubuntu_x64_HyWorksClient_Installer_331068.7z