RemoteApp &
Old Shell Mode
This section will provide details of virtual application delivery with HyWorks. Previous sections already provide information on the session host server and teams, which should be referred to.
Publish (Add) Applications
Prerequisites:
- The HyWorks Session Host Server is configured as a Session Provider. For information on adding and managing session host servers in HyWorks, refer to Shared Session Host Management.
Steps to Publish a Virtual App:
-
Launch the browser, open Primary HyWorks Controller Management Console, and log in using administrator credentials.
-
Go to Apps > Virtual Apps.
-
Click Add '+'.
-
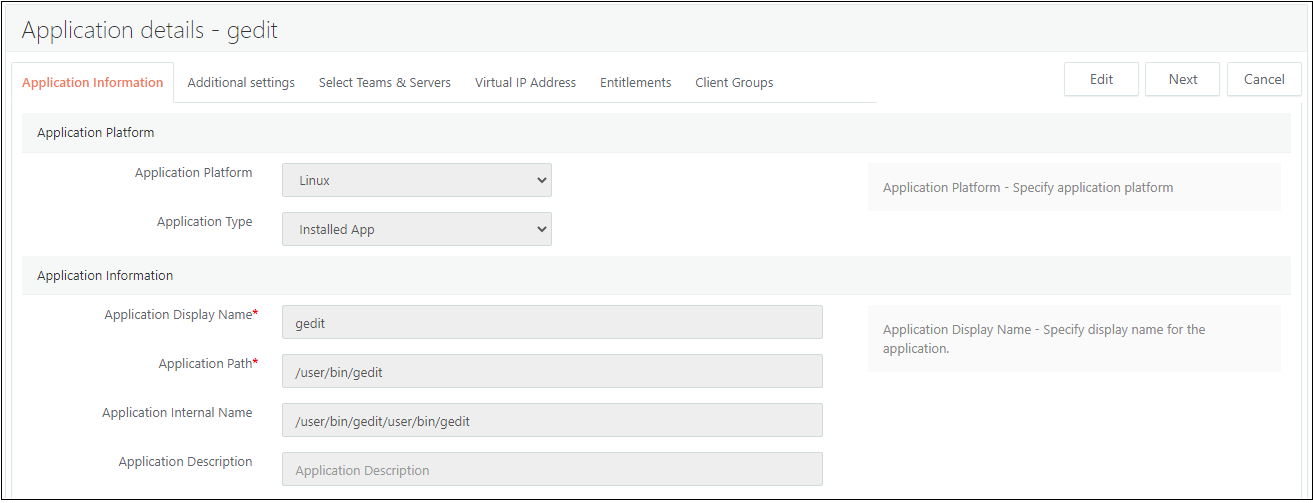
In Application Information
-
The Application Platform is set to Windows for publishing and delivering applications from Windows session host servers and to Linux for publishing and delivering applications from Linux session host servers.
-
Application Type There are two types of application formats supported in HyWorks:
-
Installed App This is an existing application type configuring apps installed on SHD.
-
MSIX App Attach is a new Windows Application packaging format provided by Microsoft. Applications can be installed and packaged in virtual hard disks (VHD) and kept at out-of-session host servers. These applications are then attached to the operating system on demand.
- This provides no footprint on the OS and offers applications to be mounted via a virtual disk (dynamically). Refer to MSIX App Attach for more information on MSIX App Attach.
-
-
Application Display Name to be displayed to the user.
-
Application Path: The full path of the application exe. It is also possible to publish a shortcut file with the path to launch the application. The command line argument can be read from the shortcut file.
-
Application Internal Name: Actual name of the application.
-
Application Description: Description if required.
-
Application Command Line: The command line parameter will be used while launching the application.
-
Application Status: when Disabled, applications are not shown to the users though assigned.
-
Parent Folder Name (Applicable for MSIX App Attach type applications) This is the name of the folder in the VHD file that contains the expanded MSIX application. Refer to MSIX App Attach for more information.
-
MSIX Name (Applicable for MSIX App Attach type applications) This is the name of the MSIX package that is added inside the VHD file. Refer to MSIX App Attach for more information.
-
Volume GUID (Applicable for MSIX App Attach type applications) VHD packages are mounted on the session host server as virtual disks and have GUIDs associated with them. The creator of the VHD package provides this. Refer to [MSIX App Attach] for more information.
-
Application Icon:
-
Get Icon Automatically: To use the icon fetched from the application exe.
-
Use Default Icon: Use Accops HyWorks Default Icon.
-
Use Custom Icon: To browse and fetch custom icons for the application.
-
-
-
Click Next to proceed to the Additional Settings section.
-
In Additional Settings
-
User Context: Select a user context from the one a logged-in user uses to launch the applications.
-
Run As: Select the user context under which to launch the app.
-
Logged-in User: No change in user context. Use the logged-in user.
-
Different User: Specify the user account to launch the application.
-
System: Launch the application under the system account.
-
-
-
Folder Information: folder under which the application will be displayed on the client side.
-
Launch Settings:
-
Logout if no window: Some applications (like Explorer and IE) linger for some time before exiting. If this setting is enabled, the session will be logged out when there is no window in the session.
-
Specify Connection Profile: This must be configured if a specific connection profile must be used for application access.
-
Virtualization Profile: If this application should use any specific Virtualization profile to support Virtual IP.
-
Limit Total Concurrent Sessions: Specify the application's total number of concurrent sessions.
-
Limit Total Concurrent Sessions per Server: Specify a total number of concurrent sessions per server that should be allowed.
-
Limit Single Instance per user: Specify whether only a single application instance should be allowed for one user. If checked, the user cannot invoke the application instance more than once.
-
Auto Launch: The application should be auto-launched once the user logs in.
-
-
Access Settings: Defines from where the application can be accessible.
-
Portal and Client: Select this option to publish applications to be shown on the client and HyLite.
-
Create Desktop shortcut: Specify a location for the application shortcut.
-
Pin Applications to Start Menu: Specify whether the application starts menu shortcut should be created.
-
-
-
Click Next to proceed to the Select Teams & Servers section.
-
In Teams & Servers, select either Sessions Teams or individual Session server to publish an application. When a Session Team publishes an application, it is made available to all Session Hosts within this Team. When any new Session host is added to a Session Team, the application is automatically available from the newly added Session Host server.
Applications from their respective management sections can be added to Session Teams and Session Hosts.
Refer to Server Selection for Application publishing for information.
-
Click Next to process the Virtual IP Address.
-
In Virtual IP Address, configure the application's virtual IP address settings to deliver an application session with the virtual IP address. Refer to the Virtual IP Address section for more details.
-
Enable session virtual IP address: Set it to enable session virtual IP address support.
-
**If no virtual IP address is available, Block the session or allow it with the server IP address. If the virtual IP address is unavailable for a new session or the session virtual IP address setting is not enabled on the team, block the session.
-
**Apply a virtual IP address to specify whether the virtual IP address should be specified for all processes or specific processes.
-
All Processes: Session virtual IP address will be applied to all processes within a session.
-
Specified processes only:
-
Include: A virtual IP address will be assigned only to specified processes.
-
Exclude: Specified processes will not be assigned any virtual IP address.
-
-
-
Process list to be: Choose if the list of processed should be inclusions or exclusions.
-
Specify the process list: List comma-separated processes to be included or excluded. A maximum of 50 processes, each less than 255 characters, can be defined.
-
Session virtual IP address on the team: The session virtual IP address is set on the team; if it is not set on the team, then a blocked session or allowed session with the server IP address action will be taken as per the above setting.
-
-
Click Next to proceed to Entitlements.
-
In Entitlements, click Add to add entitlement and select Users/ Groups/ OUs or Pools (User-based)
-
Click Next to proceed to Client Group.
-
Classification Rules: Configuring the classification rules is optional to restrict shared hosted desktop or application access to only those users connecting from specific LAN, WAN, or MAC. Refer to Classification Rules for more details.
-
Click Save to complete the application creation process.
Once the application is saved, the administrator will be notified. The process list is merged when multiple virtual IP addresses are enabled for the remote app through the Applications section, and the application will be listed.
Notes For Application Details
Note
-
Application details (Full Path/ Internal Name and Icon) will be fetched automatically when the administrator types the application exe path and moves to the next tab (using key entry Tab or by using Mouse click). Refer Section:Get Application Details by Providing Full Application Path
-
This does not work for applications from Linux session host servers
-
The administrator can also navigate to the configured Session Host Server directory to browse and get the application details. See section Browse Application in Session Host Server Directory.
Notes For Virtual IP Address
Note
Remote App: The merging of the process list is a crucial aspect to understand. In the case of multiple virtual IP addresses enabled for the Remote app, the process list is merged. The policy of the last virtual IP address will override the previous policy, and the include and exclude lists will be merged with the previous policy applied.
Suggestions: 1. App/process from the same session team should have identical VIP settings. 2. Use the 'Specified processes only' option.
Application Publishing Facts and Concepts
Browse Application in Session Host Server Directory
Note
- Only applicable for Windows-based session host servers.
-
Select Session Team using the dropdown in Browse Application Details.
-
Select RDS Server.
-
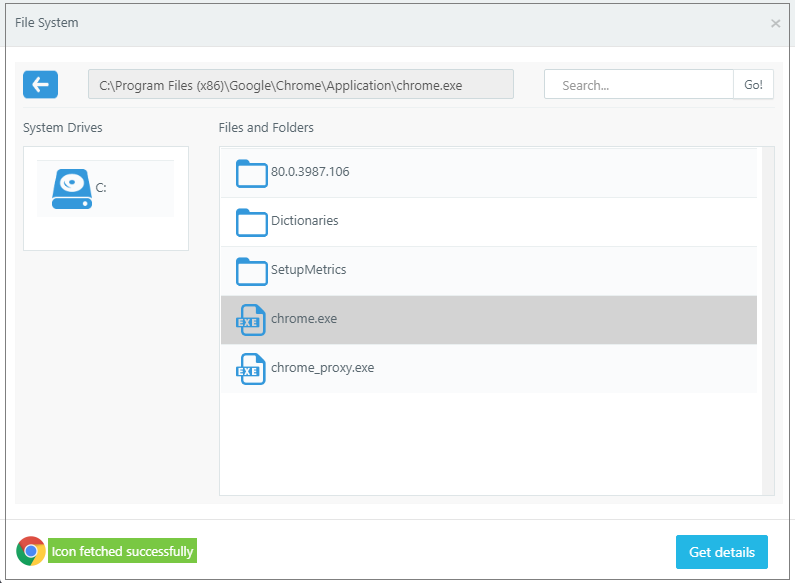
Click Browse to open the File System dialog.
-
Click any displayed drive in the File System dialog to navigate the application path.
-
Navigate to the folder where application exe can be found and select the application.exe (Google Chrome application is selected below image)
-
It automatically fetches the icon and shows a success message in the same dialog.
-
Click Get Details to go back to the Add Application wizard.
-
-
Application Path and Application Internal Name will be filled automatically.
Get Application Details by Typing the Full Application Path
An additional shortcut method is also available to get application details automatically.
In the Add Application wizard, type the full path of the executable file in the Application Path field. Change the focus using a tab or click on another field. All the application details (Full Path/ Internal Name and Icon) will be fetched automatically.
Server Selection for Application publishing
-
The list includes all the session host servers added to the current organization.
-
If the selected servers are session team members, the server will be selected according to the load-balancing mechanism while providing the application session.
-
If the selected servers do not belong to the same session team, the session will not follow any load-balancing mechanism, and it can be given from any server.
- If the Authorization server is built-in, the application session will be provided by the session host server to which the user belongs.
-
When selecting a server that does not have the application installed, it will be shown with a cross (X) and should not be selected.
- Selecting such a server will continue to give the application from the server, which may result in a failed session when given from the server.
Application-Specific Connection Profile
In HyWorks deployment, if a specific connection profile must be used for an application, that can be done by specifying the connection profile for the application.
Application-specific connection profile takes priority only when:
-
When the access mode in the connection profile is selected as Shell mode
-
In Remote App mode, an application-specific connection profile will only be used if that application is the first from the specific session host server. If the application is accessed after invoking any other application, applying a new connection profile won't be possible.
The connection profile for an application can be specified in the Additional Settings section of the Add or Edit Application wizard.
Application in Shell and RemoteApp mode
Applications can be accessed in RemoteApp or Shell mode as follows:
-
Shell mode: The published application is opened in the shell (Black background), where only accessed applications are shown. For each application instance, a separate RDS session is created.
-
Shell mode is more user-friendly in HyLite, which creates a new tab for new RDS sessions, and thus, different applications are available in different tabs.
-
Shell mode is recommended when None in the folder is accessed from the HyWorks client for Linux or MAC platforms.
-
-
RemoteApp mode: Seamless application mode, which appears like native applications. Multiple instances of applications in RemoteApp mode can be opened from a single RDS session.
- Remote App mode gives a better user experience while accessing HyWorks Client on Windows platforms.
How to enable Shell/RemoteApp mode: To enable specific mode:
- Add/ Edit a connection profile.
- Go to the Application Access Settings screen.
- Configure the Application Launch Mode as the required access mode for the Remote App or Shell.
- Assign connection profile to application.
If only Windows-based clients are the default profile, it can be used with RemoteApp mode. Similarly, if only HyLite-based deployment is preferred, the connection profile can be modified to use Shell mode.
Always Seamless and Never Seamless Access Experience
Seamless mode refers to the access experience where the user is shown a progress bar until the session is prepared on the session host server. Thus, the user gets a seamless experience.
Never Seamless mode displays a window with all session loading information showing always, and after the application is launched, the window will still be there as a parent window.
Use Cases for configuring never seamless mode:
-
The application launch is not working.
-
User input is needed to complete the login process, but the seamless mode does not show that, and thus, the session fails to launch the application.
How to configure Never Seamless mode
-
Add/Edit connection profile.
-
Go to the Application Access Settings screen.
-
Set Session Experience Option as Never Seamless.
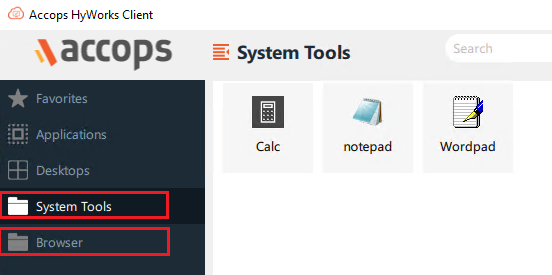
Using Folders to Categorize Applications
Administrators can choose to categorize the applications, as they will be shown on the client side by putting applications in a container called a Folder.
-
The Create Application or Edit Application wizard can only create or modify folders. To create a new folder, select Create New in the Folder Information section and provide the appropriate name for the folder.
-
To use an existing folder, select the Use Existing option in the Folder Information section of the Additional Settings screen of the Add or Edit Application Wizard. A dropdown list with all existing folder names will then be displayed.
-
Administrators can choose to edit an existing folder by clicking on Edit. The folder name will be modified with the new name provided in the Edit Folder wizard.
When a user logs in from the HyWorks Client, the applications will only be shown in respective folders.
Note
- Folders, once created, cannot be deleted. However, applications can easily be moved out by selecting the folder as None.
Publishing Application for Shared Hosted Desktops only/ Desktop Customization/ HyShell
Use HyWorks desktop customization when users are given full desktop access, but only those applications published and assigned to them are displayed on their desktops.
Desktop customization refers to a process where a user's session on a shared hosted desktop is customized to show application shortcuts on the desktop and start menu for ease of access.
To enable desktop customization, the following two changes must be made:
-
Enable desktop customization on shared session hosts
-
Windows Session Host Servers:
-
Registry Location:
HKLM\SOFTWARE\Accops\Controller\EDC\SESSIONHOST
-
ISDESKTOPCUSTOMIZATIONENABLED set as TRUE
-
Restart HyWorks Session Host service
-
-
Linux:
-
Connect to the Linux SHD server via SSH Client(if ssh is enabled) or console session.
-
Open the HyShell configuration file.
sudo vi /etc/edcdvm/linuxDVM/hyShell/hyshell.config
-
Set the value for IS_HYSHELL_ENABLED to 1.
-
Restart the DVM Agent Service by using the following command,
sudo systemctl restart edcdvm
-
-
-
Configure Applications for HyShell
While HyShell has been enabled on shared session hosts, applications can be configured to be enabled for HyShell; follow the below steps:
-
Go to the Additional Settings screen in the Application Add/Edit wizard.
-
In the section Access Settings: Define from where the application can be accessible. The following options are available for Publish the Applications on:
-
Create Desktop shortcut
- On Shared Hosted Desktop: If desktop customization or HyShell is enabled on session host servers, these published application shortcuts will be created on the user's shared hosted desktop. Refer to the HyShell for more information.
-
Pin Applications to Start Menu:
- On Shared Hosted Desktop: Select this option to pin application shortcuts on the shared hosted desktop.
Refer to **[HyShell for more information on the above options.
-
-
Save the application; shortcuts will be created during the user's desktop session.
-
Important
- HyShell supports only those application shortcuts in session, which are assigned to the user and published from this server. If any application is not available or published on the current server, it will not create the shortcut.
- Linux Session Host Server: HyShell is supported with Accops delivered Linux SHD OS only. Vanilla xUbuntu images configured as session host server do not support desktop customization using HyShell
Manage Applications
View Published Application
Go to Apps > Virtual Apps to view the list of published applications.
| Sr. No. | Column Name | Description |
|---|---|---|
| 1 | Application Name | Displays the name of the application. |
| 2 | Folder Name | If the application is kept under a specific folder. |
| 3 | Description | Application description. |
| 4 | Session Settings | Connection profile, if any specific connection profile is provided. |
| 5 | Application Status | Enabled/ Disabled |
| 6 | Defined In | If the application is defined at the current organization level, This means it has been published in that organization. |
| 7 | Platform/ Type | Windows or Linux as icon/ Installed App or MSIX App Attach. |
View Application Configurations
Click Application Name from the Application list or select an application and click View Details. The application will be opened in read-only mode for viewing configurations.
An option to edit is also provided in read-only mode to enable application editing using the same wizard.
Edit Applications
The Edit application wizard can be used to modify the configurations of an existing application. Applications can be opened in Edit mode, and the following two methods can be used:
-
Go to Apps > Virtual Apps, select the application, and click Edit.
-
Update the required information.
Copy Application
Copying an application enables administrators to clone the same application with similar configurations and entitlements quickly.
-
Go to Apps > Virtual Apps.
-
Select Application from the list and click Copy.
-
Copy Application dialog will be displayed to provide a new name for the new application. The default name uses the format Application Name-Copy.
-
Provide the appropriate name and click Save.
-
The new application will be created by cloning an existing application with the provided name and displayed in the list.
Delete Application
-
Go to Apps > Virtual Apps.
-
Select Application from the list and click Delete.
Deleting an application will have the following impact on user sessions:
-
New Sessions: Users on fresh logon won't be displayed with deleted applications
-
Existing Sessions:
-
Users who have already logged in:
-
Deleted applications will be deleted when the application list is refreshed.
-
The error No Apps Found will be displayed when clicking on the application name.
-
-
Users with running sessions of the applications will continue to use the application until the user logs out or the session expires as per configured timeouts.
-
Disabling Application
Instead of deleting an application, it can be marked as Disabled. Disabling an application can have a similar impact as deleting it, except the application can be enabled in the future with the same configurations.
Impact of disabling an application:
-
New Sessions: Users on fresh logon won't be displayed with disabled applications
-
Existing Sessions:
-
Users who have already logged in
-
Disabled applications will disappear when the application list is refreshed.
-
When clicking on the application name, the error 'Application is disabled by administrator' will be displayed.
-
-
Users with running sessions of the applications will continue to use the application until the user logs out or the session expires as per configured timeouts.
-
To disable an application, the following steps can be used:
-
In the Add Application wizard, keep the Application Status as Disabled.
-
Select an application and click Edit. In the the Entitlements section remains until it is assigned with at least one application or it is assigned with a Edit Application wizard, Set Application Status as disabled.
Exporting Applications
HyWorks Controller can export CSV of all published applications in the current organization from the management console. To export CSV of applications:
-
Go to HyWorks Controller Management Console > Apps > Virtual Apps.
-
Click Export.
-
Select the Encoding type and columns.
-
Click Export.
-
CSV with details of all applications will be downloaded.
Application Entitlements Management
The Entitlements section under Policies can be used to manage application and connection profile assignments to the following objects:
-
Users
-
Groups
-
OUs
-
Pools
This section will describe the management of entitlements for these objects.
Users
The Users section in the Policies > Entitlements menu displays the current entitlements of the users and can be used to manage entitlements and connection profile assignments.
Viewing User Entitlements
Navigating to the Users tab in the Entitlements screen displays the list of users with one or more application entitlements or assigned connection profiles.
The following information is displayed in respective columns:
-
Username: Username of the user.
-
Connection Profile: Assigned connection profile.
-
No. of Applications: Number of applications assigned to the selected user.
-
Authorization Server: Auth server details from where users are fetched.
Administrators from the Users section under Entitlements can also search user entitlements by providing the appropriate search string in the provided search box.
Viewing Entitlements of a Single User
To view the entitlements of any specific user:
-
Select a single user from the Users list and Click View Details or Click on username.
-
All entitlements to the user will be displayed in the following two sections.
-
the applications directly assigned to the user.
-
The application is assigned to the user through a group or OU.
-
Note
-
From Users tab in Entitlements section, applications directly assigned to user can be deleted.
-
On client side, only the final set of applications (removing duplicate assignments through groups or OUs) are shown.
Add User Entitlements
To add new user entitlements, follow the below process:
-
Go to Entitlements > Users section.
-
Click Add Entitlement
-
In Users > Add Entitlement wizard.
-
Click Add Users.
-
The available Clients dialog will be displayed; search with the appropriate search string to get the user list.
-
Select intended users and Click OK.
-
Selected users will be added in the Add Entitlements wizard.
-
-
Click Next to proceed to the Applications screen.
-
In the Application screen, select applications to be assigned to the selected user(s).
-
Click Next to proceed to the Connection Profiles screen.
-
On the Connection Profiles screen:
-
Select any appropriate connection profile to be assigned to users.
-
Keep connection profiles unchecked if no specific connection profile must be assigned.
-
-
Click Save to save the entitlements.
-
All user entitlements will be saved, and the Users screen will now start displaying the list of users with entitlements.
-
On login, the user will be shown all assigned applications.
Edit User Entitlement
Like adding user entitlements, the administrator can also modify the user entitlements as well. To alter the entitlements of a user:
-
Select a single user from the Users list and Click Edit Entitlement.
-
A list of assigned applications will be displayed with selected checkboxes, and unassigned applications will be listed with unchecked checkboxes.
-
Select or deselect applications as per requirement.
-
Click Save to save entitlement changes.
-
Application entitlements will be updated, and user entry in the entitlements list will now be displayed with the respective application count.
-
The user will be displayed on a new login, with an updated list of applications.
Remove Entitlement
A user's entitlements can be removed by using the following steps:
-
Select a single user from the Users list and Click Remove Entitlement.
-
Confirm Action dialog will be displayed. Click Delete to continue removing the entitlements.
-
User entitlements will be removed, and if a user is not assigned a connection profile, its entry from the Users section under Entitlements will also be removed.
Note
Entry of a user/group or OU in Entitlements section remains until it is assigned with at least one application or it is assigned with connection profile.
Assign Profile
The administrator can also assign any specific connection profile to one or more users by following the below steps:
-
Select one, more, or all users displayed in the section under Entitlements.
-
Click Assign Profile.
-
The Connection Profiles dialog will display a list of connection profiles.
-
Select the appropriate connection profile and Click Save.
-
The Connection Profile will be assigned to all the selected users and applied in the user session on the next logon.
Unassign Profile
Like assigning profiles, administrators can also unassign connection profiles from a single user, multiple users, or all users listed in the section under Entitlements. Follow the below steps to unassign connection profiles from user entitlements:
-
Select one, more, or all users displayed in the Users section under Entitlements.
-
Click Unassign Profile.
-
Connection profile will be unassigned, and now users will be listed with no connection profile entry against them.
Important
If users are not having any entitlements, then on un-assigning the connection profiles, their entry from Entitlements section will be removed.
Groups
The Groups section in the Entitlements menu displays the current entitlements to the groups and can be used to manage entitlements and connection profile assignments.
All operations for group based entitlements remain same as specified in section Users above.
Following operations on group entitlements can be performed:
-
View List of Group Entitlements.
-
View Application Entitlements of a group.
-
Add Group Entitlement.
-
Edit Group Entitlement.
-
Remove Group Entitlement.
-
Assign Profile.
-
Unassign Profile.
OUs
OUs section in Entitlements menu, displays the current entitlements to the OUs and can be used to manage entitlements and connection profile assignments.
All operations for OUs-based entitlements remain same as specified in section Users above.
Following operations on OUs entitlements can be performed:
-
View List of OUs Entitlements.
-
View Application Entitlements of an OU.
-
Add OU Entitlement.
-
Edit OU Entitlement.
-
Remove OU Entitlement.
-
Assign Profile.
-
Unassign Profile.
Pools
Direct application entitlements to a desktop pool can be managed from the Pools section under the Entitlements menu if it satisfies the following conditions:
-
If it's a USER-BASED desktop pool.
-
It's a Shared Hosted Desktop pool.
Making the entitlements to the desktop pool indirectly assigns the applications to all the users belonging to the desktop pool.
All Pool-based entitlement operations remain the same as specified in the Users section above.
Following operations on Pools entitlements can be performed:
-
View List of Pools Entitlements.
-
View Application Entitlements of a Desktop Pool.
-
Add Pool Entitlement.
-
Edit Pool Entitlement.
-
Remove Pool Entitlement.
-
Assign Profile.
-
Unassign Profile.
Application Sessions Management
Now that previous sections have covered all the details for submitting applications, this section will provide details for administering application sessions.
Application access details in User Sessions
Whenever a user connects to HyWorks and accesses published applications, the count is reflected on the User Sessions page. For example, if a user has initiated three application instances, the Application Sessions column will show as 3.

Application Sessions Detailed View and Management
Go to Monitor > Live Sessions > App Sessions, which will offer all the details of applications accessed by end-users.
Provider Session: It is equivalent to a session ID on the session host server, in which one or multiple application sessions can run. For example, a provider session with running calculator and notepad applications in remote app mode under it.
App Sessions: An instance of the application running under provider session. Notepad running in provider session.
Information available in the App Session Section
| Sr. No. | Column Name | Description |
|---|---|---|
| 1 | Username | Displays the username of the logged-in user |
| 2 | IP Address | The IP address of the server from the app session is provided |
| 3 | Session ID | Remote Desktop Server session ID of the user |
| 4 | No of Applications | Count of application sessions |
| 5 | Connection Profile | Connection profile applied on application session |
| 6 | Status | Status of App session, which could be Running/Initializing/ Disconnected |
| 7 | Remote Control | to perform session shadow on application session |
Clicking on username, expands the details of app sessions running for the user and following information is displayed for application sessions:
| Sr. No. | Column Name | Description |
|---|---|---|
| 1 | Application Name | Display name of the application, accessed by user |
| 2 | Server name | Name of session host server on which remote session (app session) is running in |
| 3 | Virtual IP Address | Displaying virtual IP address assigned to application. If not enabled then VIP column will have value as Not Available |
| 4 | Status | Status of app session, which could be Running/Initializing/ Disconnected |
Application Session Removal
Administrator can choose to remove specific application sessions and the section enables administrator to remove all the application sessions from all session host servers or terminate specific application sessions.
-
Terminate Specific Application Session: To terminate specific application session for a user, below mentioned steps can be used:
-
Go to Monitor > Live Sessions > App Sessions.
-
Click Username (User whose application session needs to be terminated).
-
This will expand and display the list of the application sessions running for the user.
-
Select the application needs to be closed.
-
Click Remove App Session(s)
-
On Confirm Action dialog,
-
Select option Show message to specify custom message to be displayed to user while terminating the app session.
-
Specify Wait Time in minutes to allow user to keep the session for the specified time.
-
Click Remove.
-
-
Selected remote app session will be closed and user will be notified as per specified options in Confirm Action dialog Administrator can opt to remove single or multiple app sessions at a time.
-
-
Terminate Provider Session or Remove RDS Sessions of a user: In certain situations, administrator can opt to remove all application sessions of a user, termed as provider session removal. To remove provider session of a user, following steps can be used:
-
Go to Monitoring > Live Sessions > App Sessions.
-
Select the Username (User whose application sessions/ provider sessions need to be removed)
-
Click Terminate Process(s)
-
Click Remove on Confirm Action dialog
-
User remote session from all the session host servers will be completely removed.
-