Clipboard, File Transfer, and Drive Redirection with HyWorks
The document provides information on mechanisms to transfer files or content to/from remote servers to client systems.
HyWorks supports the following methods:
-
Clipboard Redirection
-
Drive Redirection
-
Accops File Transfer
Clipboard Redirection
Clipboard redirection allows the client desktop's local clipboard to perform clipboard operations in remote sessions.
Default or Native Clipboard Redirection
HyWorks comes up with default clipboard redirection. This mechanism allows clipboard redirection from both directions and can not be controlled.
How to enable clipboard redirection: Clipboard redirection can be enabled from the HyWorks Connection profile.
To enable clipboard redirection:
-
Navigate to Local Resources in the connection profile.
-
Select the Clipboard option.
How to disable clipboard redirection from Windows Server: The following group policy can be used on Windows servers to control clipboard redirection at the server level:
-
Navigate to Computer Configuration > Administrative Templates > Windows Components > Remote Desktop Services > Remote Desktop Session Host > Device and Resource a Redirection.
-
Do not allow Clipboard redirection option:
-
Enabled: Clipboard redirection will not work.
-
Disabled: Clipboard redirection will work.
-
Not configured: Clipboard redirection will work as per the connection profile configuration.
-
Limitations
Sharing content through clipboard redirection has the following consequences:
-
No control over content type.
-
Unidirectional controls are not possible.
-
No logging or monitoring of copied content.
-
Files can also be transferred by default.
To overcome these and some more challenges, Accops Smart Clipboard and File Transfer features (v3.4-SP2 or later) can be used.
Smart Clipboard and File Transfer Control for VDI
As remote work grows, organizations must ensure that data sharing is secure, adheres to internal policies, and remains efficient. This requires managing the direction of data flow, restricting the data types that can be transferred, and setting size limits to prevent performance issues or security risks.
To meet the demand for secure and controlled data transfer in Virtual Desktop Infrastructure (VDI) environments, HyWorks offers a solution that utilizes the Accops client-server extension module to manage clipboard and file transfers.
This centralized solution allows administrators to configure, control, and enforce policies across all client and server endpoints. It ensures consistent data flow, restricts data types, and limits file size to enhance security and maintain performance.
Here, we will look into the configurations of:
Prerequisites:
-
Administrative credentials are required to access HyWorks version 3.5.0.19765, the controller’s management console.
-
Accops Workspace Client version 7.0.0.1042 or later.
Note
- The feature is currently supported with Windows desktop Workspace client only. The document will be updated as the feature support is extended to other platforms.
-
Accops Session Client Extension Version 3.5.0.51 or later.
-
Session Host Server version 3.4.1.138 or later
-
DVM version 3.4.0.1109 or later
-
AUEM version 3.4.0.370 or later
-
Accops server extension version 3.4.0.34 or later
-
Accops Smart Clipboard Configuration (Windows Only)
Smart Clipboard Configuration controls provide security and flexibility in transferring clipboard contents between the client machine and the remote desktop.
Configuration on HyWorks Controller
The following configurations must be done on the HyWorks Controller’s management console.
-
Log in to the management console using administrative credentials.
-
Navigate to Policies > Profiles > Connection Profiles.
-
Select the profile in which the Smart Clipboard Configuration needs to be configured and select Edit.
-
Navigate to Local Resources. Select Local Drives and Resources > Accops Smart Clipboard (Windows Only) option.

-
Configure options as per requirements. The Field descriptions are provided below.
-
Save the connection profile.
- The configured setting will be applied in the next session of the user.
Field Specifications
The details of the configuration parameters are given below.
-
Content Type Selection: This section helps the admin decide whether to allow or deny textual or visual content transfer.
-
Text: Allows the transfer of text content.
-
Image: Allows the transfer of image content.
-
Max Transferable Content Limit: The admin can set a maximum size limit for content transfers. Specify an integer value in KB, MB, or GB to set the maximum permissible data transfer size. File sizes are allowed from 1 KB to 2147483647 KB, with a default of 512 KB.
-
-
Allow Copy from: Decide the direction of the data transfer. The choices are:
-
Both Directions: Allows unrestricted clipboard access for bidirectional content transfer.
-
Client to Remote Desktop: Allows one-way clipboard transfer from the client to the remote desktop.
-
Remote Desktop to Client: Allows one-way clipboard transfer from the remote desktop to the client devices.
-
-
Send Logs to ARS: Enable/disable the checkbox to send the file audit logs to be sent to the Accops Reporting Server (ARS). This enables centralized log management to monitor and analyze file access and activities, enhancing security and compliance measures.
Important Points
-
If both the Remote Session Default Clipboard and the Accops Smart Clipboard (Windows Only), clipboard options are enabled, then the Accops Smart Clipboard option will take priority and will be used.
-
Accops Smart Clipboard does not by default allow file transfer, but enables only clipboard content transfer. To enable file transfer Accops Smart File Transfer can be configured.
Accops smart file transfer (Windows only)
File transfer controls provide security and flexibility in managing file transfer between the client machine and the remote desktop.
The functionality is based on specific requirements, such as security policies, content size limitations, and permitted content types.
Steps to configure File transfer options:
The following configurations must be done on the HyWorks Controller’s management console.
-
Log in to the management console using administrative credentials.
-
Navigate to Policies > Profiles > Connection Profiles.
-
Select the profile in which the Smart Clipboard Configuration needs to be configured and select Edit.
-
Navigate to Local Resources. Select Local Drives and Resources > Accops smart file transfer (Windows Only) option.

-
Configure options as per requirements. The Field descriptions are provided below.
-
Save the connection profile.
- The configured setting will be applied in the next session of the user.
Smart File Transfer Field Specifications
The details of the configuration parameters are given below.
-
Allow Transfer from: Decide the direction of the data transfer. The choices are:
-
Both Directions: Allows unrestricted clipboard access for bidirectional content transfer.
-
Client to Remote Desktop: Allows one-way clipboard transfer from the client to the remote desktop.
-
Remote Desktop to Client: Allows one-way clipboard transfer from the remote desktop to the client devices.
-
-
Max Transferable File Size: The admin can set a maximum size limit for content transfers. Specify an integer value in KB, MB, or GB to set the maximum permissible data transfer size. File sizes are allowed from 1 KB to 2147483647 KB, with a default of 512 KB.
-
Allowed File Type: Set allowed file extensions for transfers between the VDI and the client, allowing only specified extensions and blocking others. The admin can list extensions separated by commas.
-
Blocked File Type: Set restricted file extensions for transfers between the VDI and the client, blocking only the specified extensions and permitting the others. The admin can list extensions separated by commas.
-
Compression Disabled for File Types: Some files are already compressed, so additional compression will not significantly reduce their size. To save resources and processing time, it is advisable to disable compression for these file types. Examples of such files include ZIP, TAR, 7Z, TGZ, EXE, MSI, and RAR.
-
Timeout Duration: Set a time limit in integers for file transfers, with a default value of 5000 milliseconds. This feature ensures that transfers automatically stop if they exceed the specified limit, thereby enhancing the efficiency and reliability of file transfer operations. The available options for time units include MS (Milliseconds) and Sec (Seconds).
-
Send Logs to ARS: Enable/disable the checkbox to send the file audit logs to be sent to the Accops Reporting Server (ARS). This enables centralized log management to monitor and analyze file access and activities, enhancing security and compliance measures.
Options in Session for users
This section provides details on what options are provided to the end-user inside of the remote session.
-
For Clipboard
-
The Paste from remote desktop option will be displayed on the right-click context menu on the client system when a user is copying content from the remote computer.
-
The Paste to remote desktop option will be displayed on the right-click context menu on the remote system when a user is having content copied from the client system.
-
-
For File Transfer
-
The Upload File from Local Computer option will be displayed in the right-click context menu on a remote computer.
-
The Download File to Local Computer option will be displayed in the right-click context menu on a remote computer when clicking on some files.
Drive Redirection
Drive redirection in Accops HyWorks allows users to access their local computer's drives (like hard drives, USB drives) from within their virtual desktop session, essentially "redirecting" the drive to the remote environment so they can read and write files to it as if it were directly connected to the virtual machine; this functionality is typically managed through Connection profiles in Policies section. More details can be found in the Connection Profile section.
Advance Drive Redirection
With the native drive redirection enabled the same RDP port is used for RDP data transfer and drive data transfer affecting the performance of both. To overcome the limitations of native drive redirection, integration of Advance Drive Redirection has been done, enhancing performance and user experience for the users.
Advance Drive Redirection uses SSHFS on a separate TCP connection for drive operations without interfering with RDP session.
Prerequisites
Software Requirements
Additional drive redirection requires internet access to install dependency softwares. Details can be found here.
Version Compatibility
-
HyWorks Controller version: Should work with v3.4 or later. Tested with v3.5.
-
HyWorks Session Host Server: v3.5.0.147 having below integrated modules.
-
Session Server Extension: 3.5.0.36
-
AUEM: 3.5.0.397
-
Eltima: 10.0.2520.0
-
Diagnostics Tool: 3.4.0.21 OS Support
-
-
Client Platform: Windows only
- Windows Workspace Client Version: 7.1.0.1025
OS Support
-
Windows server 2019 or above
-
Windows 10 build 1809 or later
- The Internet should be available on VM/Client during installation.
Additional Network Requirements
- Port 22 is required to be opened for the server published via HySecure.
Configurations and Workflow
To enable and make Advance redirection feature following component installation and configuration will be needed:
-
Windows Workspace Client Installation: Detailed steps can be found here.
-
Accops HyWorks Session Host Server
-
Accops HyWorks Connection Profile Configurations:
-
Disabling native drive redirection.
-
Setting up advanced drive redirection.
-
Detailed steps can be found here.
-
-
HySecure configuration to enable network port access: Details can be found here.
Workflow Verification
Once all the above prerequisites are done, the following steps can be taken to verify and use the advanced drive redirection:
Steps:
-
Login to client with a user.
-
Launch the VM to which the connection profile is assigned.
-
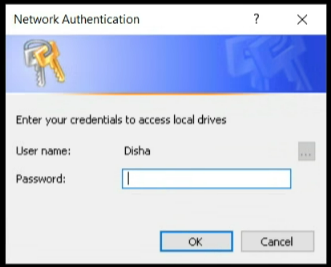
It takes sometime (Approx 5-10 secs) after session gets connected to complete drive redirection compatibility check. An authentication prompt is displayed, asking for credentials of base (client) machine for drive redirection.
-
Now enter the password and open the directory and check if the drives are redirected.
-
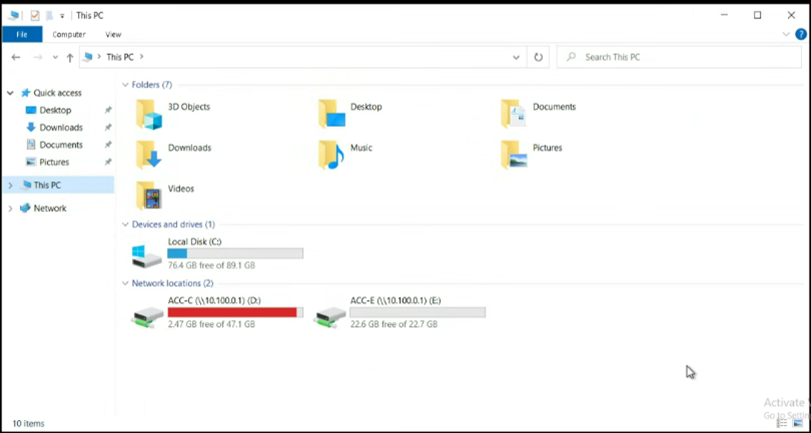
The Drives will be visible to a user as shown in the screenshot below:
Installation and Configurations
Session Host Server
Install Instructions
-
Basic installation steps are same as mentioned in document Session Host Installation
-
The only change in the installation is in component selection, where option to install Advance Drive Redirection (SMB) is added.
-
On selecting Advance Drive Redirection (SMB), a prompt will pop-up to confirm the internet availability on the server.
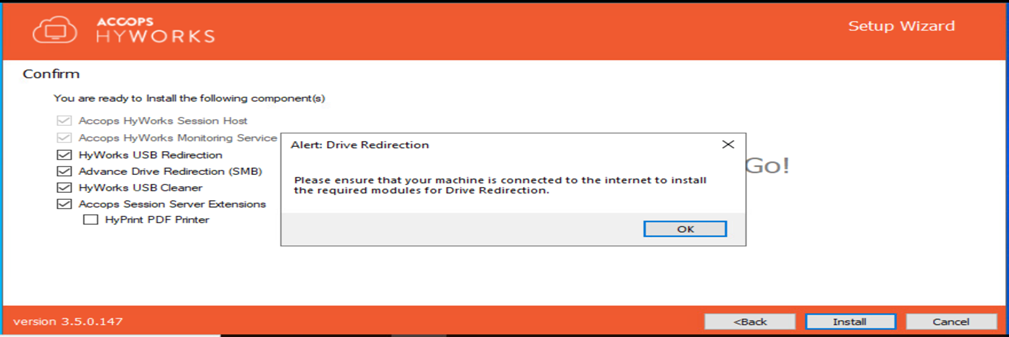
- It automatically downloads dependencies (i.e., OpenSSH Client and Serer Modules) and installs (Location: C:\Windows\System32)
Enable Advance Drive Redirection
Follow below steps for enabling advance drive redirection on session host server:
-
The following customization needs to be done on Windows session host server to get new drive redirection enabled desktop environment:
-
Enable the drive redirection:
-
Location:
Computer\HKEY_LOCAL_MACHINE\SOFTWARE\Accops\DVMAgent\ADVANCE SETTINGS -
EnableRequestRedirection: Set as True (default False)
-
-
-
Restart the HyWorks Desktop Agent service.
Windows Workspace Client
Accops Workspace client: Version: 7.1.0.1027 or later
Installation Steps:
-
Download the Workspace Client exe from the provided link.
-
Run the exe with administrative rights.
Note
While installing client the internet must be available on the system, where client is being installed.
-
Click Next after confirming the version mentioned on installer exe.
-
Agree on the license page to proceed with the installation.
-
Select the installation mode you want the client to be in.
-
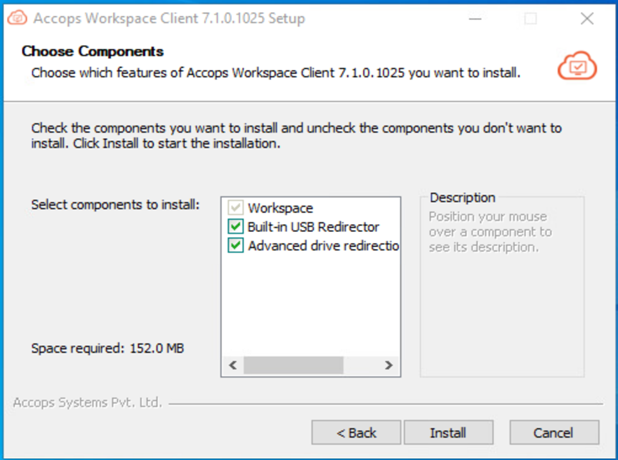
Select the components you want to install.
-
Make sure to select the Advance Drive Redirection option and click on Install.
-
Built-in USB redirection drive module can be installed or ignored based on the requirement of USB redirection from endpoint to the remote server.
-
-
Reboot the machine and then client machine should be ready for the advance drive redirection.
HyWorks Controller: Connection Profile
-
Login to HyWorks MMC.
-
Navigate to Policies there under profiles open Connection Profiles.
-
Select a profile for which you want to configure Advance drive redirection.
-
Edit the connection profile and go to local resources page and uncheck the Drives option under Local Drivers and Resources.
Warning
Keeping Drive redirection on from local resources will result in enabling of both native and advance redirection.
-
Now scroll down to the last on local resources page and check the Allow third party plugins.
-
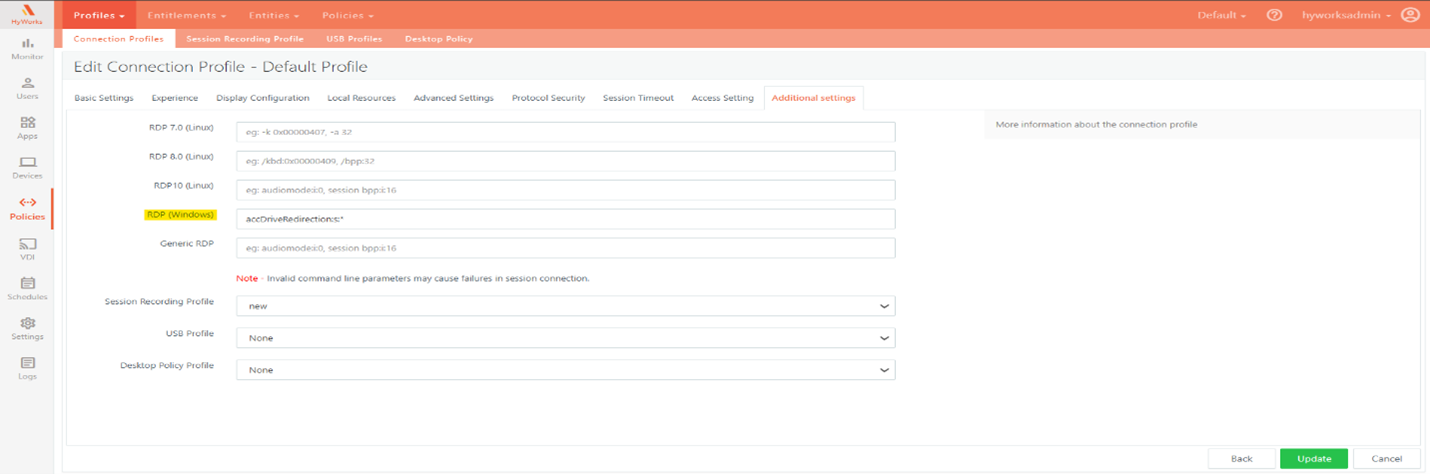
Now go to Additional settings page and in the RDP (Windows) enter
accDriveRedirection:s:*.*inaccDriveRedirection:s:*refers that all the drives present in the base machine will get redirected to the remote machine)
HySecure Configuration
-
Login into the client as an SO user and access the management console.
-
Navigate to Apps > Add application and create an application for application server as shown below:
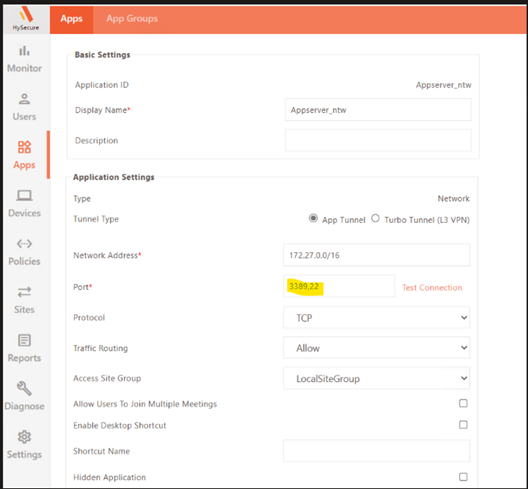
-
There will be no changes while creating the controller application, it will be same as earlier.
-
Assign these two applications (controller and application server) to the user and create an ACL.