New Features
Access Control
Advance Email Alert for application access ACL expiry
Advance Email Alert configuration features provides the option to get Email alert before Access Control Policy expires for the users. In this feature, Users and Security Officer/Administrator will receive an Email alert regarding Access control policy on the defined day prior to expiry date of Access control.
Note
Advance Email Alert for Access control Expiry feature is only applicable to "Application Access" type Access Control
Email Alert Recipients: Below mentioned users will get Email Alert for Access control expiry.
-
Security Officer
-
Administrator
-
Active Directory/LDAP/Native Users: Advance Email Alert for Access control Expiry will be sent to end users only if they have logged into HySecure at least once after upgrade patch is applied.
Note
Monitoring User will not receive Advance Email Alert for Access control Expiry.
Authentication & Authorization
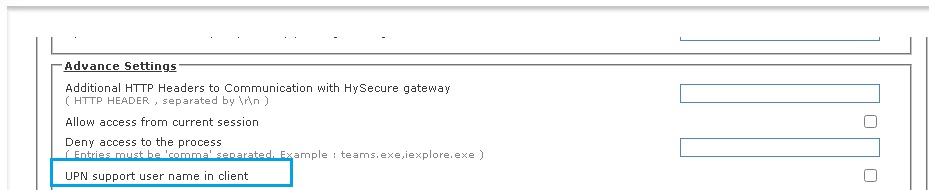
UPN based login support
In this build, we have added support for UserPrincipalName based login. To configure UserPrincipalName based login administrator needs to do following changes in HySecure management console:
a) Access HySecure Management console using security officer account.
b) Go to Auth. Management Authentication Server.
c) Change User search attribute from "SamAccountName" to "UserPrincipalName".
d) Security Officer can configure UserPrincipalName by two methods:
i.  Use the domain name entered by user: In this method, domain name
    entered by user will be used for login. User need to enter
    his/her login name in UPN Format: username\@domain name.

ii. Use the domain name entered here: In this method, domain name
    entered here will be used for user login. User need to enter
    his/her login name in UPN Format: username. Domain name will be
    automatically added by HySecure gateway.
To enable UPN based login from HySecure client, additional settings is required apart from UPN configuration in authentication domain. Enable below option in client settings to enable UPN based login from HySecure client.
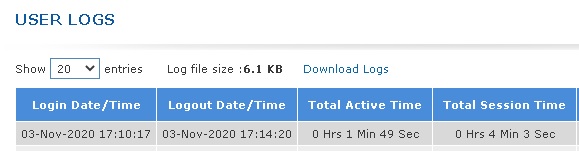
Logging of active user session
In this build, we have provided support to log the active session out of total user session.
This active user session will be calculated by subtracting idle timeout of the user from user's total session time.
Total session time of a user = User logout time -- User login time
Active User session = Total session time of a user -- Idle time of a user
Accops Directory Server support
In this build we have provided Accops directory server support to authenticate application securely with two factor authentication. This method will be helpful to integrate two factor authentication for the application where two factor authentication is not supported by default.
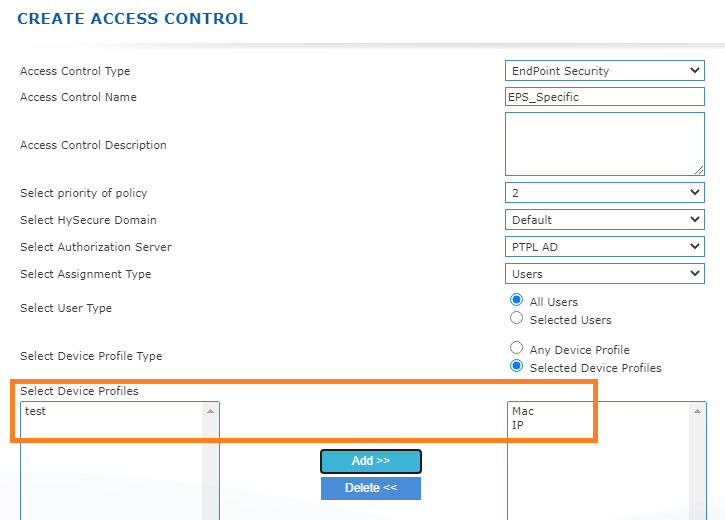
Enforcement of specific device profiles at user/ user group level
In earlier build, Endpoint security was applied over HySecure domain level. Now we can apply device profile of endpoint security at user/ user group level. User/ user group will be able to login only if device fulfills one of the selected device profiles. To enforce specific device profiles at user/ user group level follow below mentioned steps:
-
Login into HySecure management console as Security Officer.
-
Go to Access Management Access controls.
-
Click on Add and select "Endpoint Security" as Access control type.
-
Select the HySecure domain and respective Authorization server.
-
Select the user/ user group for whom access from Hylite/HySecure client will be authorized.
-
Select the device profile to be applied on user profile.
-
Click on submit.
SAML Identity Provider Authentication in HySecure gateway
In this build, we have added support of SAML Identity provider with HySecure gateway. In this mode, HySecure gateway will act as Service provider.
Configu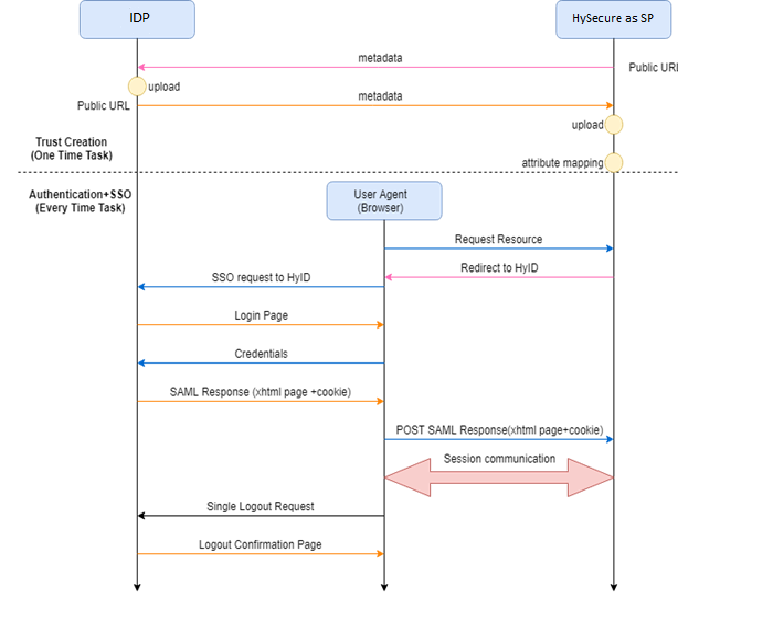
Configuring SAML IDP Authentication in HySecure gateway
The process to enable SAML based external IDP server is as follows:
-
Add SAML IDP as authentication server in HySecure
a. Using IDP Metadata file or manually configure the settings
-
Configure Accops HySecure as SAML SP in SAML IDP configuration
a. Using Accops SP Metadata file or manually configure the settings.
[Follow below steps to add SAML IDP in HySecure:]
-
Get the IDP metadata from the SAML IDP which needs to be integrated.
-
Login to HySecure and access the management console.
-
Go to Auth Management Authentication servers Add.
-
Select the authentication server type as SAML IDP.
-
Upload the IDP metadata.
-
SAML response attributes need to be defined on the portal.
-
Save the configuration form.
-
Option to download Accops HySecure SP metadata will be enabled against the IDP.
-
Download the metadata from the list of authentication servers and import the metadata file in IDP.
| Sr No | Setting Name | Description |
|---|---|---|
| 01 | IdP Issuer URI | Unique identifier of the IDP server. This is a string value or a URI and must match the IDP identifier on the IDP server. |
| 02 | IdP Single Sign ON URL | Authentication URL of the IDP server. SAML SP will redirect unauthenticated users on this URL |
| 03 | IdP Signature Certificate | This is the public certificate of IDP which is shipped with IDP metadata. This is used to verify the signature of SAML response that comes from IDP |
| 04 | Request Binding | SAML 2.0 has the following binding · HTTP Redirect Binding · HTTP POST Binding · HTTP Artifact Binding HySecure supports HTTP Redirect and Post bindings. For SAML SP Initiated HTTP Redirect is used. It is recommended to set this value to HTTP Redirect Binding |
| 05 | Request Signature | Whether the SAML *AuthNRequest* Request send by SP needs to be signed or not, if it is enabled the signature is added in the SAML AuthnRequest. It is recommended to keep this checked |
| 06 | Response Signature Verification | This field or selection signifies on what parameters signature will be created It can be on one of the following parameters a. Response b. Assertion c. Response + Assertion It is recommended to keep the value as *Response* |
| 07 | Response Signature Algorithm | Which signature algorithm needs to be used should be selected here. Following are supported a. SHA1 b. SHA256 SHA256 is recommended algorithm. |
SAML Service Provider support in HySecure gateway
In this build, we have added support of SAML based web application access like Office365, Salesforce through HySecure gateway.
Configuring SAML Web Apps in HySecure gateway
Follow below steps to configure SAML based Web apps in HySecure gateway:
-
Login into HySecure management console.
-
Go to Access management Applications.
-
Click on add application and select App type as HTTPS
-
Enter Web application address, Application port and other details.
-
In User options, select Authentication type as SAML based and Select preconfigured service provider appropriately.
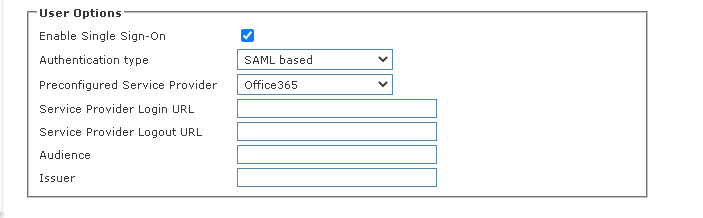
-
Enter Service provider login URL: Login URL of the SAML based Web application which will be accessed through HySecure gateway.
-
Enter Service provider logout URL: Logout URL of the SAML based Web application which will be accessed through HySecure gateway.
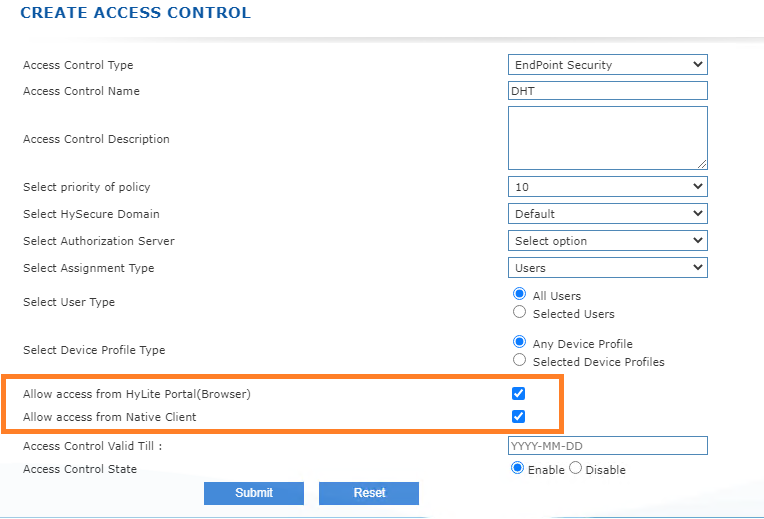
User/User group level login authorization
In this build, we have added support to allow/block login through HyLite and HySecure Client for specific user/user group. Now Security officer can create an Endpoint Security access control to allow/block login. Please follow below mentioned steps:
-
Login into HySecure management console as Security Officer.
-
Go to Access Management Access controls.
-
Click on Add and select "Endpoint Security" as Access control type.
-
Select the HySecure domain and respective Authorization server.
-
Select the user/ user group for whom access from Hylite/HySecure client will be authorized.
-
Mark the checkbox against "Allow access from HyLite Portal (Browser), if login access from browser is to be provided.
-
Mark the checkbox against "Allow access from Native client, if login access from HySecure client is to be provided.
-
Click on Submit.
End-point Security
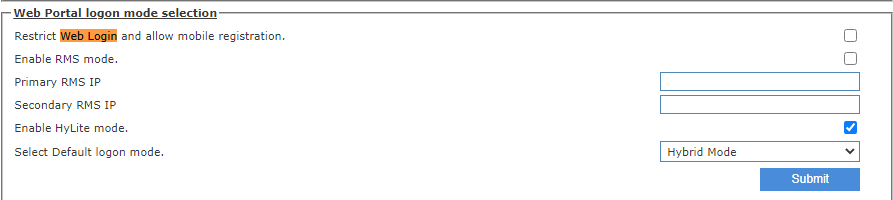
Web login restriction feature
HySecure gateway provides user application access through both HySecure client and HySecure Web portal which is HyLite portal. In this build, we have provided an option to restrict user login through HyLite Portal. After restricting HyLite portal, only Mobile token registration will be allowed through HyLite portal and user will not be able to access applications through HyLite portal.
[HOW TO CONFIGURE WEB LOGIN RESTRICTION]
To configure web login restriction, administrator user needs to follow below steps:
-
Login as Security officer in HySecure Management console.
-
Go to Host Configuration Client Settings.
-
Scroll down to Web portal logon mode selection.
-
Select "Restrict Web login and allow mobile token registration" and click on submit.
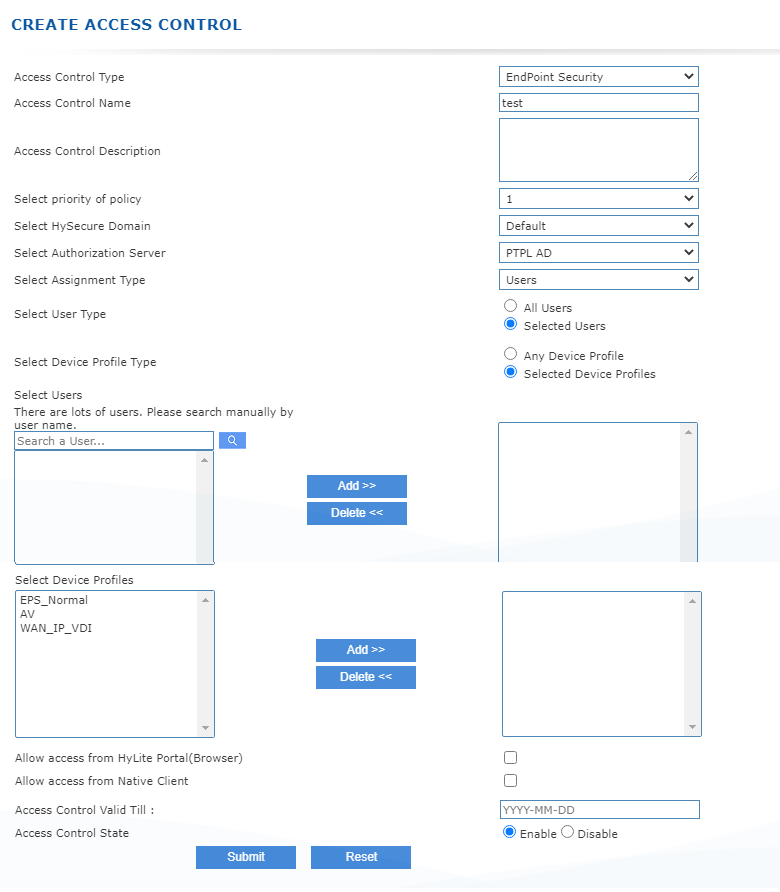
User/User group based EPS support
In this build, we have added support to apply Endpoint security to specific user/user group in HySecure domain. Now security officer/administrator user can create EPS based access control for specific user /user group to enforce EPS. Also, security officer/administrator can choose whether to enable/disable login from either HySecure client or HyLite portal or both for specific user/user group.
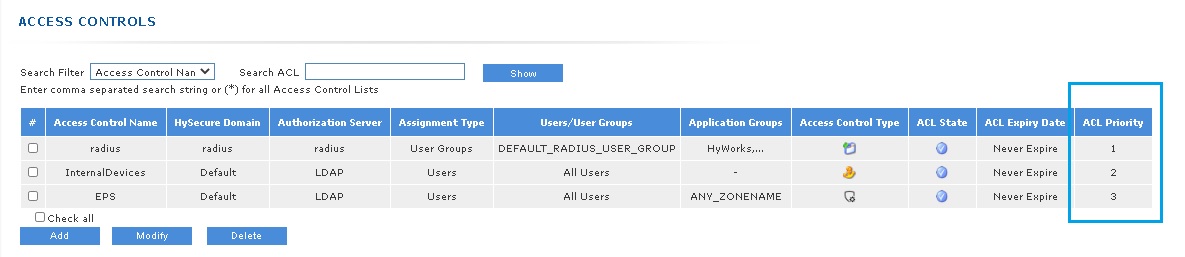
Priority in EPS and Device Id based Access control
In this build, we have added support for prioritizing the access control to be applied on end users. Currently this support is provided for device Id and EPS based Access control. Lesser the priority number means higher the priority of access control. For e.g. if there are two device ID access control for a user, then access control having lesser priority number will be applied.
Also, if two access control have same priority number then access control appearing higher in the list will be on priority.
HA
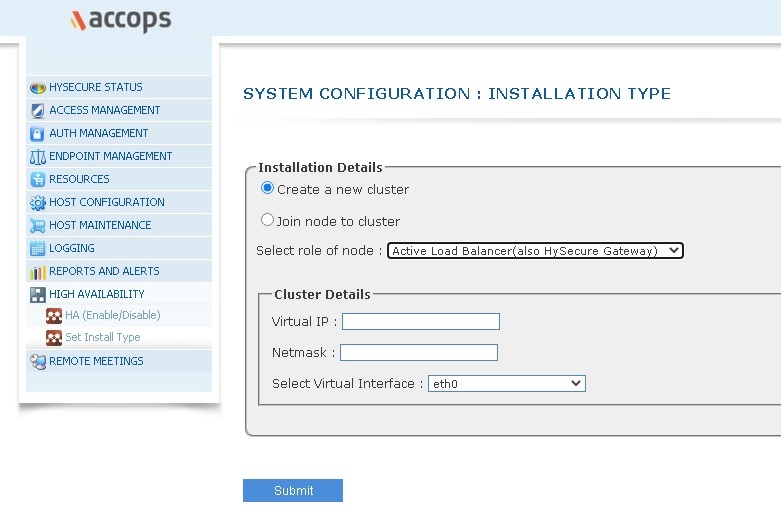
Set Install Type for HySecure HA Cluster
In this build, we have changed the option to set the installation type such as Active Load balancer, Backup Load Balancer and HySecure Gateway. While doing preboot, there will be no option to select Active load balancer, Backup load balancer or Real HySecure gateway. To set installation type follow below steps:
Steps to install Active Load Balancer
-
Complete the preboot of HySecure gateway.
-
Login as Security officer.
-
In HySecure management console, go to High Availability Set Install type.
-
Select "Create a new cluster" in Installation details.
-
Select "Active load balancer (also HySecure gateway)" option in select role of node dropdown.
-
Enter virtual IP, netmask for virtual IP and click on submit.
-
Msg will appear "successfully converted to HA Active node."
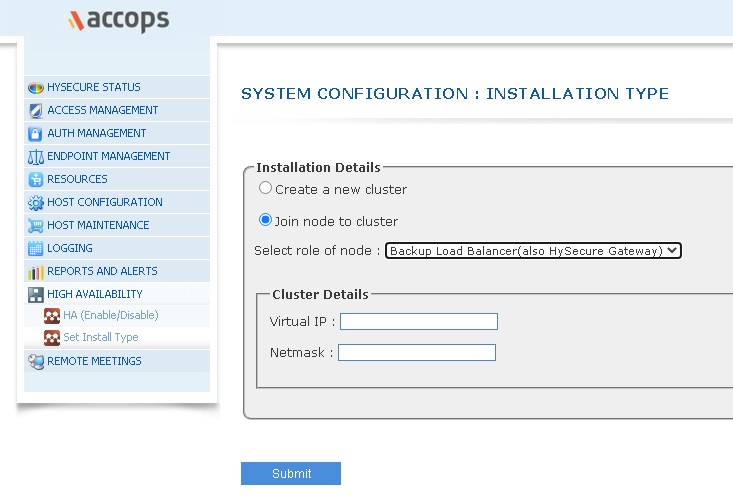
Steps to install Backup Load Balancer
-
Complete the preboot of HySecure gateway.
-
Login as Security officer.
-
In HySecure management console, go to High Availability Set Install type.
-
Select "Join node to cluster" in Installation details.
-
Select "Backup load balancer (also HySecure gateway)" option in select role of node dropdown.
-
Enter virtual IP, netmask for virtual IP and click on submit.
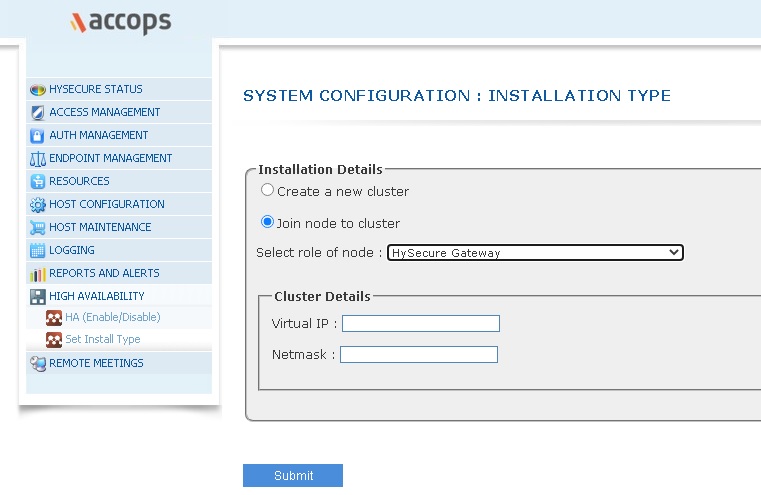
Steps to install HySecure gateway(Real node)
-
Complete the preboot of HySecure gateway.
-
Login as Security officer.
-
In HySecure management console, go to High Availability Set Install type.
-
Select "Join node to cluster" in Installation details.
-
Select "Backup load balancer (also HySecure gateway)" option in select role of node dropdown.
-
Enter virtual IP, netmask for virtual IP and click on submit.
HyID
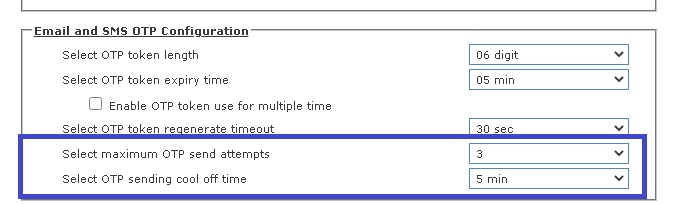
Prevent OTP flooding on HySecure gateway
In earlier versions of HySecure gateway, there was no restriction for OTP request for following events:
-
User login
-
Mobile token registration
-
Forgot password
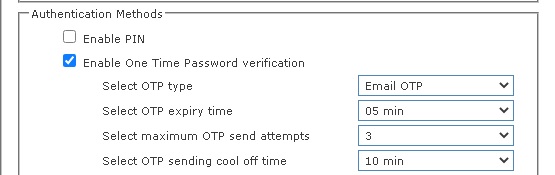
In this build, we have provided an option to limit number of OTPs a user can request for a specific time of interval.�By default, user can request OTP for 3 times in 5 minutes. If a user requests OTP 3 times and unable to login, user needs to wait for OTP cool off period which is 5 minutes by default.
Administrator/Security officer user can prevent OTP flooding by selecting number of OTP send attempt requests and cool off time while creating HyID policy. . Refer below screenshot.
For preventing OTP flooding while resetting forgot password, security officer/administrator can select number of OTP attempt requests and cool off time by editing self-service portal in Authentication domain. Refer below screenshot.
HyLite
Full screen mode in HyLite Portal
In this build, we have provided support to user applications in full screen mode through HyLite Portal. On HyLite mode when user launch any application, end user can see the full screen option on the top right edge of the page. If user clicks on this option, application will launch in full screen mode.
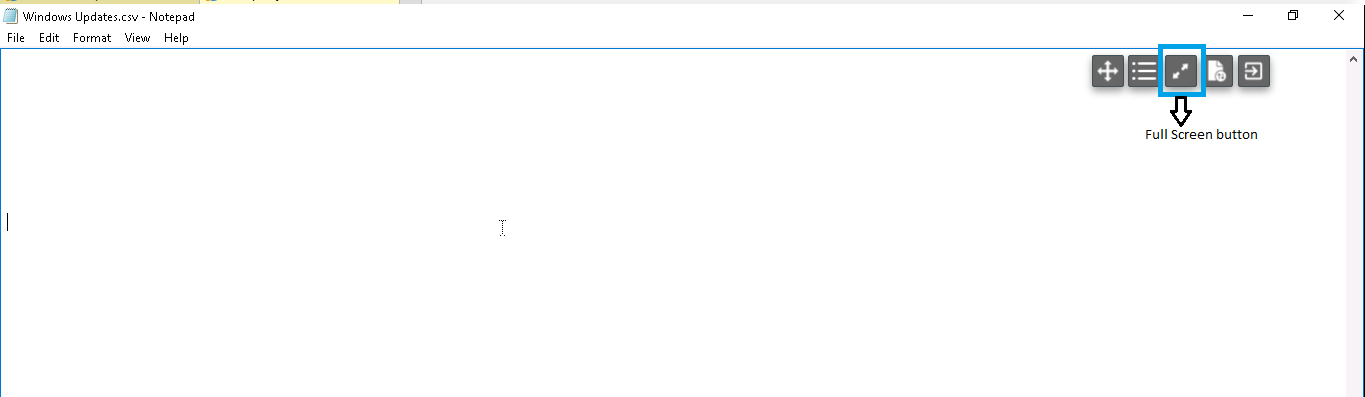
When user wants to exit from full screen mode then user can click on full screen button or press "Esc" key to exit from full screen mode.
Custom Height and Width support
In a specific scenario, if the resolution of client machine's monitor is less than the RDP application resolution then in that case user gets to see cropped image of RDP application. To resolve this, we have added custom height and width support. In this feature, administrator/security officer can customize height and width for RDP application and when RDP application resolution is more than specified than user will get scroll bar to browse content near edges. To enable Display update follow below steps:
-
Login as security officer.
-
Go to Host configuration HyLite configuration
-
Select the checkbox against "enable custom height and width for small screen".
-
Set appropriate resolution and click on submit.

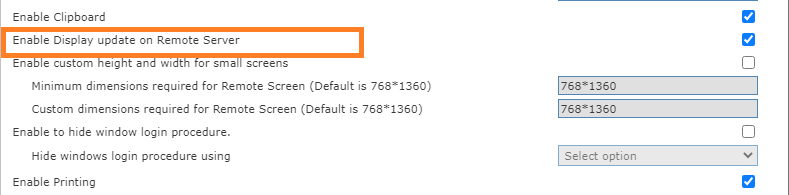
Display update on Remote Server
In earlier build when user enable full screen for any application in HyLite portal then user got to see black stripes on upper and lower edge. In this build, we have added support to update remote display resolution as per the browser window. Now if browser window is being resized then remote application resolution will update accordingly. To enable Display update follow below steps:
-
Login as security officer.
-
Go to Host configuration HyLite configuration
-
Select the checkbox against "enable display update on remote server" and click on submit.
Customizable client name
In this build, we have added support to customize the client name. To customize client name, follow below mentioned steps:
-
Login as security officer.
-
Go to Host configuration HyLite configuration
-
Enter desired client name and click on submit.

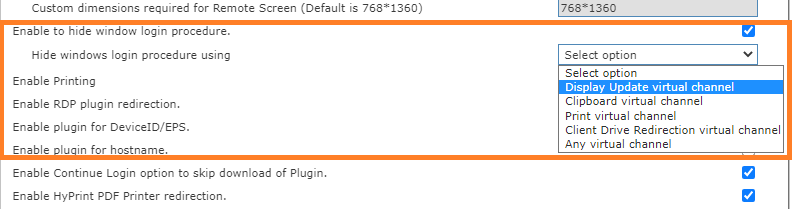
Hide Windows login procedure
Whenever a user login into Windows PC then during login process multiple channels are being created. In this build, we have added support to hide Windows login procedure while these channels are being created. To enable "Hide windows login procedure" follow below mentioned steps:
-
Login as security officer.
-
Go to Host configuration HyLite configuration
-
Select the checkbox against "enable to hide window login procedure" and select desired channels.
-
Click on submit.
Windows Key and Alt Key combination in Hylite full screen mode
In this build, we have added support of key combination of Alt keys and Windows key in full screen mode only. This feature is limited to IE 11 and Chrome browser. For e.g. now Windows + R key will open run in remote application itself and also Alt + Tab will switch tab inside remote application.
Logging & Reporting
New User based Reports
In this build, we have redesigned user-based report section. Now Security Officer/Administrator/Monitor user will be able to create user report which is more categorized and contains a lot more information.
Below screenshot will give a glance on how to generate user-based report according to redesigned format:
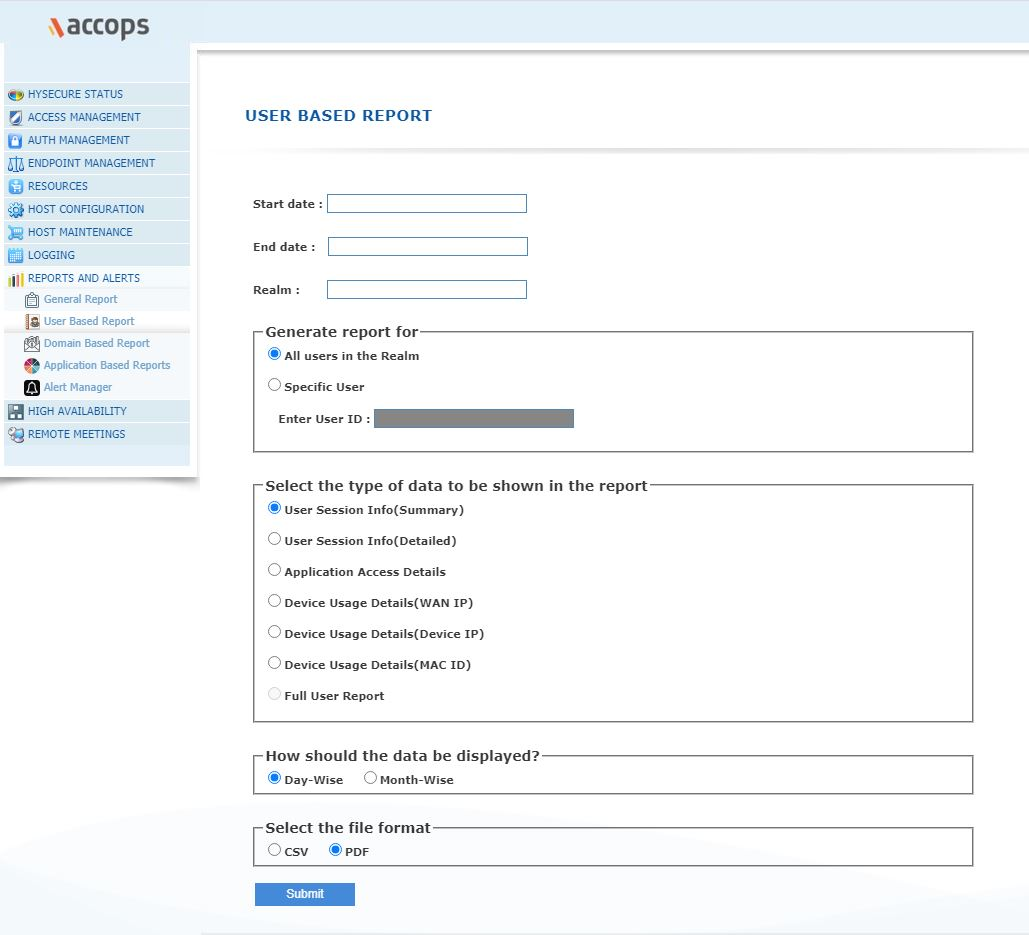
Keywords required to understand various user reports are as follows:
-
Session: If a user logs in and logs out after some time then this whole incident is called as session.
-
Session count: Numbers of distinct sessions
-
Active time: Time period during which user was accessing some application and working.
-
Total session duration: Logout time -- Login time. In other words, summation of active time and time when user was sitting idle and not accessing any application.
-
Total Active time: Summation of active time for a user for the report duration
-
Total Session time: Summation of total session duration for a user for the report duration
-
Last Access time: Time stamp when user accessed an application for the last time
-
Access count: No. of times a user has accessed any application.
Types of user reports are as follows:
User session info (summary) report
This report contains the details of session count, active time, total active time and total session time for a user/all user. This report can be generated both month wise and day wise in CSV and PDF format.
User session info (detailed) report
Apart from all the details provided in User session info (summary) report, this report will also provide information about user's login time and logout time. This report can't be generated in month wise format. It can be generated in both CSV and PDF format.
Application Access details report
This report provides the information about application access count for any application and last access time for all the application user/all users has accessed for the interval. This report can be generated both month wise and day wise in CSV and PDF format.
Device usage details report (WAN IP)
This report provides the information about the device WAN IP from which user has logged in and provide the number of times user has logged in from a WAN IP. This report can be generated both month wise and day wise in CSV and PDF format.
Device usage details report (Device IP)
This report provides the information about the device local IP address from which user has logged in and provide the number of times user has logged in from a local IP address. This report can be generated both month wise and day wise in CSV and PDF format.
Device usage details report (Mac ID)
This report provides the information about the device Mac address from which user has logged in and provide the number of times user has logged in from a Mac address. This report can be generated both month wise and day wise in CSV and PDF format.
Full user report
This report type provides the details provided in all other report types in a single report. This report can't be generated in CSV format and only applicable for specific user.
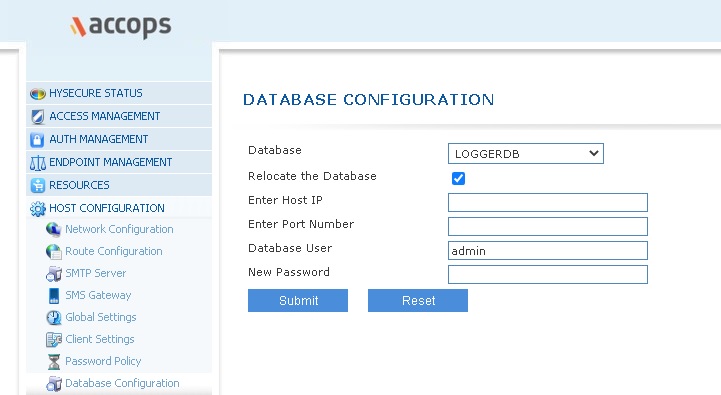
HySecure LoggerDB database relocation through HySecure management console
LoggerDB database is responsible for storing data for User based report. By default, loggerDB is hosted on the HySecure gateway. We can also host the LoggerDB on a different HySecure Server or Centos server. If relocated on another HySecure gateway, then it is recommended that another HySecure gateway is solely used for LoggerDB only. Steps to relocate HySecure loggerDB database:
-
Login as Security officer into Active node's management console (Do not login using Virtual IP)
-
Put HySecure gateway in configuration state.
-
Go to Host configuration Database configuration.
-
Select database as LoggerDB
-
Mark the checkbox "Relocate the Database."
-
Enter the IP of Server where HySecure LoggerDB is going to be relocated.
-
Enter Database port: 3306
-
Enter current Database password of the new HySecure LoggerDB.
-
Click on submit.
-
HySecure gateway database LoggerDB has been relocated successfully. Put HySecure gateway in Run state.
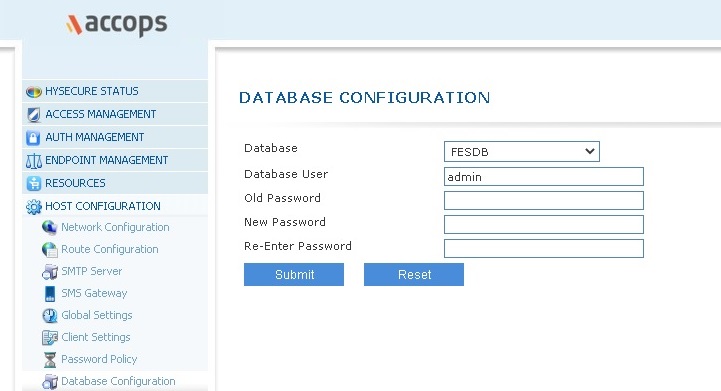
HySecure database password change through HySecure management console
In this build, we have provided feature to change HySecure gateway database password through HySecure management console. HySecure gateway database password can be changed from HySecure's active node's in configuration mode. Steps to change database password:
-
Login as Security officer into Active node's management console (Do not login using Virtual IP)
-
Put HySecure gateway in configuration state.
-
Go to Host configuration Database configuration.
-
Select database as FESDB
-
Enter old password.
-
Enter and confirm new password.
-
Click on submit.
-
HySecure gateway database password has been changed successfully. Put HySecure gateway in Run state.
HySecure database password change through HySecure OS console
In this build, we have provided feature to change HySecure gateway database password through HySecure OS console. HySecure gateway database password can be changed only from HySecure's active node's in configuration mode. Steps to change database password:
-
Login into HySecure OS console.
-
Select option 7 Database password reset by entering 7.
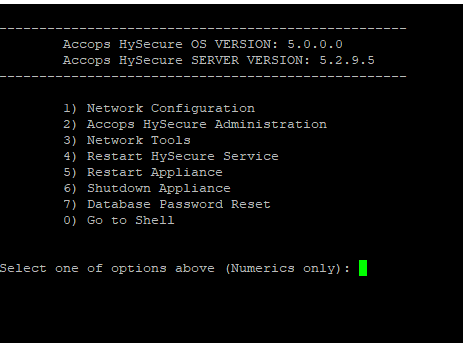
- Enter the new database password.
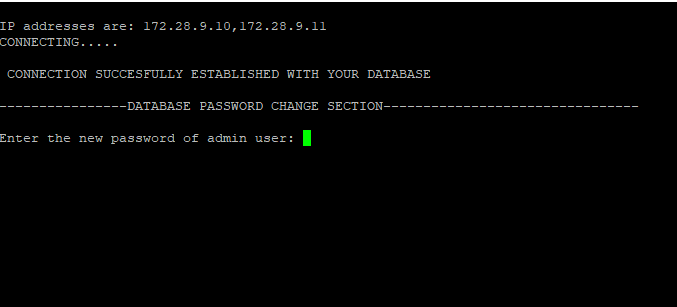
-
Click on submit.
-
HySecure gateway database password has been reset successfully. Put HySecure gateway in Run state.
Licensing
Subscription based License feature support
In this build, we have added support of HySecure gateway license based on subscription period for specific days.