ProID Server
Authentication Servers
Having a local database of users who can authenticate to HySecure, you can configure authentication servers which will allow integration with LDAP based directories such as Active Directory or RADIUS based authentication systems. Once configured, these Authentication Servers become active in the VPN Domains and Access Controls pages.
Adding Authentication Server

- Open HySecure management console.
- Click to expand Access Management, and then click Authentication Servers.
- Click Add to specify a new Authentication Server.
- Choose from one of AD/LDAP, Radius or ProID.
Adding ProID Server
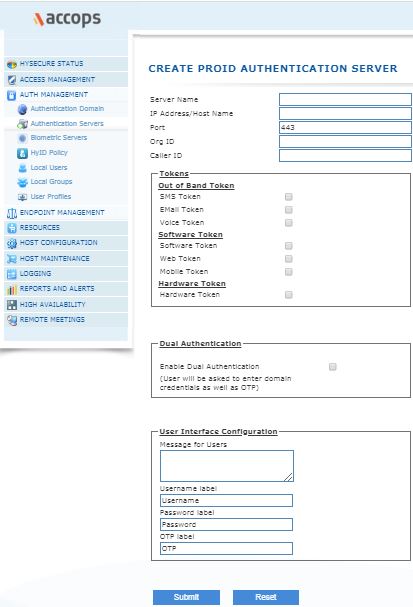
One or more ProID servers can be created and assigned to VPN domain. ProID server only provides authentication services. Authorization service is not provided by ProID server. We recommend Active Directory is used in conjunction with ProID to provide group assignment of resource access.
For more information on installing and configuring the ProID server please refer to HySecure - ProID Install Guide.
Type an identifier of the External ProID Authentication Server in Server Name field. Type the IP address, host name, or FQDN of the ProID server, in the Host Name field. The port number should be changed to 8443 in the Port field. Type the Organization ID on the ProID authentication server in the Org ID field. (Contact your ProID Authentication Server administrator to get the Org ID value).
Type the Caller ID on the ProID authentication server in the Caller ID field. (Contact your ProID Authentication Server administrator to get the Caller ID value).
The Tokens listed can be enabled and used to authenticate users. Enable Dual Authentication - If checked user will be asked to enter HySecure credentials as well as OTP. User Interface Configuration:
- Message for users - This message will be sent to user with OTP
- Username label, Password label, OTP labels - These labels will be displayed to the user in the portal.
Click Submit to save the configuration data or Reset to clear all data in this screen.