Authentication Domain
Overview
The Authentication Domain page in the management console allows the administrator to define the authentication and authorization scheme for HySecure, and this scheme is termed as an Authentication Domain. It is now possible to add multiple such domains each with its own AA scheme.
Important
An Authentication Domain becomes effective only when it gets attached with a HySecure Domain to which a remote user would log on to.
The Authentication Domain Details page provides management of Authentication Domains configured in the system including the Authentication Domain creation. To get the list of configured authentication domains and manage them, perform the following steps:
- Open the Management console and expand AUTH MANAGEMENT
- Select Authentication Domain from the sub menu
- All the created authenticated domains including the default ones, will be visible on this page in a tabular manner with the following information of each domain:
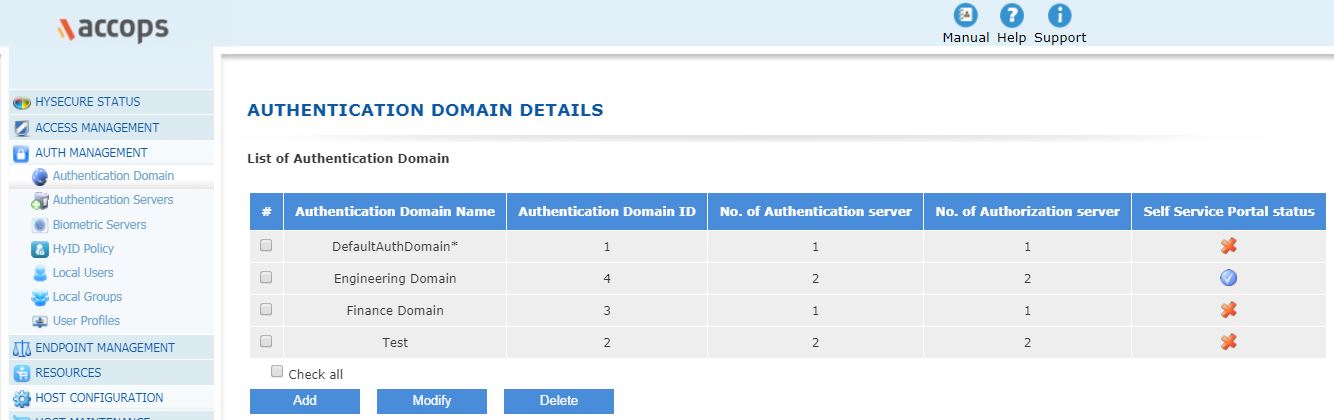
| # | Field | Description |
|---|---|---|
| 1. | Authentication Domain Name | This is the logical name of the Authentication Domain |
| 2. | Authentication Domain ID | This is the system generated Authentication Domain ID |
| 3. | No. of Authentication Server | This represents the number of Authentication Servers configured for this Authentication Domain |
| 4. | No. of Authorization Server | This represents the number of Authorization Servers configured for this Authentication Domain |
| 5. | Self Service Portal | This indicates whether the Self Service Portal is enabled for this domain or not |
Add Authentication Domain
On the Authentication Domain page, click on the Add button to create an Authentication Domain and provide the information indicated under the below mentioned heads. Once the information is filled, click on Submit button.
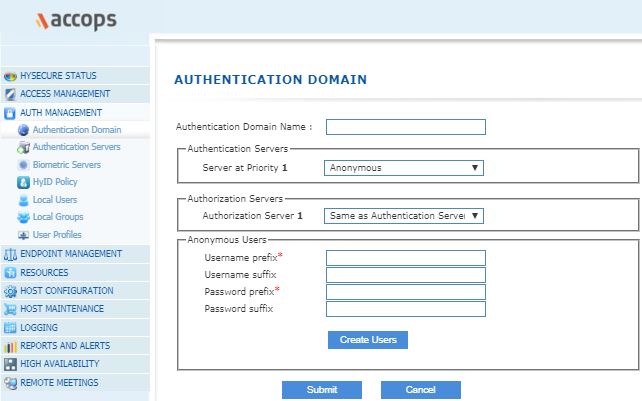
Authentication Domain Name
Authentication Domain name is the Identifier of the authentication domain.
Authentication Servers
Multiple Authentication Servers can be configured in a priority order, against which the users will get authenticated. Once the user gets authenticated from an authentication server, the subsequent server(s) would not be checked for and user will be considered as authenticated. Note: At max, FIVE authentication servers can be used in the configured priority order.
Following can be the values in the drop down list of Authentication Servers:
| S.No. | Field | Type | Description |
|---|---|---|---|
| 1 | Server at Priority 1 | List | a) Anonymous: If selected against the "Server at Priority 1", then anonymous users will need to be configured under the "Anonymous Users" dialog in this screen. The users will need to log in by selecting the HySecure domain only without the need to enter username and password. The username used will be from the list of anonymous users which will get created. For "Anonymous" configuration, the authorization server would be same as the Authentication Server. b) Native: In case "Native" is selected, then the user gets authenticated against the local users. c) Configured Servers: Besides "Native" and "Anonymous", a list of configured AD/LDAP servers will be listed and any one of these can be used. Click on Add another Authentication Server if another authentication server needs to be added at the next priority level |
| 2 | Server at Priority 2 till Server at Priority 5 |
List | a) Native: In case "Native" is selected, then the user gets authenticated against the local users. b) Configured Servers: Besides "Native" and "Anonymous", a list of configured AD/LDAP servers will be listed and any one of these can be used. Click on Add another Authentication Server if another authentication server needs to be added at the next priority level. Option to add another authentication server will not be available while configuring server at priority 5. |
Authorization Servers
At max TWO authorization servers can be configured in a priority order. Authorization server configuration can be selected from the following values:
| S.No. | Field | Type | Description |
|---|---|---|---|
| 1 | Authorization Server 1 | List | a) Same as Authentication Server: Selecting the option 'Same as Authentication Server' will cause the authorization to happen using the same Authentication Server through which the user is authenticated. b) Native: In case "Native" is selected, then the user gets authorized against the local users database. c) Configured Servers: Besides "Same as Authentication Servers" and "Native", a list of configured AD/LDAP servers will also be listed and any one of these can be used for Authorization. Click on Add another Authorization Server if another Authorization server needs to be added at the next priority level |
| 2 | Authorization Server 2 | List | a) Same as Authentication Server: Selecting the option 'Same as Authentication Server' will cause the authorization to happen using the same Authentication Server through which the user is authenticated. b) Native: In case "Native" is selected, then the user gets authorized against the local users database. c) Configured Servers: Besides "Same as Authentication Servers" and "Native", a list of configured AD/LDAP servers will be listed and any one of these can be used for Authorization. |
Against each Authorization Server, the server can be used for authentication purpose as well after the prioritized list of Authentication Servers. This can be achieved by checking the option Enable additional authentication with this server.
Anonymous Users
In case the "Authentication Servers" has "Anonymous" as the configured server at Priority 1, then anonymous users need to be created by specifying the username prefix and suffix as well as the password prefix and suffix. The number of users created will depend on the concurrent user license which has been applied.
| S.No. | Field | Type | Description |
|---|---|---|---|
| 1 | Username prefix | String | Mention the username prefix to be used. |
| 2 | Username suffix | String | Mention the username suffix to be used. |
| 3 | Password prefix | String | Mention the password prefix to be used. |
| 4 | Password suffix | String | Mention the password suffix to be used. |
E.g.: If Username prefix is "unPrefix" and Username suffix is "unSuffix", then on on clicking the "Create Users" button, users will be created as "unPrefix00000unSuffix" to "unPrefix00004unSuffix" assuming that a 5 user license is used. Accordingly their respective passwords will be created.
Self Service Portal
If an Authentication Server is selected for authentication, the Self Service Portal can be enabled through which all the authenticated and authorized HySecure users who authenticate using Active Directory or LDAP will be able to manage their own AD password by creating their profile. Using the newly added "forgot password" link on the HySecure login page, the user will be able to follow a wizard to authenticate via various mechanisms and reset their password without any intervention from the Administrator. HySecure administrator can control how strongly users have to authenticate with Self Service Portal and reset their passwords. The authentication mechanisms include PIN authentication,security questions, email & mobile no. verification and OTP sent to registered email ID or mobile phone.
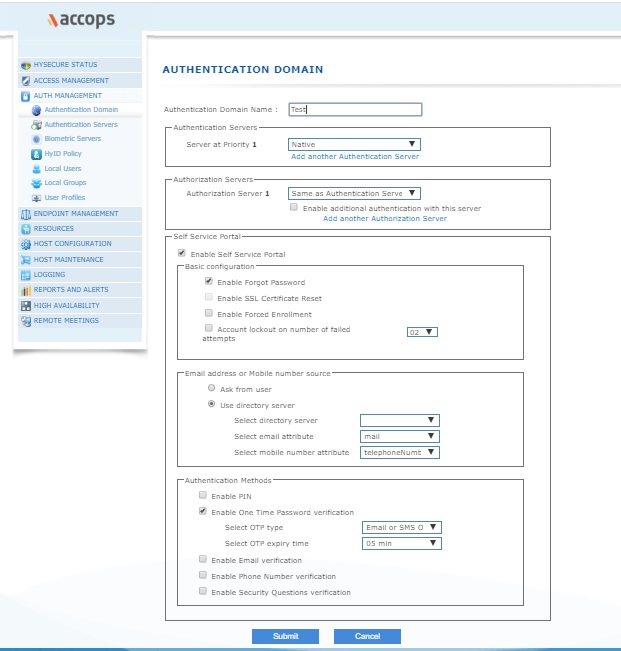
Enable Self Service Portal
Self Service Portal can be enabled for the Authentication Domain so that the users who get authenticated/authorized by the configured Authentication/Authorization servers of the Authentication Domain can create their profiles and manage their own AD passwords.
Basic Configuration
| S.No. | Field | Type | Description |
|---|---|---|---|
| 1 | Enable Forgot Password | Check box | If enabled then users can update his/her password after authentication with by using the Service Portal. |
| 2 | Enable SSL Certificate Reset | Check box | If enabled then certificate users can reset his/her passphrase after authentication with Self Service Portal. |
| 3 | Enable Forced Enrollment | Check box | By enabling this administrator can force users to enroll with Self Service Portal |
| 4 | Account Lockout on number of failed attempts | Check box | Number of authentication failed attempts after this user profile will be automatically locked. |
Email Address or Mobile Number Source
| S.No. | Field | Type | Description |
|---|---|---|---|
| 1 | Ask From User | Radio Button | If enabled, user will be asked for email address and mobile no. at the time of enrollment. |
| 2 | Use Directory Server | Radio Button | If enabled, selected directory server will be used for fetching user mobile no. and email address. |
| 2.1 | Select Directory Server | list | The list will be populated with the list of configured Directory Servers. Select the one from which the email and mobile numbers will be fetched. |
| 2.2 | Select Email Attribute | list | Select from the list of attributes which should be used for fetching the Email |
| 2.3 | Select Mobile Number Attribute | list | Select from the list of attributes which should be used for fetching the mobile number |
Authentication Method
| S.No. | Field | Type | Description |
|---|---|---|---|
| 1 | Enable Pin | Check box | If enabled then user will be asked to enter PIN while enrolling and authenticating with Self Service Portal. |
| 2 | Enable One Time Password Verification | Check box | If enabled then user will be asked for OTP for authenticating with Self Service Portal. |
| 2.1 | Select OTP Type | list | Select from one of the listed OTP which will be asked from the user for authenticating with the Self Servie Portal |
| 2.2 | Select OTP expiry time | list | Select the time from the list after which the OTP will expire |
| 3 | Enable Email Verification | Check box | If enabled then user will be asked for email address for enrolling and authenticating with Self Service Portal. |
| 4 | Enable Phone No. Verification | Check box | If enabled then user will be asked for mobile no. for enrolling and authenticating with Self Service Portal. |
| 5 | Enable Security Question Verification | Check box | If enabled then user will be asked to answer security questions for enrolling and authenticating with Self Service Portal |
Modify Authentication Domain
On the Authentication Domain page, select the domain whose details are to be modified and click on the Modify button. Modify the details as appropriate and click on Submit button for the changes to take effect.
Delete Authentication Domain
On the Authentication Domain page, select the domain which needs to be deleted and click on the Delete button. On confirmation, the Authentication Domain will be deleted.