Features
New dash board
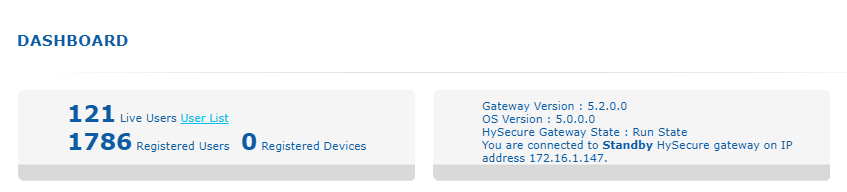
The Dashboard now displays the count of registered users and registered devices on HySecure gateway. Registered users are the unique users that have logged in, in the past, on HySecure gateway and Registered devices are the devices from which users have logged in, in the past. To view the list of registered users, go to AUTH MANAGEMENTUser Profiles. Similarly, to view the list of registered devices, go to ENDPOINT MANAGEMENTDevice Management. Note that Live Users is the total number of users that are currently logged in on a gateway.
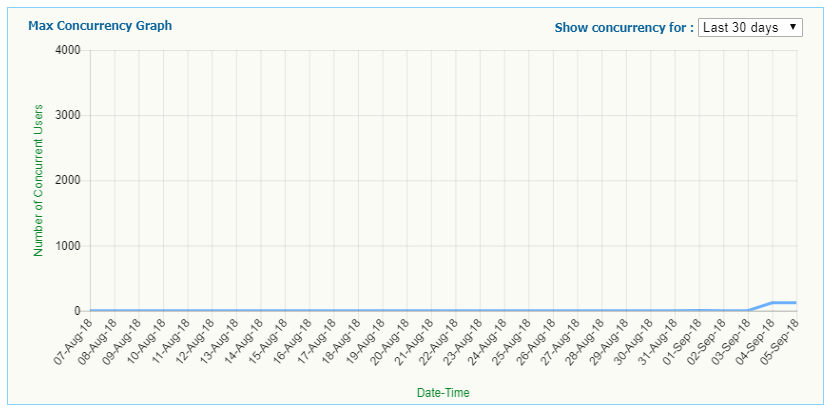
Administrator also can get the information about the maximum concurrent users for 3 different timeframes viz. last 30 days, last 7 days and last 24 hours. If the administrator selects "Last 30 days", then the graph shows maximum concurrent users for all 30 days from the current day. If "Last 24 hours" is selected then the graph will show the maximum concurrent users for every hour, for the last 24 hours. In a nutshell, day wise peak is plotted for the last 30 days, hour wise peak is plotted for last 7 days, and minute wise peak is plotted for last 7 days.
Access control UI enhancements
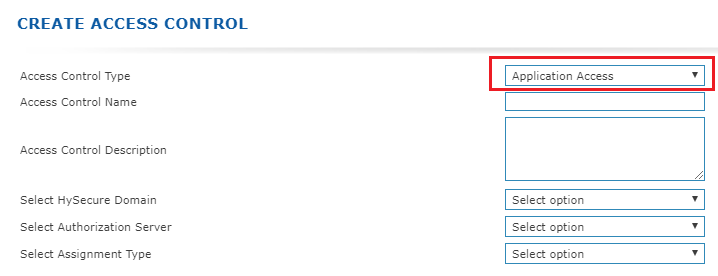
Access control UI has been modified. In the previous release, Access Control Name was the first option. This has now been modified to Access Control Type. While creating any ACL, administrator needs to select Access Control Type first.
For 'All user' or 'All User Group' related access control, administrator needs to select the appropriate radio button for "All user" or "All User Group" respectively after selecting Authorization Server and Assignment Type. In previous release, administrator was required to search all user / all group for creating ACL for all.
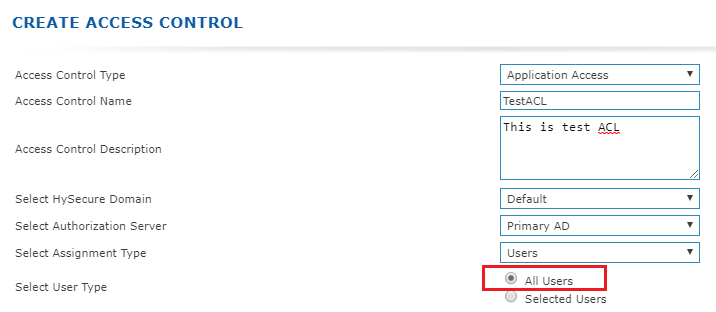
If administrator wants to create access control for specific user or user group, then select radio button called "Selected Users". After selecting this button, search windows will appear on the page automatically. Here, type and search the user or user group to proceed adding them to ACL.

Access control expiry
Access control expiry option has been added in this release. Administrator can now set the expiry date for all access control policies except "Notification" policy. The applicable ACL shall be put in disabled state upon reaching the expiry date and users shall not be permitted to login to the gateway thereafter. While creating access controls, administrator needs to set the required expiry date on "Access Control Valid Till" field.
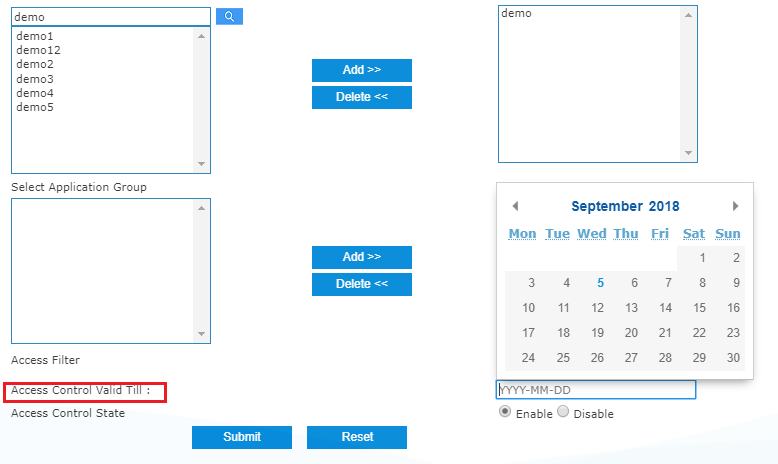
Once the access control has expired, an email notification will be sent to the email Id that was specified while creating the notification policy (Note: To get email on acl expiry, another access control of the type 'notification' needs to be created). After ACL expiry, administrator can enable and change the ACL expiry date if required. Administrator can set ACL expiry date any time and set expiry date to never expire by deleting the date from "Access Control Valid Till" field.
Access control for notification
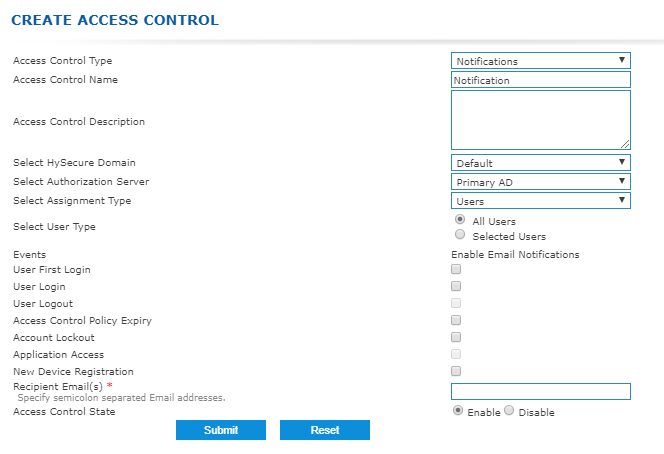
New access control type called "Notification" has been added in this release. Using this type of ACL, administrator can receive notifications on HySecure for following events:
- User Login
- User First Login
- Access Control Policy Expiry
- Account Lockout
- New Device Registration
Note: Email is sent to all email IDs that were specified in Email Recipients field creating the notification ACL.
Email notification can be set for users of following authorization servers:
- Active Directory
- LDAP
- Radius
- Native.
In an Email notification policy, for the events Access Control Policy Expiry and Account Lockout, "User Type" should be All users or All groups. These events cannot be configured for Selected users or user groups.
For other notification events namely User Login, User First Login and New Device Registration, User Type field can be set as All users/ All groups or Selected User/ user group.
Example: If notification policy has been configured for the event User Login with User Type as All Users, then email will be sent to the administrator (If email Id is specified) when any user logs in to HySecure gateway from the specified domain. If notification policy is created for specific user/ specific user group, then notification shall be triggered when that specific user will login to HySecure gateway.
Also, while creating notification policy please enter Recipient Email ID. To send notifications to multiple email addresses, please enter the required email addresses in this field separated by a semicolon ( ; ). Example: user1\@company.com;admin\@company.com;so\@company.com
Note: While creating notification type access control, please ensure that SMTP is configured on HySecure gateway.
Account lockout
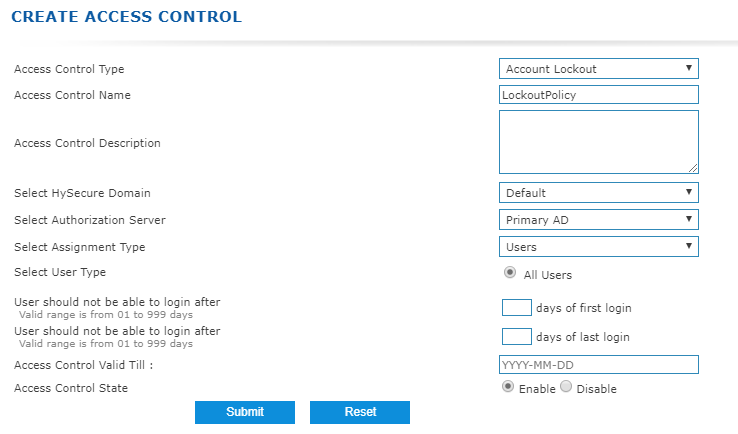
Account lockout feature is available on this release. Account lockout is new type of access control. Using this type of ACL administrator can lock user accounts on HySecure gateway if they haven't logged into the gateway for a specified amount of time after first/most recent login. Account lockout policy is applicable for the authorization servers: Native, Active Directory, LDAP and Radius. This type of policy is applicable for All user or All User Group. The lockout policy cannot be applied to a Selected User / User Group.
The following scenarios can be implemented:
| Scenario | Details |
|---|---|
| User should not be able to login after a certain period from first login: | If administrator wants that after specific number of days of first login, user account will be locked on HySecure gateway. |
| User should not be able to login after a certain period from the most recent / last login: | If administrator wants that after specific number of days of last login, user account will be locked on HySecure gateway |
If any user account is locked due to account lockout policy, then account lockout notification will be sent to the specific email account, given that an email notification policy exists for Account Lockout event.
Password policy
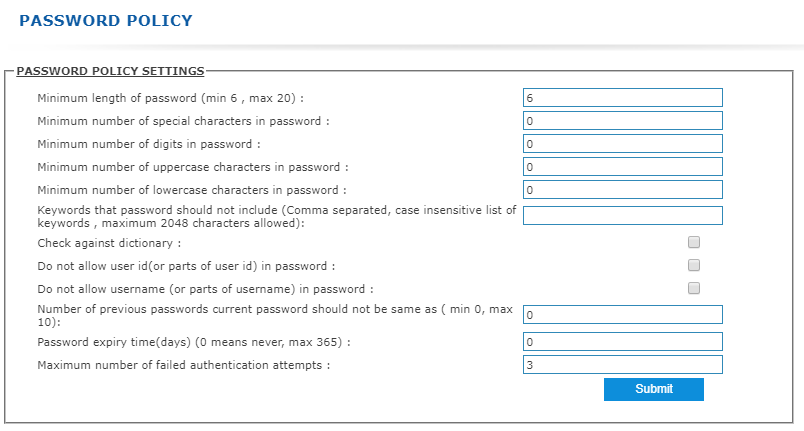
For native users, a new password policy setting has been added in this release. This password policy will be applicable for all native users including Low Security User and all type of certificate users. Once the administrator configures the password policy on gateway, the newly set passwords for all Native Users will be verified against the configured policy. If it does not match with password policy, an appropriate error message shall be displayed.
| Field | Details |
|---|---|
| Minimum length of password (min 6, max 20): | Specify the minimum length of password. |
| Minimum number of special characters in password: | Specify the minimum number of special characters in password |
| Minimum number of digits in password: | Specify the minimum number of digits in password |
| Minimum number of uppercase characters in password: | Specify the minimum number of uppercase characters in password |
| Minimum number of lowercase characters in password: | Specify the minimum number of lowercase characters in password |
| Keywords that password should not include: | Specify the keywords that should not be in password. User can enter multiples keywords with comma separated values. |
| Check against dictionary: | Mark the checkbox to check the strength of password. Common English words will be rejected. |
| Do not allow user id (or parts of user id) in password: | Mark the checkbox to reject the password which contains more than 2 characters from User ID. For e.g. if User ID is Accops then password Acc\@123 or cop\@123 or Accops will be rejected. |
| Do not allow username (or parts of username) in password: | Mark the checkbox to reject the password which contains more than 2 characters from Username. For e.g. if Username is Accops then password Acc\@123 or cop\@123 or Accops will be rejected |
| Number of previous passwords current password should not be same as (min 0, max 10): | Enter the no. of previous passwords to check while setting new password for any user. Password matching with these users will be rejected. |
| Password expiry time(days): | Enter the time after which user's password will expire. Here 0 means never expire and maximum value which can be set is 365 days. |
| Maximum number of failed authentication attempts: | No. of failed authentication attempts allowed for the user. After these attempts user account will be locked. Once the account is locked, the administrator will need to manually unlock the user from the management console. |
Geo-fencing baseD EPS policy
Geo-fencing based EPS (End Point Security) policy support has been added in HySecure. Using this EPS policy, administrator can set up a virtual boundary around a geographical location, known as a geofence. This policy is applied at a domain level and once applied, any user part of this domain shall be governed by the applicable policy for this domain. For e.g. if the administrator has applied a policy on a domain named 'Mumbai' to allow logins, the gateway will permit access only if the user's IP address belongs to Mumbai. Access to users attempting to login to the gateway from anywhere else will not be permitted. The geo-fencing policy on the domain to allow or restrict access can be set at a granular level of Country, State or City name.
Note: Geo-Fencing based EPS policy requires an Endpoint Protection Security License to be applied on the gateway.
To configure, please go to ENDPOINT MANAGEMENTHost Scan Policies. Add host scan policy of the type "Geolocation"
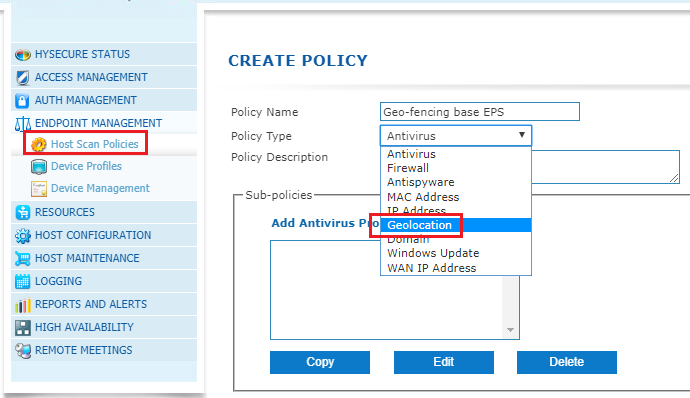
Click on Add Geolocation Policy to configure a policy to Allow or Block access. Further, select the appropriate geo-fencing level (Country/State/City) to be applied for this policy as given in the below screenshot:

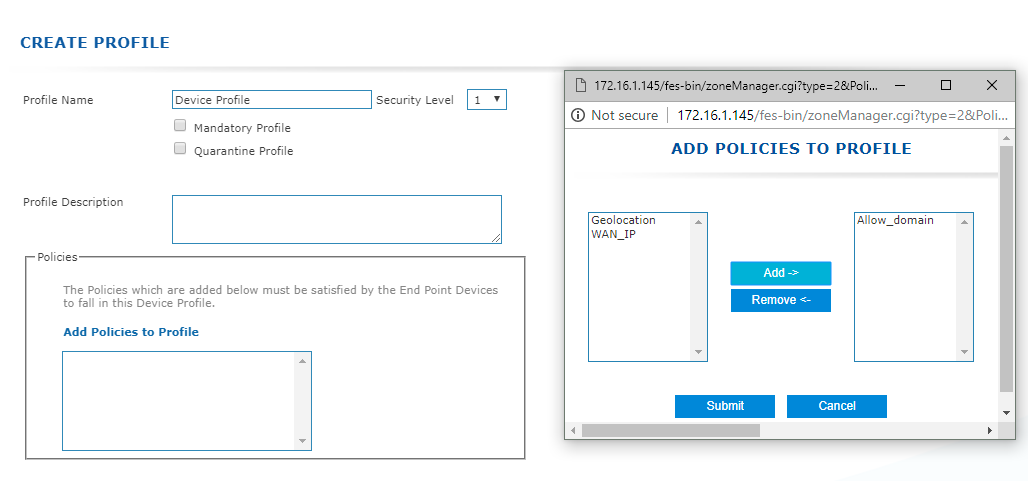
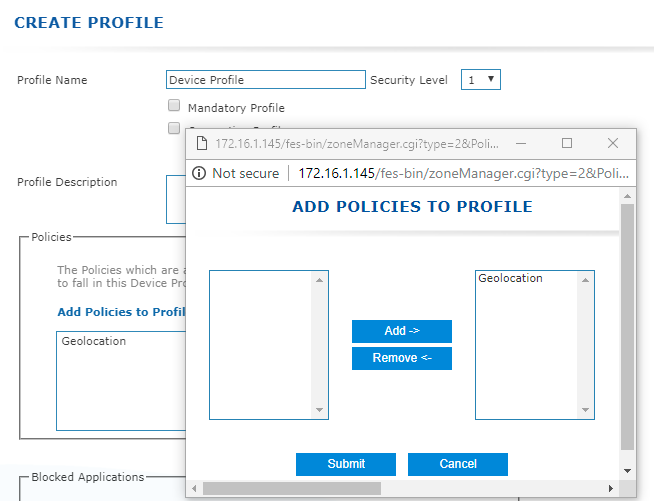
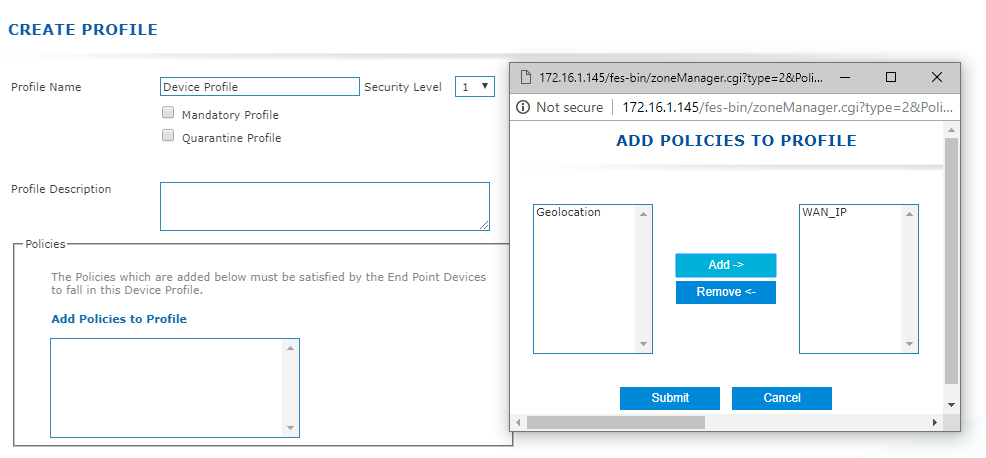
Once the level of access has been selected, click Submit. Next go to ENDPOINT MANAGEMENTDevice Profiles and create a new profile. Click on 'Add policies to profile' and select add the Geo-Fencing policy created previously and click on submit to apply.
WAN IP baseD EPS policy
Extending the Geo-fencing capabilities, HySecure also supports allowing or denying access to the gateway based on the user's WAN IP address. For e.g. if the administrator wishes to allow access to the gateway from a specific WAN IP address (belonging to a branch office) and deny access from other IP addresses, this can be achieved by setting up a WAN IP based EPS policy.
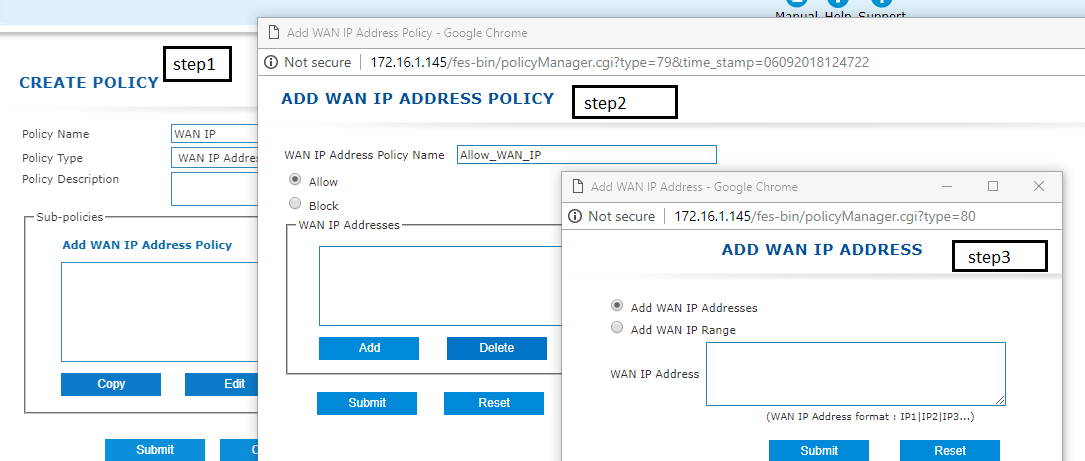
To configure, please go to ENDPOINT MANAGEMENT Host Scan Policies. Add host scan policy of the type "WAN IP Address"
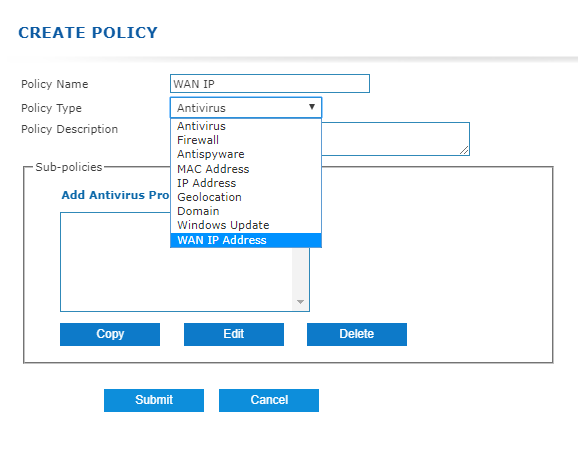
Click on Add WAN IP Address to configure a policy to Allow or Block access. Next, select Allow/Block and specify the WAN IP Address on which the policy should be applied. Multiple WAN IP addresses can be specified by separating the IP addresses with a pipe (|).
Once the level of access has been selected, click Submit. Next go to ENDPOINT MANAGEMENTDevice Profiles and create a new profile. Click on 'Add policies to profile' and select to add the WAN IP Address policy created previously and click on submit to apply.
Domain based EPS policy
It is now possible to allow or disable access to the gateway based on whether the user's device is part of a pre-configured domain. For e.g. if the administrator wishes to only allow access to the users whose devices are part of a domain named accops.com and deny access to all other devices, it can be implemented using this feature.
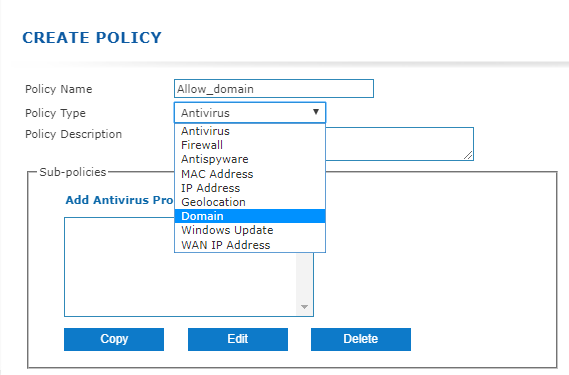
To configure, please go to ENDPOINT MANAGEMENTHost Scan Policies. Add host scan policy of the type "Domain"
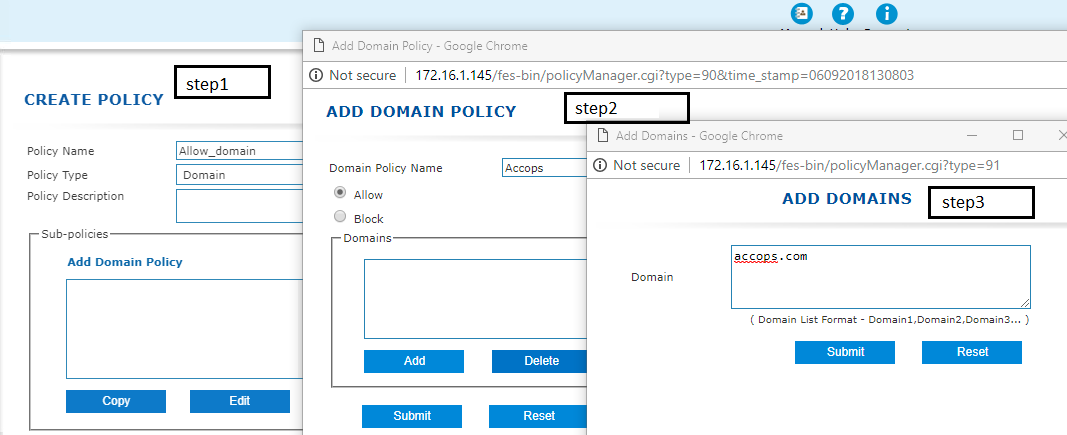
Click on Add Domain to configure a policy to Allow or Block access. Next, select Allow/Block and specify the domain name(s) on which the policy should be applied. Multiple domain names can be specified by separating them with a comma.
Once the level of access has been selected, click Submit. Next go to ENDPOINT MANAGEMENTDevice Profiles and create a new profile. Click on 'Add policies to profile' and select to add the Domain policy created previously and click on submit to apply.