Access Controls
Overview
Access Controls manage the availability of services/applications to users in accordance with corporate policies. Access Controls are primarily specified for Users / User Groups. Additionally, the Access Controls can also be based on Device ID and Endpoints (see Device ID and Endpoint Access Control section). Through HySecure Access Controls, a User / User Group is assigned one or more Application Groups as needed. Access Filters can be applied for imposing time-restrictions on access to applications.
Access Controls can be created for Native, LDAP/ADS, and RADIUS User / User Groups. The Native User Groups include the default User Groups, and all other High Security (HS) and Basic Security (BS) User Groups created by Administrator.
The Access Control Lists for BA User Groups, LDAP/ADS User Groups, and DEFAULT_RADIUS_USER_GROUP can include only BA Application Groups. The Access Control Lists of HS User Group can include both BA and HS Application Groups.
Access Control List
To get the Access Control list and eventually create Access Control, perform the following steps:
- Open the Management console and expand ACCESS MANAGEMENT
- Select Access Controls from the sub menu
- All the created Access Control List will be visible on this page in a tabular manner with the following information of Access Control:
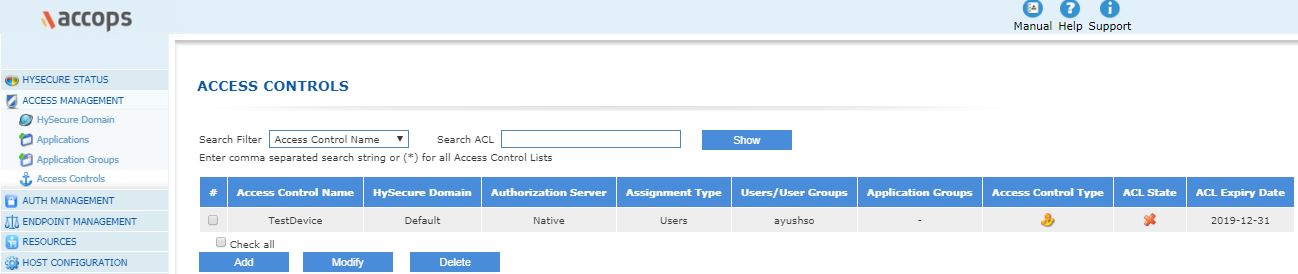
Search Option: User can search Access control on the basis of Access Control name, HySecure Domain, Authorization server, Assignment type, Users/User Groups and Policy Type.
| # | Field | Description |
|---|---|---|
| 1 | Access Control Name | Access control Identifier |
| 2 | HySecure Domain | HySecure Domain for which Access control will be applied. |
| 3 | Authorization Server | Authentication domain linked with Access control. The Users / User Groups on which this Access Control is applied, are obtained from this Authorization server |
| 4 | Assignment Type | Indicates whether the Access control is assigned to "Users" or "User Groups" |
| 5 | Users/User Groups | Lists the actual Users / User Groups on whom the Access control is applied. |
| 6 | Application Groups | Lists the "Application Groups" on which the Access Control is applied, in case of Application access ACL. |
| 7 | Access Control Type | This indicates the Type of policy being Application access policy, Device ID policy, Endpoint protection policy, Notifications policy or Account Lockout policy. |
| 8 | ACL State | This indicates the Access Control as Enabled or Disabled. |
| 9 | ACL Expiry Date | Shows the expiry date of the Access control. |
| 10 | ACL Priority | Shows the priority of ACL |
Add Access Control
Access Control Types
HySecure provides support of following types of Access Controls
-
Application Access: This type of policy is created to restrict users/user groups to specific set of applications/application groups. There has to be atleast one "Application Access" based Access Control so that the user can use the desired application.
-
Device ID: This type of policy is created to restrict the type and number of devices per user and also to restrict the users to login from specific devices which can be considered as trusted devices.
-
Endpoint Protection: This type of policy is created to restrict internet and other connections on user's machine
-
Notifications: This type of policy is created to have e-mail alerts for various user events
-
Account Lockout: This type of policy is created to restrict users/user groups as per the login time
-
Endpoint Security: This type of Access Control can be used to enforce EPS for specific user / user group
The Access Control is configured either for all Users/User Groups or a set of Users/User Groups, except in the case of "Account Lockout" type of Access Control in which it is applied for all Users/User Groups only. As a result, there is a common configuration applicable for all types of Access Controls. This common configuration is indicated below. Additional configuration is specific for each of the Access Control types listed above and is described in subsequent sub-sections.
Common Configuration
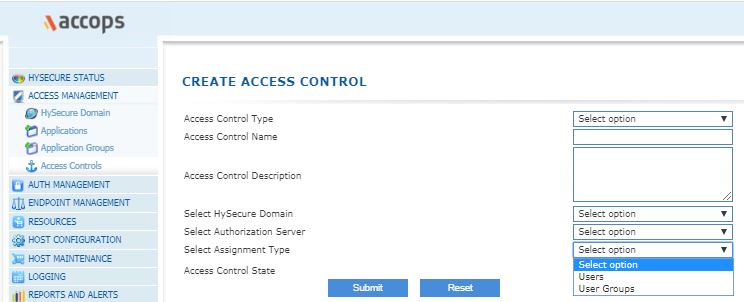
On the ACCESS CONTROLS page, click on the Add button to create a new Access Control and provide the following basic information which is needed for each type of Access Control Policy. Once the common and Access Control specific information is entered, click on Submit button to generate the Access Control policy.
| # | Identifier | Description |
|---|---|---|
| 1 | Access Control Type | Choose an appropriate Access Control type as described here |
| 2 | Access Control Name | Add an ACL identifier. This is used for identification during listing or in logs/reports |
| 3 | Access Control Description | Description of ACL so that the intent of its creation is clear to the administrator at any later point in time. |
| 4 | Select HySecure Domain | Select the HySecure domain on which this policy is to be applied. This domain will be used to fetch the Authorization Server list. Select "DefaultDomain" to use the HySecure local database users. |
| 5 | Select Authorization Server | This will have a drop down list of authorization servers configured for the selected HySecure Domain. Select the authorization server to fetch the User/User Group list. Select "Native" to use the HySecure local database users. |
| 6 | Select Assignment Type | Select "Users" or "User Groups" to assign ACL to specific users or user groups. |
| 7 | Select User Type | This option is displayed when the "Authorization Server" selected is an AD/LDAP server and the "Assignment Type" is selected as "User". The option "All Users" is selected if the Access Control is to be applied on all users. Select "Selected Users", if a set of users need to be selected on which the Access Control is to be applied. |
| 8 | Select Group Type | This option is displayed when the "Authorization Server" selected is an AD/LDAP server and the "Assignment Type" is selected as "User Groups". The option "All Groups" is selected if the Access Control is to be applied on all User Groups. Select "Selected Groups", if the Access Control is to be applied on a specific set of User Groups. |
| 9 | Select Native User Type | This option is displayed only if "Select Authorization Server" is set to "Native". Select the Native user type to be "High Security User" or "Low Security User" as appropriate, on which the ACL is to be applied |
| 10 | Select Users | This list box is displayed only when "Select Assignment Type" is set to "Users" and the "Select User Type" is set as "Selected Users" in case of AD/LDAP server as Authorization Servers. It is also displayed when the "Select Authorization Server" is set to "Native" and the "Select Assignment Type" is set to "Users" Note: In case of AD/LDAP server: When you click on search box the users will be loaded. The user list can be narrowed down by keying in initial characters of the desired users in the search text box. This box would list the AD/LDAP users / High Security / Low Security Users based on the selected "Authorization Server" Select the list of Users by using "Ctrl" key and click on "Add" button to move the selected list of users on the list box on the right which indicates the list of users on which the Access Control would get applied. A set of selected Users can be removed by selecting them in the list box on the right and clicking on the "Delete" button |
| 11 | Select User Group | The User Group selection is similar to the User selection as described in row 10 above for "Select Users" with the only difference being that "User Groups" will need to be used in place of "Users" Choose User Group Following default groups can be used for authorization when using local database: DEFAULT_USER_GROUP: All users and groups SYSTEM: All Security Officers and administrators DEFAULT_BA_USER_GROUP: All users authenticating with basic username/password/token Following default group can be used for authorization when using AD/LDAP server: All Groups: All groups exiting on Ad/LDAP server. In this case the application group would be available to any user authorized by AD/LDAP server. Following default group is used for authorization when using RADIUS server: DEFAULT_RADIUS_USER_GROUP: All users authenticated and authorized by RADIUS server. Following default group is used for authorization when using PROID server: DEFAULT_PROID_USER_GROUP: All users authenticated and authorized by PROID server. |
Note
The below indicated fields are common for all Access Controls except for "Notification" type of Access Control, for which "Access Control Valid Till" is not applicable.
Also these fields are displayed at the end of the screen after the type specific configuration is filled in.
| # | Identifier | Description |
|---|---|---|
| 12 | Access Control Valid Till | Access control will expire after entered date. |
| 13 | Access Control State | The current ACL should be enabled immediately on clicking "Submit" button, or it can be kept as "Disabled" for the time being so that it can be explicitly enabled at a later point in time. |
Application Access Based Access Control
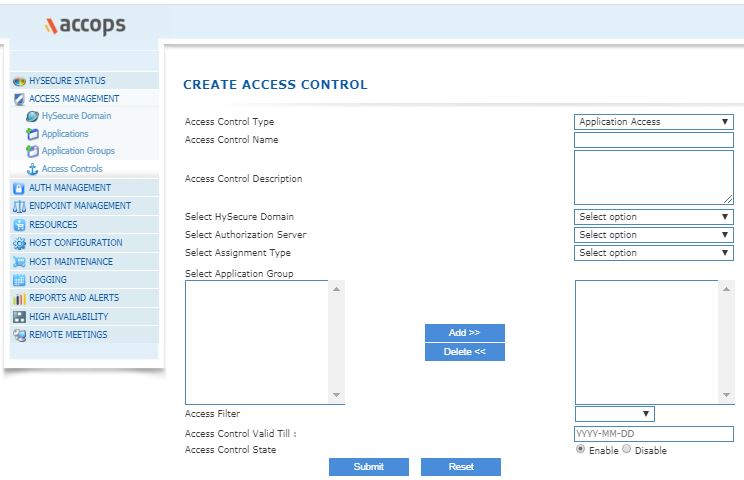
"Application Access" is a minimum kind of access control which would be needed. In its absence, a user will not be able to log into an application thereby defying the whole purpose of the product. To create an "Application Access" based Access Control, select "Access Control Type" as "Application Access" while carrying out Common Configuration. After filling the other common configuration, provide the below indicated configuration specific to "Application Access" and click on Submit button.
Note
If there are multiple Application Access based Access Controls, then all the Access Controls will get applied i.e. the user will get access to all the Applications for which access is enabled.
| # | Type | Description |
|---|---|---|
| 1 | Access Control Type | As part of Common Configuration, choose "Application Access" from the drop down list. |
| 2 | Select Application Group | This list box will list following types of application groups 1) Application Groups With "High" Security Level, if "Select Authorization Server" is set to "Native" and the "Select Native User Type"/"Select Native Group Type" is set to "High Security User"/"High Security Group" respectively 2) Application Groups with "Basic" Security Level (i.e Application Groups with Security Level "High" is unchecked), if a) "Select Authorization Server" is set to "Native" and the "Select Native User Type"/"Select Native Group Type" is set to "Low Security User"/"Low Security Group" respectively. OR b) "Select Authorization Server" has an AD/LDAP server selected Select application group(s) for assigning application groups to users/user groups. Select the list of Application Groups by using "Ctrl" key and click on "Add" button to move them to the list box on the right which indicates the list of application groups used for Access Control. A set of selected Application Groups can be removed by selecting them in the list box on the right and clicking on the "Delete" button |
| 3 | Access Filter | Select time based access filter which would have been configured through the page "Resources | Access Filters". The Access Filter defines the time frame in a specific timezone. So setting the Access Filter indicates the time period during the day when the Access Control will be enabled. ANY_TIME is a default Access Filter which if selected, would indicate that the Access Control will be enabled at all the time. |
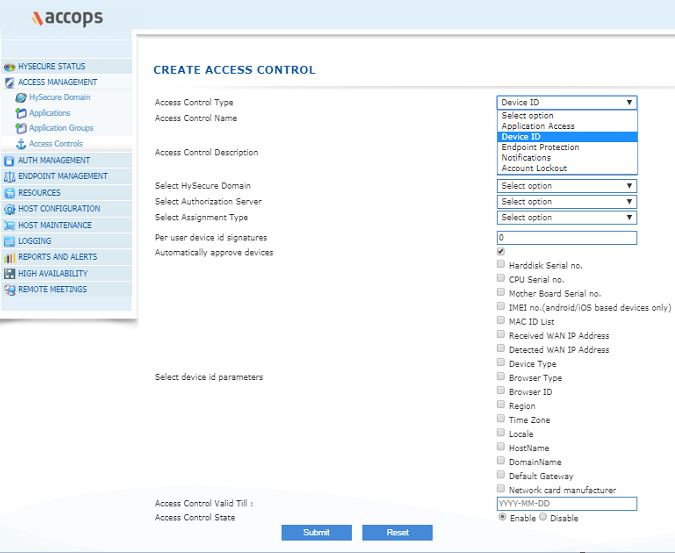
Device ID Fingerprinting Based Access Control
Device ID based finger printing feature will capture necessary details from the client machine running the HySecure client software. The Device ID is a unique set of numbers and letters generated and allotted by hardware manufacturers for identifying their device. Administrator can create access control for users / user groups based on Device ID fingerprinting.
If a "Device ID" based Access Control is to be created, select "Access Control Type" as "Device ID" while carrying out Common Configuration. After filling the other common configuration, provide the below indicated configuration specific to "Device ID" based Access Control and click on Submit button.
Warning
-
In order to ensure that the DeviceID Fingerprinting based Access Control takes effect, check the option "Enable collection of device fingerprint details from user device" from "Client Settings" under the "Advanced Settings" tab
-
If there are multiple Device ID based Access Controls, then the first matching Access Control will get applied.
| # | Type | Description |
|---|---|---|
| 1 | Access Control Type | As part of Common Configuration, choose "Device ID" from the drop down list. |
| 2 | Select priority of the Policy | |
| 3 | Per User Device Id Signatures | No. of devices allowed per user at a point in time. So with this value as 1, if a user is already logged in from a machine and s/he tries to login in from another machine, then the first session gets closed. |
| 4 | Automatically Approve Devices | If checked devices will be automatically approved. This means that the device from which the user logs in first, will get registered as a valid device. If not checked, the administrator would get an email notification of user's login and will have to approve every particular device from which user logs in. This approval happens through the "Endpoint Management" | "Device Management" page |
| 5 | Select Device ID Parameters | Choose atleast one of the following parameter for device identification. The selected information will be used for approval as a valid device Device ID: Hard disk Serial no: This represents the Serial number of Hard disk CPU Serial no: This represents the Serial number of CPU Mother Board Serial no: This represents the Serial number of Mother board IMEI number: IMEI Number of the device (For Android and iOS based Devices) MAC ID List: MAC Address of LAN card Received WAN IP address: WAN IP address of client, as received by the Server. This can be different than original IP address if client browser is proxy configured i.e. the client connects through some proxy. This option can be disabled using preference on the server side. Detected WAN IP address: This represents the real IP of the client. In case the client is on the internet and connects directly to the server, then the detected WAN IP and the Received WAN IP will be the same. Device Type: This defines the OS of the device from where the user logs in Browser Type: This represents the browser name. For e.g Chrome, Edge etc. Browser ID: This represents the browser ID Region: This represents the Client machine regional Settings Time zone: Time zone of end user machine Locale: Language which is set on client machine. HostName: This represents the hostname of the device from which the client attempts a login DomainName: This represents the domainof the device from which the client attempts a login Default gateway: This represents the Default gateway address of Client machine Network card manufacturer: This represents the name of NIC card manufacturer. |
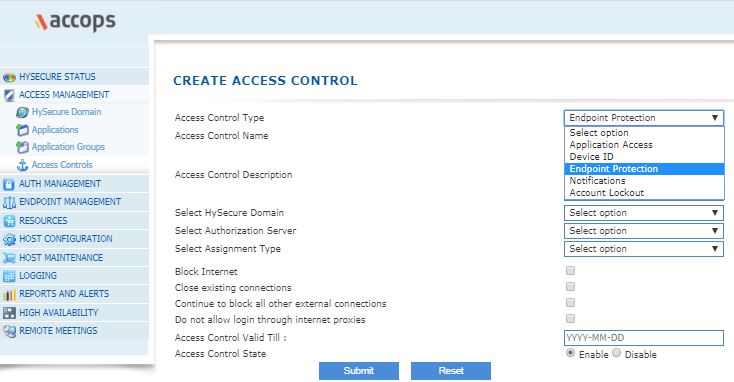
Endpoint Protection Based Access Control
To create an "Endpoint Protection" based Access Control, select "Access Control Type" as "Endpoint Protection" while carrying out Common Configuration. After filling the other common configuration, provide the below indicated configuration specific to "Endpoint Protection" and click on Submit button.
| # | Type | Description |
|---|---|---|
| 1 | Select Priority of the Policy | |
| 2 | Block Internet | Select this option to block internet on user machine after user logs in. |
| 3 | Close existing connections | Select this option to close already existing connections on user's machine on user login to the server. For e.g. there could be an RDP connection to another machine etc. Such connections get closed |
| 4 | Continue to block all other external connections | Select this option to block external connections continuously, even after login |
| 5 | Do not allow login through Internet proxies | Select this option to block HySecure login through Internet proxies. |
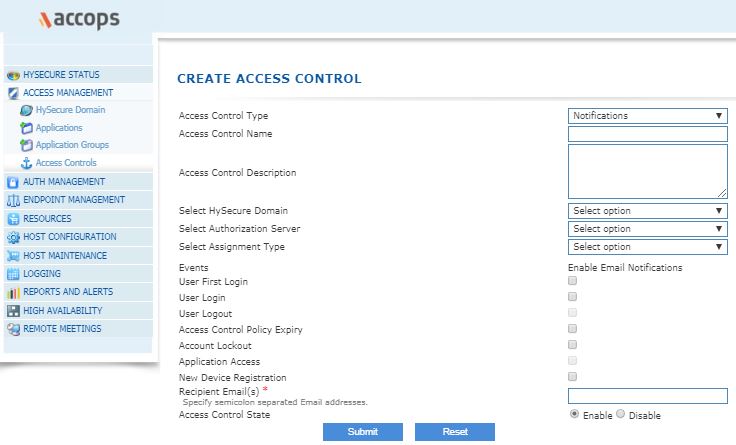
Notifications Based Access Control
To create a "Notifications" based Access Control, select "Access Control Type" as "Notifications" while carrying out Common Configuration. After filling the other common configuration, provide the below indicated configuration specific to "Notifications" and click on Submit button.
Note
-
Notifications are e-mail event based.
-
The event on which the notifications are sent are configured as part of this Access Control
| # | Field | Description |
|---|---|---|
| 1 | Events | Select one or more of the events on which email must be sent to those in the receiver list which is configured in "Recipient Email(s)" towards end of this page. Application Access and Account Logout are not available currently. |
| 2 | User First Login | Enable this option if notifications are to be sent on first user login. |
| 3 | User Login | Enable this option if notifications are to be sent on every user login. |
| 4 | User Logout | This is currently not implemented and hence is Greyed out |
| 5 | Access Control Policy Expiry | Enable this option if notifications are to be sent on expiry of Access Control which was enabled for the User / User Group. |
| 6 | Account Lockout | Enable this option if notifications are to be sent on user Account lockout. Note that this is not AD lockout but is rather the lockout by Administrator through the "Auth Management | User Profiles" page. The lockout can also happen from the "Account Lockout" Access Control |
| 7 | Application Access | This is currently not implemented and hence is Greyed out |
| 8 | New Device Registration | Enable this option if notifications are to be sent on a new Device Registration. The number of allowed devices from where a user can login, is configured as part of the Device ID Access Control |
| 9 | Recipient Email | Enter a semicolon separated list of email ids of the users who should receive an email notifying them about the above configured events that will occur. Ex: abc@gmail.com;xyz@gmail.com; |
Account Lockout Based Access Control
To create a "Account Lockout" based Access Control, select "Access Control Type" as "Account Lockout" while carrying out Common Configuration. After filling the other common configuration, provide the below indicated configuration specific to "Account Lockout" and click on Submit button.
Important
The Account Lockout Access Control is applicable on the complete domain and not on specific Users or User Groups

| # | Field | Description |
|---|---|---|
| 1 | User should not be able to login after entered days of first login | User account will be locked after entered no. of days after user's first login. |
| 2 | User should not be able to login after entered days of last login | User account will be locked after entered no. of days after user's last login. |
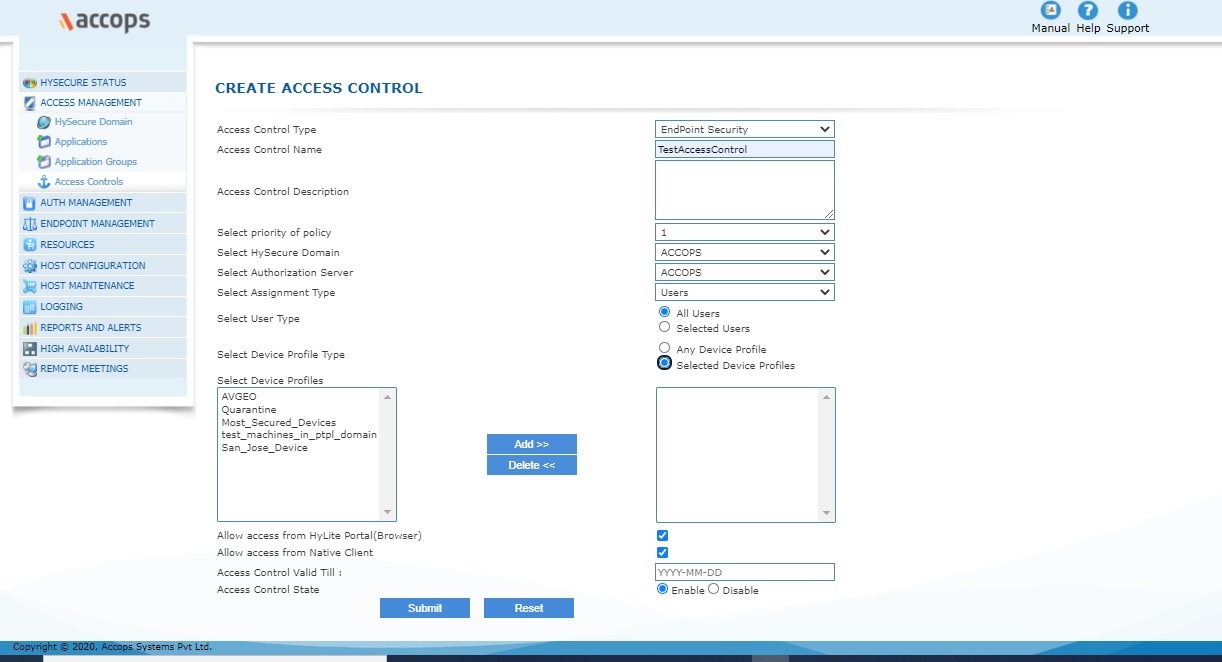
Endpoint Security Based Access Control
To create a "Endpoint Security" based Access Control, select "Access Control Type" as "Endpoint Security" while carrying out Common Configuration. After filling the other common configuration, provide the below indicated configuration specific to "Endpoint Security" and click on Submit button.
| # | Field | Description |
|---|---|---|
| 1 | Select Device Profile Type | Select "Any Device Profile", if this EPS based Access Control is to be applied for any device. Select "Selected Device Profiles" if this Access Control is to be applied on a specific set of device profiles |
| 2 | Select Device Profiles | This list box is displayed if "Select Device Profile Type" is set as "Selected Device Profiles". The list box will display the list of Device Profiles which were created through the "Endpoint Management | Device Profiles" page. Select the list of Device Profiles by using "Ctrl" key and click on "Add" button to move the selected list of device profiles on the list box on the right which indicates the list of device profiles on which the Access Control would get applied. A set of selected device profiles can be removed by selecting them in the list box on the right and clicking on the "Delete" button |
| 3 | Allow Access from HyLite Portal (Browser) | Check this option if the user login is to be allowed from HyLite Portal (Browser) |
| 4 | Allow access from Native Client | Check this option if the user login is to be allowed from Native Client |