Local Users
Overview
A user needs to log in to HySecure to either access the applications securely over the network OR manage HySecure through the Management Console. Typically organizations would integrate their AD / LDAP servers with HySecure so that the users would authenticate with the corresponding authentication servers. There are, however, situations where an organization does not have an AD or LDAP server OR they may not want to integrate such servers with HySecure for internal reasons. In such cases, HySecure provides support of local users. This page provides details on Local User management including their creation.
Note
User accounts should not be created for the users of the integrated authentication servers like AD, LDAP, RADIUS etc.
User Roles
Local Users can have different roles as described below:
| User | Privileges |
|---|---|
| Low Security Users: | Low Security Users can be Native, LDAP/ ADS, or RADIUS users who are authenticated with the weaker Basic Authentication mechanism. They primarily logon with just the username and password. If you wish to have users login with their Active Directory credentials then you do not have to create them an account on the HySecure server. See configuring Authentication Servers for more information. |
| High Security Users: | High Security Users are Power Users who are authenticated with the stronger Certificate-based authentication mechanism. Security Officers, Administrators & Monitoring Users are Power Users by default. High Security Users are thus end users with stronger authentication mechanism involving certificates. |
| Administrator (Admin): | Administrator can create, delete, and modify other Administrators, High Security, and Low Security Users. They can also administer Applications, User Groups, and Application Groups, and manage the Access Control Lists (ACL's) for User Groups. Admin users cannot create, modify, or delete a Security Officer Admin also cannot apply license, cannot upload certificates and cannot even apply upgrade |
| Security Officer (SO): | The most privileged of all HySecure users. A Security Officer can create, delete, and modify other SOs, Administrators, High Security, and Low Security Users. An SO can also manage the Access Control Lists (ACL) for User Groups, as well as manage applications. Only a Security Officer can change the Server State, Database Password, and Basic Authentication Method and Enable/Disable SSH. |
| Monitoring User |
Important
Security Officers, Administrators, and High Security Users can also log on to HySecure with Basic Authentication but they will NOT have the Power User privileges when they log on with Login ID and Password.
You can integrate HySecure with LDAP, ADS or RADIUS authentication servers. This allows the users registered with these servers to log on to VPN with their LDAP, ADS, or RADIUS user accounts. There is no need to create user accounts in the HySecure server (Native Database) for these users. However, the LDAP, ADS, or RADIUS users have only Low Security User privileges. For High Security User privileges, you must create an account for the user in the HySecure database.
Local User List
To get the existing list of local users, perform the following steps:
- Open the Management console and expand AUTH MANAGEMENT
- Select Local Users from the sub menu
- All the created users will be visible on this page in a tabular manner with the following information of each user:

| # | Field | Description |
|---|---|---|
| 1. | UserID | This is the id of the user with which s/he would log in to HySecure. |
| 2. | User Name | This is the full name of the user |
| 3. | This is the Email id of the user | |
| 4. | Role | This represents the type of user which can be a "Security Officer", "Low Security User", "High Security User", "Administrator" or "Monitoring User". Details of the roles are available in the User Roles section |
| 5. | Class | The class of the user can be either a "User" or "Machine". Machine type of users are used in case of site-to-site VPN configurations. |
| 6. | ID | This is the ID of the user generated by the system |
Search Local Users
In case there are a large number of configured users, the administrator can filter or search a particular user based on any of the columns except the system generated ID.
The field on which the list is to be filtered can be selected in the "Search Filter" drop down list. The search values can then be specified in the "Search User" text box. On clicking the "Show" button, the filtered list will get displayed.
Exporting User List
On the Local Users page, click on Export User List on top right of the page. The list of users will be exported and downloaded in a csv format.
Adding User
On the Local Users page, click on the Add button to create a user and provide the following information and click on Submit button.
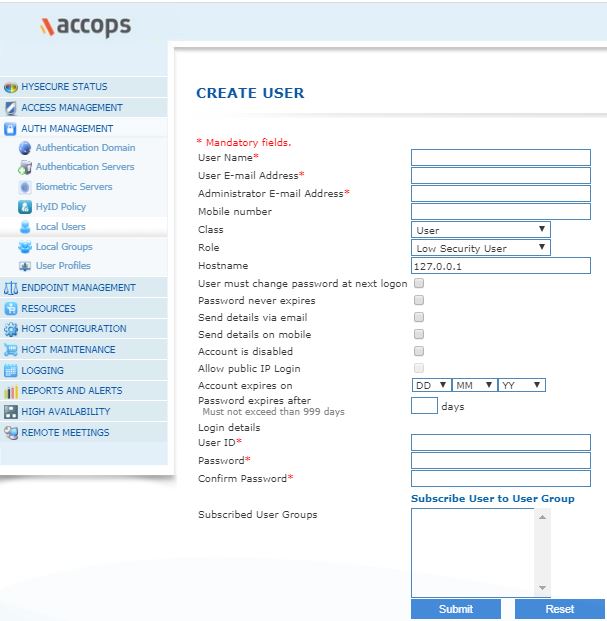
| Field | Description |
|---|---|
| Username | Enter user's full name. |
| User E-mail Address | Enter user's email address. |
| Administrator E-mail Address | Enter Administrator's email Address. |
| Mobile number | Enter users mobile number to send sms messages. |
| Class | From the Class drop-down menu select the user's class from the list. Select class as Machine in case you want to configure site-to-site vpn only. |
| Role | On the Role drop-down menu select the user's role from the list. Note that the High Security User and the Low Security User are created for providing application access whereas the Administrator, Security Officer and Monitoring User are primarily for managing the system. |
| Hostname | Hostname of the HySecure server (for Site-to-Site Connections). In other cases, use the default value of 127.0.0.1 |
| User must change password at next logon | Check the checkbox if password change is to be enforced for this user, at the immediate next login post this change |
| Password never expires | Check the checkbox if the password is not expected to expire |
| Send details via email | Check the checkbox if authentication details are to be sent via email of this user which is configured as the User E-mail Address on this page. |
| Send details on mobile | Check the checkbox if authentication details are to be sent via sms to the monile number which is configured as Mobile Number on this page. |
| Account is disabled | Administrators can mark an account in disabled state for a time period. Check the checkbox if the acount is to be kept disabled. Uncheck it, if otherwise. |
| Allow Public IP Login | This option is for management users like Administrator, Security Officer and Monitoring User. Check this checkbox if the management user needs to be allowed login from a public IP. Uncheck it, if otherwise. |
| Account expires on | Administrator can set a date when the account will automatically expire. After the given date the user account is set to "disabled". This option is applicable only for basic authentication and certificate users. This option is not applicable to security officers and administrators. |
| Password expires after | Specify the number of days after which the password expires for this user |
| User ID | Enter the user ID which will be used by the user while logging in to HySecure gateway. This field is available to all types of users except Machine Class User. |
| Password | Type the user's password in the Password field. |
| Confirm Password | Type the user's password again in this field. |
| Subscribed User Groups | Assign user to local user groups by clicking on the Subscribe User to User Group. A dialog box would appear where in all existing users groups are visible and the appropriate groups can be added. (Refer Add User to User Group section for more information). |
| Submit | Click Submit to create user or click Reset to clear the data entered in the fields. A success message confirms that the user has been created. |
Note
All High Security Users must enroll in order to access VPN. All users must download the root certificate (cacert.cer) and import it to the browser, in the list of Trusted Root Certification Authorities.
Modifying User Details
On the Local Users page, select the user whose details are to be modified and click on the Modify button. Modify the details as appropriate and click on Submit button for the changes to take effect. The changes will be effective post the next logon of the user.
Note
The Username, UserID and the Role cannot be changed.
Deleting User
On the Local Users page, select the user which need to be deleted and click on the Delete button. On confirmation, the user will be deleted.
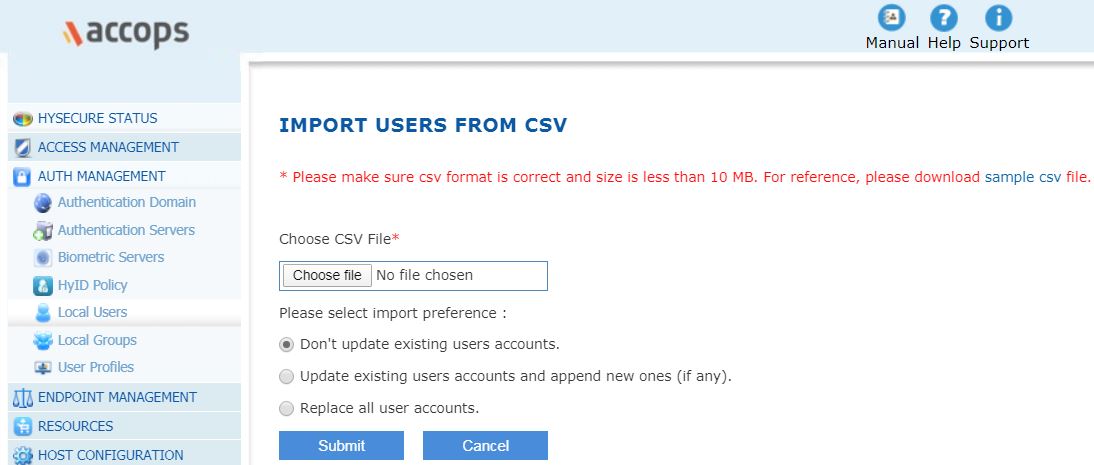
Importing Users From a csv file
On the Local Users page, click on the Import users from CSV button. A dialog would appear. Follow the steps mentioned below:
-
Click on the sample csv link to download a template file. This sample file contains the format of user data. The bulk user data to be imported, must be in the indicated format.
-
The sample file has the correct format of arranging data along with column names. The table below provides description of each column
# Column Description 1 INDEX_U_NAME Mention the user's display name here 2 INDEX_U_UID Mention userID here. The ID mentioned here will be used by users to login to Accops 3 INDEX_U_PASSWD Mention user password here 4 INDEX_U_EMAILID Mention user mail IDs here. These will be used to send Email OTPs in case MFA is configured for email 5 INDEX_U_EMAILCC Mention admin mail ID here. This can be a common mail ID used for the administrator managing the solution 6 INDEX_U_MOBILENO Mention user mobile numbers here. These will be used to send SMS OTPs in case MFA is configured for SMS 7 INDEX_U_USERGROUP i. Mention the group name the user should be a part of. Generally, if a user group is not created, the newly mentioned group shall be created upon import and user will be added automatically to the group
ii. If a group is already present, mention the correct name hereImportant
For rest of the columns, follow the already inserted value throughout. Do not change the values unless asked for.
-
Choose the file by clicking on the Choose File button
-
Upload the CSV file with the updated user data
-
Select one of the following import preferences:
-
Don't update existing users accounts: Select this option if the existing user accounts are not to be updated.
-
Update existing users accounts and append new ones (if any): Select this option if existing user accounts are to be updated and new accounts are to be added.
-
Replace all user accounts: Select this option if all existing low security users are to be replaced by the csv uploaded users.
-
-
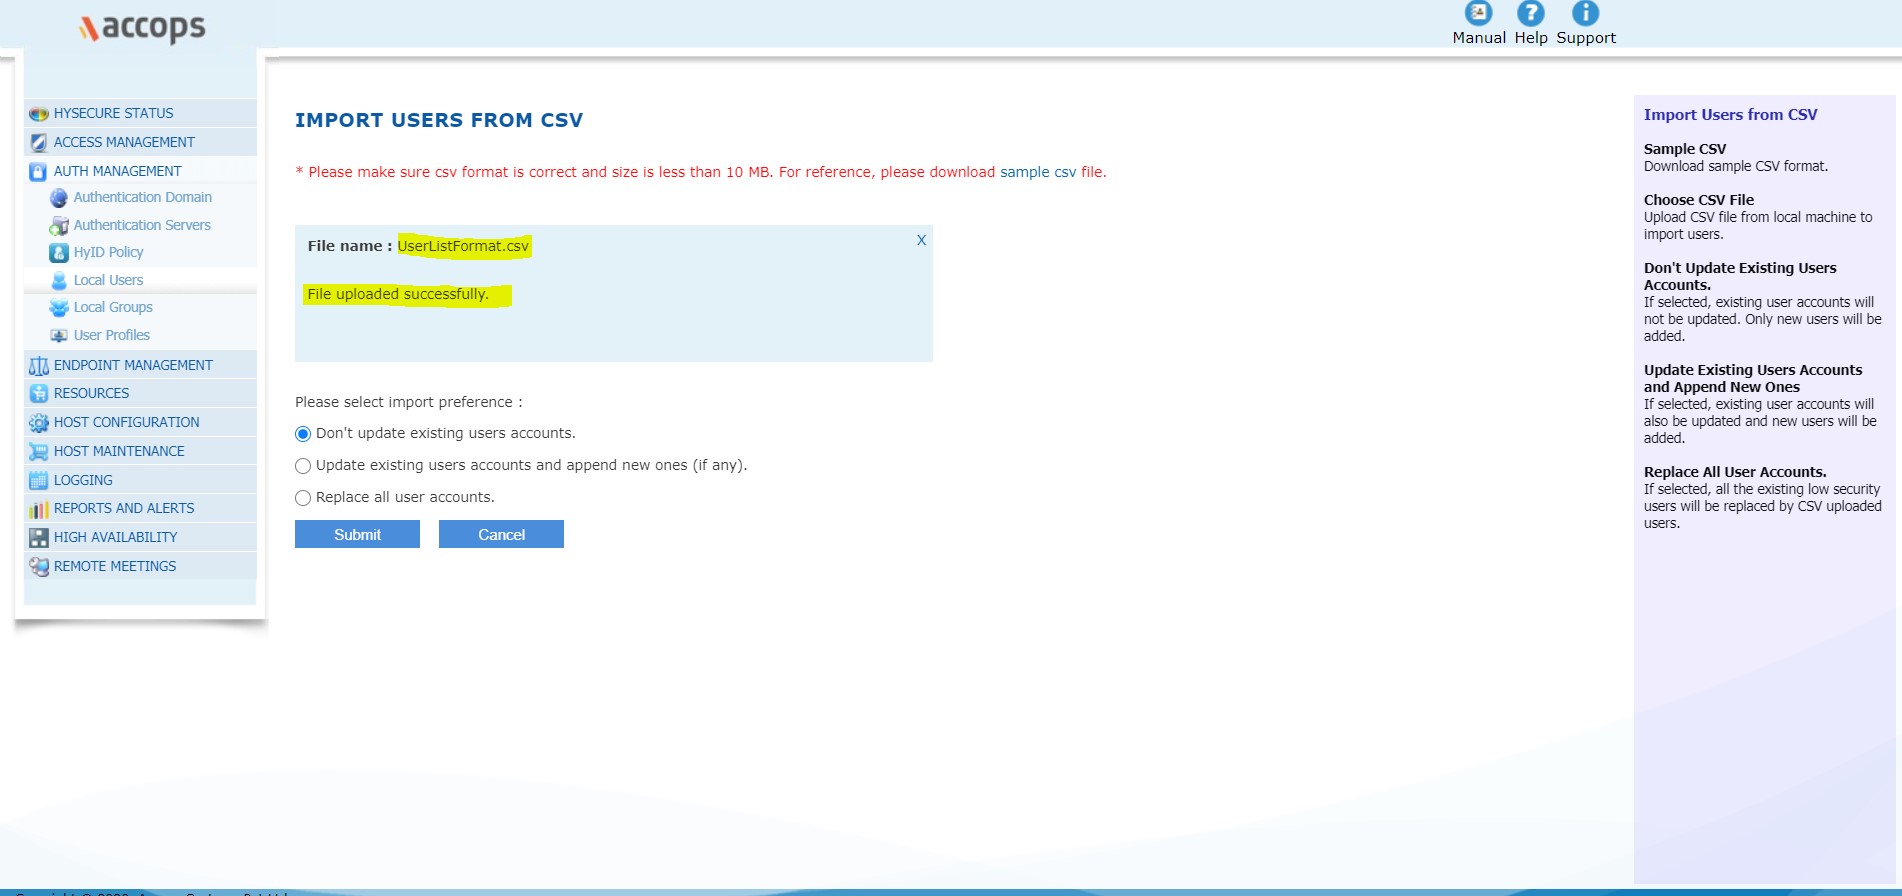
Click Submit. Wait for the file to upload successfully. Upon success, admin shall get a message saying "File uploaded successfully". If any errors found in the file, then these will also be highlighted here with a downloadable link for incorrect entries. Clear the errors and retry uploading.
-
Verify the user accounts by clicking on the Local Users section.
Reset Passphrase
On the Local Users page, select the user(s) whose passphrase is to be reset, and click on Reset Passphrase button. The passphrase of certificate user will be reset and sent to the user Email id. One of the common use of this option is when the user loses his/her certificate. Note: The user should be enrolled for the passphrase to be reset.