Local Groups
Overview
The local users can be organized into logical local groups based on the organization requirements like department, so that appropriate policies can be applied on those group of users.
The Local Groups page provides management of local groups including their creation. To get the list of configured local groups and manage them, perform the following steps.
-
Open the Management console and expand AUTH MANAGEMENT
-
Select Local Groups
-
All the created Local Groups will be listed on this page in a tabular manner with the following information for each group.
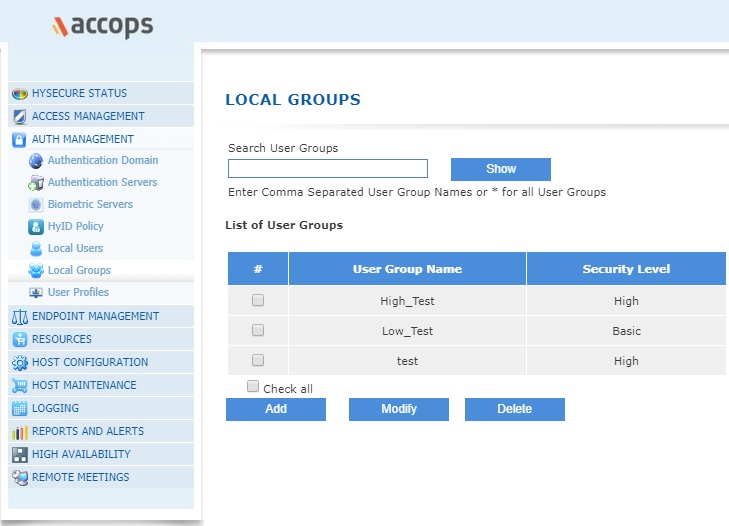
| # | Field | Description |
|---|---|---|
| 1. | User Group Name | This is the logical name of the Local Group |
| 2. | Security Level | This is the security level of the group. A High level would indicate that only certificate users will be part of this group |
Search Local Groups
In case there are a large number of configured Local Groups, the administrator can filter or search a particular User Group, based on either a single User Group name or multiple User Group names.
The list can be filtered on the various User Group names by specifying these as "Comma" separated names in the "Search USer Groups" text box. On clicking the "Show" button, the filtered list will get displayed.
The administrator can also search the groups based on full or partial User Group Name. The full/partial name can be entered in the Search User Groups text box and the Show button needs to be clicked to get the desired list.
Once the filtered list is available, the complete list can be displayed by entering "*" in "Search User Groups" text box and clicking on "Show" button.
Add Local Group
On the Local Groups page, click on Add button to create a Local Group and provide the information indicated against each head.
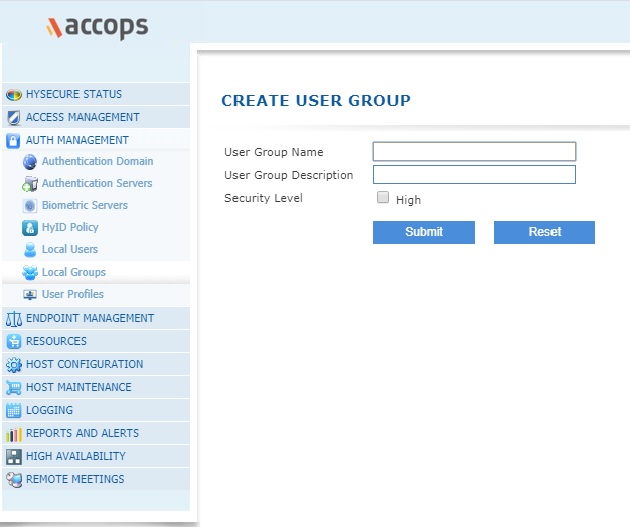
| S.No. | Field | Type | Description |
|---|---|---|---|
| 1 | User Group Name | String | This is a logical identifier for the Local User Group which is used primarily to match the user being part of the group so that an appropriate policy can get applied. This name is also used for for listing as well as logging and reporting. |
| 2 | User Group Description | String | Enter the description of the need or use of this Local Group for an easy recall. |
| 3 | Security Level | CheckBox | Check the box, if the users of this group are expected to be certificate users. The group can, however, be associated with both the High and Basic security Application Groups. |
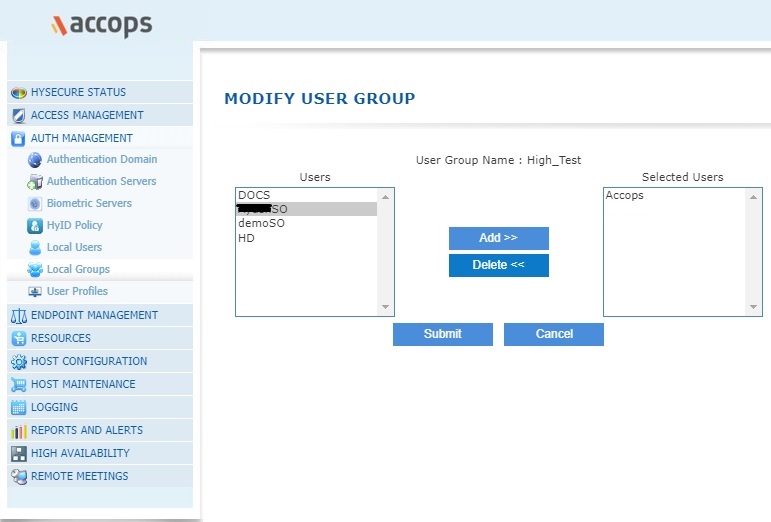
Modify Local Group
On the Local Groups page, select the group whose members are to be modified and click on the Modify button. Add or Delete members from this group, as appropriate and click on Submit button for the changes to take effect.
Delete Local Group
In order to delete the Local Group, all the users of the group need to be deleted by using the Modify button. Once that is done, select the group which needs to be deleted and click on the Delete button. On confirmation, the Local Group will be deleted.
OLD TEXT STARTES HERE User Groups allow you to organize Users on the basis of function, logistics or any criteria that suits your organization.
Accops HySecure has three default User Groups:
- SYSTEM
- DEFAULT_USER_GROUP
- DEFAULT_BA_USER_GROUP The Security Officers and Administrators belong to SYSTEM group. The other Certificate-based (High Security Users) users belong to DEFAULT_USER_GROUP. And the Native Basic Authentication Users (Low Security Users) belong to DEFAULT_BA_USER_GROUP. Accops HySecure Administrator can create other User Groups of the following types:
- High Security(HS) User Group
- Basic Authentication(BA) User Group
The Native Basic Authentication Users can be subscribed to BA User Group while the High Security Users can be subscribed to both HS and BA User Groups. NB: The User Groups for the LDAP/ADS users are obtained from the LDAP/ADS servers. The RADIUS users belong to DEFAULT_RADIUS_USER_GROUP group.
Creating User Group
- In the Administration menu on the left side of the management console, click Access Management > Local Groups. Choose to Add Local Group.
- Type the group name in the User Group Name field.
- Type the group description in the User Group Description field.
- To create a High Security User Group, click on the check box for High Security Level. To create a Basic Authentication User Group, leave it empty.
- Click Submit to create the User Group or click Reset to clear all data in this screen. A success message confirms that the User Group has been created.
Deleting User Group
- In the Local Groups screen, click on the box for the User Group(s) you want to delete. To select all groups, click on the Check all box below the table.
- Click Delete to delete the selected group(s).
- When prompted for deletion confirmation, click OK to delete the group(s) or click Cancel to abort.
Adding User to User Group
- Low Security Users belong to DEFAULT_BA_USER_GROUP by default, and High Security Users to DEFAULT_USER_GROUP. Security Officers and Administrators belong to SYSTEM group by default.
- Accops HySecure Administrator can create other User Groups of type HS (High Security) User Group or BA (Basic Authentication) User Group, and add the registered users to these groups. A Low Security User can belong to multiple BA User Groups while a High Security User can belong to multiple HS and BA User Groups. Users can access the Applications in the Application Groups assigned to the Users Groups to which they belong.
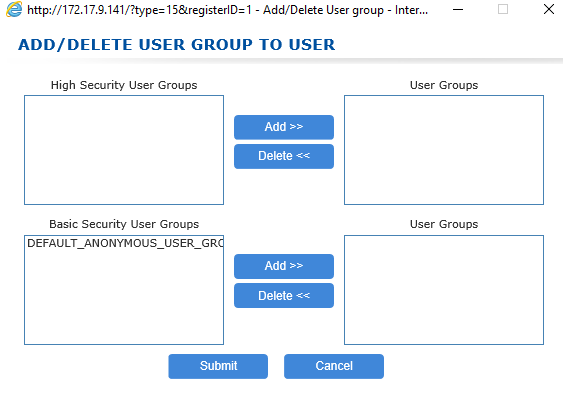
Adding Low Security Users to User Groups
-
While in the Create User screen or Modify User screen, click on the Subscribe User to User Group link. The Add/Delete user group screen appears.
-
Select the User group(s) in the Basic Security User Groups table to which this user should be subscribed, and click Add. The selected user group(s) move from Basic Security User groups table to the User Groups table on the opposite side of the screen.
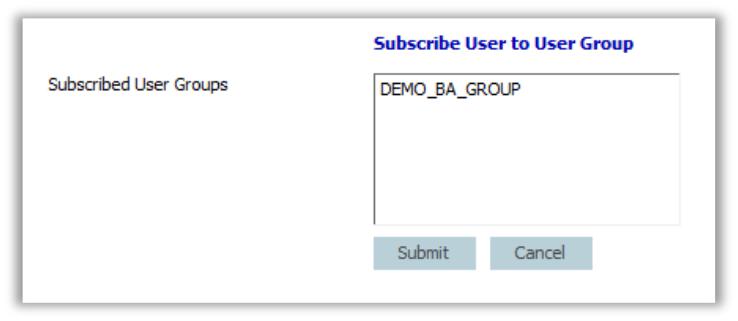
- Click Submit to subscribe the user to the selected user groups or click Cancel to abort. The group name(s) will be listed in the Subscribed User Group list on the user's account screen.
Adding High Security Users to User Groups
- While in the Create User screen or Modify User screen, click on the Subscribe User to User Group link.
The Add/Delete user group screen appears.
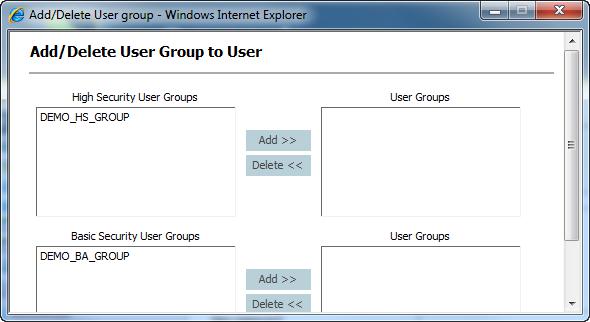
- Select the High Security User Group(s) to which this user should be subscribed, and click Add. The selected user group(s) move from High Security User groups table to the User Groups table on the opposite side of the screen.
- Select the Basic Security User Group(s) to which this user should be subscribed, and click Add. The selected user group(s) move from Basic Security User Groups table to the User Groups table on the opposite side of the screen.
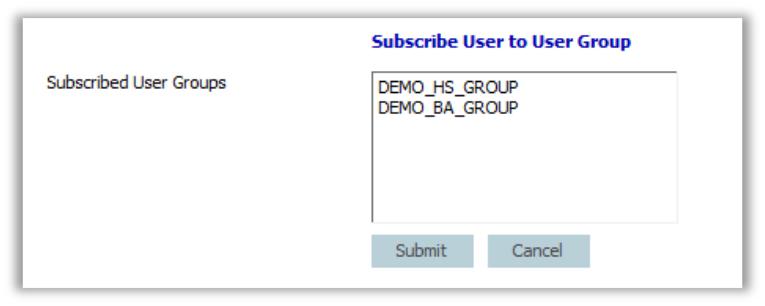
- Click Submit to subscribe the user to the selected user groups or click Cancel to abort.
The group name(s) will be listed in the Subscribed User Group list on the user's account screen.
 Note: Subscription to user groups is not applied until after you have completely saved the User data.
Modifying Subscription to User Group

- In the Modify User screen, click on the Subscribe User to User Group link. The Add/Delete user group screen appears (this screen varies, depending on the user type).
- To remove the user from any User Groups, select the subscribed User group(s) from which the user should be removed in the User Groups table and click Delete. The selected group(s) move from the User groups table to the Basic Security User Groups or High Security User Groups table on the opposite side of the screen.
- Click Submit to update the list of selected user groups or click Cancel to abort. The changes will be listed in the Subscribed User Group list on this user's Modify User screen.
Local Groups
The Administrator can specify a list of native/local groups that are not allowed to login into the HySecure server. This feature can be used when the external authentication server cannot provide any role information and local groups need to be used to put users into particular roles. In that case specific local groups can be blocked to login into HySecure.