Host Scan Policies
Overview
Host Scan policies help define the endpoint information like the AV product being used, firewall being used, its geolocation etc. which can be evaluated for allowing appropriate application access to the user logging in from the endpoint.
Important
The Host Scan policy by itself is not sufficient to decide on the application access, rather it becomes effective only when it gets attached to a Device Profile and the device profile is matched for the connecting endpoint.
Following types of Host Scan policies can be created
- Antivirus based
- Firewall based
- Antispyware based
- MAC Address based
- IP Address based
- Geolocation
- Domain
- Windows Update
- Wan IP Address
Some of the Host Scan policies are evaluated for existence of different types of 3rd party products as well. An example is Antivirus which gets evaluated for different 3rd party products like Symantec, McAfee, QuickHeal etc.
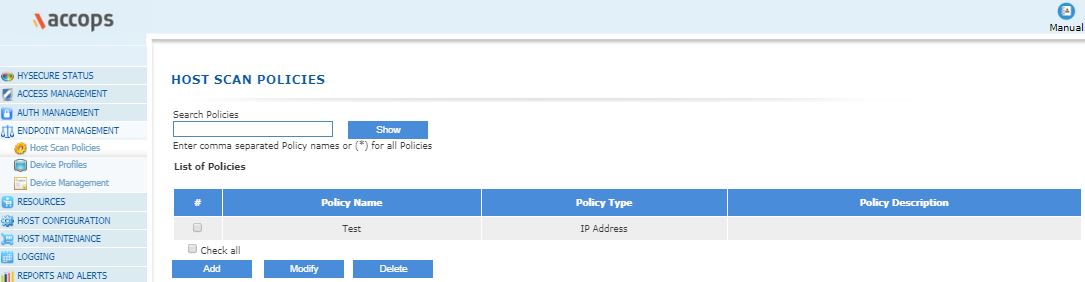
Host Scan Policy Listing
To get the list of Host Scan Policies created and eventually create Host Scan Policies, perform the following steps:
- Open the Management console and expand ENDPOINT MANAGEMENT
- Select Host Scan Policies from the sub menu
- All the created Host Scan Policies will be visible on this page in a tabular manner with the following information of each user:
| # | Field | Description |
|---|---|---|
| 1 | Policy Name | Host Scan Policy Identifier |
| 2 | Policy Type | Policy Type: Details: Antivirus: This policy scans for 1 or more Antivirus products. Firewall: This policy scans for 1 or more Firewall products. Antispyware: This policy scans for 1 or more Antispyware products. IP Address: This policy checks for IP address of endpoint. MAC Address: This policy checks for MAC Address of endpoint.Geolocation: Domain: Windows Update: Wan IP Address: |
| 3 | Policy Description | Policy description |
Search Host Scan Policy
The Host Scan policy list can be filtered or searched on the policy name by entering the name in the "Search Policies" text box and clicking the "Show" button.
Adding Host Scan Policies
With Accops HySecure you can create following type of policies:
- Antivirus based
- Firewall based
- Antispyware based
- MAC Address based
- IP Address based
- Geolocation
- Domain
- Windows Update
- Wan IP Address
These policies can be then linked with the security profiles described in later section Device Profile Management.
| # | Field | Description |
|---|---|---|
| 1 | Policy Name | Host Scan Policy Identifier |
| 2 | Policy Type | Policy Type: Details: Antivirus: This policy scans for 1 or more Antivirus products. Firewall: This policy scans for 1 or more Firewall products. Antispyware: This policy scans for 1 or more Antispyware products. IP Address: This policy checks for IP address of endpoint. MAC Address: This policy checks for MAC Address of endpoint.Geolocation: Domain: Windows Update: Wan IP Address: |
| 3 | Policy Description | Policy description |
| 4 | Sub-Policies | Add sub-policies to this policies. Sub-Policy is an element of type as "Policy Type". A Sub-Policy can have more than 1 rule. All rules must pass on endpoint for a Sub-policy to pass. |
| 5 | Add Product Policy | Add a Sub-policy of selected policy type |
| 6 | Copy | Copy to create a new Sub-policy |
| 7 | Edit | Modify a Sub-policy |
| 8 | Delete | Delete a Sub-policy |
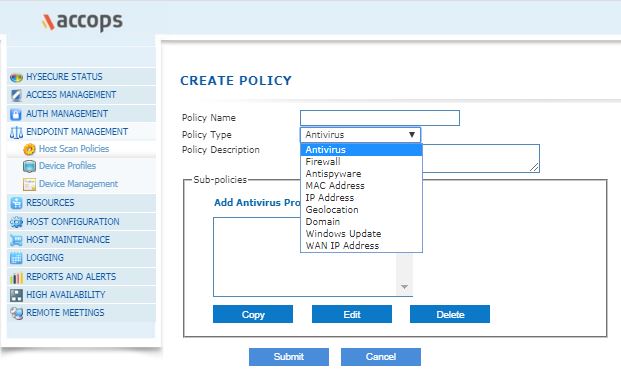
Sub-policies
The Sub-policies can have 1 or more policies of the type as selected in the "Policy Type". All sub-policies must get evaluated and satisfied for the end-point to connect to HySecure.
As part of the sub-policies, the HySecure Administrator can create different types of product Policies as are the policy types available.
| # | Button / Link | Description |
|---|---|---|
| 1 | This link will be available as per the selected policy type. For e.g. if the "Policy Type" is selected as "Antivirus", then the link will indicate, "Add Antivirus Product Policy". Clicking on the link will take to a product policy configuration corresponding to the selected Policy Type. The details of each type of product policy creation is described in section below | |
| 2 | Copy | A selected product policy listed in the list box containing sub-policies, gets copied on clicking the "Copy" button. This will also pop up a dialog where the destination policy name will need to be entered. The fields of the destination sub-policy will be copied with the fields of the selected product policy. |
| 3 | Edit | Click on the Edit button to edit the selected sub-policy |
| 4 | Delete | The selected sub-policy will get deleted on confirmation |
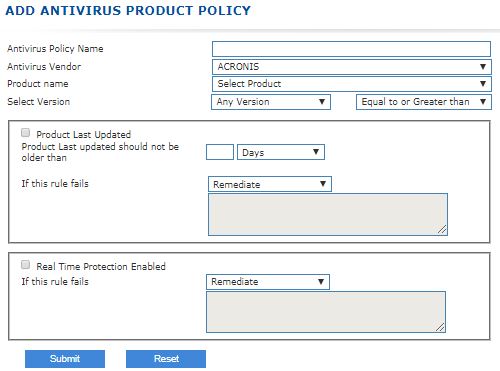
Adding Antivirus Product Policy
- On the "CREATE POLICY" page, select policy type "Antivirus" from "Policy Type" drop down list, click on the "Add Antivirus Product Policy" link. The Add Antivirus Product Policy screen will appears.
- Add an Antivirus Product Policy to the Host Policy
| # | Field | Description |
|---|---|---|
| 1 | Antivirus Policy Name | Identifier to the Antivirus Policy. |
| 2 | Antivirus Vendor | Select an Antivirus Product Vendor. |
| 3 | Product Name | Select a Product from the Antivirus product list from the selected Vendor. |
| 4 | Select Version | Select the Version for the selected Product. Selecting 'Any Version' will check for the any version for the product. 'Equal to or Greater than' will check for the same version or higher version. 'Equal to' will check for the same version of the product. |
| 5 | Product Last Updated | Enabling this option will check for last updated date of the Antivirus on the Device. Specify the number of days/weeks to check for the last updated date. |
| 6 | Real Time Protection Enabled | Enabling this option will check the Status of the Antivirus on the Device. i.e., whether On/Off. |
| 7 | Remediate | Selecting 'Remediate' for any of the above options will remediate the Endpoint Device automatically (if any problem occurs). |
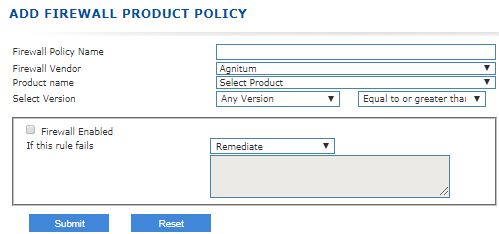
Adding Firewall Product Policy
-
On the "CREATE POLICY" page, select policy type "Firewall" from "Policy Type" drop down list, click on the "Add Firewall Product Policy" link. The Add Firewall Product Policy screen will appears.
-
Add an Firewall Product Policy to the Host Policy
| # | Field | Description |
|---|---|---|
| 1 | Firewall Policy Name | Identifier to the Firewall Policy. |
| 2 | Firewall Vendor | Select a Firewall Product Vendor. |
| 3 | Product Name | Select a Product from the Firewall product list from the selected Vendor. |
| 4 | Select Version | Select the Version for the selected Product. Selecting 'Any Version' will check for the any version for the product. 'Equal to or Greater than' will check for the same version or higher version. 'Equal to' will check for the same version of the product. |
| 5 | Firewall Enabled | Enabling this option will check the Status of the Firewall on the Device. i.e., whether On/Off. |
| 6 | Remediate | Selecting 'Remediate' for the above option will remediate the Endpoint Device automatically (if any problem occurs). |
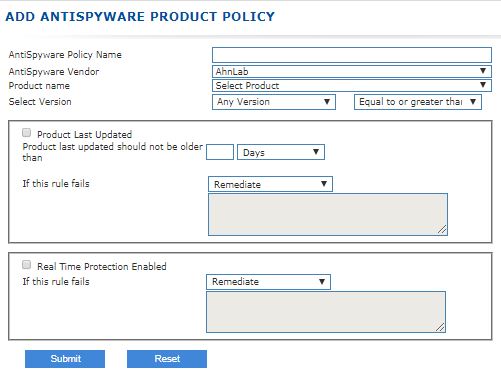
Adding Antispyware Product Policy
- On the "CREATE POLICY" page, select policy type "Antispyware" from "Policy Type" drop down list, click on the "Add Antispyware Product Policy" link. The Add Antispyware Product Policy screen will appears.
- Add an Antispyware Product Policy to the Host Policy
| # | Field | Description |
|---|---|---|
| 1 | Antispyware Policy Name | Identifier to the Antispyware Policy. |
| 2 | Antispyware Vendor | Select an Antispyware Product Vendor. |
| 3 | Product Name | Select a Product from the Antispyware product list from the selected Vendor. |
| 4 | Select Version | Select the Version for the selected Product. Selecting 'Any Version' will check for the any version for the product. 'Equal to or Greater than' will check for the same version or higher version. 'Equal to' will check for the same version of the product. |
| 5 | Product Last Updated | Enabling this option will check for Last Updated date of the Product on the Device. Specify the number of days/weeks to check for the definition age. |
| 6 | Real Time Protection Enabled | Enabling this option will check the Status of the Antispyware on the Device. i.e., whether On/Off. |
| 7 | Remediate | Selecting 'Remediate' for any of the above options will remediate the Endpoint Device automatically (if any problem occurs). |
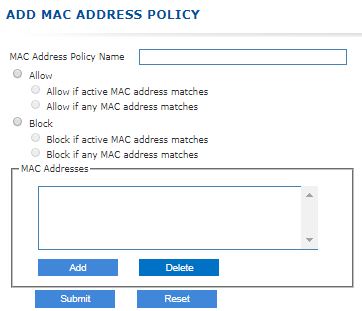
Adding MAC Address Product Policy
- On the "CREATE POLICY" page, select policy type "MAC Address" from "Policy Type" drop down list, click on the "Add MAC Address Product Policy" link. The Add MAC Address Product Policy screen will appears.
- Add an MAC Address Product Policy to the Host Policy
| # | Field | Description |
|---|---|---|
| 1 | MAC Address Policy Name | Identifier to the MAC Address Policy. |
| 2 | Allow | 1. Allow if active MAC address matches : Selecting this option will allow the User to Login only when the Active MAC Address (MAC Address of the Endpoint Device's network interface from which the connection is made to the VPN). matches with the configured ones in this policy. 2. Allow if any MAC address matches : Selecting this option will allow the User to Login only when any of the MAC Addresses matches with the configured ones in this policy. |
| 3 | Block | 1. Block if active MAC address matches : Selecting this option will allow the User to Login only when the Active MAC Address (MAC Address of the Endpoint Device's network interface from which the connection is made to the VPN). does NOT match with the configured ones in this policy. 2. Block if any MAC address matches : Selecting this option will allow the User to Login only when any of the MAC Addresses does NOT match with the configured ones in this policy. |
| 4 | MAC Addresses | Add : Add the MAC Addresses in the format - AA:BB:CC:DD:EE:FF |
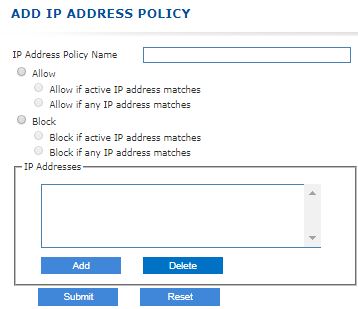
Adding IP Address Product Policy
- On the "CREATE POLICY" page, select policy type "IP Address" from "Policy Type" drop down list, click on the "Add IP Address Product Policy" link. The Add IP Address Product Policy screen will appears.
- Add an IP Address Product Policy to the Host Policy
| # | Field | Description |
|---|---|---|
| 1 | IP Address Policy Name | Identifier to the IP Address Policy. |
| 2 | Allow | 1. Allow if active IP address matches: Selecting this option will allow the User to Login only when the Active IP Address (IP Address of the Endpoint Device's network interface from which the connection is made to the VPN). matches with the configured ones in this policy. 2. Allow if any IP address matches: Selecting this option will allow the User to Login only when any of the IP Addresses matches with the configured ones in this policy. |
| 3 | Block | 1. Block if active IP address matches: Selecting this option will allow the User to Login only when the Active IP Address (IP Address of the Endpoint Device's network interface from which the connection is made to the VPN). does NOT match with the configured ones in this policy. 2. Block if any IP address matches: Selecting this option will allow the User to Login only when any of the IP Addresses does NOT match with the configured ones in this policy. |
| 4 | IP Addresses | Add : Add the IP Addresses in the format - 192.168.1.10 |
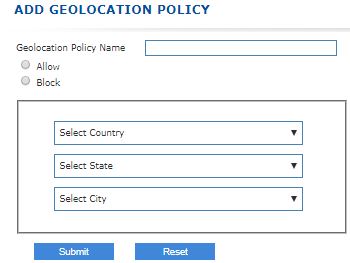
Adding Geolocation Product Policy
- On the "CREATE POLICY" page, select policy type "Geolocation" from "Policy Type" drop down list, click on the "Add Geolocation product policy" link. The Add Geolocation Product Policy screen will appears.
- Add an Geolocation Product Policy to the Host Policy
| # | Field | Description |
|---|---|---|
| 1 | Geolocation Name | Identifier to the Geolocation Policy. |
| 2 | Allow | Select this option to allow user to login only from below specified location. |
| 3 | Block | Select this option to block user to login only from below specified location. |
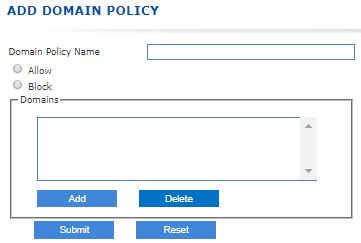
Adding Domain Product Policy
- On the "CREATE POLICY" page, select policy type "Domain" from "Policy Type" drop down list, click on the "Add Domain product policy" link. The Add Domain Product Policy screen will appears.
- Add an Domain Product Policy to the Host Policy
| # | Field | Description |
|---|---|---|
| 1 | Domain Policy Name | Identifier to the Domain policy. |
| 2 | Allow | Allow if Domain matches : Selecting this option will allow the User to Login only when the Domain matches with the configured ones in this policy. |
| 3 | Block | Block if Domain matches : Selecting this option will allow the User to Login only when the Domain does NOT match with the configured ones in this policy. |
| 4 | Domains | Add : Add the Domains in the format - Domain1, Domain2... Delete : Delete added domains. |
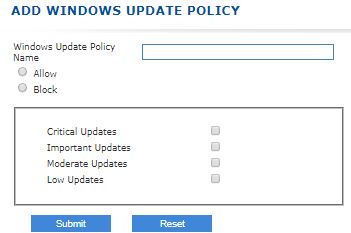
Adding Windows Update Product Policy
- On the "CREATE POLICY" page, select policy type "Windows Update" from "Policy Type" drop down list, click on the "Add Windows Update product policy" link. The Add Windows Update Product Policy screen will appears.
- Add an Windows Update Product Policy to the Host Policy
| # | Field | Description |
|---|---|---|
| 1 | Windows Update Policy Name | Identifier to the Windows Update Policy. |
| 2 | Allow | |
| 3 | Block | |
| 4 | Critical Updates | |
| 5 | Important Updates | |
| 6 | Moderate Updates | |
| 7 | Low Updates |
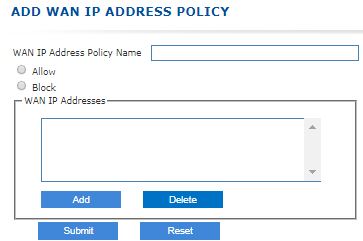
Adding Wan IP Address Product Policy
- On the "CREATE POLICY" page, select policy type "Wan IP Address" from "Policy Type" drop down list, click on the " Wan IP Address product policy" link. The Wan IP Address Product Policy screen will appears.
- Add an Wan IP Address Product Policy to the Host Policy
| # | Field | Description |
|---|---|---|
| 1 | WAN IP Address Policy Name | Identifier to the WAN IP Address Policy. |
| 2 | Allow | Allow if WAN IP address matches: Selecting this option will allow the User to Login only when the WAN IP Address matches with the configured ones in this policy. |
| 3 | Block | Block if WAN IP address matches: Selecting this option will allow the User to Login only when the WAN IP Address does NOT match with the configured ones in this policy. |
| 4 | WAN IP Addresses | Add : Add the WAN IP Addresses in the format - 192.168.1.10 |
Modify Host Scan Policies
On the Host Scan Policies page, select the Policy whose details are to be modified and click on the Modify button. Modify the details as appropriate and click on Submit button for the changes to take effect.
Delete Host Scan Policies
On the page, Host Scan Policies select the Policy which needs to be deleted and click on the Delete button. On confirmation, the Policy will be deleted.