Prepare Ubuntu-based Shared Session Provider
This page describes the details of preparing a Ubuntu based Shared Session Host provider which can be used for Delivery of Virtual Ubuntu based Desktops and Applications via HyWork Controller.
Following steps are involved to setup and configure Linux Server for Shared Hosted Desktop delivery.
Required Packages
Deployment of Linux based desktops or application will require following packages to be installed and configured:
-
Linux Shared Hosted Desktops and Applications
-
Linux SHD OS Image: Linux SHD OS (latest version) Image having customized xUbuntu 16.04.4/18.04/20.04
-
Offline packages
-
HyWorks DVM Tools for Linux
-
-
Optional - Offline Packages: To be installed if Linux SHD ISO does not have latest offline packages
-
Having all dependency packages for HyWorks deployments
-
HyWorks DVM Tools for Linux
-
-
Optional - HyWorks DVM Tools for Linux: Offline package contains the DVM Tools, but if new DVM tools is available, then those should be used.
-
Refer sections How to Get Linux SHD Packages and Getting Version of HyWorks DVM Tools - Linux to check the latest available versions and currently running versions on Linux server.
Important
Linux App/SHD delivery will only be supported with ISO provided by Accops.
Step#1: Getting Linux SHD Packages
Refer the latest HyWorks release information on Accops official website or Accops Support portal for downloading
-
Accops Linux SHD Server ISO
-
All the packages required for preparing Accops Linux VDI servers
Step#2: Accops Linux SHD - OS Installation Process
-
Create a fresh VM or physical servers
-
For VMs, mount the ISO as bootable drive.
-
For installation on physical server, create a bootable media (USB/DVD) and boot the server with it.
-
-
Follow the onscreen instructions for installation without changing any default options.
-
Linux SHD server will reboot automatically once the installation is completed.
Note
The installation of Linux SHD will format the existing disk and thus existing data on disk will be lost. Please make sure to copy the important data before installation.
-
Remove the installation media.
-
Once the server restarts, login screen is displayed. Login with the admin user credentials - username: admin, password: zer0client.
Step#3: Accops Offline Package Installation [Conditional]
Follow the below given steps only if Linux SHD Server ISO does not contain the latest offline packages. Refer Accops website and Accops support portal for the latest releases of Accops Linux SHD Server ISOs and Offline packages.
To get details of currently installed packages, execute the following commands:
\~\$ cat /opt/Accops/linuxVDIVersion.txt
[LinuxVDI]
OSname=AccopsLinuxVDI
Version=u9
BuildDate=09122020
Tag BuildDate indicates the offline package version.
If a latest offline package is available and needs to be installed, refer Accops Offline Package Installation to install offline packages on the SHD server.
Step#4: Configurations and Environment Preparation
Basic Configuration
Follow the steps provided in Basic Configuration Environment Preparation for performing basic configuration steps for authentication.
Advanced Configuration
HyShell Configurations for Linux SHD Servers
HyShell is desktop customization utility which can be used to change the configuration on the Shared Hosted Desktops:
-
Create Allowed applications shortcuts on Start Menu and Desktop.
-
Restrict user access for any other applications.
Due to application usage limitations, it is recommended to use HyShell enabled Linux Shared Hosted desktops, so that the users can be given a restricted access to full desktop with the allowed applications only.
The customizations include restricting native applications from adding access points for published apps assigned to the user in SHD as application menu and desktop icons.
Various set of configurations are possible and below table details these combinations and their impact in behavior.
| Configured in Controller | Enabled in SHD | Impact |
|---|---|---|
| No | No | User gets desktop with no restrictions |
| Yes | No | User gets desktop with no restrictions |
| No | Yes | User gets restricted desktop with no application (neither assigned apps nor native apps) |
| Yes | Yes | User gets restricted desktop only with assigned applications (no native applications will be available. |
Note
When desktop is restricted:
-
User gets access to only those applications that are assigned by HyWorks.
-
If HyWorks is configured to show desktop shortcuts in SHD, desktop display icons for assigned applications only
-
If HyWorks is configured to pin applications on Start menu in SHD, Application menu will show only hosted applications along with disconnect option
-
-
User is not allowed to personalize desktop
HyShell can also be configured to execute user scripts in both system and user context before and after HyShell execution.
How to enable HyShell in Linux Session Host Server
For enabling HyShell in Linux SHD, following steps can be used:
-
Connect to linux SHD server via SSH Client(if ssh enabled) or console session
-
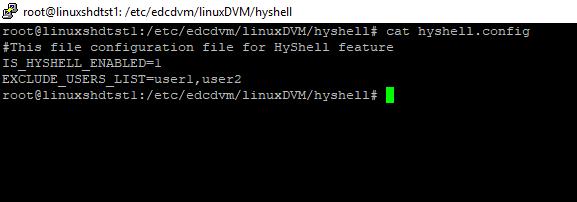
Open HyShell configuration file
sudo vi /etc/edcdvm/linuxDVM/hyShell/hyshell.config
-
Set the value for IS_HYSHELL_ENABLED to 1.
-
If any user is added in EXCLUDE_USERS_LIST, then desktop restriction is not applicable for EXCLUDE_USERS_LIST
-
Restart DVM Agent Service by executing following command
sudo systemctl restart edcdvm
-
Linux SHD is now enabled with HyShell.
Note
-
HyShell configuration is a server level configuration and thus will affect all the users accessing Linux SHD Desktops.
-
Once enabled, HyShell provides access to only those applications, which are assigned to the user and published from that server. In other words if a user is not having any applications assigned then the customized Linux SHD desktop will not show any application or shortcuts.
-
HyShell configuration may take 3 to 5 seconds to load and users will not be able to perform any tasks until then.
Enable Published Applications for HyShell
Once HyShell is enabled in Linux Session Host Server, applications must also be configured to be shown in the user session.
Following the below given steps to publish applications for Linux Shared hosted desktops:
-
Follow the steps mentioned in section Application Publishing in HyWorks
-
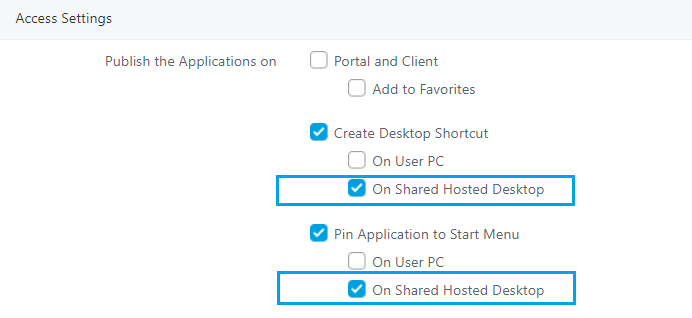
In Application Add/ Edit wizard > Additional Settings > Access Settings section
-
Uncheck option Publish the application on > Portal and client: This will stop showing application on the client screen.
-
Configure Create Desktop Shortcut
-
On User PC option - Uncheck (this will not create Desktop shortcuts on User PCs)
-
On Shared Hosted Desktop option - Check
-
-
Configure Pin Application to Start Menu
-
On User PC option - Uncheck (This will not pin Application on User PCs)
-
On Shared Hosted Desktop option - Check
-
-
Above configuration will create all the applications' shortcut on the desktop or Start menu for the user session.
Running Custom Shell Scripts in User Session
Follow the below given steps to run the custom shell script if required:
-
Connect to Linux SHD Server via SSH Client or Terminal
-
Go to HyShell directory to locate scripts you want to run by executing following command:
cd /etc/edcdvm/linuxDVM/HyShell/
-
Modify and save the following scripts as per the requirement:
-
HyShellLauncherPreScript.sh: This script executes before HyShell is launched.
-
HyShellLauncherPostScript.sh: This script executes after HyShell is launched successfully.
-
-
Scripts will execute from next logon to SHD from server.
Syslog configuration for forwarding Audit Logs to Syslog Server
Linux SHD integrated HyWorks DVM tools supports sending user session logs to Syslog server.
Desktop Agent Logs Format
<Date time of event>, <OS Type>, <Hostname>, <IP Address>, <Username>, <Display Port>, <Process ID>, <Event Message>
where OS Type - Possible values:
- Windows
- Linux
Event Message - Possible values:
- User logged in
- User session disconnected
- User logged out
Sample Logs
-
26-03-2018 15:55:29,Linux,sid-centos-5,10.0.7.91,sd.sid1,-,-,User logged in.
-
26-03-2018 15:56:56,Linux,sid-centos-5,10.0.7.91,sd.sid1,11,18418,User session reconnected.
-
26-03-2018 15:57:29,Linux,sid-centos-5,10.0.7.91,sd.sid1,11,18418,User logged out.
Available states
-
Windows: Login, Disconnect, Logout
-
Linux: Login, Reconnect, Logout
-
In Login syslog, 'Display_Port' and 'PID' are not available hence DASH (-) is displayed.
Syslog Configuration Process
Follow the below steps to configure logs forwarding to syslog server:
-
Take console or RDP session of Linux VDI Gold Master VM with user having sudo permission
-
Create a file with name EventTypedataPath.txt at /etc/edcdvm/linuxDVM by executing command
cd /etc/edcdvm/linuxDVM
-
Update file with following contents with sudo access:
{
"EventType":3,
"LogType":3,
"SyslogHost":"<Syslog server IP>",
"SyslogPort":"514",
}
-
Save the file and restart DVM Agent Service by executing following command
systemctl restart edcdvm
-
Cerify configuration by connecting to the VM using HyWorks client and check syslog server if appropriate log entries are added.
Troubleshooting
Refer section Troubleshooting and basic HowTos for detailed debugging steps and log file paths.