Configure
After installing the Active Load Balancer node and setting the Installation Type, the entire cluster and each node must be configured. To do this, visit the Configuration page. Remember that the Configuration page can only be accessed via port 3636. Follow the steps explained in the Enable Configuration section.
Warning
If the steps indicated in the Enable Configuration Page are not followed, then the Configuration page will not be accessible. As a result, the HA will not be configured.
Important
To ensure the smooth functioning of HA, it is mandatory to configure the NTP server from Management Console > Settings > Global > Server.
Enable the Configuration Page
Since the Configuration page is hosted on port 3636, it must be published as an application before making it accessible. Follow the steps listed below to make the Configuration page accessible:
- Create a new HTTP-type application named ClusterManagement. The Application Server field should be set to the virtual IP address and port 3636. Provide the URL as http://hysecure_virtual_IP_address:3636.
- Create an application group named ClusterAdminApps and add the application to this group.
- Create an Application Based Access control using Native as the authentication server for High Security Users for the SYSTEM user group and assign the newly created High Security application group ClusterAdminApps.
- In the Management Console, navigate to Service Config > Gateway State and put the gateway in Run State.
- Log out of the HySecure client and log in again.
-
The Configuration page should now be accessible. !!!Important
Replace the hysecure_virtual_IP_address with the cluster's virtual IP address configured from the Set Install Type page for the Active Load Balancer.
If the administrator does not want to publish this on their Launchpad, this application can be marked as hidden (while creating it).
HA Configuration
Once the installation type of the Active Load Balancer node has been set, the remaining HA can be configured on the Active Load Balancer’s Management Console using the steps listed below:
-
Log on to the Management Console.
-
Go to the Settings > Cluster > Configure.
-
Set the IP addresses for the Active Load Balancer node. This information will sync with the other nodes. For more information, refer to Configure HA.
-
Click ADVANCED CONFIGURATION and configure the relevant parameters if required. For more information, refer to Advanced HA Configuration.
-
Click Add under the Load Balancing section and provide details of the other nodes. This should be added only on the Active Load Balancer node.
Important
-
The configuration page is accessible over port 3636. To access this page, follow the steps in the Enable Configuration Page section.
-
Complete HA configuration must be done only on the Active Load Balancer before setting the Installation Type of any other node.
-
The HA configuration done on the Active Load Balancer node gets automatically synced to all the other nodes which are configured to join the cluster through the configuration in the Set Install Type page.
Reload Service
Even the minutest change in the HA configuration must be saved, and the HA services must be reloaded by clicking the RELOAD SERVICE button.
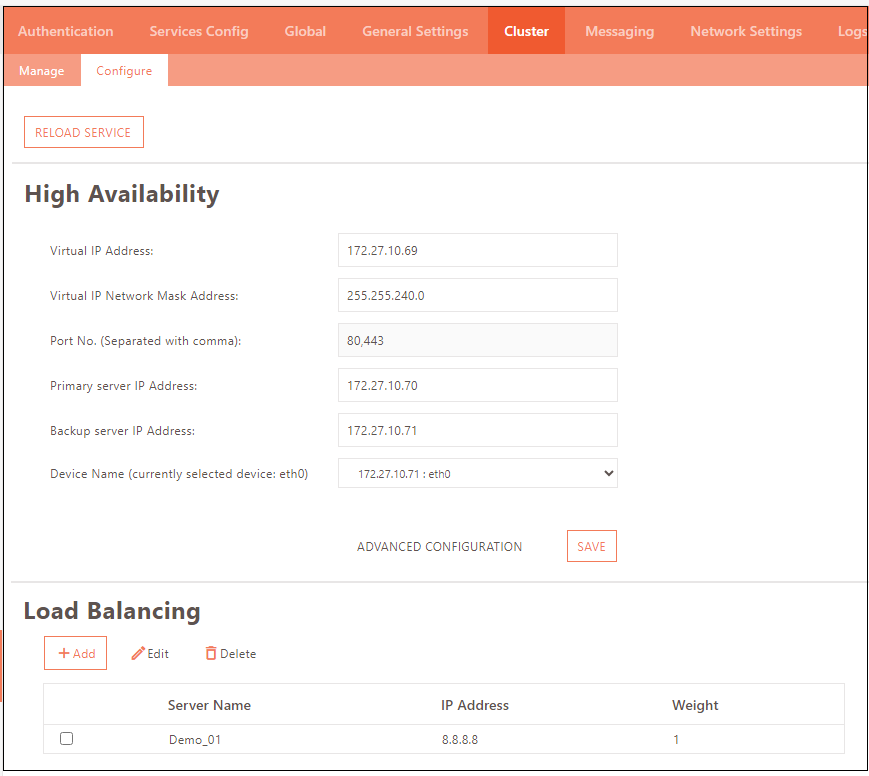
Configure HA
This section configures the HA cluster information, primarily involving the Load Balancers.
| Field | Description |
|---|---|
| Virtual IP Address | This is the Virtual IP Address for the HA Load Balancing service. This IP address will be assigned automatically to the active load balancer. |
| Virtual IP Network Mask Address | This should be the netmask for the load balancing service. |
| Port No. (Separated with comma) | This should have a comma-separated list of port numbers for the Load Balancing service. The default value for the same is 80,443, which is populated automatically. |
| Primary server IP Address | This should be the IP address of the Load Balancer node, which is expected to act as a Primary Load Balancer on bootup. |
| Backup server IP Address | This should be the IP address of the Load Balancer node, which is expected to act as a Backup Load Balancer on bootup. |
| Device Name (currently selected device: eth0) | This should be the interface name on the Gateway node used for the Load Balancing service. |
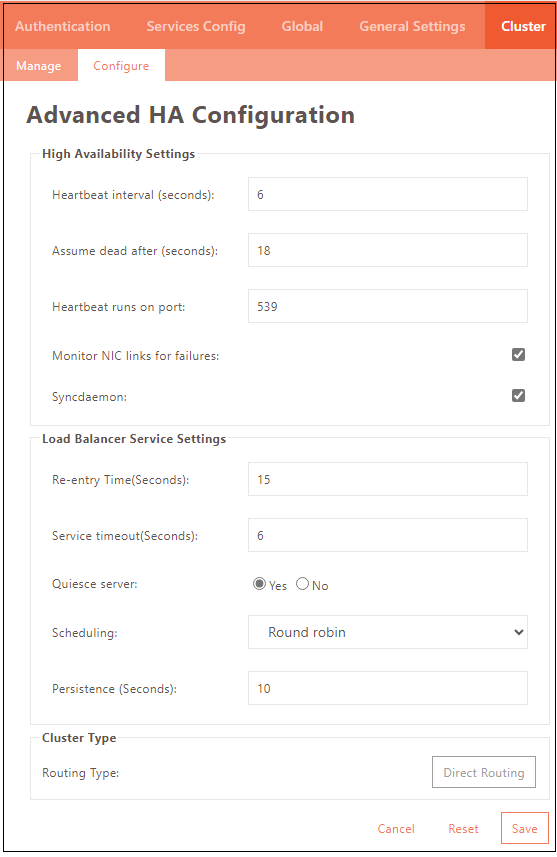
Advanced HA Configuration
| Setting | Description | Default Value |
|---|---|---|
| High Availability Settings > Heartbeat interval (seconds) | The time interval for the backup load balancer to check the functional status of the primary load balancer. | 6 |
| High Availability Settings > Assume dead after (seconds) | The number of seconds after which the Backup Load Balancer will initiate a failover if the primary load balancer does not respond within this specified time frame. | 18 |
| High Availability Settings > Heartbeat runs on port | The Port is the one on which the heartbeat communicates with the primary load balancer. | 539 |
| High Availability Settings > Monitor NIC links for failures | If this option is enabled, the network card failures will be monitored | Enabled |
| High Availability Settings > Syncdaemon | High availability service checks whether all the required services run on the Gateway servers. | Enabled |
| Load Balancer Service Settings > Re-entry Time (Seconds) | The time before the active Load Balancer attempts to reintroduce a failed server back into the pool. | 15 |
| Load Balancer Service Settings > Service timeout (Seconds) | The time before a gateway server is considered dead and removed from the pool. | 6 |
| Load Balancer Service Settings > Quiesce server | If the selected option is enabled, the least connection table will be reset to zero every time a new gateway server comes online. | Yes |
| Load Balancer Service Settings > Scheduling | Select your preferred scheduling algorithm from the drop-down menu. | Round robin |
| Load Balancer Service Settings > Persistence (Seconds) | Connections from the same source are redirected to the same HySecure Gateway for the interval specified here. | 10 |
| Cluster Type > Routing Type | The network type supported currently for the HA cluster is Direct Routing. | Direct Routing |
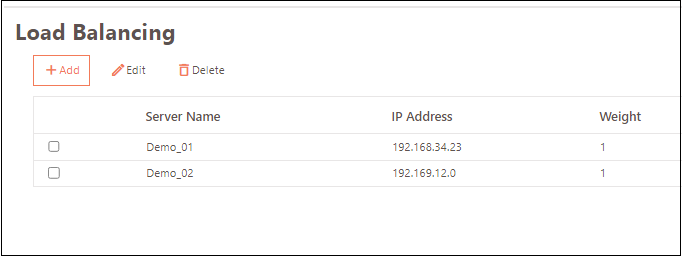
Load Balancing
This section configures nodes to be part of the HA cluster, including the server name, IP address, and weight.
| Field | Description |
|---|---|
| Server Name | Displays the identifier for the VPN server participating in the HA cluster. |
| IP Address | Displays the IP Address of the VPN server participating in the HA cluster. |
| Weight | Displays the Weight-based load balancing assigned to each server, determining its share of the load. Equal weights mean equal distribution. A weight of 1 for one server and 2 for others means the former bears half the load as others. |
Add Load Balancer
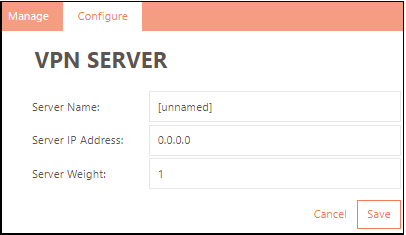
- Go to Settings > Cluster > Configure > Load Balancing and click Add.
-
Enter the following VPN Server details:
- Server Name: Enter the VPN Server identifier participating in the HA cluster.
- Server IP Address: Enter the IP Address of the VPN server participating in the HA cluster.
- Server Weight: Assign the load balancing weight for the server.
-
Click Save to confirm.
Edit Load Balancer
Select the Load Balancer to be modified and click Edit. After modifying the required field, click Save for the changes to take effect.
Delete Load Balancer
Select the Load Balancer to be deleted. Click Delete and confirm the action.
Warning
Information on all nodes forming a part of the HA cluster must be added to this section before configuring the nodes for their respective Installation Type.
Synchronized Data
The following data is synchronized between the cluster nodes:
| Configuration | Details | Sync Details | Sync Duration |
|---|---|---|---|
| Main HySecure configuration | All user, application, access control-related data, and other data stored in the database | From Active to Standby node as database sync | within 5 minutes |
| Cluster configuration | Active node, Standby node, and Gateway configuration | Only from Active to other nodes in the cluster | During the first cluster join and every modification, it is within 2 minutes. |
| Client Settings | HySecure client-related configuration. | From modification node to all node | On every modification |
| HyLite Settings | HyLite setting | Active to standby | 5 mins |
| SSL Certificates | Upload external SSL certificate | Active to standby | On every modification |
| HySecure License | HySecure license | Active to standby and other nodes | 5 mins |
| Gateway state | HySecure gateway state. | Active to standby and other nodes | 5 mins |
Non-synchronized Data
The following data is not synchronized between the clusters and must be done on each node manually.
| Gateway binary upgrades | HySecure gateway binary | Not synchronized. Upgrade each gateway manually. | |
|---|---|---|---|
| Hostname Entry | Host file for name resolution | Not synchronized. Manually create host file entries on each gateway. | |
| DNS Configuration | DNS Server settings | Not synchronized. Manually create settings on each gateway. | |
| NTP Settings | NTP configuration for date and time on each gateway | Not synchronized. Manually start NTP on each gateway. | |
| HyLite License | HyLite license | If unable to synchronize, the HySecure Admin must manually upload the HyLite license on each node. | |
| SSL Settings | SSL setting on HySecure gateway | If it cannot synchronize, the HySecure Admin must manually make this setting on each node. | |
| Global Settings | HySecure gateway configuration | The following option is not able to synchronize Keep Alive Connection, SSL Version 3.0 Support, and Current SSL timeout | 5 mins |