Single Node Cluster
A Single-node cluster deployment option involves setting up a cluster on a single node, simplifying the process, and reducing hardware requirements.
A Single-node cluster does not provide High Availability, which makes it unsuitable for production environments. Single-node cluster deployment is primarily intended for testing and Proof of Concept (POC) purposes.
There are 4 stages of deployment in a Standalone Single-node cluster:
- Installing HySecure VM
- Post VM installation (Preboot execution)
- Installing HySecure Client
- Configuring Cluster Services
Deployment Architecture
Prerequisites
-
Three free Static IP addresses on the LAN:
-
Primary node: To be assigned to the primary node of HySecure.
-
Secondary node: To be assigned to the secondary node, which is essential for configuring the cluster.
-
Floating IP: To be assigned for the load balancing.
Note
In a Single node cluster, the secondary node is only required for assignment purposes. We will not configure the secondary node here.
-
-
Access the HySecure node on port 443 using a Windows system with an HTML5-supported browser, such as Microsoft Edge, Google Chrome, or Mozilla Firefox, for post-installation configuration.
Note
It is required for the setup to use an HTML5-supported browser. Make sure the browser on the system meets the requirements outlined by HySecure.
-
DNS server’s IP address: The IP address of the DNS server that the HySecure gateway will use for domain name resolution. This ensures that HySecure can resolve domain names to IP addresses.
-
NTP Server address: The Network Time Protocol (NTP) server address with which the HySecure will synchronize. This is crucial for maintaining accurate time across the network and ensuring that certificates and system logs are correctly timestamped.
-
External certificate in PEM format with a private key (Optional): You can optionally use an external SSL/TLS certificate (in PEM format) with a private key for secure HTTPS connections to the HySecure. HySecure can also create a self-signed certificate post-installation for Security Officer user login if an external certificate is not available.
Network Ports
| Source | Destination | Purpose | Port No | Protocol | If the port is not open |
|---|---|---|---|---|---|
| HySecure Client | HySecure Virtual IP | User login, app launch | On the gateway 443 port is to be reachable | HTTPS | User login fails |
| Windows System | HySecure Node | Admin login for administration, app launch | 443 | HTTPS | User login fails |
Sizing Guidelines
A Single node cluster deployment is recommended only for Proof of Concept and testing.
For more details refer to the Sizing Guidelines.
Deployment Steps
Installing HySecure VM
-
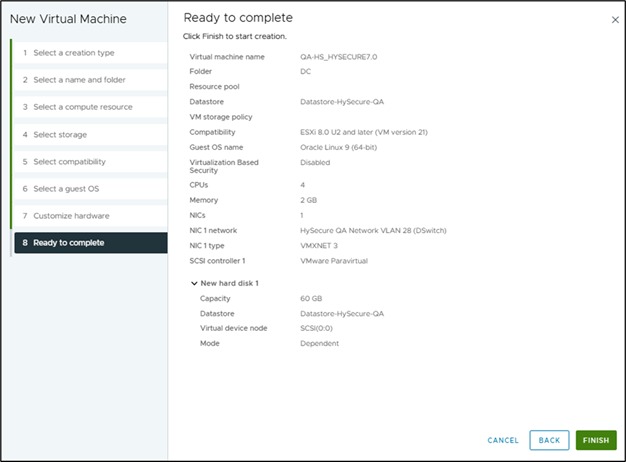
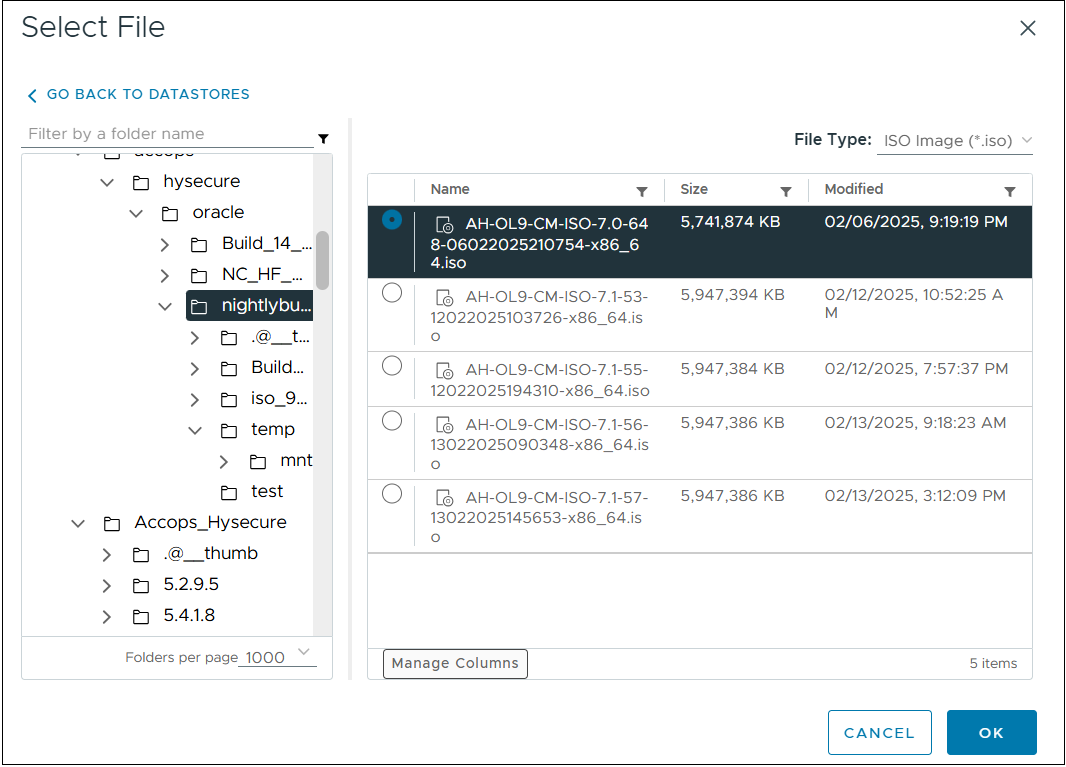
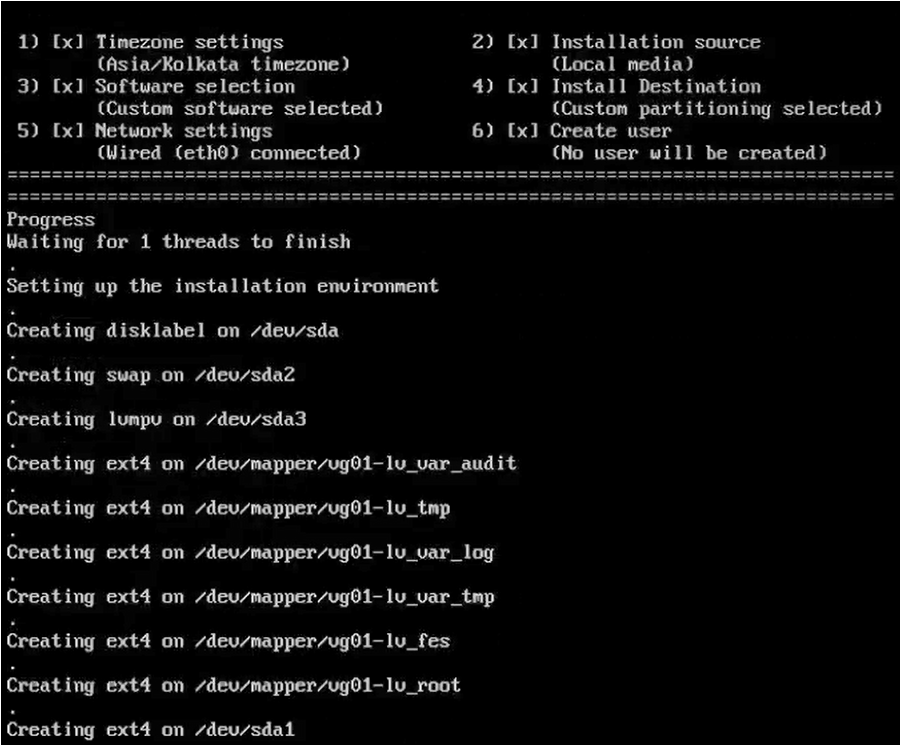
Create a VM with 4 vCPU, 2GB Memory, and 60 GB vDisk. Attach the latest version of the HySecure ISO image to VMware ESXi 6.x/7.x/8.x or Hyper-V. Here, for demonstration purposes, we have created a HySecure VM on VMware ESXi.
-
Power On the VM. The installation will begin automatically.
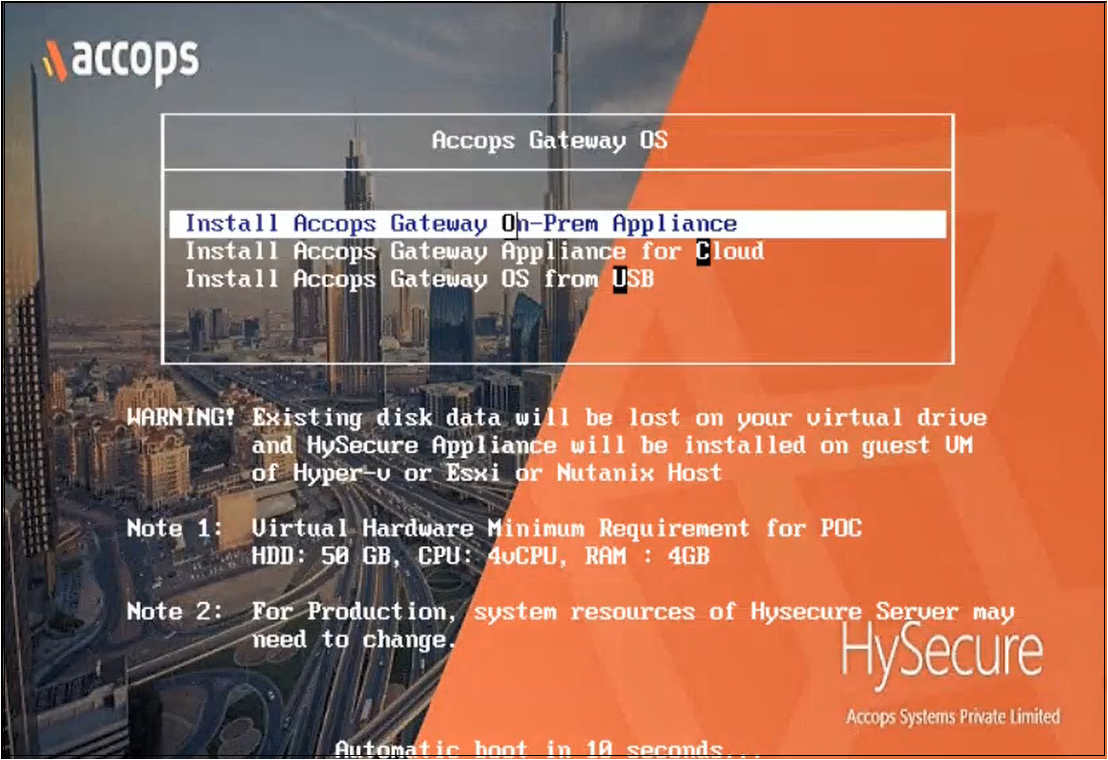
-
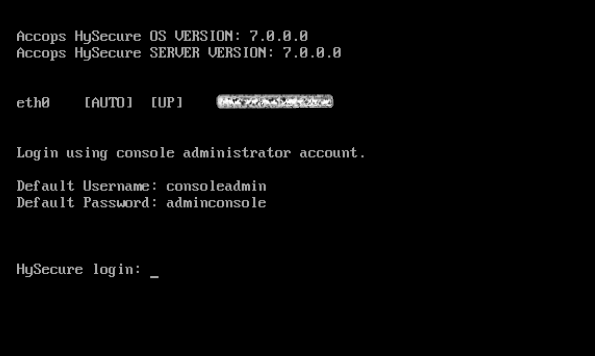
Upon completion, the VM will reboot automatically, and the login screen will be presented.
-
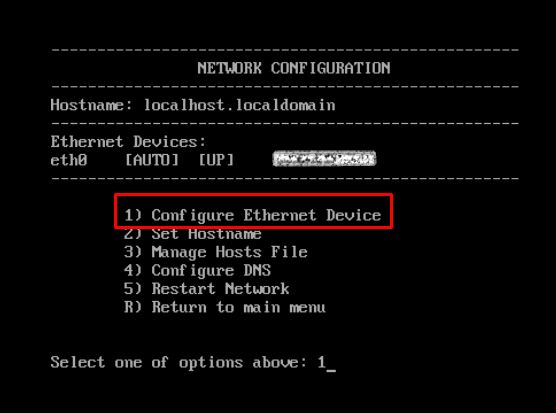
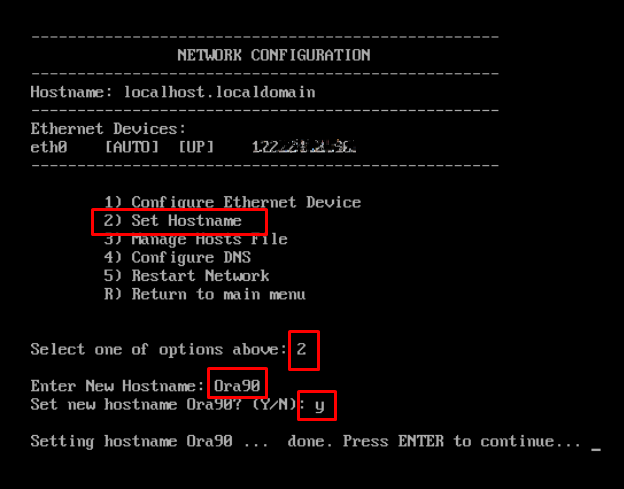
Enter the credentials and the numeric option as shown in the image. Enter 1 to modify the Network Configuration.
-
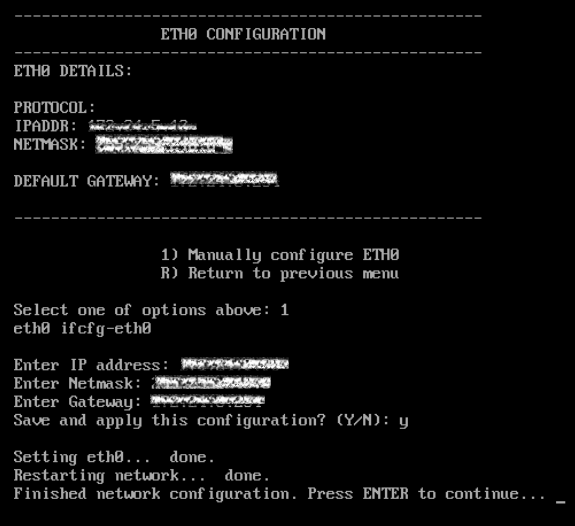
Enter 1 to manually configure a static IP address. Enter IP address, Netmask, and Gateway details. Enter Y to save the configuration. Enter R to go to the previous menu.
-
Enter 2 to set the Hostname.
-
Enter Y to save the configuration. . Press Enter to continue.
Following the above steps, you have successfully installed the HySecure VM using the HySecure bootable installation ISO image.
Post VM installation (preboot execution)
After successfully installing the HySecure VM, the next step includes preboot execution. This will ensure that the VM is correctly configured and prepared for operational use.
The following steps will guide you through the necessary actions to complete the post-installation setup and prepare the HySecure VM.
-
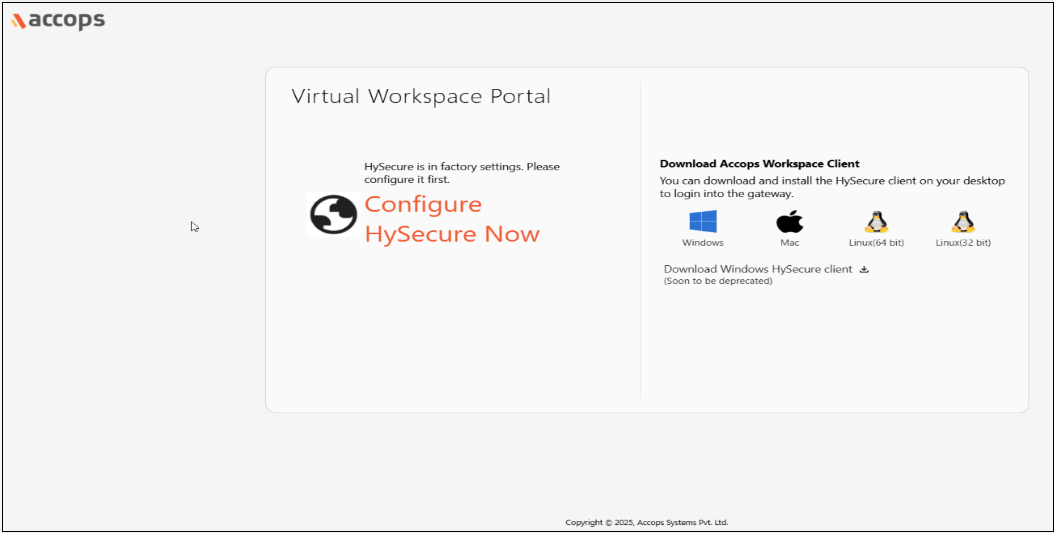
Open the Web browser and enter the website address as the static IP configured on the VM. For example, browse https://10.10.208.16 and click on Configure HySecure Now.
-
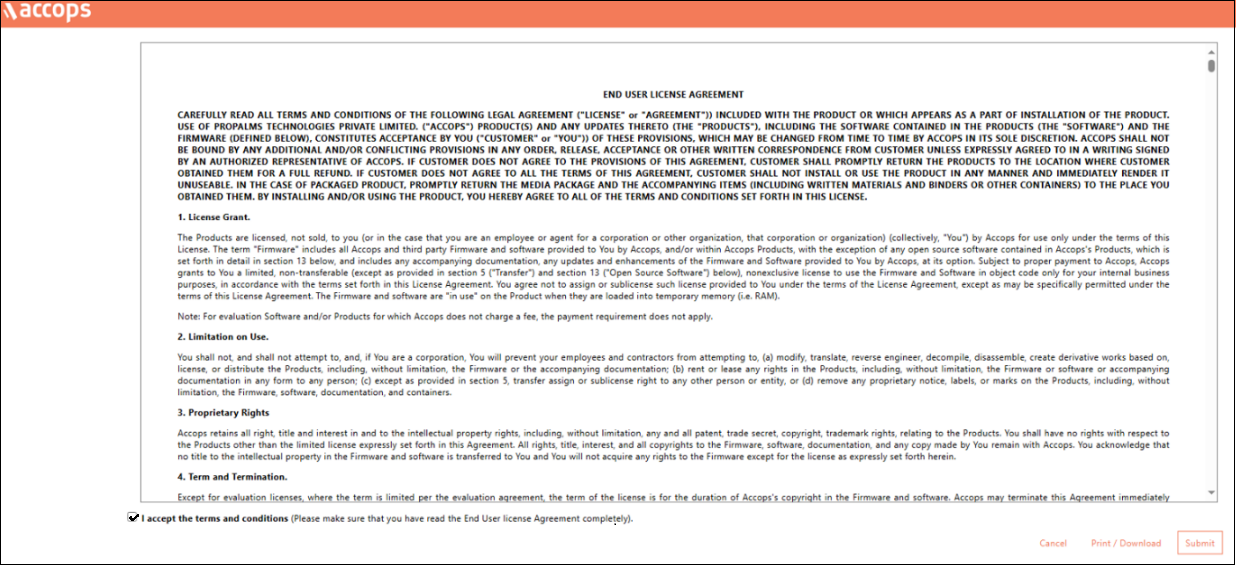
Accept the License Agreement. Check the I accept the terms and conditions box and click Submit.
-
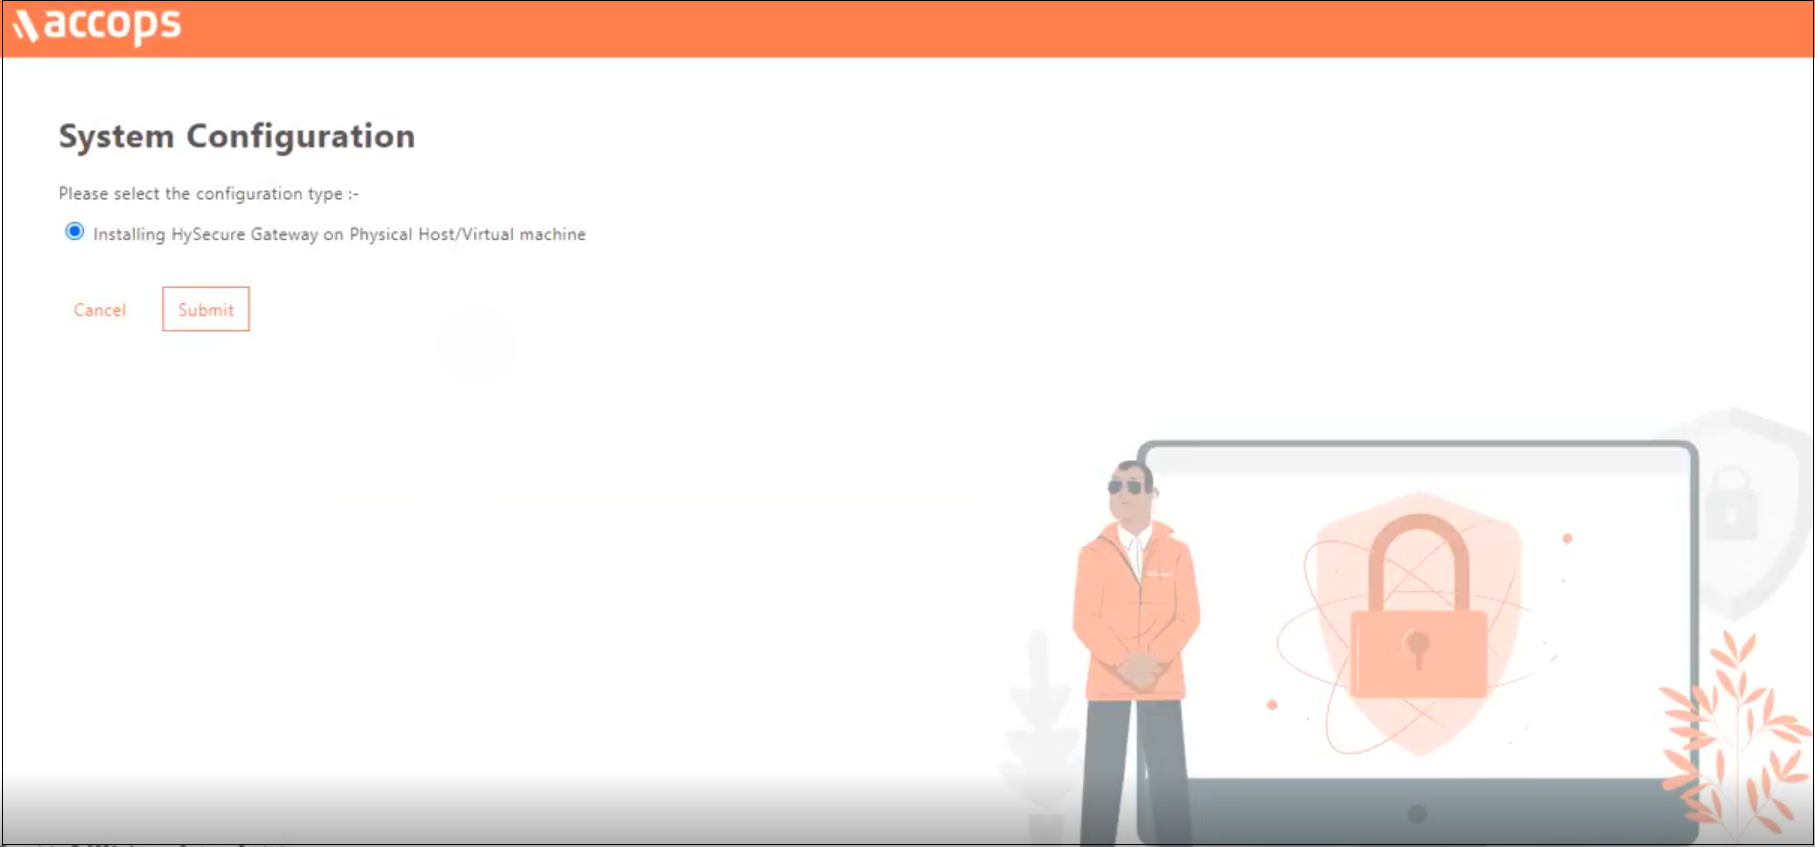
Select the configuration type Installing HySecure Gateway on Physical Host/Virtual machine from the System Configuration window and click Submit.
-
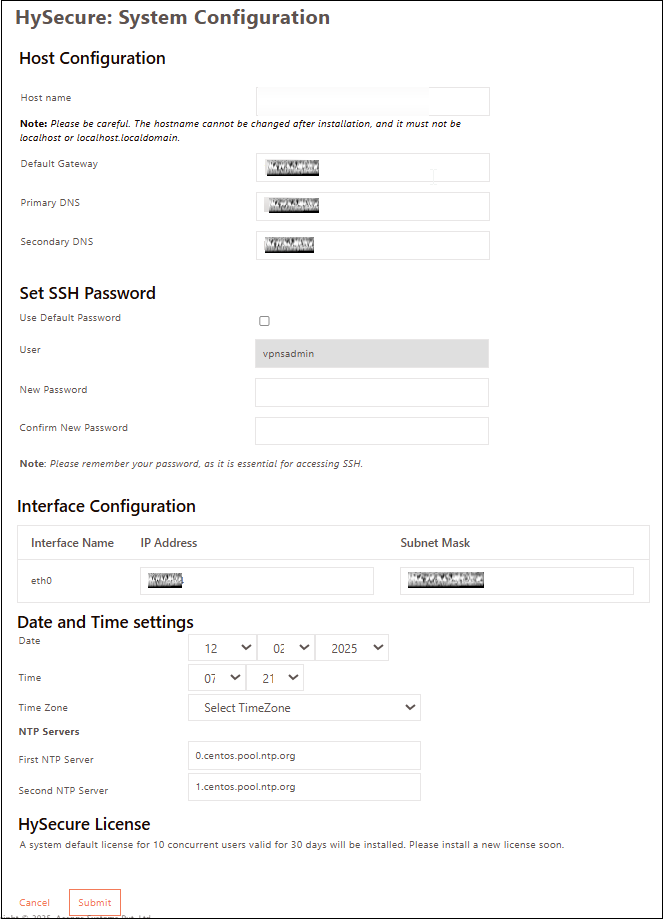
Set the Hostname, DNS server IP address, Time Zone, and NTP Servers. Set an SSH password for the Gateway. If you prefer not to set a password, select the Use Default Password option. Click Submit.
Note
- Configure the internal NTP Server. Internet access is required to reach the external NTP server.
- NTP Server configuration is a must to ensure TIME on all nodes in the cluster are in sync.
-
Select the Configuration Method for the gateway as Setup a New Installation and click Continue.

-
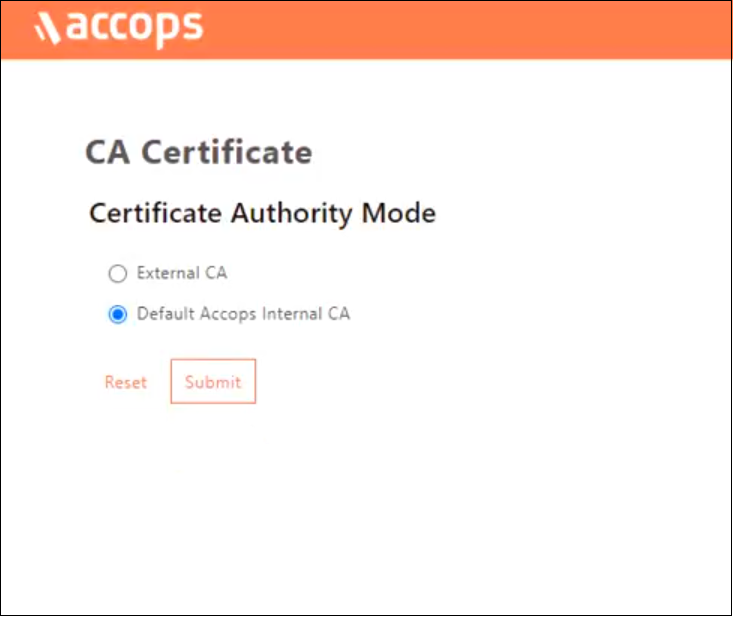
On the Certificate Authority Mode selection window, select Default Accops Internal CA for self signed certificate by the HySecure gateway. Else, select External CA to upload an External certificate in PEM format with a private key if it is available. Click Submit.
-
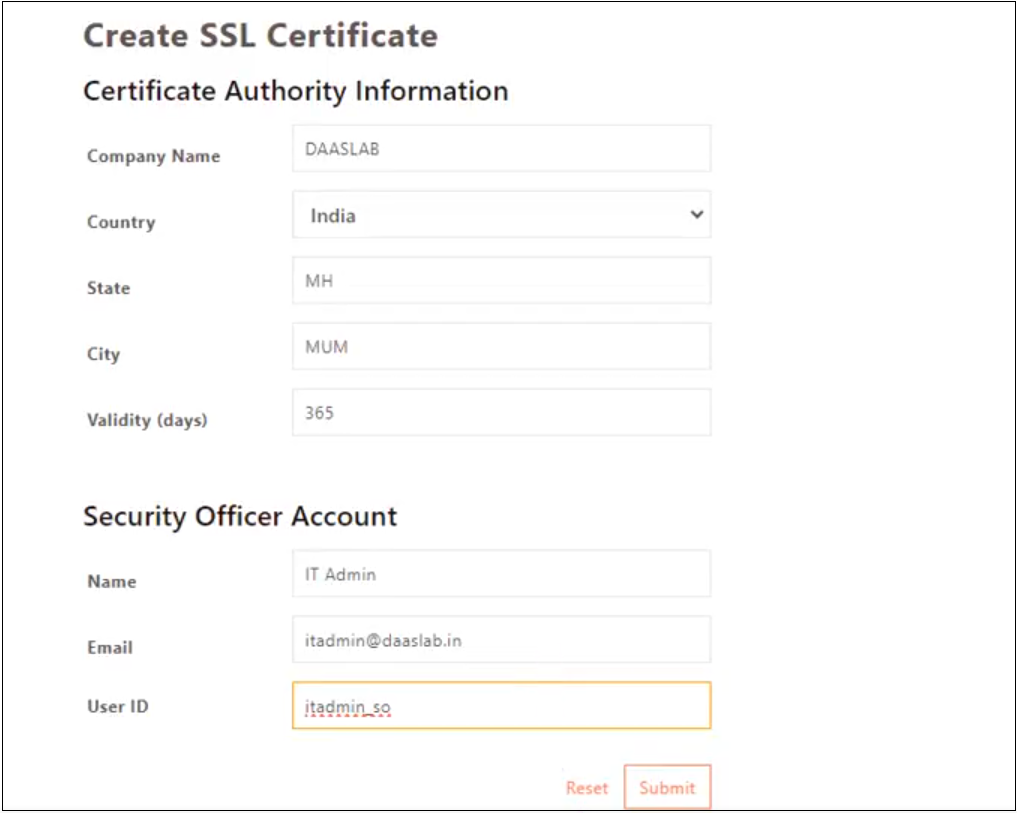
Navigate to the SSL Certificate creation platform provided by the Certificate Authority (CA).
-
Enter the details to Create SSL Certificate. The CA created is used to create a certificate for the HySecure admin, which is called a Security Officer Account (SO account). Click Submit and wait for a few seconds for the operation to complete.
-
A success message and the Passphrase will be displayed. Copy the Passphrase before closing the browser window.

Following the above steps, you have completed the preboot execution post-VM installation.
Installing HySecure Client
After completing the preboot process, the next essential step is to install the Windows HySecure Client.
The Windows HySecure Client is imperative for secure access to the HySecure management console. This ensures that all administrative operations are executed securely, thereby protecting the cluster from unauthorized access and potential security threats.
Note
- Administrative privileges are NOT supported on Mac and Linux platforms.
- It is recommended to use the latest version of HTML 5-supported browsers like Edge, Chrome or Firefox to access the HySecure Management Console.
Follow the steps below to install the HySecure Client:
-
Download HySecure Client:
- From the Windows system, open an HTML5-supported web browser (Microsoft Edge, Google Chrome, or Mozilla Firefox).
- Enter the HySecure VM IP address to access the download page.
- Download the HySecure Client.
-
Install the HySecure Client (Admin privileges are required):
- Locate the downloaded executable file and run it.
- Follow the installation wizard steps to complete the installation.
-
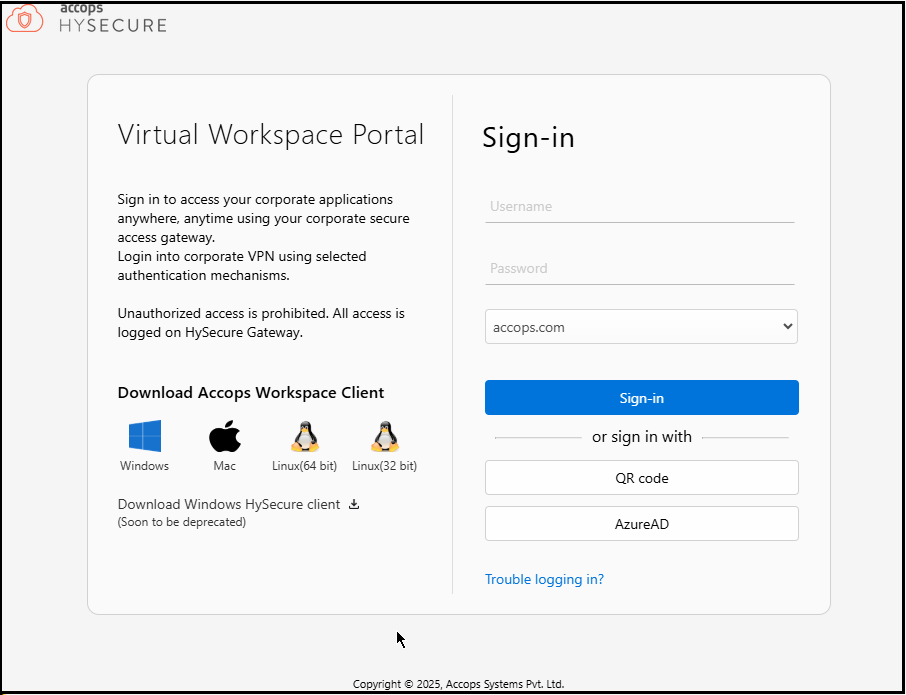
Launch the HySecure Client:
- After installation, launch the HySecure Client by entering the HySecure VM IP address in the client interface.
- Select the option Login with a digital certificate.
- Click the Action to enroll the Security Officer (SO) account.

-
Enter the Passphrase and Set a Password:
- Enter the Passphrase that was created during the preboot execution process.
- Set a new password for the Security Officer (SO) account.
- Click Submit to complete the Enrollment.

-
Log in and Access the Management Console:
- Open a HySecure client instance. Select the box Log in with a digital certificate and enter the password. Click Login.
- The browser will open automatically and display the HySecure Management Console.

The HySecure Client is now installed successfully.
Configuring Cluster Services
To create and configure cluster services on the HySecure VM, follow the steps below:
-
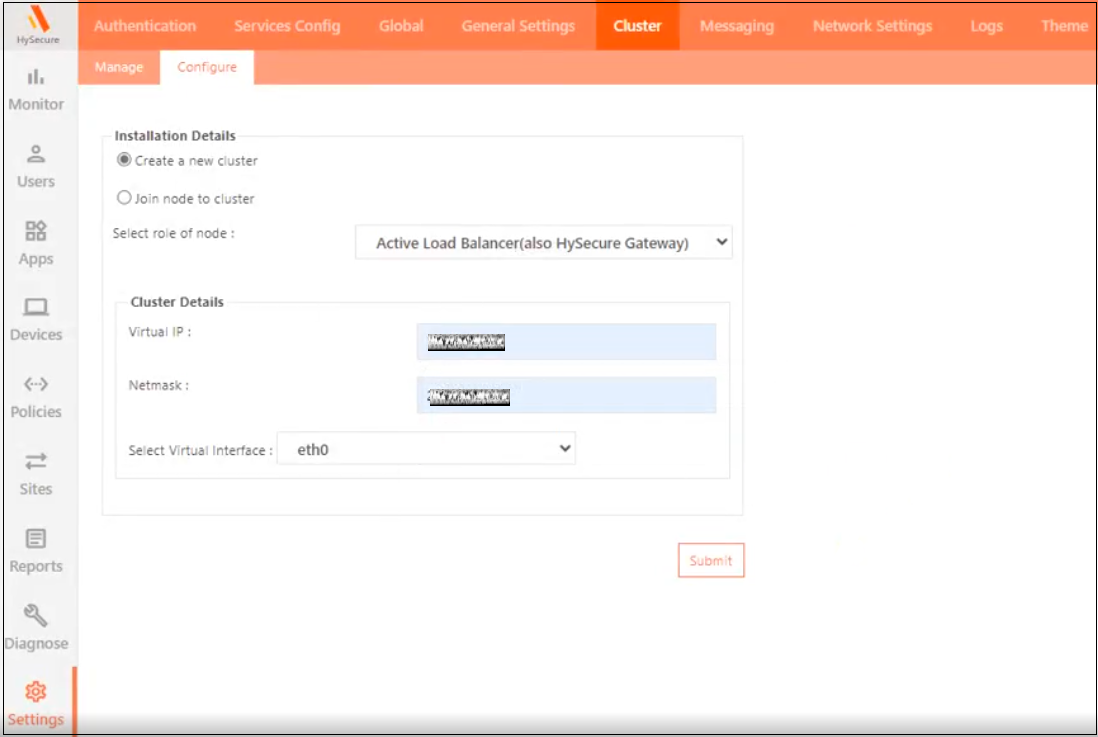
Launch the HySecure Client and log in as a Security Officer(SO). To create a new cluster from the HySecure Management console, navigate to Settings > Cluster, then click Configure.
- Click the option Create a new cluster and select the role of node as Active Load Balancer.
- Enter the following Cluster Details:
- Virtual IP: Any unused IP address on the network. It should be from the same subnet as the HySecure VM.
- Netmask: Enter the Subnet mask.
- Select Virtual Interface: Select the virtual interface option eth0.
- Click Submit.
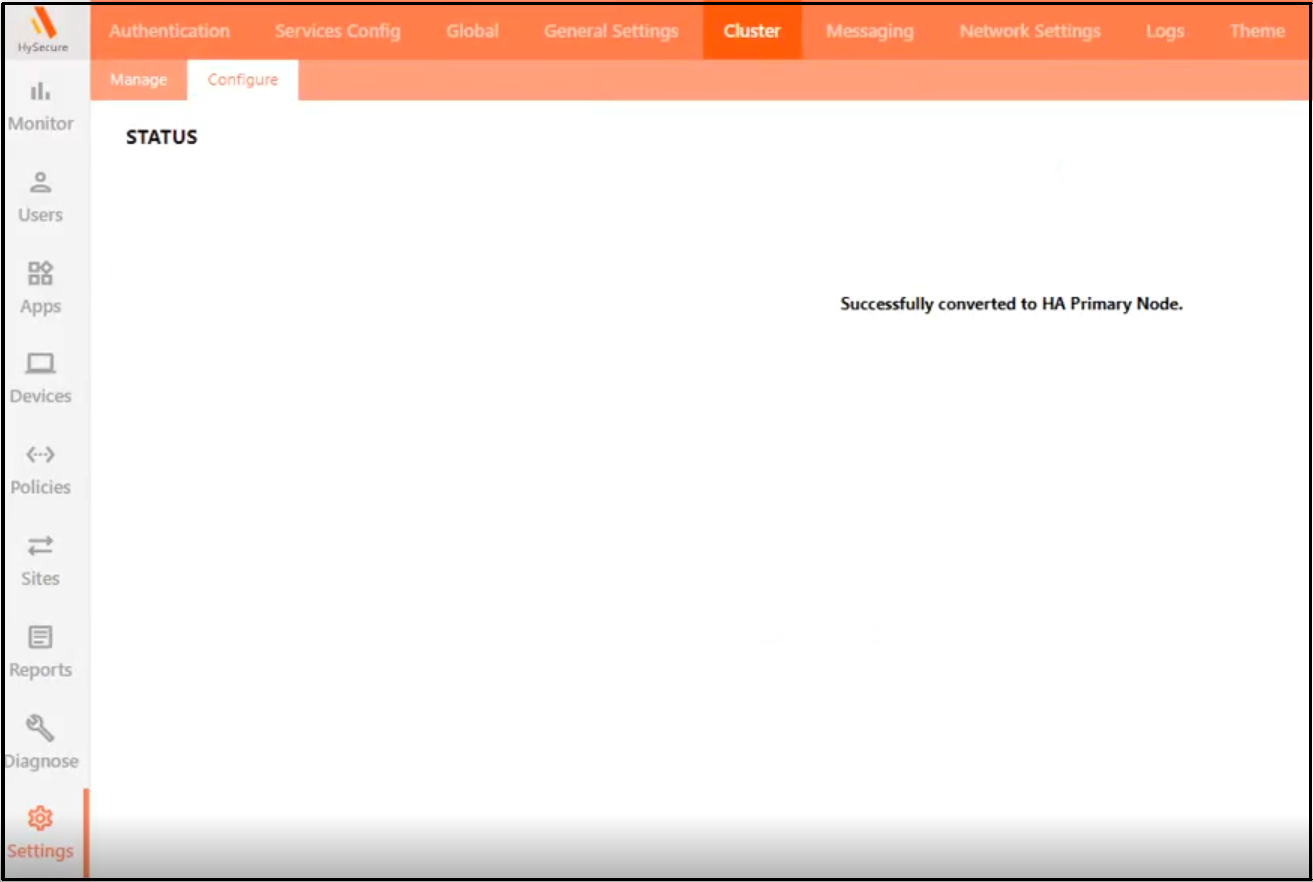
The following STATUS will appear after enabling the cluster: Successfully converted to HA Primary Node.
-
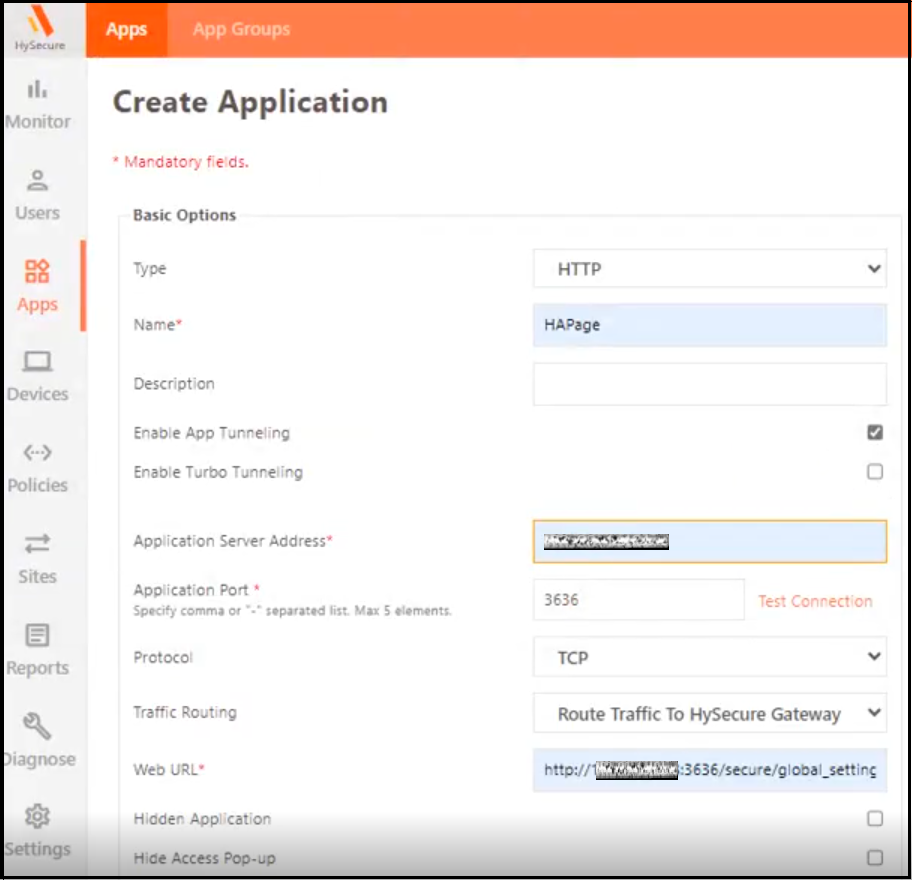
To configure the newly created cluster from the management console:
- Navigate to Apps > Add.
-
Add a new HTTP-type application and set the Application Server Address as the virtual IP address, and set the port as 3636. Provide the URL as http://hysecure_virtual_IP_address:3636.

-
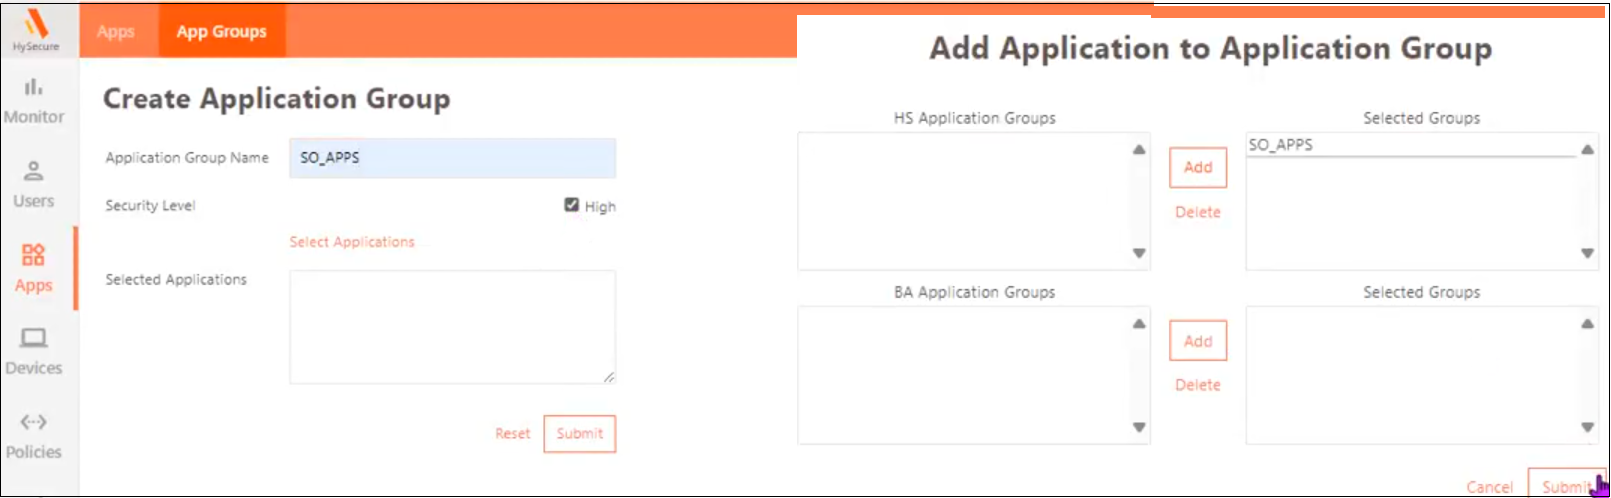
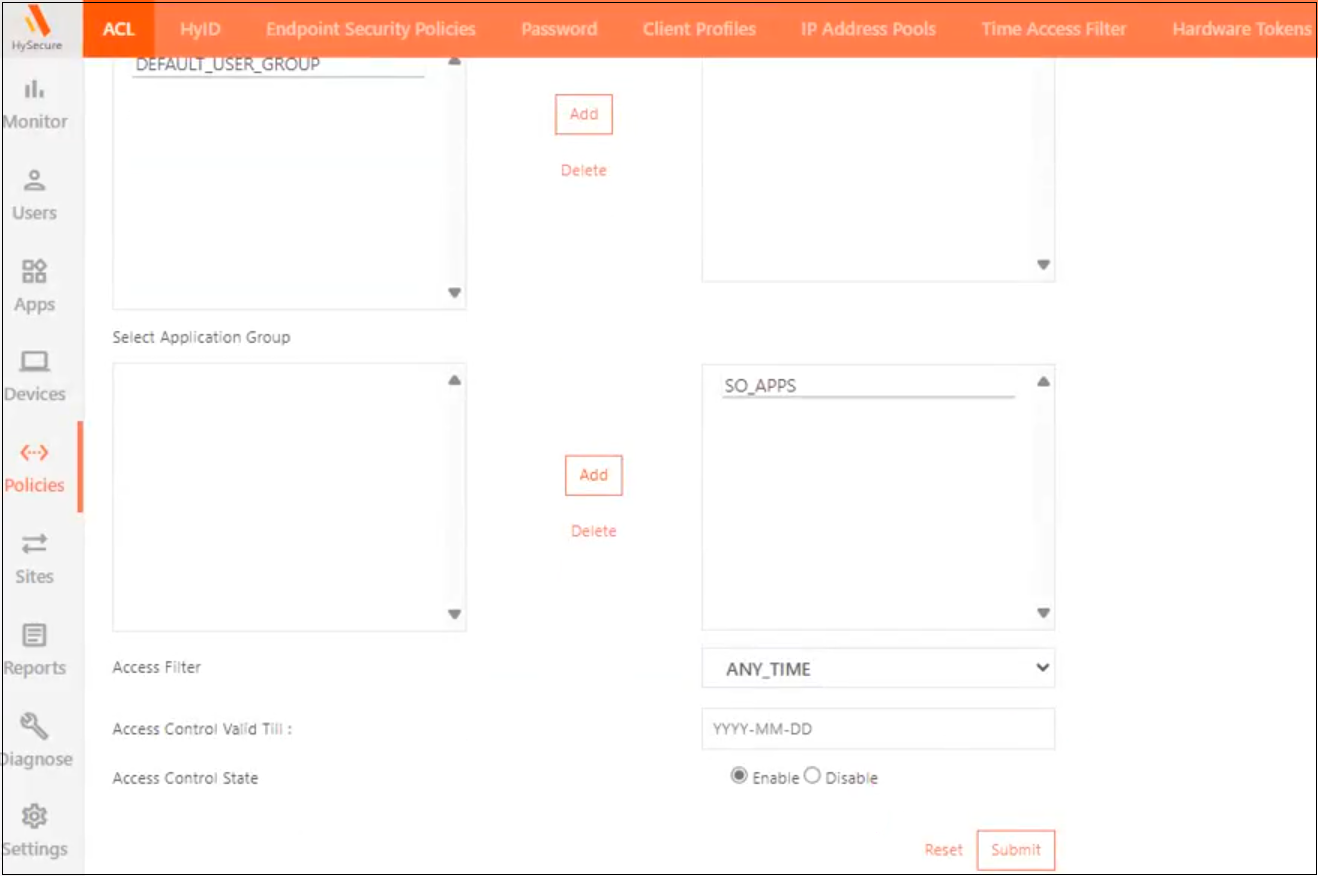
Navigate to Apps > App Groups > Add. Create a High-Security application group and add the application created above to this group.
-
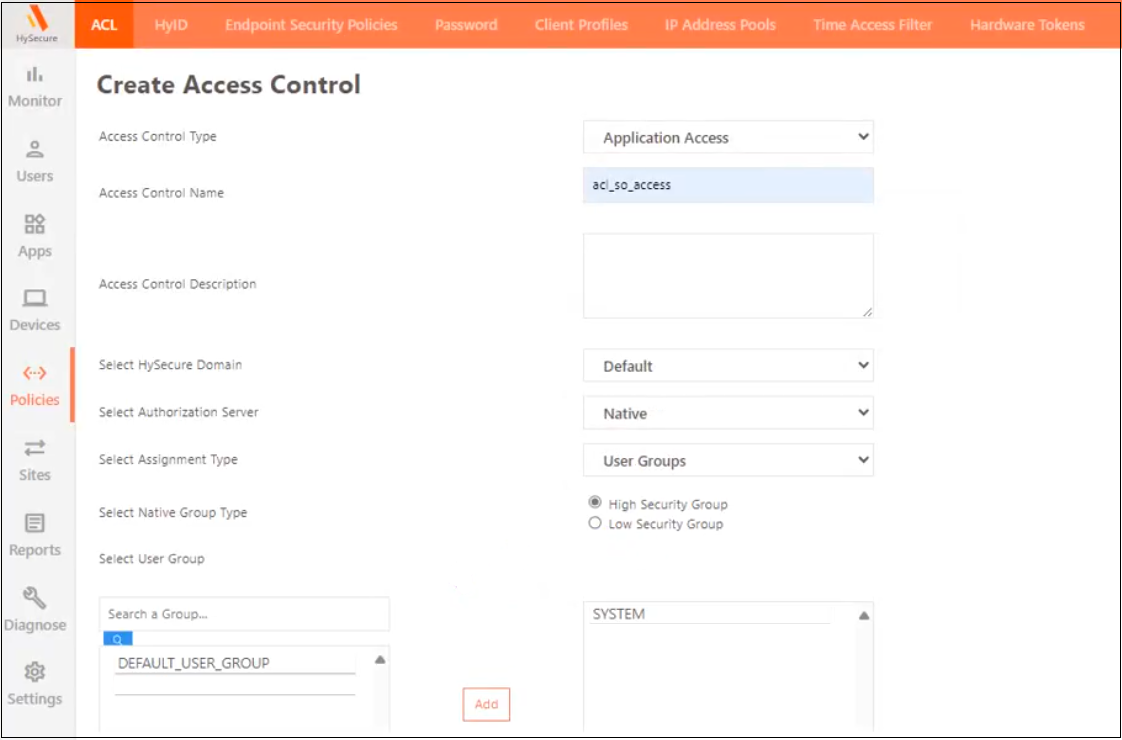
Navigate to Policies > ACL > Add. Create an Application-Based Access control using Native as the Authorization Server for high-security users for the SYSTEM user group and assign the newly created High-Security application group.
-
Navigate to Settings >Services Config > Gateway State and change the Gateway state to Run State.

-
Log out of the HySecure Client and re-login. The Configuration page will now be accessible.
-
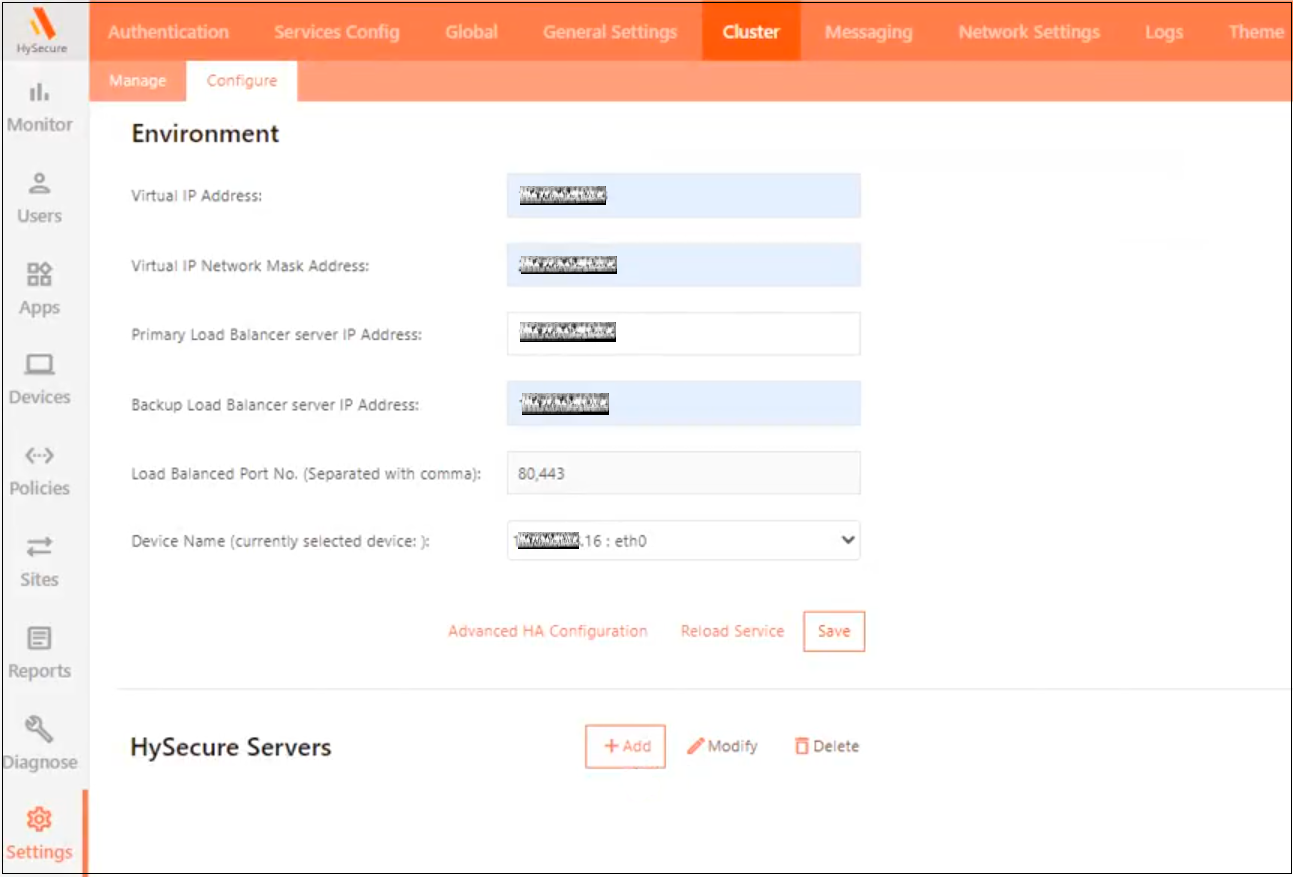
Navigate to Settings > Cluster > Configure. If the page does not appear, open a new tab in the browser and type the URL: http://HySecureIP:3636/secure/global_settings.php
-
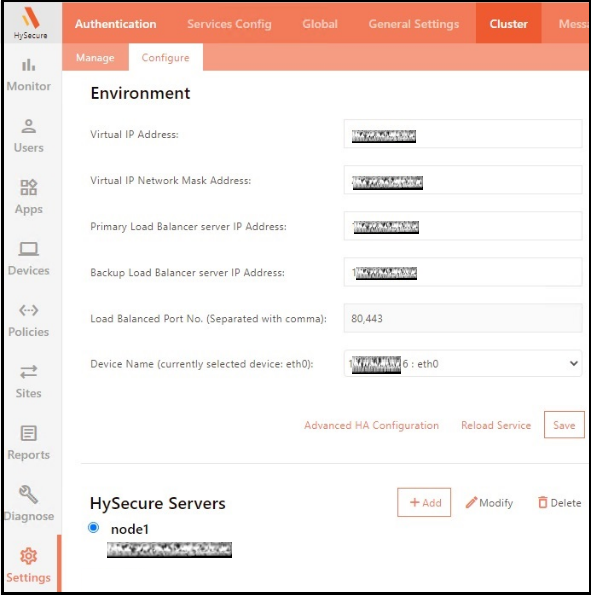
Enter the Environment details and click Save.
-
Virtual IP Address and Netmask: Same as configured during the cluster creation.
-
Primary IP Address: The static IP address assigned to the HySecure VM.
-
Backup Static IP Address: Any unused Static IP address from the same subnet as the HySecure VM.
-
-
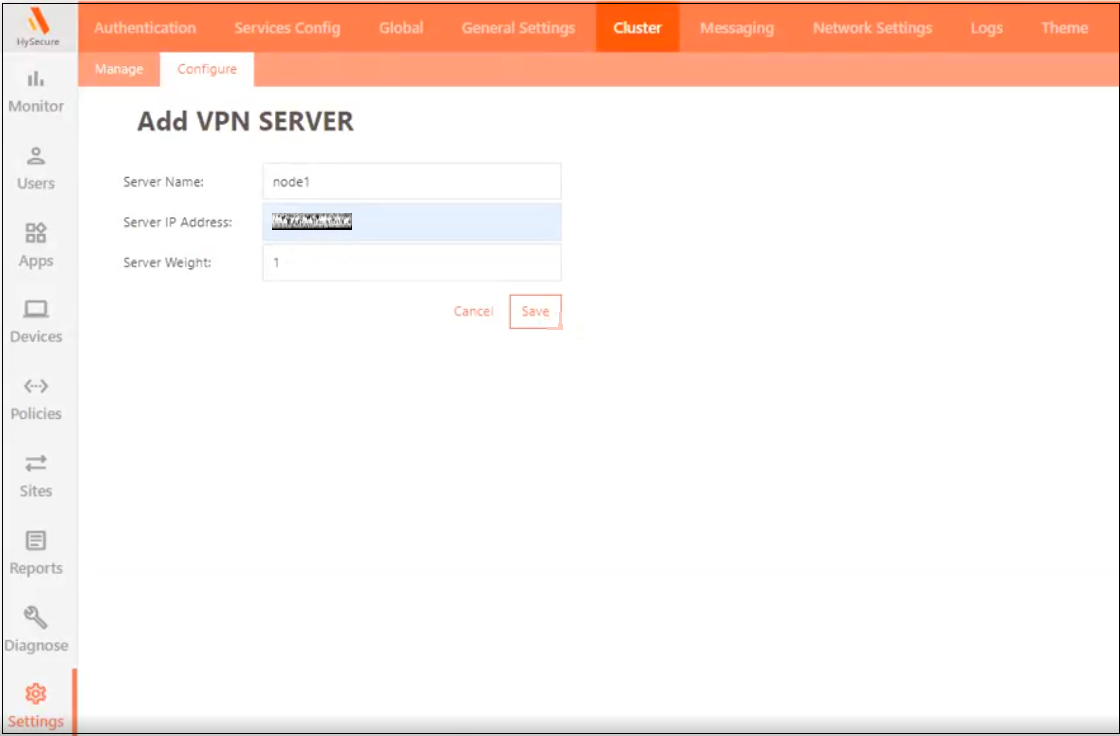
Click Add to add a node to a cluster. Enter the details and click Save.
- Server name: Enter the server identifier.
- Server IP address: It should be the eth0 IP address of the HySecure VM.
- Server Weight: Keep the default value.
-
Click Save, then click Reload Service.
-
Click Monitor to view the status.
- The pop-up will appear when connected to Standby/Real. The administrator can verify this by checking the role as Active, Real, or Standby label next to the IP address.
- Gateway IP address: Displays the node you are logged into.
- Cluster Nodes Information: Displays the available nodes in a cluster and shows whether the services are running properly.
Conclusion
This single-node deployment option involves setting up all cluster components on a single node. It involves configuring network settings, installing the necessary software, and creating SSL certificates for secure communication. However, it is crucial to recognize that this setup should only be used in non-production scenarios to avoid potential downtime and performance issues.
For the production environment, it is recommended that two-node or multi-node cluster deployments be explored. They can provide the necessary scalability, reliability, and High Availability to meet high operational demands effectively.