G-Suite Apps
Prerequisites
- G-suite Admin Console Access.
- Accops HySecure Gateway with a Public DNS name and a valid SSL Certificate.
- Management Console of the HySecure Gateway with Security Officer privileges.
- Shell Access to the Hysecure Gateway.
Configurations
Configure HySecure as IdP for SAML Application
Note
This configuration is applicable for HySecure 5427 with the Hotfix 0006 and above.
Configuration Steps
-
Configure HySecure gateway as SAML identity provider.
- Log in to the HySecure management console.
- Navigate to Settings > Services Config > SAML Identity Provider.
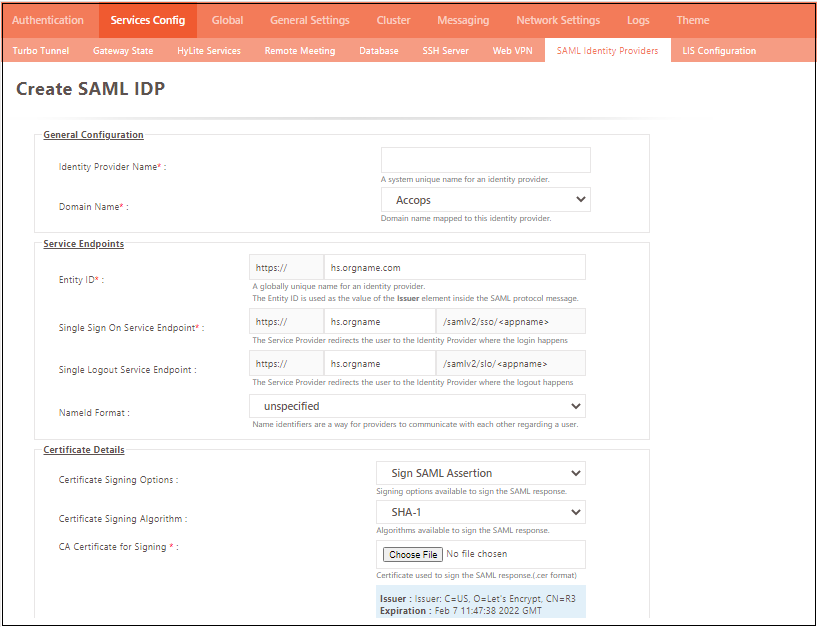
- Create a new SAML Identity Provider.
- Enter the following details:
- Domain Name: Select the configured HySecure domain that is used to authenticate the use from the authentication server.
- Entity ID: Enter the unique shared data between IdP and SP in the format https://hostname
- Single Sign-On Service Endpoint: Enter the IdP URL (HySecure) where SP will connect for SAML SSO.
- Single Logout Service Endpoint: Enter the IdP Logout URL where SP will connect for SAML Logout.
- NameId Format: Select the name identifier for the providers to communicate with each other regarding the user.
- Certificate Signing Options: Select the available SAML Signing Options (The default value is Sign SAML Assertion).
- Certificate signing Algorithm: Select the SAML assertion signing Algorithm (Default value is SHA 1).
- CA Certificate for Signing: Select the CA Certificate used to sign the SAML assertion (Use the certificate that is configured in SP if the HySecure certificate is used in SAML SP; we can leave this with the default value).
-
Publish the SAML SSO-based HTTPS application in the HySecure gateway.
- Select the SAML identity provider that is created.
- Select the preconfigured service provider.
- Verify the mapping attributes. Use the following for Office 365:
- Object GUID: NameID
- EmailID: IDPEmail
Important
SAML Certificates are stored at the location: /home/fes/fescommon/certs/saml_certs/{IDP_Name}
Set up HySecure Identity Provider (IdP) for G-Suite access
-
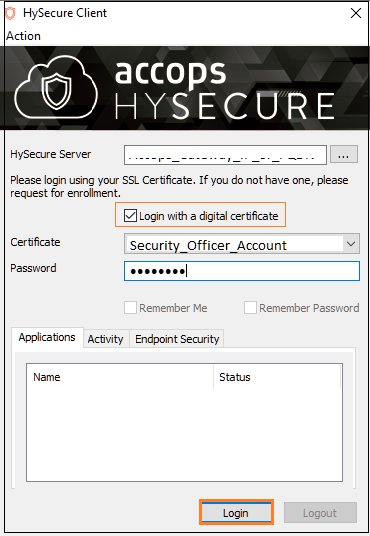
Log in with a digital certificate to the Accops HySecure Gateway using a Security Officer's account.
-
Navigate to Apps > Apps and click Add to create a new application named Google for Gmail.

- Type: HTTPS
- Name: Gmail
- Description: G-suit
- Application Server Address: account.google.com
- Application Port: 443
- Protocol: TCP
- Web URL: https://account.google.com/
- Use Reverse Proxy: No
- Hidden Application: No
- Hide Access Pop-up : No
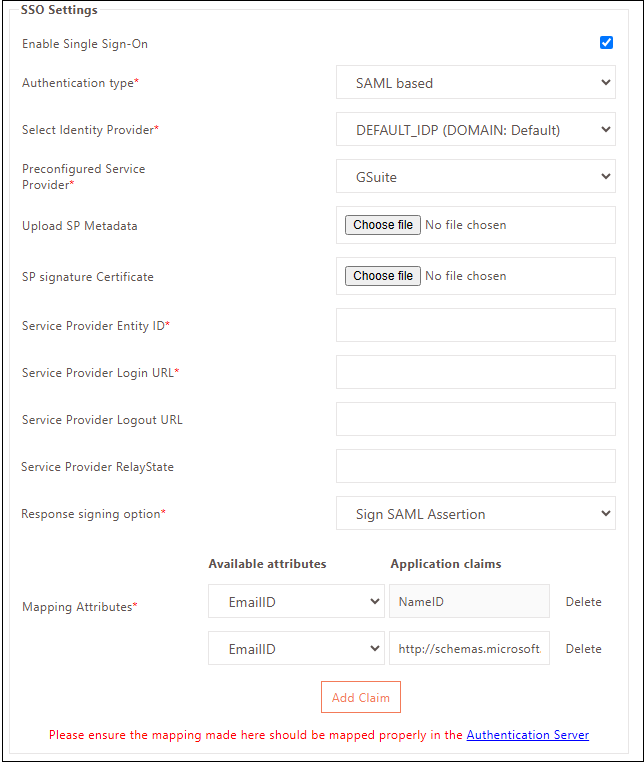
- Enable App Tunneling: Yes
- Enable L3 VPN Tunneling: No
- Enable Single Sign-on: Yes
- Authentication Type: SAML Based
- Select Identity Provider: Select the created SAML IdP.
- Preconfigured Service Provider: Google
- Service Provider Login URL: https://www.google.com/ a/onaccops.com/acs
- Service Provider Logout URL: https://www.google.com/a/onaccops.com/
- Service Provider Relay State: Enter Relay State if the application is configured with any relay state.
-
Mapping Attributes: Add mapping approbated which will be sent in SAML response to the Application.
-
Add the Google app into a New/Existing Application Group.
-
Create/Update an Application Access in the New/Existing Access Controls.
-
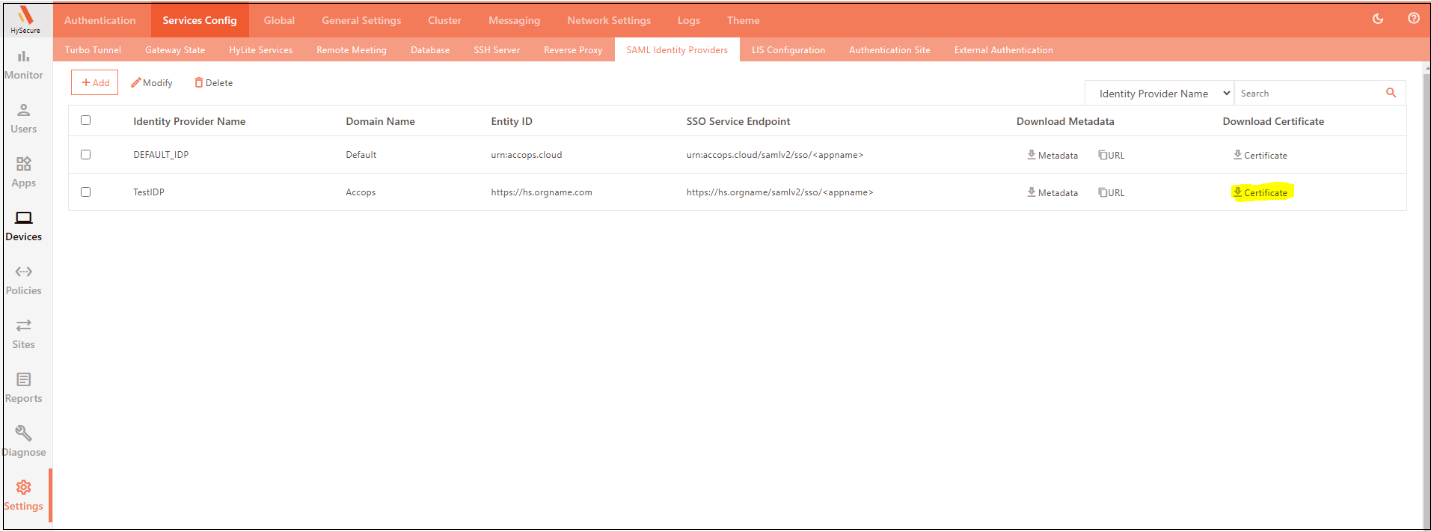
Verify the SAML SSO Certificate in the Accops HySecure Gateway.
Ensure that the following files are available in the Accops HySecure Gateway:
- Certificate Path: /home/fes/fescommon/certs/
- -rw-r--r-- 1 apache apache 1024 Aug 20 16:49 CA_Certificate_TestIDP.crt
- -rw-r--r-- 1 apache apache 1024 Aug 20 16:49 CA_Decryption_Certificate_TestIDP.crt
- -rw-r--r-- 1 apache apache 1674 Aug 20 16:49 Encrypt_Private_Key_TestIDP.pem
- -rw-r--r-- 1 apache apache 1674 Aug 20 16:49 Private_Key_TestIDP.pem
Note
The TestIDP.cert is the name of the SAML Identity Provider that was created in the previous step.
-
Navigate to Settings > Services Config > SAML Identity Provider and download the certificate for the identity provider attached to the Google Suite Application.
For any HySecure Gateway version 5427 with hotfix below 0006
-
Ensure that the following files are available in the Accops HySecure gateway:
- -rw-r--r-- 1 apache fes 2029 Mar 11 11:08 SAML_Signing_Certificate
- -rw------- 1 apache fes 2498 Mar 11 11:09 SAML_Signing_Private_Key
If the above-mentioned files are not present, make sure to create them using the command mentioned below:
[root@sso1 ~]# cd /home/fes/fescommon/certs/ openssl x509 -inform PEM -in "sslcert.cer" -out SAML_Signing_Certificate openssl rsa -in "sslcert.pem" -out SAML_Signing_Private_Key
Note
The command should be used after changing the Working Directory to /home/fes/fescommon/certs/.
-
-
Copy the content of the SAML SSO Certificate SAML_Signing_Certificate from the Accops Gateway.
Warning
Ensure there aren't any new lines in the SAML SSO Certificate when copying the content.
cat /home/fes/fescommon/certs/SAML_Signing_Certificate
-----BEGIN CERTIFICATE-----
MIIFrDCCBJSgAwIBAgISBGJHkNGfVYEtgk7jonYIws6FMA0GCSqGSIb3DQEBCwUA
MDIxCzAJBgNVBAYTAlVTMRYwFAYDVQQKEw1MZXQncyBFbmNyeXB0MQswCQYDVQQD
EwJSMzAeFw0yMTAxMjcxMDA1NDBaFw0yMTA0MjcxMDA1NDBaMBcxFTATBgNVBAMT
DGFjY29wcy5jbG91ZDCCAaIwDQYJKoZIhvcNAQEBBQADggGPADCCAYoCggGBAJYh
aZIcaKxjsQc0pheAN1qDTHUnfRIny3W6dShVEcdHBtVDqLo8BaFZ5elEhRZHt5u9
G1FTtN9r3YN8EyVqGG+VoHFZLs53nT2pKXe+OqtqKtW4sTOEWyVER3lFRRKgL1sx
D8OZwjsDHtPubK9vcTwPE64+nfAcBGj+1tTETgXgsorZXmtybXiexwZxad4tFrFW
XIm0aVB8FwRLiKhNZ5eK6c7+dKwQPkYuS6n60Psg9v/MBzxEE87nHbK5tDMmTotN
xIn8uyi+l7ArPFvIWKIN8O/Qnrym7RH1L73jAuykhwEDXBkNysjpKkTuvthJCeGw
oab9jcbVX5Vx0WCsuwTkvikJbp1NkI9pJcm97ST1d7NOkkIaI9Fq4TgucX2b0ZPr
zCwaIRHXgII9eB9BO7idUi4u+23hB+jZYzGSVBz0lOPs90mW9jaFbPCt8CoX/Pm9
GAq0uFb/ceNrRKtk3gAX9J2XHqk1rlnCwauT4qo7gfuqW4ygtwkYCSMHPPG+wID
AQABo4ICVTDCAlEwDgYDVR0PAQHBAQDAgWgMB0GA1UdJQQWMBQGCCsGAQUFBwMB
BggrBgEFBQKDAjAMBgNVHRMBAf8EAjAAMB0GA1UdDgQWBBQ2EBlrVJBjq2oHXam7
Xzv5IVqm/jUfBgNVHSpEGDAWgBQULrMXt1hWy65QCUDmH6+dixTCxjBVBggrBgEF
BQcBAQRJMEMwIQYIKwYBBQUHMAGGFWh0dHA6Ly9yMy5vLmxlbmNyLm9yZzAiBggr
BgEFBQcwAoAWaHR0cDovL3IzLmkubGVuY3Iub3JnLzAnBgNVHREEIDAegg4qLmFj
Y29wcy5jbGR1ZIIMYWNjb3BzLmNsb3VkMEwGA1UdIARFMEMwCAYGZ4EMAQIBMDcG
CysGAQQBgtNTAQEBMCgwJgYIKwYBBQUHAgEWGmh0dHA6Ly9jcHMubGV0c2VuY3J5
cHQub3JnMIOBAgYKKwYBBAHWeQIEAgSB8wSB8ADuAHUAlCC8Ho7VjWyIcx+CiyIs
DdHaTV5sT5W9YdtOL1hNosIAAAF3Q4U54wAABAMARjBEAiBXSdXt8+QVBFC4sy3j
FpJYds7BIMYysomjQXY4EM+AiwIgUOtBJPV6s9mT3VdQOz4+R3CYD08Zu72+bahC
oyT2/+gAdQO2XJQv0XcwIhRUGAgwlFaO400TGTO/3wwvIAvMTvFk4wAAAXdDhTof
AAAEAwBGMEUCIEC8Gb+EDzePNEuEE5pOT0jnV2M41Jj94DTwKEoqjoRxAiAZZUX5
tG4mCC+G4pCRIHhrbxdPoBXj7UsWPzkHiHnZxjANBgkqhkiG9w0BAQsFAAOCAQEA
BV6d943HCsAesV1SiT7+hsBZQsDy7+KcPiSkfq50qMFuD1S2m1PE/Y0tNULT2DxB
fEPGsJrVubND+wJrufAljenEZZzivdrxjAMBBuybqzFlNQoMmIJa7V7xnE9pCSPb
k0UGYKSgHxSsqKxzLiRuneicVyMwyD/LxdF/QbxPfVWnt+mi1rduQk9yhoT6wubq
T99qVOIzPnEkM1MO5qm0mD/xirlO5bbVDqJClGR0ifnrHN5ueWTgbMT1ruCyFcx5
zDPB+7NWzyELdQ82I9UNCZ+/8GNu7bQX6p/w0BzDLwv3i3B5So8QetouPBF4Zpu1
Ejb8AQeQjIMJCWtYHdO4Fg==
-----END CERTIFICATE-----
Set up HySecure in G-Suite (Service Provider)
-
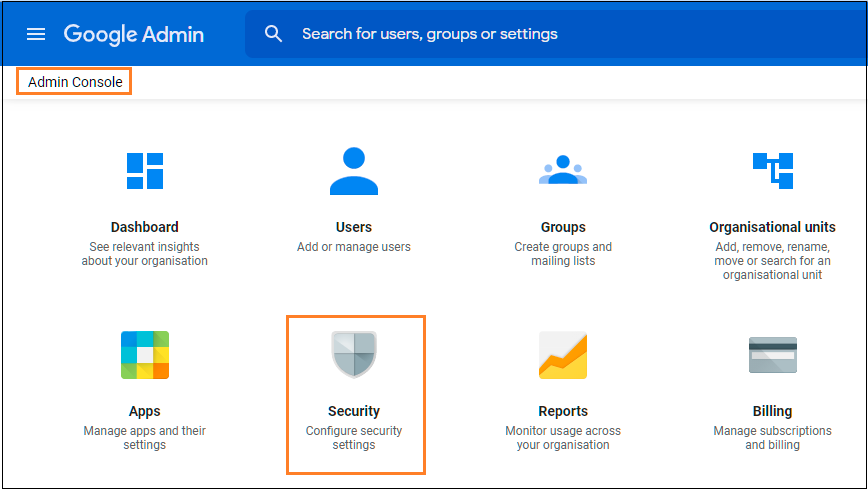
Go to the Google Admin Console https://admin.google.com/u/1/?pli=1 and log in with Admin Access.
-
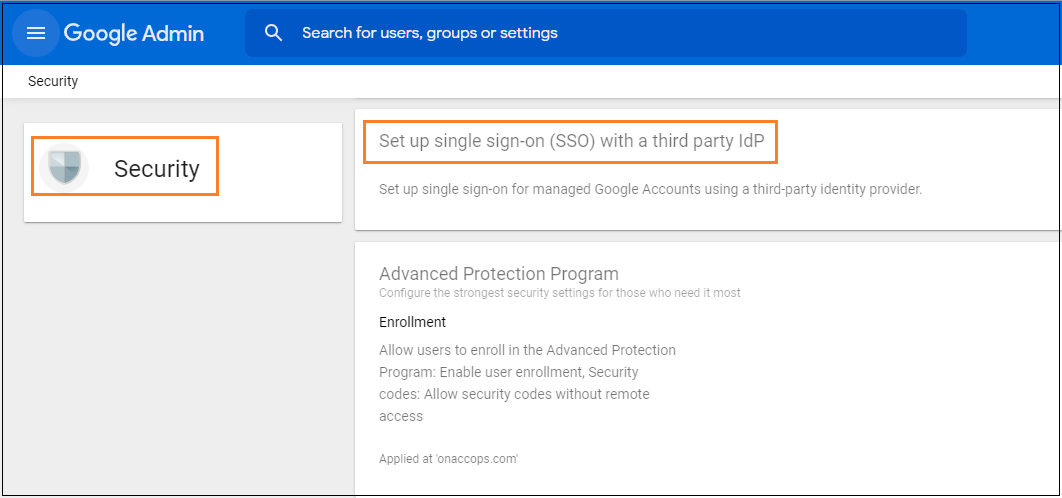
Select Security from the Google Admin Console.
-
Select the Set up single sign-on (SSO) with a third party IdP option.
-
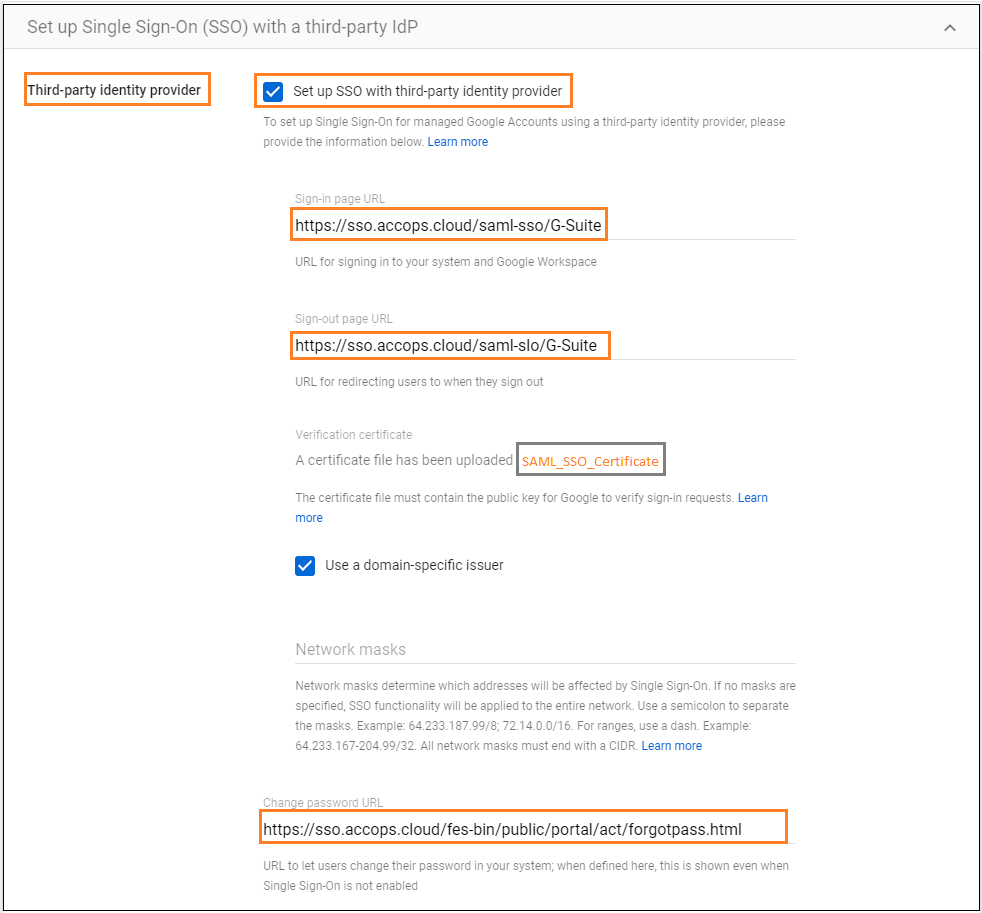
Configure the HySecure IdP Server Details using the instructions included below.
- Sign-in Page URL : https://sso.accops.cloud/saml-sso/G-Suite
- Sign-out page URL: https://sso.accops.cloud/saml-slo/G-Suite
- Upload IdP SSL Certificate : SAML_SSO_Certificate.cer
- Select Use a domain-specific issuer
-
Click Save.
Sign in to G-Suite
Using IdP initiated login
This will validate the SAML IdP configuration for SSO.
-
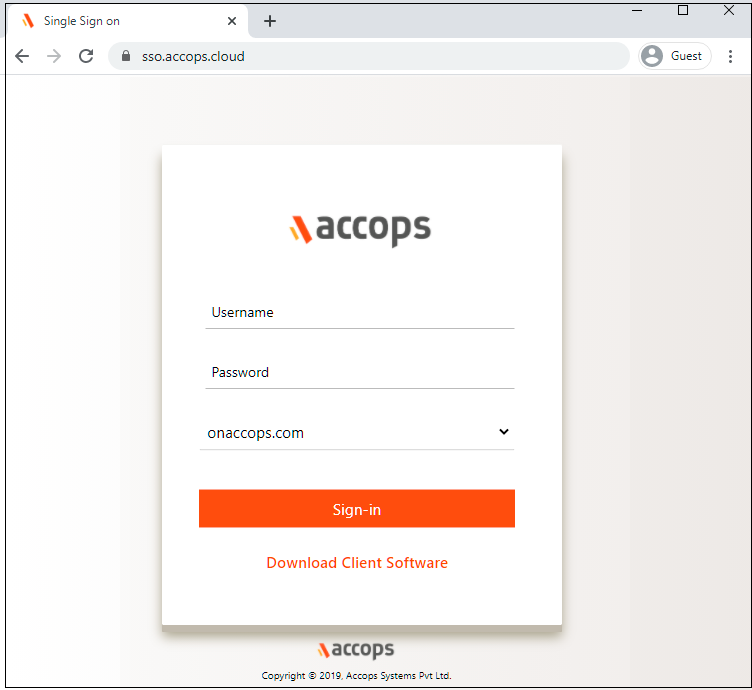
Go to the Accops Workspace Portal (https://sso.accops.com/).
Enter the sAMAccountName of the user
For Example:
Username: xyz.abc Password: xxxxxx Domain: onaccops.com -
Enter the Login Credentials. Choose a domain from the dropdown and click Sign In.
-
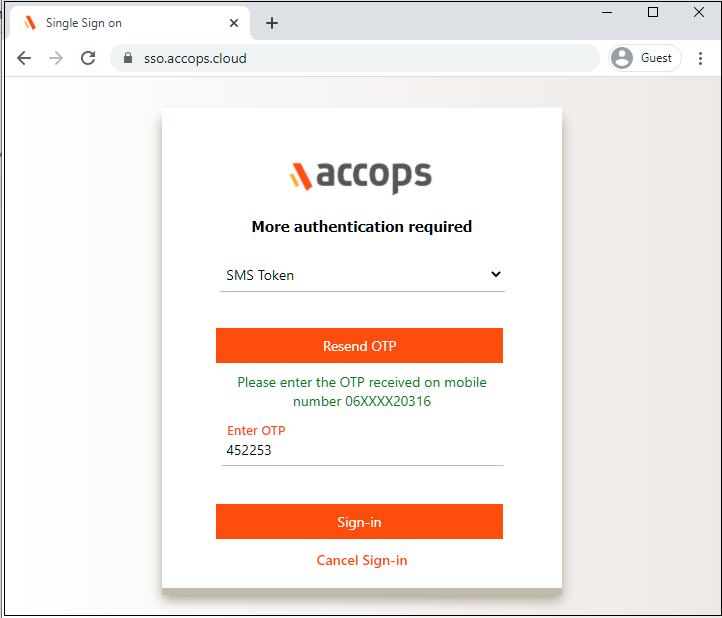
Verify using any of the Multi-Factor Authentication options available in the dropdown.
-
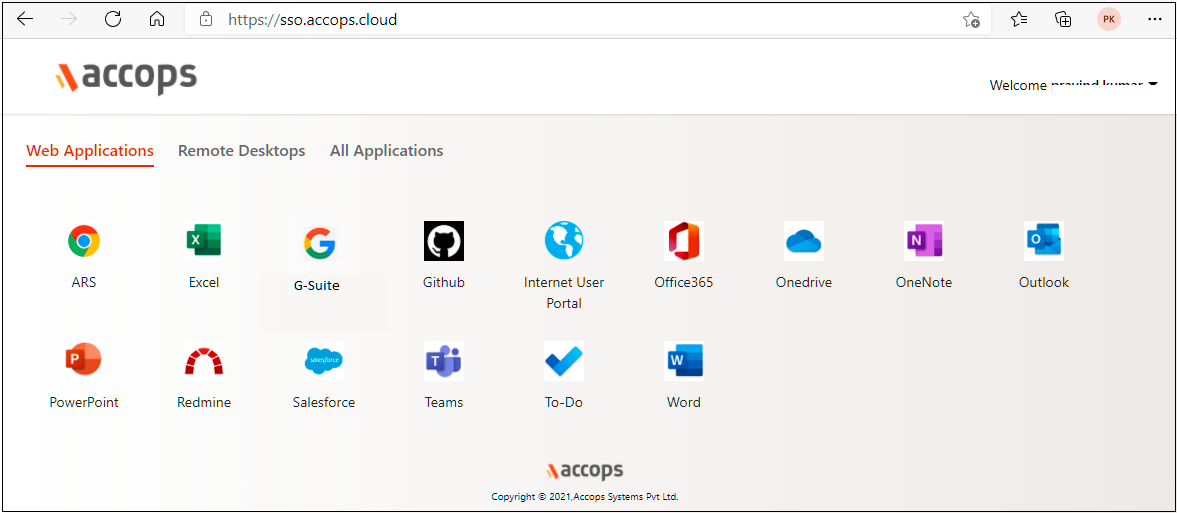
Upon successful Authentication and Authorization, the user will be redirected to the Accops Workspace Portal.
-
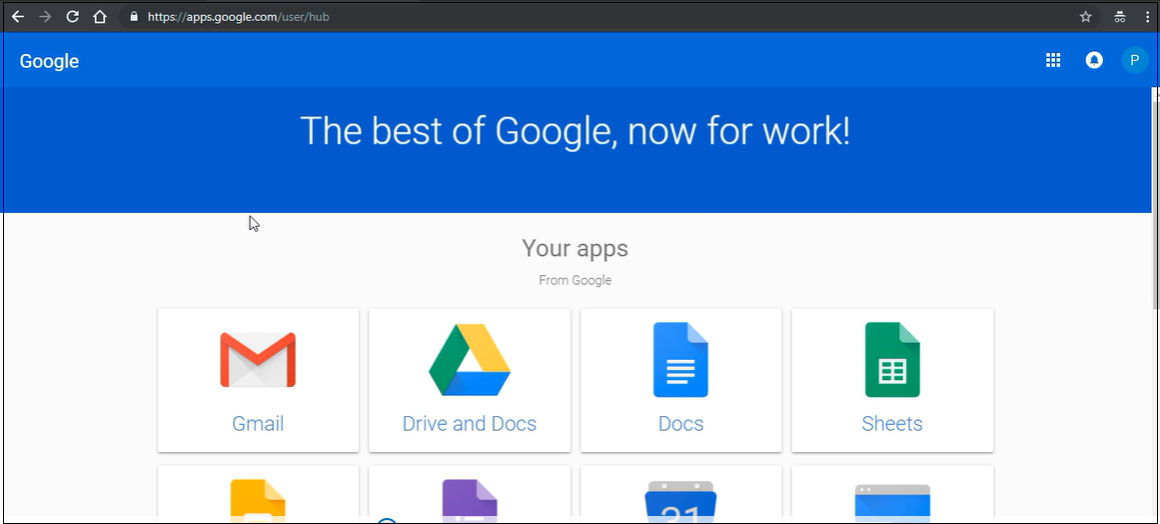
Click on the G-Suite icon to launch the Single Sign On access to Gmail.
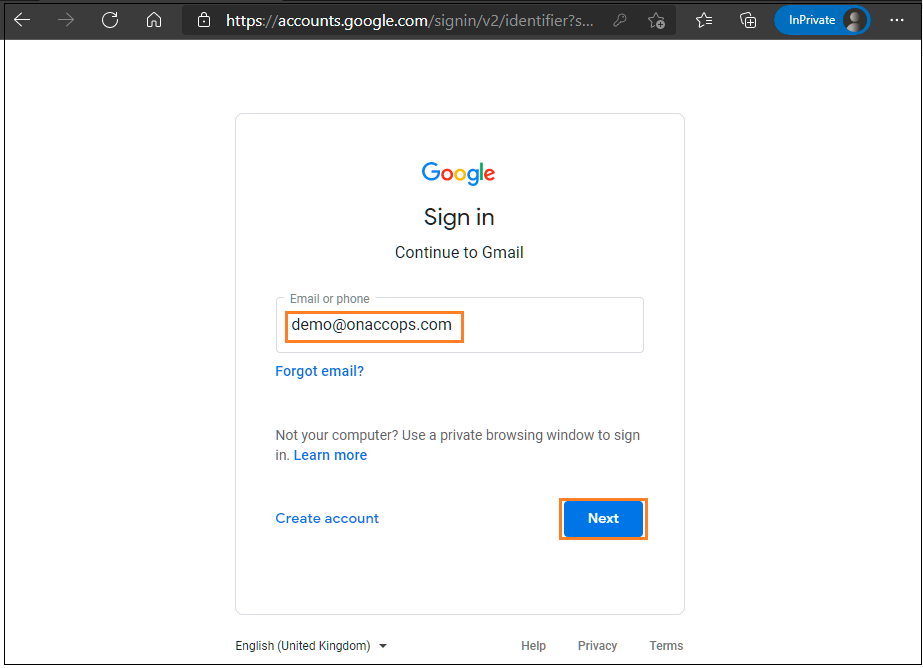
Using SP initiated login
-
Go to Gmail (https://mail.google.com) and choose to log in using the Accops SSO.
-
An Authentication request will be redirected to the Organization Sign in Page (Accops IdP Login Portal). Enter the Authentication details and click on Sign-in.
Enter the sAMAccountName of the user
For Example:
Username: xyz.abc
Password: xxxxxx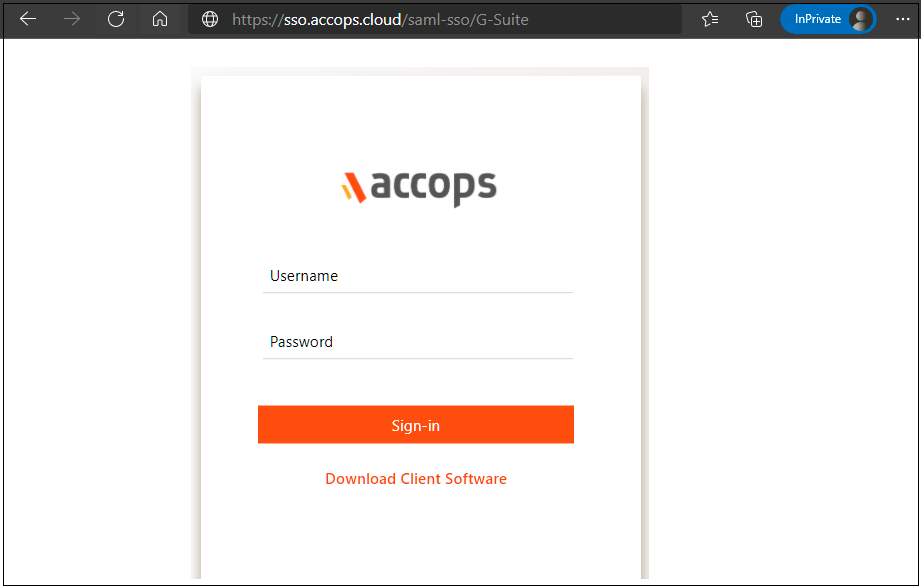
-
On the next screen, the Accops IdP Server will prompt if more Authentication is required. Choose Send Push to Mobile/Desktop and Authorize the desktop to push to log in.
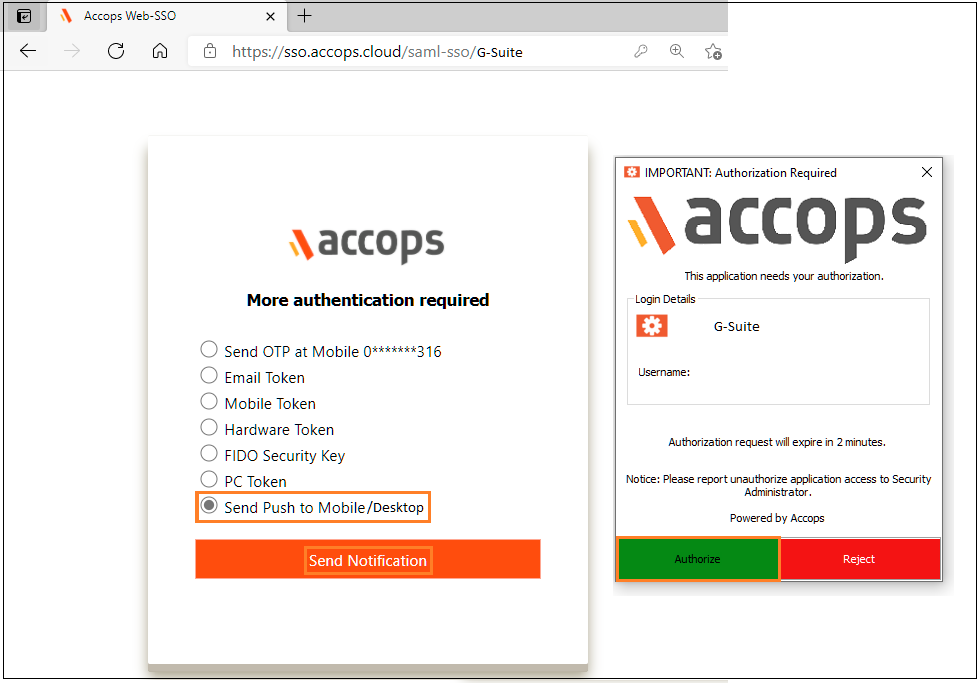
-
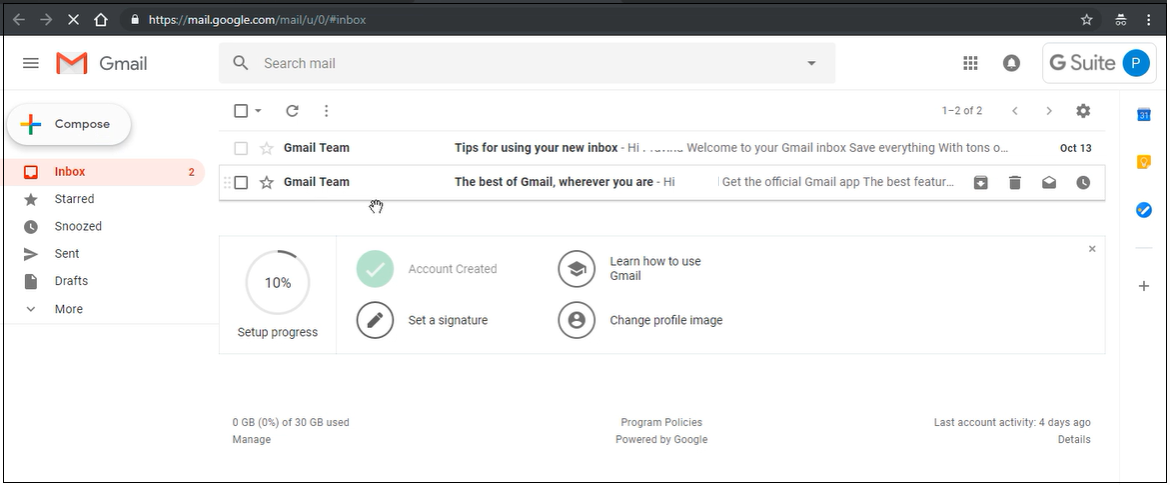
Upon successful authorization the G-Suite Portal can be accessed.