Server settings
In this section of the Management Console, all configurations related to time zones, monitoring intervals for Turbo users, user idle timeouts, the global endpoint security policy, SSL, and TCP settings are included.
Time Settings
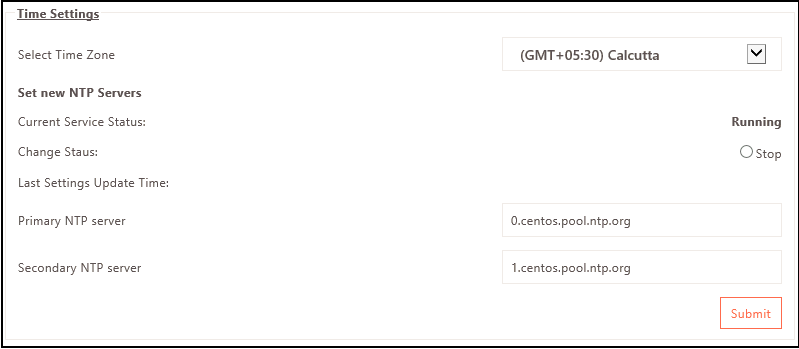
Network Time Protocol (NTP) will be the time source for all the Gateway nodes. This will ensure the same time across them. To configure NTP for HySecure gateway:
-
Log on to the Management Console.
-
Navigate to Settings > Global > Server > Time Settings.
-
Select Time zone and NTP (Network Time Protocol) server settings for the HySecure Server.
-
Click Submit.
After submission, HySecure will synchronize time from the above-mentioned source. This will start the NTP service on the HySecure server and ensure that the date and time of the HySecure server are always correct by synchronizing with the NTP server.
Turbo Users Data Transfer Settings
-
Log on to the Management Console.
-
Navigate to Settings > Global > Server > Turbo Users Data Transfer Settings.
-
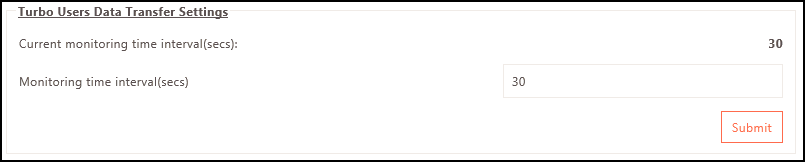
The Current monitoring time interval is set to 30 seconds. To change it, specify the times in the Monitoring time interval(secs).
-
Click Submit.
User Settings
-
Log on to the Management Console.
-
Navigate to Settings > Global > Server > User Settings.
-
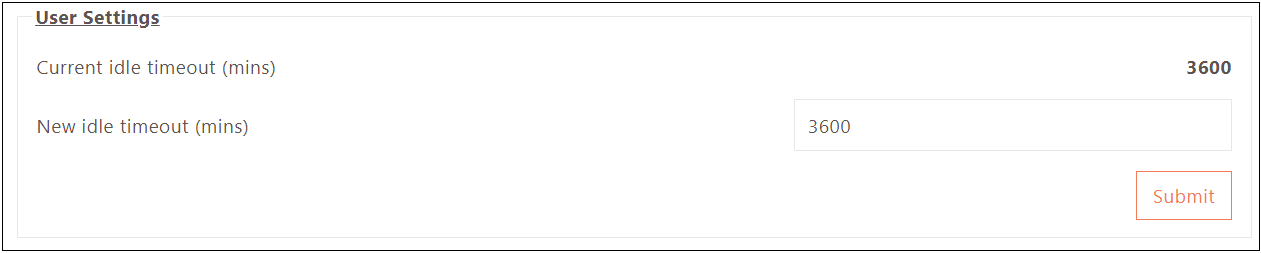
If the client machine has been inactive for a long time, automatically logging the user out is good security practice. The inactivity period for automatic logout can be configured on the server.
-
Set the logout time (in minutes) in the New Idle Timeout. The time must be between 1 and 3600 minutes. The default logout time is 30 minutes.
-
Click Submit.
Realm Settings

-
Log on to the Management Console.
-
Navigate to Settings > Global > Server > Realm Settings.
-
Select Enable automatic realm detection if multiple organizations or groups use a single HySecure cluster within the same organization with their own domain names, like company1.provider.com and company2.provider.com. The organizations will have their corresponding HySecure Domains (Realms), ‘company1 ’ and ‘company2 ’, configured on the gateway.
Note
Ensure the Realm is configured before enabling. Once enabled, configure the hostname on the Settings > Authentication > HySecure Domain page. The configured hostname or URL can be used to access the organization’s login page directly via the browser or the HySecure client.
-
Select Don't allow login if realm detection fails to restrict the user login if the realm detection fails.
-
Click Submit.
Global Policy Settings
-
Log on to the Management Console.
-
Navigate to Settings > Global > Server > Global Policy Settings.
-
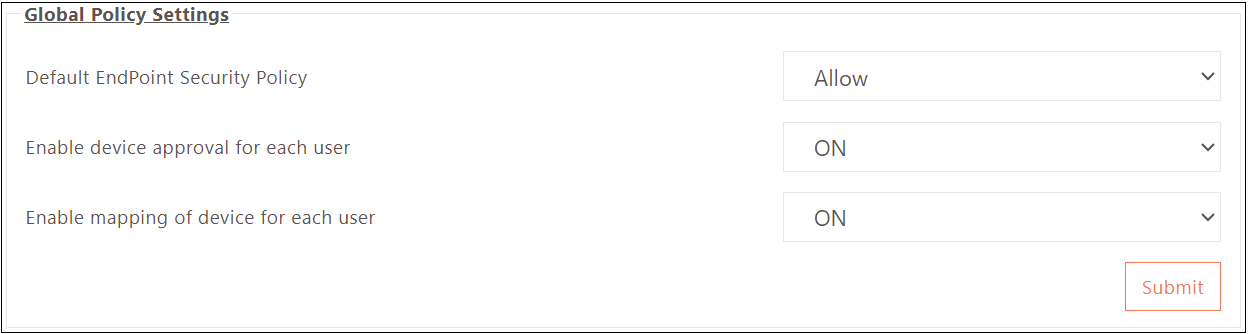
Select the Allow or Block option from the Default Endpoint Security Policy dropdown.
-
Select Enable device approval for each user as ON if device approval is required every time the user logs in on the device. This is useful for corporate-owned devices shared among multiple users. With this option, the device must only be approved once, and any authenticated user can use it.
-
Select Enable mapping of the device for each user as ON if the device-user mapping is required. If this is disabled and device approval is also not enforced, the device will not be listed in the device list.
-
Click Submit.
Configuration for Health Status Check
-
Log on to the Management Console.
-
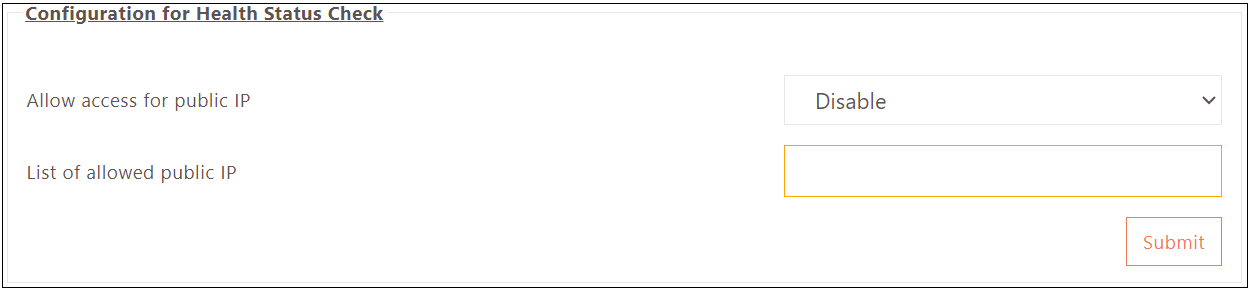
Navigate to Settings > Global > Server > Configuration for Health Status Check.
-
Select Enable from the dropdown menu to allow access for public IP addresses when accessing the HySecure Gateway.
-
Provide a List of allowed public IP addresses for access.
-
Click Submit.
Cloud Configurations
-
Log on to the Management Console.
-
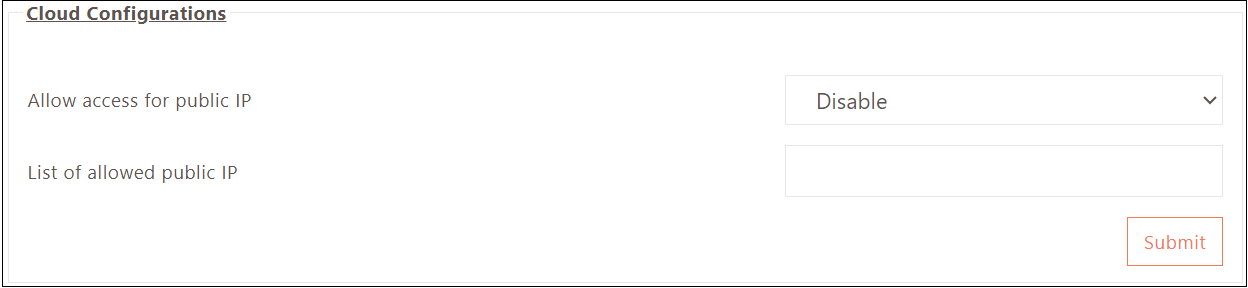
Navigate to Settings > Global > Server > Cloud Configurations.
-
Select Enable from the dropdown menu to Allow access for public IP addresses when accessing the HySecure Gateway.
-
Provide a List of allowed public IP addresses for access.
-
Click Submit.
External Authentication Configuration
-
Log on to the Management Console.
-
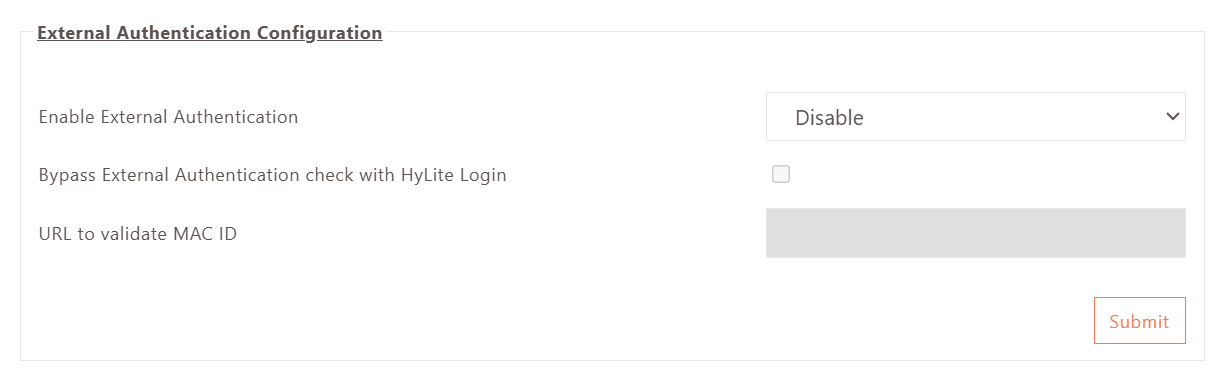
Navigate to Settings > Global > Server > External Authentication Configuration.
-
Select Enable from the dropdown menu to Enable External Authentication while accessing the HySecure Gateway.
-
Provide a URL to validate MAC ID for access.
-
Click Submit.
Configuration for DoS Attack
-
Log on to the Management Console.
-
Navigate to Settings > Global > Server > Configuration for DoS Attack.
-
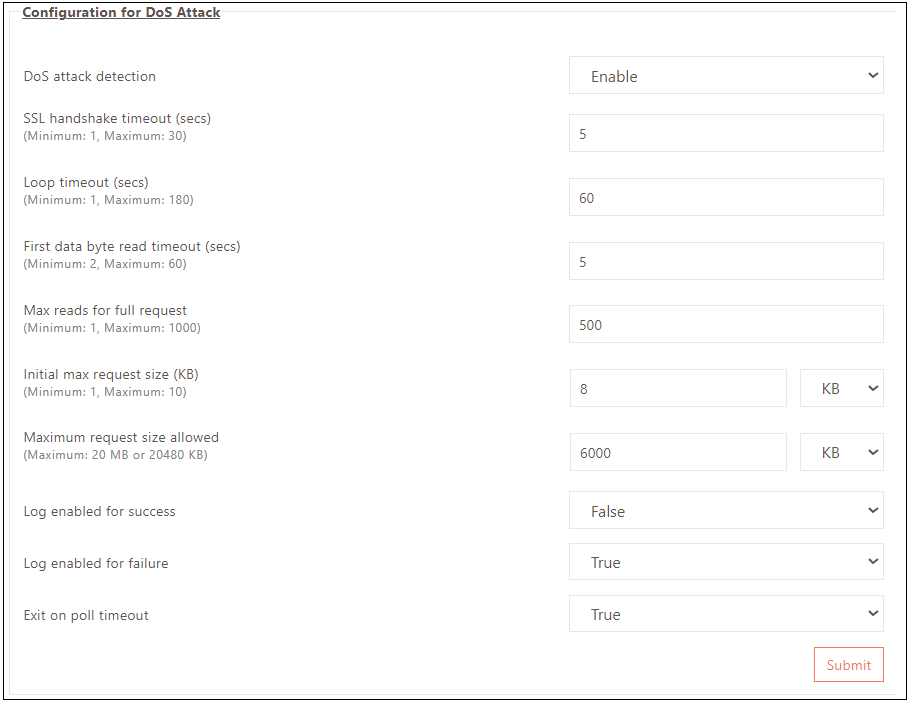
DoS detection is enabled by default and pre-filled with standard DoS protection configurations. It is not recommended to make any changes unless deemed necessary by an expert.
-
Click Submit.
The configuration details are as follows:
| Field | Description |
|---|---|
| DoS attack detection (Default - Enable) | Choose Enable to monitor incoming traffic for signs of a DoS attack actively. |
| SSL Handshake timeout (secs) (Default - 5 secs) | HySecure Gateway sets a time limit for completing SSL/TLS handshake. The connection terminates if the handshake is not completed within this time. |
| Loop Timeout (secs) (Default - 60 secs) | This critical time interval enables the detection of repeated actions or loops in the traffic. If HySecure identifies repetitive behavior, it responds after a predetermined interval. |
| First data byte read timeout (secs) (Default - 5 secs) | A significant delay in receiving the first data byte may indicate a slow or stalled connection, indicating an ongoing DoS attack. |
| Max reads for the full request (Default - 500) | Limit the number of read operations per incoming request to identify and address suspicious requests. |
| Initial max request size (KB) (Default - 8 KB) | Use this to establish an initial maximum request size threshold and prevent unusually large requests. |
| Maximum request size allowed (Default - 5859.375 KB) | For optimal protection, set a maximum request size. Any requests exceeding this limit will either be flagged or rejected. |
| Log enabled for success/failure (Default - False) | Requests that fail or appear suspicious are meticulously logged, while successful requests are not logged to reduce unnecessary entries. |
| Exit on poll timeout (Default - True) | In the event of a polling timeout, HySecure exits operations to optimize resource usage when connections are potentially stalled. |
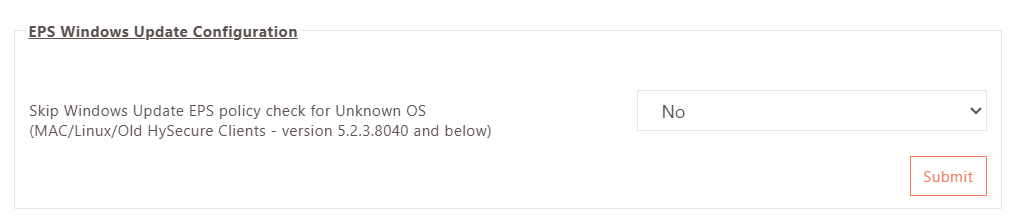
EPS Windows Update Configuration
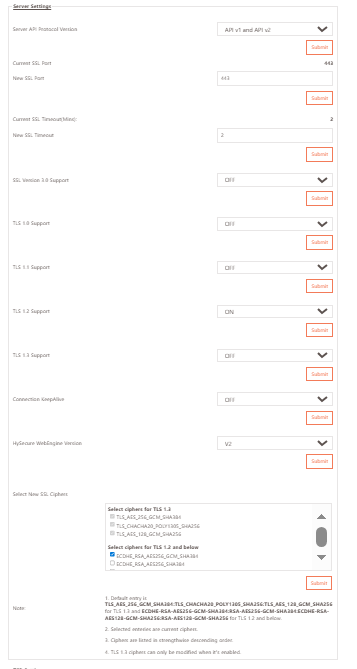
Server Settings
-
Log on to the Management Console.
-
Navigate to Settings > Global > Server > Server Settings.
-
Select the API protocol version and click Submit. Choose API v1 and API v2 if CAPTCHA settings are enabled from Authentication > HySecure Domain.
-
The current SSL Port displays the port on which the HySecure server is currently running. Set a new port if required and click Submit. HySecure will restart when the port is changed. Avoid using ports 80, 4001, 4002.
-
The current SSL Timeout displays the time after the session. The required SSL ciphers must be enabled to comply with FIPS 140-2. Set a new timeout if required and click Submit.
Note
To comply with FIPS 140-2, the required SSL ciphers must be enabled.
-
By default, SSL v3.0 is used to establish a connection. Disable if required and click Submit.
-
By default, TLS 1.0 is supported. Disable if required and click Submit.
-
By default, TLS 1.1 is supported. Disable if required and click Submit.
-
Select New SSL Ciphers to specify the encryption and key negotiation algorithms.
-
After selecting new ciphers, the HySecure service will restart.
Note
Selecting unsupported Ciphers may cause complete loss of connectivity to the Gateway for any machines or browsers that do not support them.
MAC ID validation configuration
When manual review and approval for devices is configured, Devices connecting to the HySecure gateway must be approved for access before end users can access apps on those devices. This manual approval process burdens the IT team by requiring approval for each device. For an organization that already has a service or database that records corporate device identification and can provide approval status based on device properties, it is possible to configure the HySecure gateway to communicate with that service and automatically approve devices without manual admin intervention. HySecure can make an HTTP call to the external service with the incoming device's MAC ID, Motherboard ID, and hostname, and the service can confirm the identity.
-
Log on to the Management Console.
-
Navigate to Settings > Global > Server > MAC ID validation configuration.
-
Enable MAC ID validation and specify the URL. The default validation script does nothing and approves no devices. To utilize the feature, the script
/home/fes/pyapp/validateMACForUser.pymust be customized to communicate with the device approval service.
TCP Settings
-
Log on to the Management Console.
-
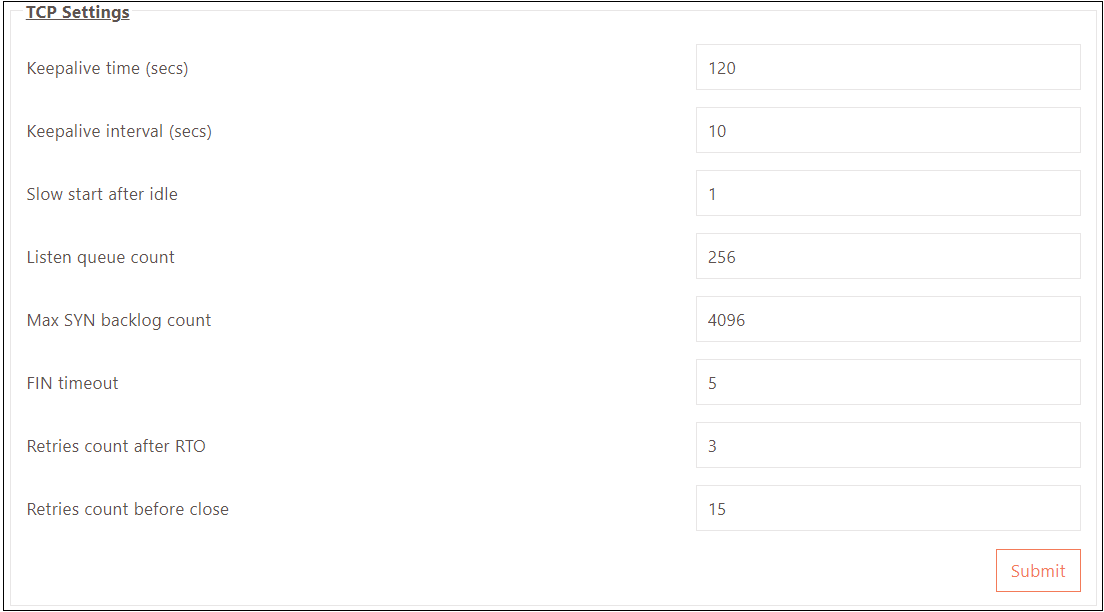
Navigate to Settings > Global > Server > TCP Settings.
-
Set keepalive time. The default is 120 seconds. It is the interval between the last data packet sent and is for each established connection. This value cannot be changed once the connection is marked for Keep-Alive.
-
Set Keepalive interval. The default is 10 seconds. The subsequent Keep-Alive probes must be sent before the connection is considered dead.
-
Set a Slow start after idle time. The default is 1 second.
-
Set the listen queue count. The default is 256.
-
Set the max SYN backlog count.
-
Set FIN timeout.
-
Set the retry count after RTO.
-
Set the retry count before closing.
CARTA & EPS Re-evaluation Settings
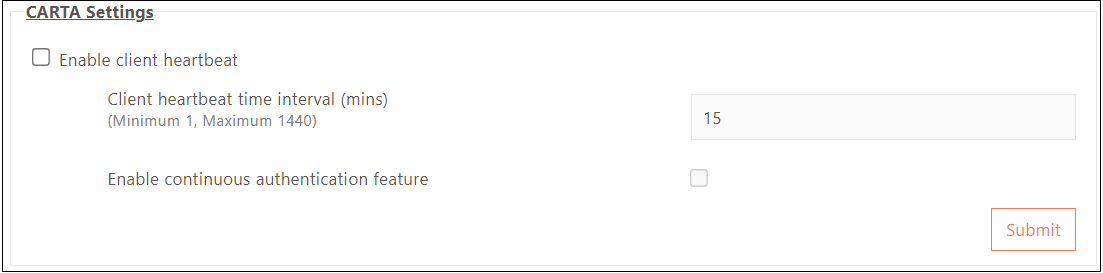
CARTA & EPS Re-evaluation Settings are configured when Forced Reauthentication or EPS Re-evaluation is configured via Authentication ACL.
-
Enable Client heartbeat: Select this to enable heartbeat between Workspace client and HySecure gateway. This is required for both Forced Reauthentication and EPS Re-evaluation.
-
Enable continuous authentication: Select this option to enable continuous authentication when Forced Reauthentication is configured via the Authentication ACL.
-
Log in to the management console.
-
Navigate to Settings > Global > Server > CARTA & EPS Re-evaluation Settings.
-
Select Enable client heartbeat to activate continuous Endpoint Security re-evaluation for users associated with the configured Authentication ACL.
-
If required, enable the continuous authentication feature.
-
Click Submit.
TLS Settings

TLS is a widely used security protocol that enables secure communication between two applications. It provides authentication, privacy, and data integrity, making it ideal for web browsing, file transfers, VPN connections, remote desktop sessions, and VoIP.
TLS is now integrated into modern cellular transport technologies, including 5G, to secure core Radio Access Network (RAN) functions.
-
Log in to the management console.
-
Navigate to Settings > Global > Server > TLS Settings.
-
Select the Verify Peer Certificate and Verify Peer Certificate Curl options to enable TLS.
-
Click Submit.
WAF Settings

A web application firewall (WAF) filters HTTP traffic to and from a website or web application. It filters HTTP traffic to and from a website or web application. It's placed in front of one or more websites. It analyzes the web application logic at Layer 7, blocking potentially harmful traffic to prevent zero-day exploits, malware infections, impersonation, and other known and unknown threats and vulnerabilities.
-
Log on to the Management Console.
-
Navigate to Settings > Global > Server > WAF Settings.
-
Tick the checkbox against Enable WAF Header Check and configure the options below based on the requirement:
-
WAF Header Name: The custom header key the WAF device will add, except for the app connect request. By default, it is empty.
-
WAF Header Value: The WAF device assigns a value to the custom header. By default, it is empty.
-
-
Disable WAF Header Check for WAN IP Addresses: Enable this option to allow login without custom header check for specific devices with provided WAN IP Addresses.
- Allowed Subnet: Provide a comma-separated Subnet address for which the custom header check is to be ignored for login.
-
Click Submit.
External API Settings
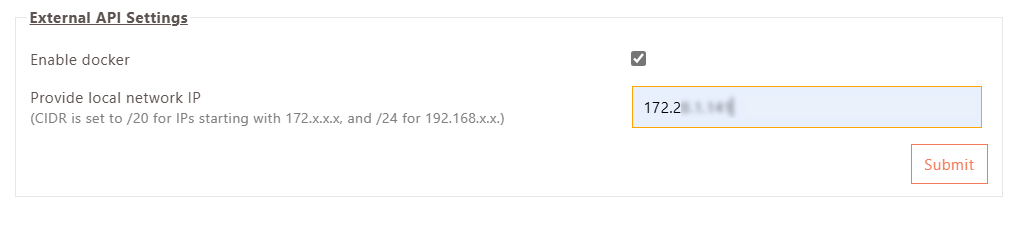
Significant improvements have been made to user reporting with the introduction of new HySecure APIs. These APIs enable seamless integration with corporate HRMS, automating attendance tracking based on user login activity and eliminating the need for manual attendance marking, especially in work-from-home situations.
The API provides login/logout data in JSON format and uses JWT-based authentication for secure access, with flexible filters for Domain, Start Date, End Date, User Name, and Start of Day. These enhancements boost overall operational efficiency.
-
Log in to the HySecure management console as Security Officer/Administrator.
-
Navigate to Settings > Global > Server and find External API Settings.
-
In External API Settings, check the box for Enable Docker, then enter the local network IP address to assign to the Docker service, which will run on the Active HySecure gateway and be used by HySecure APIs for HRMS in the "Provide local network IP" field.