Reservation Management
Reservation Creation
A reservation admin, or the person in charge of a course, can create a reservation for the course.
When creating reservations, the course specifies which HyLabs users will be part of this reservation.
Course Reservation Creation
Prerequisites
-
A course is already defined with an incharge, assistants, and participants (refer to the Courses section for detailed information on course creation and associated information).
-
A Gold Master is imported into HyLabs and assigned to a course (refer to the Gold Master section for more information), or a course default Gold Master is available.
Configuration Steps
-
Log in as reservation admin and go to Reservations.
-
Click Add New Reservation. The Add Reservation wizard will open.
-
In the Option tab, select Reservation For as Course Reservation.
-
Click Next to navigate to the Course Reservation tab.
-
Select the course for which the reservation needs to be created.
-
Gold Master VMs assigned to this course.
-
Course default Gold Master VMs.
-
-
Select the Gold Master to be used for this course reservation. While selecting a Gold Master, the list will display in the following format:
-
If Gold Master has a display name: Gold Master Name [Gold Master Display Name] - [Session Type]
-
If the Gold Master doesn't have a display name: Gold Master Name - [Session Type]
-
A search text box allows users to search for the Gold Masters by Name or Display name.
Important
The Gold Master Display Name feature is supported in HyWorks v4.1 HF1 or later.
-
-
Provide a Display Name for the reservation (whether to show the system-generated reservation name, admin-provided display name, or classroom name to the participant is set in Default Reservation Settings).
-
Computer/VM Name:
-
Use Provisioning profile Computer/VM Name: Reserved VMs will use the same VM name as configured in the provisioning profile.
-
Override Default computer/VM Name: When selected, a text box will appear below prompting the user to enter a custom computer name. The input supports up to 1 to 10 alphanumeric characters. VMs will be named using the new computer name, overriding the configurations in the provisioning profile.
Important
-
The feature is supported in HyWorks v4.0 or later.
-
Any previous version will not show this option.
-
-
Enable DVM reset on schedule end: If enabled, the reservation will work as non-persistent; if disabled, it will remain persistent (default).
Important
-
Non-persistent reservation is only supported with vCenter and Nutanix providers. If a Gold Master from another provider is selected, this option will not appear.
-
Refer to the Non-persistent Reservation Support section for more information.
-
-
Select the appropriate snapshot settings for this reservation. The following options are available:
-
Current State: Reserved VMs will be created from the current state of the Gold Master.
-
Use Gold Master Settings: Reserved VMs will be created as per the Gold Master snapshot configurations.
-
Choose a Snapshot: Reserved VMs will be cloned from the specified snapshot only.
-
-
Selecting the course also auto-fills the Total VMs count, which defines the total number of VMs to be cloned from the Gold Master, but can be changed as needed.
-
Total VMs
-
By default, it will be populated with the total number of HyLabs users added to the course i.e., Incharges, Assistants, and Participants, but the admin can choose to change the count as well.
-
The reservation will deploy reserved VMs as per the given number only.
-
-
-
Allow Extensions: When enabled, the incharge will be able to extend the reservation by a certain amount of time as specified in the configuration during course reservation. The extensions will be limited to the number specified in the course configurations.
-
Extension Duration: Duration of extension
-
No. of Times: Allowed number of extensions after the course reservation e.g., 2, then it will allow the reservation to be extended twice with duration as extension duration.
-
-
Reuse VMs for each run of reservation: When enabled, this option enables the reuse of provisioned VMs in every cycle of reservation, which means the provisioned VMs will not get deleted after the first cycle is completed. Unchecking this option will provision new VMs before every occurrence of the reservation.
-
Assignment Life Span: Defines the assignment life span for reservation.
-
Permanent: User will be given the same desktop for all the schedules and all the occurrences of the reservation.
-
Temporary: For single schedule only. User assignment will be limited to single occurrence and on completion of the schedule the assignment will be reset.
-
-
Allow Connect Before Reservation Start: The configuration allows users to connect to the reservation before the actual start time. By default, the setting is configured as zero, which means users will only be able to connect to VMs when the reservation is running.
-
Click Next to navigate to the Schedule tab. It defines the date, time, and pattern when the VMs will be delivered to end users.
-
Define whether it is a one-time or recurring reservation.
-
For One Time schedule:
-
Schedule Code: Provide a unique code for reservation. 3 characters long, supporting only alphanumeric characters e.g., a01.
-
Provide appropriate Start Time/End Time
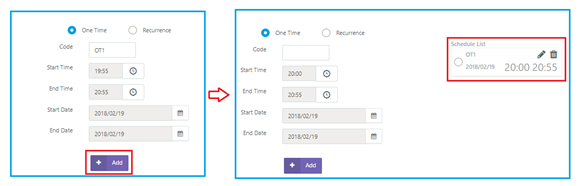
-
-
For Recurring schedule > Define recurring pattern as daily or weekly
-
Daily Recurring Reservation
-
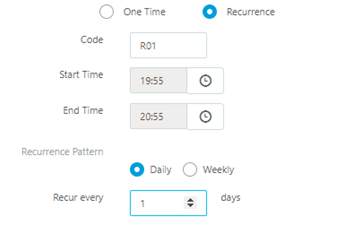
Provide Course Start Time and End Time
-
Select Recurrence Pattern as Daily and provide a numeric value from 1–7 for the Recur Every field (the Recur Every field will define the recurring schedule, e.g.,
-
Recur every = 1, means the schedule will occur on daily basis
-
Recur every = 2, means the schedule will occur on alternate day
-
Recur every = 3, means the schedule will occur on every two days and so on
-
-
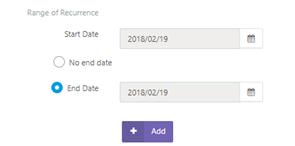
Select Recurrence Range (Start Date and End Date: schedule can also be defined to run infinitely with no End Date).
-
-
Weekly Recurring Schedule
-
Provide Course Start Time and End Time
-
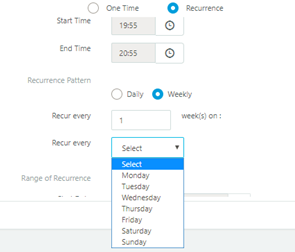
Select Recurrence Pattern as Weekly and provide numeric value from 1-52 for field Recur Every Week(s) (Recur every field along with selected Day will define the recurring schedule, e.g.,
-
For a weekly Monday reservation: Recur every = 1 and selected day will be Monday
-
Select Recurrence Range (Start Date and End Date: schedule can also be defined to run infinitely with no End Date).
-
-
-
-
-
Click Add.
-
Add more schedules as per requirement e.g., if a reservation must run every week on Monday and Wednesday, then two weekly schedules should be added one for Monday and another one for Wednesday.
-
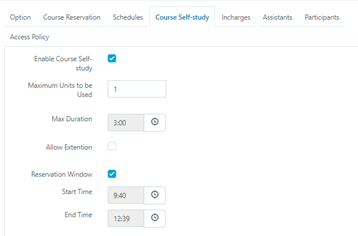
Click Next to navigate to Course Self-study. Course Self-study settings allows admin to enable/disable the course self-study for participants. If allowed, participants will be able to create self-study reservation after the course reservation.
-
Enable Course Self-study: To allow course self-study for the course reservation.
-
Maximum Units to be used: The number of units to be allowed for self-study. (This cannot be greater than Total VMs count in Course Reservation screen).
-
Max Duration: Maximum allowed duration for which a participant can request for self-study.
-
Allow Extension: Will be enabled only if extension is allowed for course. If checked, extensions will be allowed as per configurations of course. If unchecked, the extensions in course self-study will not be allowed irrespective of configuration in course.
-
Reservation Window: If enabled, course self-study reservations will be allowed only in the defined time slot, and this should not be conflicting with the course reservation timing. If enabled, the start time and end time must be defined.
-
-
The next three tabs are for viewing and editing HyLabs users i.e., Incharges, Assistants, and Participants respectively.
-
It displays the list of all HyLabs users.
-
Incharges: Click Add Incharge. The admin can select Users, Groups, or OUs from the pop-up interface. These added objects will be dynamically mapped with reservation only and not with the course. Display a list view of all currently added Incharge entities with type indicators (User / Group / OU).
-
Assistants: Click Add Assistant. The admin can select Users, Groups, or OUs from the pop-up interface. These added objects will be dynamically mapped with reservation only and not with the course. Display a list view of all currently added Assistant entities with type indicators (User / Group / OU).
-
Participants: Click Add Participant. The admin can select Users, Groups, or OUs from the pop-up interface. These added objects will be dynamically mapped with reservation only and not with the course.
-
Display a list view of all currently added Participant entities with type indicators (User / Group / OU).
Important
- The above feature is supported in HyWorks v4.0 or later.
- Any previous version will not show this option.
-
-
Incharges, assistants, or participants cannot be removed from the Reservation wizard, but they can be excluded by deselecting the unwanted HyLabs users in their respective tabs:
- Excluded users will not be able to access the reserved VMs from this reservation.
-
-
Next tab Custom Deployment Settings (Available in HyWorks v3.4-SP1 or later) can be used to configure the reservation specific deployment and VM power policies or continue to use default deployment configurations. It has two sub-sections for Power operation settings and Reservation Deployment Settings.
Important
-
The feature is supported in HyWorks v3.4-SP1 or later.
-
Any previous version will not show this option.
-
Power Operation Settings:
-
Power On VM:
-
On reservation start:
-
Start all VMs (Default): It will power on all the reservation VMs on the start of the schedule.
-
Specify VM count:
-
It will power on only the specified VMs in the reservation. This number cannot be greater than the total VMs in the reservation.
-
If already powered on VMs are greater than the specified VMs number, then no action will be taken and extra powered on VMs will not get powered off.
-
If the already powered on VMs are less than the specified VMs number to power on, then [already powered on VMs - specified VMs to power on] will be powered on. For example: Already Powered On VMs: 4, Specified VMs to Power On: 6, then only [6-4] "2" VM(s) will be powered on.
-
-
-
On User connect: The VM will get powered on only when the user clicks the connect button to access the reservation. All VMs in the reservation will remain in the powered-off state until then.
-
-
Power off VM:
-
On reservation end (Default): It will power off all the VMs at the end of the reservation.
-
On user logout and on reservation end:
-
Will power off the VM only when the user logs out from the running reservation and selects Log Off from all active sessions.
-
If there is no assignment found for the user who is currently logged in, then a log will be printed stating no assignment found and the VM will not be powered off.
-
If the VM assigned to the user is already powered off then a log will be printed stating the same.
-
-
-
-
Reservation Deployment Settings: Default configuration is to inherit it from the default deployment settings. But by unchecking this, the administrator can choose to specify deployment settings for this reservation.
-
Supported Deployment Mode: Custom deployment is supported with on-demand deployment type only, which means if the administrator selects to not inherit deployment settings and specify custom deployment settings, then it will only be done as per on-demand deployment. The following configurations are possible for custom deployment settings:
-
Deployment Type: On demand (Default and only available option).
-
Keep VM: Defines whether VMs should remain powered on after deployment. Options are Shutdown and Powered-on.
-
Deployment Time: Duration in minutes, when deployment for this reservation will start before the reservation start time.
-
Preparation Time: Duration in minutes, when reservation preparation will be triggered before the reservation start time.
-
-
-
-
Click Next to go to the Access Policy tab.
-
Inherit Access Policy from Gold Master: Use same access policies as Gold Master.
-
Choose Access Policy: Selecting this option enables administrators to remove Classified Groups which are already added at Gold Master level. This means reservations cannot reduce the security level by adding new classified groups and can only be restricted further by removing classified groups from the Gold Master.
-
-
Click Save to save the configured reservation. All configurations are completed and now HyLabs will deploy and deliver the reservation as per schedules and deployment settings.
Non-persistent Reservations in HyLabs
This section provides information on non-persistent reservations.
Supported Version
- v3.4-SP1 or later. The non-persistent feature is available only on HyWorks Controller v3.4-SP1 or later. Older versions will not see this option.
Use Case
Main use case of non-persistent reservation is to revert VMs to their original state after each schedule end for Course and Course Self-study reservations.
There are some conditions in which HyLabs reverts the reserved VMs to a restore point:
-
On every schedule end of reservation.
-
If option to Power off VM on user logout is enabled in Custom deployment settings:
-
Exceptions, when reserved VMs will not be reverted: There are some exceptional cases when reserved VMs will not be reverted to fresh state on user logout:
- If Remove HyLabs temporary assignment on logout flag from HyWorks advanced config is set to True.
-
If Enable VM retention option after logoff is checked in Default reservation settings and while logging out user unchecks Retain running course reservation desktop.
-
If Course self study is enabled and
-
If Reservation VM power operation on end flag from HyWorks advanced config is set to 0 [Shutdown] then we will revert the VM first and then Shutdown.
-
If Reservation VM power operation on end flag from advanced config is set to 1 [Restart] then we will revert the VM first and then start.
-
On each course self study schedule end.
-
Power operations [Restart,Power Off, Shutdown] performed from Reserved VMs page (HyLabs) and Desktop VMs page (HyWorks).
-
Recreate and Recompose in HyLabs
-
-
Conditions when reserved VMs will not be reverted:
-
On last schedule on every reservation on both user logout and end.
Note
This feature is only supported with vCenter and Nutanix connectors.
Self-study Reservation by Reservation Admin
Self-study reservations can be created by a reservation admin for specific participants using a self-study Gold Master.
Prerequisites
- Self-study Gold Master is imported into HyLabs.
Configuration Steps
-
Log in as reservation admin and go to Reservations.
-
Click Add New Reservation. The Add Reservation wizard will open.
-
In the Option tab, select Reservation For as Self-study Reservation and click Next.
-
In the Self-study Reservation tab:
-
Select the Gold Master to be used for this self-study reservation. While selecting a Gold Master, the list will display in the following format:
-
If Gold Master has display name: Gold Master Name [Gold Master Display Name] - [Session Type]
-
If the Gold Master doesn't have a display name: Gold Master Name - [Session Type]
-
A search text box allows users to search Gold Masters by name or display name.
Important
The Gold Master Display Name feature is supported in HyWorks v4.1 HF1 or later.
-
-
Provide an appropriate Display Name for the reservation (whether to show the system-generated reservation name, admin-provided display name, or classroom name is set in Default Reservation Settings).
-
Provide the count of reserved VMs to be created for this self-study reservation in the Number of Units field.
-
-
Click Next to navigate to the Schedule tab.
-
Appropriate Date for the reservation.
-
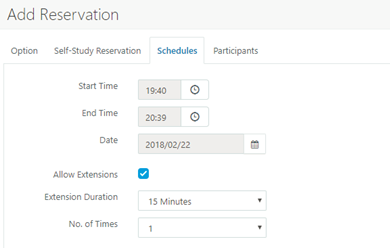
Appropriate Start and End time
-
Allow Extensions: When the Allow Extensions option is enabled, the incharge will be able to extend the self-study reservation by a certain amount of time as specified in the configuration. The extensions will be limited to the number specified in the configurations. The following configurations are available for extensions:
-
Extension Duration: Duration of extension.
-
No. of Times: Allowed number of extensions after the self-study reservation e.g., 2, then it will allow the reservation to be extended twice with duration as extension duration.
-
-
-
Click Next to continue.
-
On Participants screen configure the following:
- Click Add Participants > Participants and add users from the authorization server as participants for this self-study reservation.
-
Click Save to schedule the reservation.
-
Reservation will be scheduled, and participants will be able to access the reservation on scheduled time.
Modifying Existing Reservation
Administrators can also edit any existing reservations depending on the status of the reservation.
This section covers the editing of existing reservations:
Modify an Expired Reservation
Expired reservations can only be deleted from HyLabs, and modification is not possible for an expired reservation.
Modify a Preparing Reservation
Reservations currently being prepared cannot be modified and can only be deleted from HyLabs.
Modify a Running Reservation
It is possible to modify a running reservation, but only certain attributes will be modifiable and only a few of them will take effect during the reservation. To modify a running reservation, follow these steps:
-
Select the reservation with Current Status as Running.
-
Click Edit Reservation to open the Edit Reservation wizard.
-
In Course Reservation tab configure the following:
-
Display Name can be modified and will require users to re-login for new settings to take effect.
-
Computer/VM Name can be modified and changes will only be applicable on next deployments.
-
Reuse VMs for each run of reservation editable, select or unselect to modify. As per changes, reserved VMs can be made volatile or non-volatile.
-
Snapshot Settings: Changing the snapshot settings may prompt the following options: Redeploy Now or Redeploy on Next Schedule. Either option triggers redeployment as per the deployment settings. Currently running reservations will not be redeployed immediately.
-
-
In the Schedule tab configure the following:
-
Schedule is not modifiable as the reservation is running, but end-time can be changed.
-
The extension setting can be modified to allow extensions during the reservation itself; the changes will come into effect in the next schedule.
-
-
The next three tabs can be used to modify the associated HyLabs users, as in the reservation creation process:
-
Already added incharges, participants, assistants cannot be removed but can be excluded/included.
-
Though exclusion should not affect VM creation or deletion.
-
Modify a Scheduled (Not Running) Reservation
Modifying a non-running reservation allows multiple fields to be changed. Follow these steps to modify a non-running reservation:
-
Select the reservation with Current Status as Not Running
-
Click Edit Reservation to open the Edit Reservation wizard
-
In Course Reservation tab configure the following:
-
Course, Classroom and Gold Master fields are not editable.
-
Reuse VMs for each run of reservation editable, select or unselect to modify.
-
-
Clone from snapshot: Changing snapshot settings from its old configuration can populate the following options:
-
Redeploy Now or Redeploy on next Schedule.
-
Redeploy now will deploy the reservation immediately after saving the reservation.
-
Redeploy on next schedule, redeployment will take place as per deployment settings before next schedule.
-
-
-
In the Schedule tab configure the following:
-
Reservation admin can simply change the schedule of the reservation and reservation will get started as per the new schedule.
-
Extension can be modified to allow extensions during the reservation itself.
-
-
The next three tabs can be used to modify the associated HyLabs users, as in the reservation creation process:
-
Already added incharges, participants, assistants cannot be removed but can be excluded/included.
-
Exclusion should not affect VM creation or deletion.
-
Cancelling Reservations
A reservation admin or incharge users can cancel a reservation. The following two types of cancellation flows can be used:
-
Cancelling entire series
-
Cancelling current occurrence
Cancelling entire series
To cancel the entire series of a reservation, follow these steps:
-
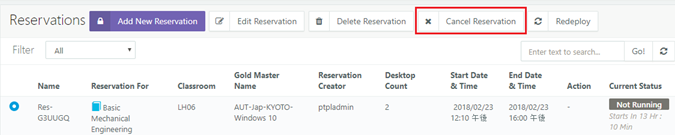
Select the reservation to be cancelled.
-
Click Cancel.
-
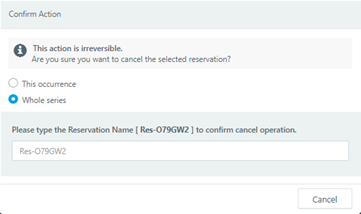
A dialog will appear to cancel the whole series or this occurrence.
-
Select Whole Series.
-
-
Click OK.
-
The reservation will first go into Cancelling state and will then be shown as Cancelled.
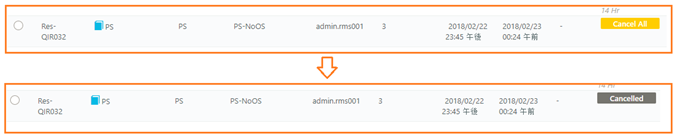
Entire Series Cancellation Flow
-
Not Running (Scheduled – not deployed Reservations):
- Reservation will go into cancelled state and will never get deployed.
-
Running Reservations:
-
Reservation will go into cancelling state.
-
All deployed VMs and replicas will be deleted.
-
Reservation will go into cancelled state.
-
None of the participants will be able to use the reservation.
-
Future occurrences will not run.
-
-
Reservations with completed occurrences (Deployed but not running)
-
Reservation will go into cancelling state.
-
All deployed VMs and replicas will be deleted.
-
Reservation will go into cancelled state.
-
Future occurrences will not run.
-
-
Preparing Reservations
-
Controller will first create a job for cancelling the preparing reservations.
-
It will wait for the running deployment/preparing job to get completed.
-
On completion, all deployed VMs and replicas will be deleted.
-
Reservation will go into cancelled state.
-
Future occurrences will not run.
-
Cancelling This Occurrence
-
Select the reservation to be cancelled
-
Click Cancel

-
A dialog will appear to cancel the whole series or this occurrence.
- Select This Occurrence
-
Click OK
-
The reservation will first go into cancelling mode and will then be shown as Cancelled. The flow will be explained in the next section of the document.
This Occurrence Cancellation Flow
The flow of cancellation of this occurrence will follow different flows for volatile and non-volatile reservations:
Cancellation flow for Non-volatile Reservations
Non-volatile reservations refer to reservations that reuse VMs across all occurrences, and VMs are preserved when an occurrence completes. The following flow applies when deleting a single occurrence of a non-volatile reservation:
-
Not Running (Scheduled, not deployed Reservations):
-
Reservation will go into cancelled state and next occurrence will not be started.
-
Current deployment will be skipped, and the deployment will happen as per next deployment window.
-
-
Running Reservations:
-
Reservation will go into Cancelling state
-
All VMs will be powered off
-
Reservation status will get changed to cancelled and HyLabs users will not be able to use the current occurrence
-
On next occurrence, it will run as expected.
-
-
Reservations with completed occurrences:
-
Reservation will go into cancelled state and next occurrence will not be started.
-
Future occurrences will continue to work as expected.
-
-
Reservation with Preparing State:
-
Controller will first create a job for cancelling the preparing reservations
-
It will wait for the running deployment/preparing jobs to get completed.
-
All deployed VMs will be powered off and remaining VMs will not be deployed anymore.
-
Next reservation will not start, and future occurrences will work as expected with already created VMs.
-
Note
- If VMs are powered off (due to cancellation) when Sysprep is in progress, the VMs may get corrupted and may not be recoverable, and thus it is not recommended to cancel the occurrence of a reservation currently in deployment state.
Cancellation flow for Volatile Reservations
Volatile reservations refer to reservations where VMs are deleted after each occurrence, and fresh VMs are created for the next cycle. The following flow applies when cancelling an occurrence of a volatile reservation:
-
Not Running (Scheduled Reservations):
- Reservation will go into cancelled state and next occurrence will not be started.
-
Running Reservations:
-
Reservation will go into Cancelling state
-
All VMs will be powered off and will be deleted
-
Reservation status will get changed to cancelled and HyLabs users will not be able to use the current occurrence
-
On next occurrence, it will run as expected.
-
-
Reservations with completed occurrences:
-
Reservation will go into cancelled state and upcoming occurrence will not be started.
-
Next occurrences in series will continue to work as expected.
-
-
Reservation with Preparing State:
-
Controller will first create a job for cancelling the preparing reservations
-
It will wait for the running deployment/preparing job to complete.
-
All deployed VMs will be powered off and remaining VMs will not be deployed anymore.
-
The next occurrence will not run and will be marked as cancelled.
-
Future occurrences will work as expected with already created VMs.
-
Deleting Reservations
Deleting a reservation removes the reservation configuration from HyLabs and deletes the associated VMs and replicas from the session provider. To delete a reservation, follow these steps:
-
Select the reservation to be deleted
-
Click Delete Reservation
-
Confirm the action by clicking Delete in the Confirm Action dialog.
-
The reservation will be removed from HyLabs and will have the following impact:
-
Scheduled (Not Deployed) Reservation:
- Will be removed from HyLabs and will not be deployed in future.
-
Scheduled (Deployed) Reservations:
-
All associated VMs will be deleted from provider
-
Reservation will be removed from HyLabs
-
Reservation will not be deployed in future.
-
-
Running reservations:
-
All associated VMs will be powered off and will be deleted from provider.
-
Reservation will be removed from HyLabs, and no future occurrences will occur.
-
-
Preparing Reservation:
- Delete operation is not available on reservations with Preparing state
-
Expired Reservation:
- Reservation will be removed from HyLabs (All associated VMs are already deleted on reservation expiry)
-
Purging Expired/Cancelled Reservations
In HyLabs, deleted reservations are removed from HyWorks databases and all associated objects are deleted. But in case of reservation expiry or cancellation, reservation records will be maintained as per policies configured.
The reservation purge policies can be defined from HyWorks Management Console > Settings > General > Advanced Settings.
Refer to the Reservation Purge Durations in HyWorks Configurations section for available configurations.