Watermark
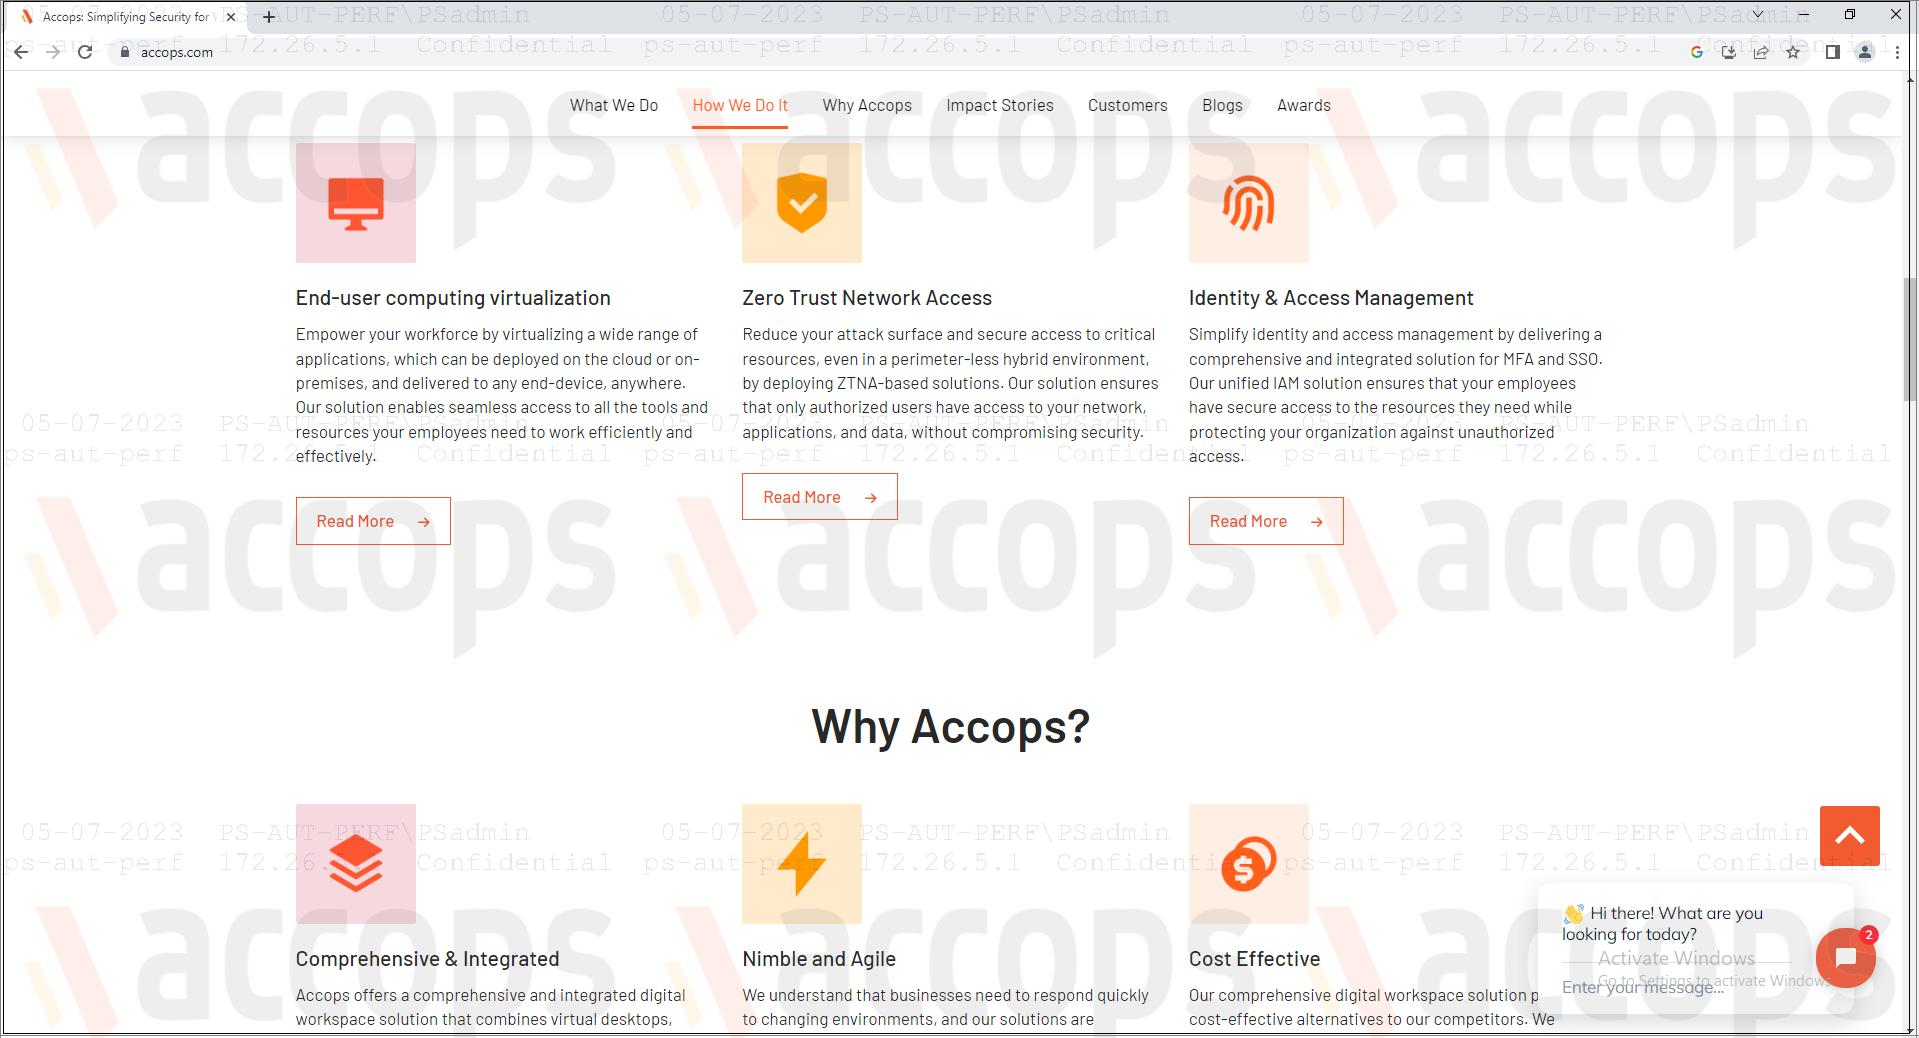
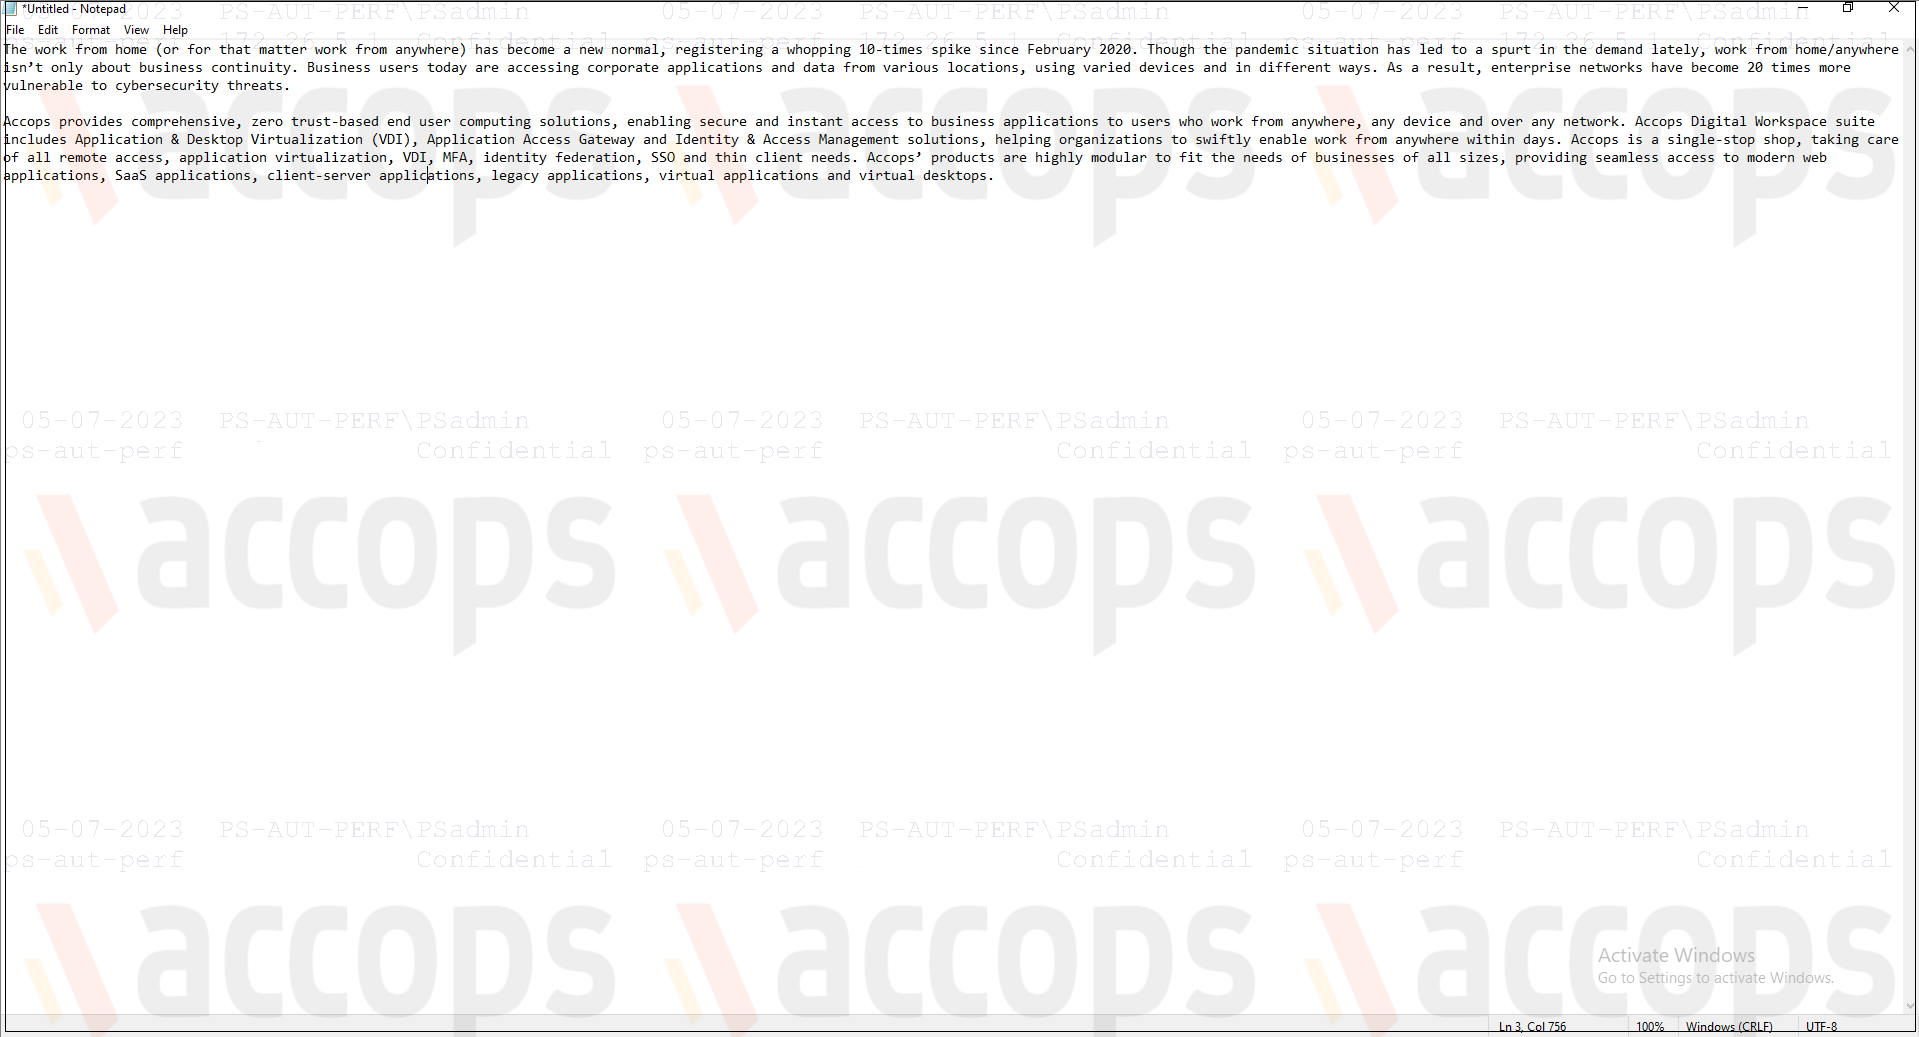
The Accops Watermark Module enables administrators to display a low-contrast watermark over user sessions delivered through desktop and application virtualization environments. The watermark can contain images, text, or both, and is designed to discourage unauthorized sharing, screenshots, and misuse of sensitive organizational data.
The module can be deployed either:
-
On Virtual Desktop Infrastructure (VDI) servers to protect virtual desktops and applications.
-
On endpoint devices through the HySecure Client to secure access to business applications
Benefits of Using Watermarks
The Watermark Module is the foundation for the Accops Data Leakage Prevention (DLP) feature. This module empowers IT administrators to protect the organization’s data confidentiality.
A screen watermark deters unauthorized use of company data.
The standalone Watermark Module is readily accessible and can be effortlessly installed on any desktop or application virtualization system using Accops products.
Administrators can customize watermarks using images, logos, signatures, custom text, and user-specific information.
Features
Accops Watermark Configuration Manager provides the following features:
-
Image preview
-
Image resolution and quality control
-
Support for
-
PNG, JPG, and JPEG watermark images
-
Custom text-based watermarks
-
Watermark scaling
-
Opacity adjustment
-
Font and color customization
-
Watermark visibility controls
-
Password protection
-
Reset to get to the default settings
Supported Platforms
-
Windows 7-SP1 and above
-
Windows Server 2008 R2 SP1 or above
Prerequisites
Before installing the Watermark Module, ensure the following requirements are met:
-
The system on which the Accops watermark module is to be installed must have Microsoft .NET Framework 4.5 or later.
-
Image types supported for logos: PNG (recommended), JPG, and JPEG.
-
Accops Watermark modules download link: Watermark Latest Releases
-
A supported version of the Accops HySecure Client is available (recommended version: v5.2.3.8543)
Important
- Make sure to use the recommended HySecure Client version. Some newer client versions may not include support for the Watermark Module. Contact Accops Support if you are unsure which version to use.
Accops Watermark Manager
The Watermark Manager is used to create and manage watermark configurations.
Installation
-
Download and install the Watermark Manager using the links provided above.
-
Install any available patches to ensure you have the latest fixes.
-
The default installation directory is:
C:\\Program Files (x86)\\Accops\\Watermark.
-
-
Accops Watermark Manager must be run with Administrator privileges.
-
Navigate to the installation directory.
-
Right-click
AccopsWatermarkManager.exeand select Run as administrator.
Accops Watermark Manager contains two sections:
-
Image and Text
-
Watermark Settings
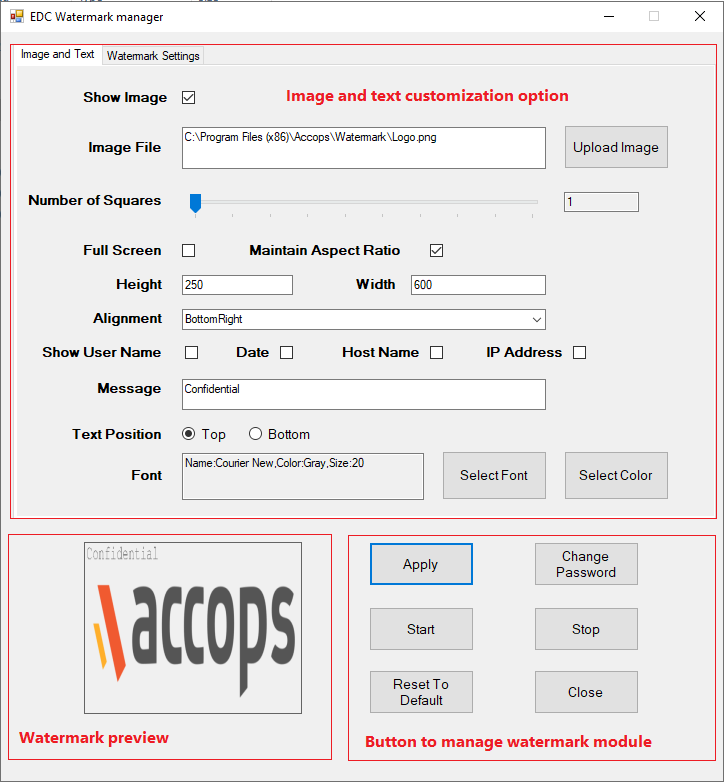
Image and Text
This section allows administrators to configure watermark content and appearance.
-
Show image: Enable this option to use an image as the watermark. The supported image formats are PNG (recommended), JPG, and JPEG. PNG format is recommended because JPG and JPEG formats may exhibit known rendering issues.
-
Number of Squares: Configure to specify the number of watermark instances displayed across the screen.
-
Full Screen: The administrator can apply the watermark image to the full screen by selecting this option.
-
Maintain Aspect Ratio: If this option is enabled, the image’s Height and Width will be maintained, or the administrator can manually customize the aspect ratio. If Full Screen is disabled, administrators can manually specify the option to maintain the aspect ratio and specify the Height and Width.
-
Alignment: Controls the watermark position on the screen. The watermark's alignment can be chosen from here. The following are the available positions:
- Top Left
- Top Center
- Top Right
- Middle Left
- Middle Center
- Middle Right
- Bottom Left
- Bottom Center
- Bottom Right
-
Additional information can also be displayed along with the logo in the watermark, such as:
- User Name
- Date
- Hostname
- IP address
-
Text Message: Administrators can configure the text to display in the watermark as they choose. The position of this text within the logo image can be configured. The text’s Font style, Font size, and Font color, as well as text placement relative to the image, can also be configured here.
-
At the bottom of Watermark Manager, the following actions are available:
-
Apply: Click to apply the configurations. It can be selected here or on the Watermark Settings screen.
-
Start: Click to commence the watermark service with all configured options, on the current system.
-
Stop: Click to stop the watermark service if it is already running.
-
Change Password: Click to change the Watermark Manager’s password.
-
Reset to Default: Click to restore default configuration settings.
-
Close: Click to dismiss the Watermark Manager after making the changes.
-
Watermark Settings
The administrator can configure how the watermark will be applied in this section.
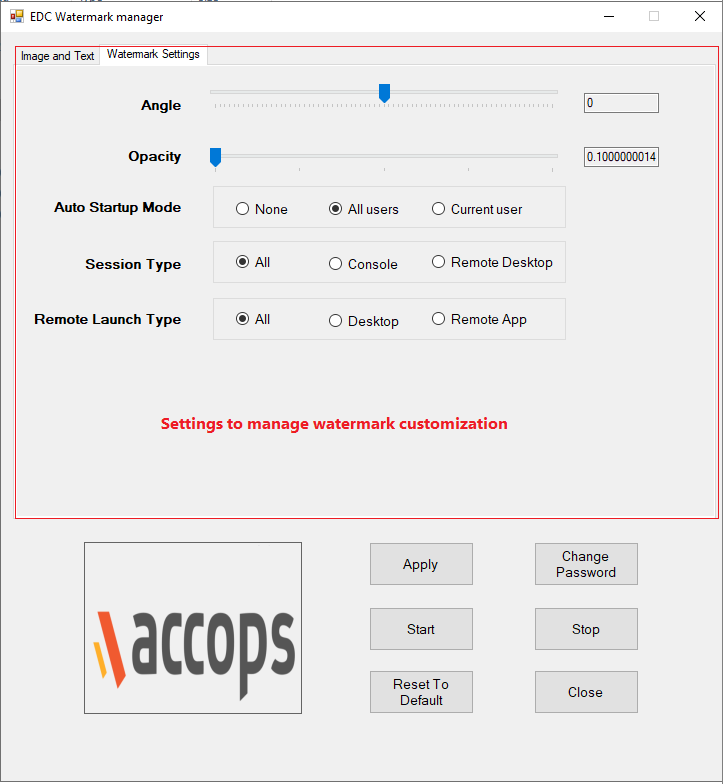
The following options are available:
-
Angle: Sets the watermark's angle on the screen. The default angle is 0.
-
Opacity: Sets the watermark's opacity.
-
Auto Start Mode: Determines when the watermark starts automatically as the user logs in.
-
None: No auto-start.
-
All users: Watermark settings apply to all users.
-
Current user: Watermark settings apply only to the currently logged-in user.
-
-
Session Type: Determines which session types the watermark applies to on the system where the watermark module is installed.
-
All: Watermark applies to console and remote desktop access.
-
Console: Watermark applies to console access only.
-
Remote Desktop: Watermark applies to remote desktop access only.
-
-
Remote Launch Type: Determines which remote launch types the watermark applies to.
-
All: Watermark applies when the session is in both Desktop/Shell mode and Remote App mode.
-
Desktop: Watermark applies only when the session is taken in Desktop/Shell mode.
-
Remote App: Watermark applies only when the session is in Remote App mode.
-
-
Once all the configuration is done, the administrator can choose either one of the following options:
-
Apply: Click to apply the configurations. Administrators can select it from this screen or the Watermark Settings screen.
-
Start: Click to start the watermark service on the current system. Watermark will be displayed with the configured settings on the current system.
-
Stop: Click to stop the watermark if it is already running.
-
Change Password: Click to change the password of the Watermark Manager.
-
Reset to Default: Click to reset all settings to default.
-
Close: Click to dismiss the Watermark Manager after making the changes.
-
Config File
The Watermark Manager stores its configuration in a file located in the installation directory.
-
Changes made in the Watermark Manager GUI will be saved to the config file.
-
All settings are encrypted.
-
The configuration file is used by
Watermark.exeto render the watermark. -
If the file is deleted, a new configuration file containing default settings is automatically created.
Password Protection
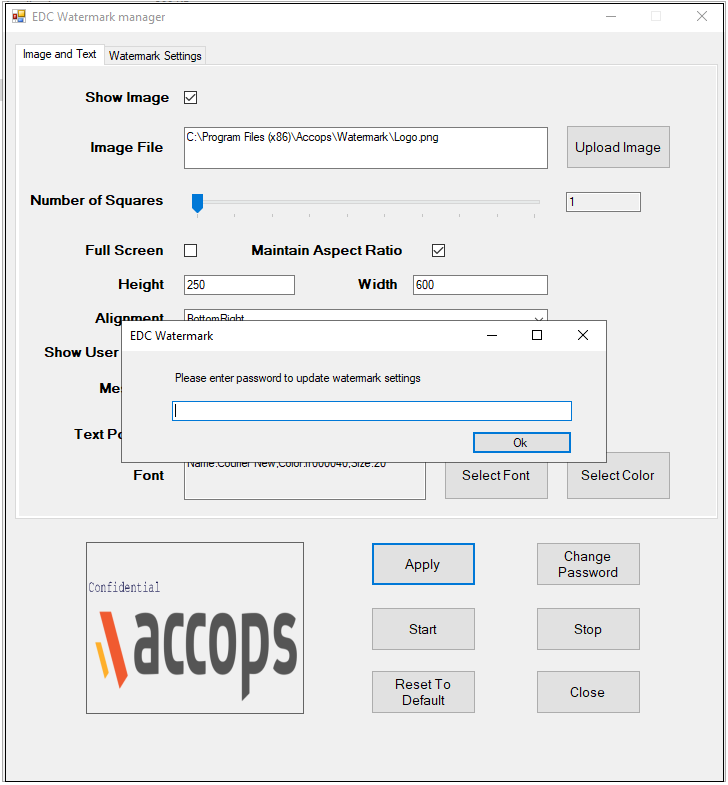
A password is required to apply changes, and to start or stop the watermark from being displayed on the screen.
- The default password is
Watermark12!@. - Accops recommends that the Administrators should change the default password immediately after installation.
- Password protection ensures that only authorized personnel have access to the watermark configuration.
Usage Scenarios
The Watermark Module can be used in the following two ways:
-
On VDI servers: Secures desktop or virtual application sessions delivered from the VDI server.
-
Using the HySecure Client: On the end user’s system, and securing the usage of any applications via HySecure Client. This can include virtual desktops or applications.
Using Watermark on VDI Server
-
Install Watermark Manager on the VDI server, preferably on the source VM or the Gold Master image.
-
Configure Image and Text and Watermark Settings as per requirements.
- Change the password and do not keep the default password.
-
Apply and start the watermark.
-
Deploy virtual machines using the Gold Master prepared above, or follow the steps on all pre-deployed virtual machines.
-
Log in with the end user and connect to assigned virtual desktops or virtual applications. A watermark should appear over the session, deterring data theft.
Note
In step 4, install and configure the watermark on all session servers used in virtual desktops. The Gold Master image can be prepared with all configurations for dynamically provisioned servers.
Using Watermark on Endpoints via HySecure Client
When users access business applications over the network using the HySecure Client, without virtual desktop or application delivery, the Watermark Module can still be used.
To use the Watermark Module with the HySecure Client, follow these steps:
-
Create Configuration File:
-
Install the Watermark Manager on a Windows machine to use it as the configuration server.
-
Place the watermark image file (PNG format recommended) at
%appdata%\AccopsWatermark\logo.png, usinglogo.pngas the file name. -
Go to
C:\Program Files (x86)\Accops\Watermarkand open the Watermark Manager as administrator (WatermarkManager.exe). -
Select Upload Image and browse to
%appdata%\AccopsWatermark\logo.pngto select the image.Note
If the application shows the error "selected image not found," click OK to safely dismiss it.
-
Configure the remaining settings: Image and Text and Watermark Settings, as required.
-
Click Apply, then click Start.
-
Enter the password used to configure the watermark (see Password protection for the default password).
Note
If the "logo not found" error is shown, open the command prompt and run:
C:\Program Files (x86)\Accops\Watermark\EDCWatermark.exe 1. -
Copy the configuration text from
%appdata%\AccopsWatermark\Watermarksettings.conf.
-
-
Upload Configurations on HySecure Server:
-
Navigate to the
/home/fes/publicdirectory on the gateway using PuTTY or WinSCP. -
Create a
watermark.conffile in this directory, and paste the encrypted data copied fromWatermarksettings.confin the following format:<WATERMARK_CONF>'DATA_COPIED_FROM_WATERMARKSETTINGS.CONF'</WATERMARK_CONF>
Note
Spaces or any extra characters would break the feature. The tag WATERMARK_CONF must be written in all capital letters.
-
Copy the logo file, named
watermark_logo.pngexactly, to this directory. -
Once both the logo and conf file are copied, change permissions and ownership of the file using the following commands:
-
Change permission: Run
chmod 755 watermark* -
Change ownership: Run
chown apache:fes watermark* -
To validate the changes: Run
ls -lrth | grep -i watermark
-
-
The
.conffile extension and thewatermark.conffile must both be whitelisted on the gateway before they can be accessed. This only needs to be done once, when creating the file for the first time, not on every configuration change:-
Go to
/etc/httpd/conf. -
Open the
httpd.conffile. -
Search for BrowserMatch and make the following changes:
-
Add
confto the<FilesMatch>section:<FilesMatch ".(js|csv|txt|conf)">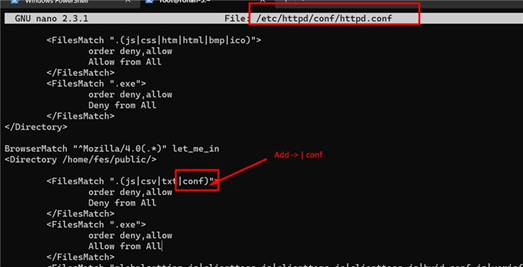
-
Add
watermark.confto the section as shown below: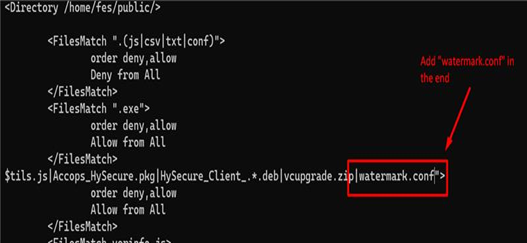
-
-
Save the conf file and restart the httpd service:
systemctl restart httpd.
-
-
-
Enable Watermark Feature on HySecure:
-
Access the HySecure Management Console and navigate to Policies > Client Profiles.
-
Edit the default configuration and search for Watermark.
-
Administrators can also specify the text to display over the watermark directly on the gateway.
Note
If the text is specified both on the gateway and the configuration server, the client text overrides the gateway text.
-
Enable the setting and save the configuration.
-
-
Log in with the HySecure Client and verify the configurations.
Sample Images after Applying Watermark
Limitations and Troubleshooting
Watermark Manager Logs
In case of any issues, the administrator can check the log files.
- The log files are located in the
C:\Users\Public\AccopsWatermarkfolder. This file contains logs of user activity related to the Watermark Module.
Error: Logo not found
An "error message: logo not found" is displayed on the screen when starting the watermark, even after the watermark setting is successfully applied.
The following process should be executed to run the watermark in the current user context:
-
Open
cmdwith administrator rights. -
Execute the following command to launch
Watermark.exein user mode:C:\Program Files (x86)\Accops\Watermark\EDCWatermark.exe 1
Error: Image not found
While applying configurations, the Watermark Manager usually displays the error “Selected image not found.”
-
Make sure the logo image is placed at
%appdata%\AccopsWatermark\logo.png. -
The file must be named
logo.png. -
The recommended format is
.png.
Note
Even after correct configurations are in place, if the error is displayed, it can be safely ignored.
Verify Downloaded Files on the Client
After applying the configuration, the administrator can cross-verify the conf file and logo files on the Client's machine.
-
Open the
%appdata%\AccopsWatermarkfolder on the Client's machine after registering the gateway. -
The correct conf file and image file should be downloaded from the gateway. The administrator can cross-check these against the files uploaded to the gateway using PuTTY or WinSCP.