Ubuntu Linux Feature Configuration Guide
This section describes how to enable and use various features in Ubuntu Linux to deliver single-session or multi-session desktops.
Active Directory Configurations
GUI-Based AD / LDAP Join (Recommended)
Follow the process below if a single Linux desktop is to be joined to the domain or configure OpenLDAP configurations:
-
Go to the terminal and navigate to the following path:
cd /etc/accops/dvm/scripts -
Run the script below. After executing it, a UI prompt will appear for you to input the AD details.
sudo ./hyprep.py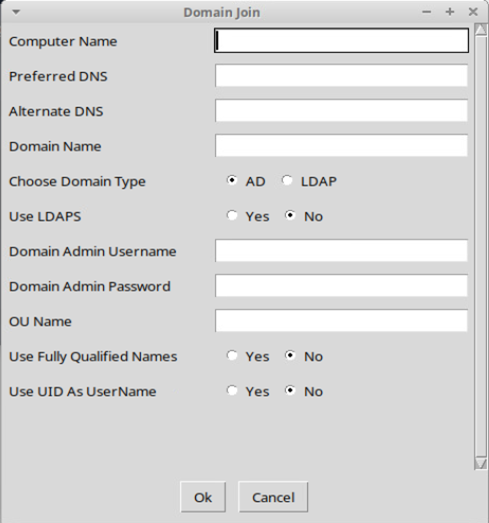
-
The following configurations are available:
Field Name Description Example Value Computer Name Hostname of VM linux-vdi-01 Preferred DNS Primary DNS server 192.168.1.1 Alternate DNS Secondary DNS (Optional) 192.168.1.1 Domain Name Domain FQDN example.com Domain Type AD / LDAP AD Use LDAPS Secure LDAP No/Yes as per deployment. Domain Admin Username Admin user administrator Domain Admin Password Password NA OU Name Organizational Unit OU=VDI,DC=example,DC=com Use Fully Qualified Names Yes/No No Use UID as Username Yes/No No -
Apply Configuration
-
Click OK.
-
Script executes automatically
-
System joins the AD/LDAP domain.
-
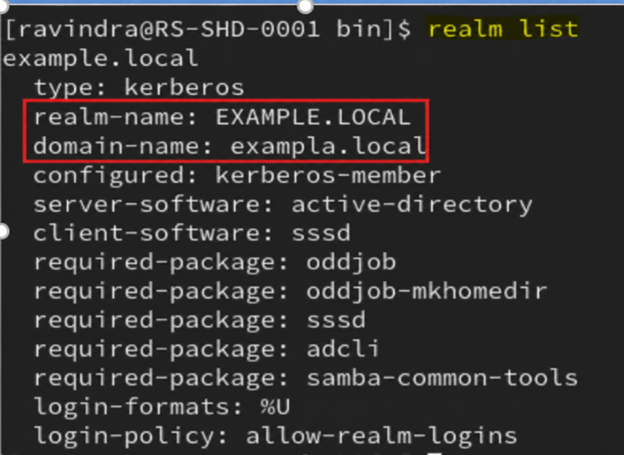
Post Domain Join Verification
After entering all the details, the AD joining script will be executed, and the Ubuntu/Xubuntu Linux machine will be added to the specified AD. Once the script has been completed, you can use the command to verify whether the machine is joined:
realm list
Additional Domain Join Verification
- Using ID Command:
id <Domain Username>
- Using SSH Login Command:
ssh username@localhost
Manual LDAP Configuration (Alternative Method)
Following the step-by-step process can be used to configure a Linux desktop or gold master with OpenLdap configurations:
Step 1: Navigate to Config Files:
cd Linux_Assistive_Package_4.0.0.170/Linux_Assistive_Package/manual_customization/ldap_configuration/config_files
Step 2: Edit the configuration file name “ldap.conf”
nano ldap.conf
- Update:
BASE dc=labs,dc=example,dc=com
URI ldap://172.23.10.2
Step 3: Edit sssd.conf
nano sssd.conf
- Update:
ldap_uri = ldap://172.23.10.2
ldap_search_base = dc=labs,dc=example,dc=com
ldap_user_search_base = dc=labs,dc=example,dc=com
ldap_group_search_base = dc=labs,dc=example,dc=com
Step 4: Apply Configuration
Navigate one folder back:
cd Linux_Assistive_Package_4.0.0.170/Linux_Assistive_Package/manual_customization/ldap_configuration
Run:
./set_ldap_config.sh
Note
Once the script execution is successfully completed, reboot the machine.
Additional LDAP Join Verification
- Using ID Command:
id <Domain Username>
- Using SSH Login Command:
ssh username@localhost
LDAPs Configurations
This release introduces support for LDAPS (LDAP over SSL/TLS) to enhance the security of directory service communication. When the LDAPS feature flag is enabled, SSSD will establish encrypted connections over port 636, ensuring that all interactions with Active Directory and other LDAP-compliant servers are secure and protected from interception or tampering. This capability can be used to strengthen authentication and directory queries across both AD and standard LDAP environments. This section provides the steps required to configure LDAPS (LDAP over SSL) for secure authentication on Ubuntu-based systems.
Important
- Before proceeding, ensure that all configuration steps in this document are completed, then perform hyprep (domain join).
- Performing hyprep before completing LDAPS configuration may result in:
- Authentication failures
- Certificate validation errors
- Domain join inconsistencies
Requirement
LDAP configurations are often required when policies are pushed, making it necessary to ensure trusted communication.
This is often done using the following Group Policy on the AD Side:
-
Computer Configuration > Windows Settings > Security Settings > Local Policies > Security Options
-
Domain controller: LDAP server signing requirements > https://learn.microsoft.com/en-us/previous-versions/windows/it-pro/windows-10/security/threat-protection/security-policy-settings/domain-controller-ldap-server-signing-requirements
- Configure as signing is required.
-
Network security: LDAP client signing requirements > https://learn.microsoft.com/en-us/previous-versions/windows/it-pro/windows-10/security/threat-protection/security-policy-settings/network-security-ldap-client-signing-requirements
- Configure as signing is required.
-
-
HKLM\SYSTEM\CurrentControlSet\Services\NTDS\Parameters\LDAPServerIntegrity. (None = 1, Require Signing = 2)
- Configure as signing is required, i.e., 2=Require Signing
-
HKLM\System\CurrentControlSet\Services\LDAP\LdapClientIntegrity (0=None, 1=Request Signing, 2=Require Signing)
- Configure it to request signing, i.e., 1=Request Signing
Now, these configurations require LDAP communication from the Linux desktop. To configure Linux Desktops, follow the steps listed below:
Preparation: Exporting Certificate from CA Server (Base64 Format)
Step 1: Open Certificate Manager
-
Log in to the CA / Domain Controller system.
-
Open Run > type:
certlm.msc -
Navigate to:
Certificates (Local Computer) > Personal > Certificates
Step 2: Select the Required Certificate
-
Identify the CA certificate.
-
Right-click on the certificate
-
Select: All Tasks > Export
Step 3: Start Certificate Export Wizard
-
The Certificate Export Wizard will open.
-
Click Next
Step 4: Choose Export Option
-
Select: No. Do not export the private key.
-
Click Next
Step 5: Select Export Format
-
Choose: Base-64 encoded X.509 (.CER)
- This format is required for LDAPS and Ubuntu systems.
-
Click Next
Step 6: Specify File Location
-
Click Browse
-
Choose a location (e.g., Desktop)
-
Provide file name: ca-cert.cer
-
Click Save > Next
Step 7: Complete Export
-
Click Finish
-
A confirmation message will display: The export was successful
Step 8: Extract Certificate Data (PEM Format). Follow the steps listed below upon exporting:
-
Open the .crt file using a text editor (Notepad / Notepad++)
-
You will see content like:
-----BEGIN CERTIFICATE-----
........MIID........
-----END CERTIFICATE-----
Step 9: Copy the Certificate Content
- Copy the entire content, including:
-----BEGIN CERTIFICATE-----
-----END CERTIFICATE-----
Step 10: Convert to .crt (For Ubuntu Use)
-
Create a new file: ca-cert.crt
-
Paste the copied content into this file and Save it
-
Ensure:
-
No extra spaces or missing lines
-
Proper BEGIN and END markers are intact
-
-
Final Output Example
-----BEGIN CERTIFICATE-----
certificate data
-----END CERTIFICATE-----
Important
-
Always use Base64 format for compatibility with Linux systems
-
Do not export the private key
-
Ensure the certificate content is not modified after export.
This .crt file is now ready to be used in the LDAPS configuration on Ubuntu systems.
LDAP(s) Configuration Setup Guide
Step 1: Configure CA Certificate:
To establish trust with the LDAP server, the Certificate Authority (CA) certificate must be added to the system.
1.1 Copy CA Certificate: Place the CA certificate (in PEM format) at the following location:
/usr/local/share/ca-certificates/ca-cert.crt
-
If the file does not exist, create it and paste the CA certificate content:
-----BEGIN CERTIFICATE-----
 <CA CERTIFICATE DATA>
-----END CERTIFICATE-----
Important
The file extension must be .crt. Other extensions (e.g., .cer) will not be recognized.
1.2 Update System Trust Store: Run the following command to update the system certificate store:
sudo update-ca-certificates
Note
The above mentioned command require root privileges (run as root or prefix with sudo). On Ubuntu, successful import is confirmed by output such as: '1 added, 0 removed; done.'
Successful execution will confirm that the certificate has been added to the system trust.
1.3 Configure LDAP Certificate Directory
- Create the LDAP certificate directory if it does not already exist:
sudo mkdir -p /etc/ldap/certs
- Create or update the certificate chain file:
/etc/ldap/certs/full-chain-cert.cer
- Add the CA certificate content to this file:
  -----BEGIN CERTIFICATE-----
   CA CERTIFICATE DATA
  -----END CERTIFICATE-----
Step 2: Add Domain Controller Certificate:
To complete the trust chain, the Domain Controller (LDAP server) certificate must be added.
2.1 Retrieve Certificate: Run the following command on Ubuntu OS to connect to the Domain Controller on LDAPS port 636 and display the full certificate chain.
-
Run the following command to fetch the certificate from the Domain Controller:
openssl s_client -connect <dc-ip>:636 -showcerts (Replace <dc-ip> with the Domain Controller IP address or FQDN.) -
From the output:
-
Identify the certificate issued to the Domain Controller
-
Copy the PEM block for the AD Domain Controller from the command output. It appears between -----BEGIN CERTIFICATE----- and -----END CERTIFICATE----- markers. There may be multiple certificates — pick the one issued to the DC hostname.
-
2.2 Update Certificate Chain: Append the Domain Controller certificate to the file:
/etc/ldap/certs/full-chain-cert.cer
-
Final file content should be:
    -----BEGIN CERTIFICATE-----
    CA CERTIFICATE DATA
    -----END CERTIFICATE-----

    -----BEGIN CERTIFICATE-----
    AD DC CERTIFICATE DATA
    -----END CERTIFICATE-----
Important
The certificate order must be maintained. Incorrect ordering may result in LDAPS connection failures.
-
CA certificate first
-
Domain Controller certificate second
-
Step 3: Enable LDAPS in Agent Configuration
-
Edit the agent configuration file:
/etc/accops/dvm/agentconfig.json -
Update the following parameter:
"EnableLdaps": true -
Save the file after making the change.
-
Restart Agent Service: Restart the service to apply the changes:
sudo systemctl restart edcdvm
Step 4: Perform Hyprep and Domain Join
Once all the above steps are completed:
-
Proceed with Hyprep customization
-
Join the system to the AD/LDAP domain.
Summary
-
Ensure the following sequence is strictly followed:
-
Configure CA certificate
-
Add Domain Controller certificate
-
Enable LDAPS in configuration
-
Restart service
-
Perform hyprep and domain join
-
-
This configuration ensures:
-
Secure LDAP (LDAPS) communication
-
Proper certificate trust validation
-
Successful domain authentication using SSSD
-
Disabling Screenlock on Linux Desktops
To disable screenlock feature in remote sessions, following flag in sudo nano /etc/accops/dvm/agentconfig.json can be kept as true.
| Flag Name | Default Value | Possible Values | Updated By | Description |
|---|---|---|---|---|
| DisableAutomaticScreenLock | false | true / false | Admin | Disables automatic screen lock on the desktop. |
Restart DVM Agent Service using command sudo systemctl restart edcdvm to apply the changes.
VIP Configurations in Multi-session Deployments
Following flag in sudo nano /etc/accops/dvm/agentconfig.json can be kept as true to enable VIP feature on the Ubuntu Multi-session deployments:
| Flag Name | Default Value | Possible Values | Updated By | Description |
|---|---|---|---|---|
| EnableVipManagement | false | true / false | Admin | Enables Virtual IP management. |
Restart DVM Agent Service using command sudo systemctl restart edcdvm to apply the changes.
Additional flags, which gets set as per configuration from HyWorks controller:
| Flag Name | Default Value | Possible Values | Updated By | Description |
|---|---|---|---|---|
| IsSessionSyncEnabled | false | true / false | System (Comes from Controller Configuration) | Enables session state synchronization. |
| SessionSyncIntervalInMinutes | 60 | Integer | System (Comes from Controller Configuration) | Interval for session synchronization. |
Direct Unmanaged or Non-HyWorks Session Clean-up
To modify the direct session or console session block:
-
Edit the configuration file located at:
sudo nano /etc/accops/dvm/agentconfig.json.Flag Name Default Value Possible Values Updated By Description DirectRdpAdminBlock false true / false Admin Blocks direct RDP
access for administrator users.DirectRdpBlock false true / false Admin Blocks direct RDP
access to the VM.DirectConsoleAdminBlock false true / false Admin Blocks console access
for administrator users.DirectConsoleBlock false true / false Admin Blocks direct console
access to the VM.DirectRdpBlockTimeoutSec 10 Integer (seconds) Admin Delay before
enforcing RDP block. If profile loading and connections take time, this should be kept accordingy. -
Change the configurations as per the deployment need.
-
Restart DVM Agent Service
sudo systemctl restart edcdvm
Request Redirection Configuration:
Local Traffic Redirection for Biometric and Token Devices Administrators can enable local traffic redirection from the client machine to Virtual Desktop Infrastructure (VDI). This functionality allows seamless usage of locally connected devices such as biometric scanners, digital token devices, and other peripherals that require communication with localhost services.
VDI Side Configuration:
-
Update DVM Agent Configuration on VDI
-
Edit the configuration file located at:
sudo nano /etc/accops/dvm/agentconfig.json-
Modify the following parameters:
-
Enable Request Redirection:
"EnableRequestRedirection": true -
Define Redirection Endpoints: Specify the list of localhost IP addresses and ports that should be redirected from the VDI to the client machine. Update this list based on the services required by the devices.
-
"RequestRedirectionInfo": ["127.0.0.1:8030", "127.0.0.1:8031", "127.0.0.1:8004", "127.0.0.1:8005"] -
This list is a generic list of ports, if the peripheral uses some other port. It should be configured here.
-
-
-
-
Restart DVM Agent Service
sudo systemctl restart edcdvm
Client-Side Configuration
-
Supported Versions:
-
For Windows Clients: Make sure to have Windows Client version v7.2.4.1013 or later (which has compatible session client extensions v4.0.0.101).
-
For Linux Client: Linux Clients are not GA available. Please connect with Accops team for specific Linux endpoint requirements.
-
Connection Profile Changes
-
In Local Resources > Allow RDP plugins > Accops Web Request redirection is checked (enabled).
-
Add the following command-line parameter under the RDP 10 Linux settings in the Additional Settings section of the connection profile configuration to enable request redirection: [For Linux and Windows Clients]
/vc:reqrdrn
Test and Verify:
- After above changes, login from the client devices, connect to the Linux virtual desktops and check if locally attached devices can be used inside the Linux desktop session.
RTT (Round Trip Time) Enablement
RTT helps in monitoring network latency and session performance for user sessions.
Steps to Enable:
-
Open configuration file:
sudo nano /etc/accops/dvm/usermonitoringinfo.json -
Update the following flags:
-
"RttInterval": 10 -
"EnableRtt": true
-
-
Restart service:
sudo systemctl restart edcdvm
Result:
- RTT data will be collected and sent for monitoring
ARS (Accops Reporting Server) Configuration
To forward session logs and events to ARS, configuration must be done in the updated file.
Steps:
-
Open file:
sudo nano /etc/accops/dvm/eventtypeconfig.json -
Configure as per environment:
{
  "EventType": 3,
  "SyslogHost": "172.26.5.99",
  "SyslogPort": "515"
}
- Applying Changes: After updating the configuration, restart the service:
sudo systemctl restart edcdvm
Custom Script Execution (Session Events)
Custom scripts can be executed automatically during different session events. Administrators will be able to configure these scripts as per use case to get some custom requirements. Below are the details:
- Session Events:
-
Login
-
Logout
-
Connect
-
Disconnect
-
Reconnect
-
-
Script Location:
/etc/accops/dvm/scripts -
Available Scripts:
-
custom_root_context_connect.sh
-
custom_root_context_disconnect.sh
-
custom_root_context_logout.sh
-
custom_root_context_reconnect.sh
-
custom_user_context_connect.sh
-
custom_user_context_disconnect.sh
-
custom_user_context_reconnect.sh
-
Note
All script execution will be done post event. E.g., once user logs out only then the logout script will execute.
Virtual Smart Card based SSO (Single Sign-On) Configurations
SSO enables virtual smart card certificate-based login for VDI/SHD desktops.
Supported Certificate Servers:
| Type | Description |
|---|---|
| Windows CA | Microsoft ADCS |
| ACM | Accops Certificate Manager |
Prerequisites
-
Controller-side and CA Server-side configuration should be completed.
-
Linux VM should be Domain Joined.
Enable SSO Configuration VDI side
-
Open configuration file
sudo nano /etc/accops/dvm/agentconfig.json -
Modify Configuration
-
EnableSSOManagement: true -
ReserveSSOVirtualSmartCards: 75-
Default is 75
-
For environments where the SHD is expected to support more than 50 sessions, configure this value to approximately 1.5 times the maximum concurrent session count.
-
-
-
Restart Service
sudo systemctl restart edcdvm
User Profile Management with NFS Storage (Interrelated)
User profile persistence depends on NFS configuration.
-
Profile Configuration
-
EnableUserProfileMount
-
true > Mounts profile at login
-
false > No profile mounting
-
-
EnableUserProfileCleanup
-
true > Cleans local profile on logout
-
false > Leaves local profile mounted
Note
If the 'EnableUserProfileCleanup flag is set to False' while using NFS, the data will remain on both the local machine and the NFS server. This will gradually increase the VM’s disk usage and may eventually cause issues for new sessions.
-
-
Storage Configuration
-
NFSMountPath
-
Example:
"NFSMountPath": "192.168.255.255:/<Profile Storage Path>" -
Defines location of shared user profiles
-
-
NFSMountOptions: These should be configured according to the NFS server, as different servers require different mount parameters for optimal performance.
-
NFSMountTimeoutInSecs: 10
This defines the timeout for the NFS mount; if the mount does not complete within the specified time, the user login will be blocked.
-
Dependency Behavior
-
If EnableUserProfileMount = true and NFS path is invalid > Login/profile load failure
-
Cleanup works only if profile mount is enabled.
Applying Changes: After updating the configuration, restart the service:
sudo systemctl restart edcdvm
HyShell Configuration (Shared Hosted Desktop Customization)
HyShell is a customized desktop environment designed for SHD (Shared Hosted Desktop) deployments. It enables administrators to deliver a controlled, secure, and restricted desktop experience to end users.
Administrators can perform the following with HyShell:
-
Control user desktop behavior and access
-
Restrict visibility of system resources
-
Standardize the user environment
-
Enhance security by limiting unauthorized actions
Configuration File Location
All HyShell configurations are managed through the following file:
/etc/accops/hyshell/hyshell.config
Edit the hyshell.config file
sudo nano /etc/accops/hyshell/hyshell.config
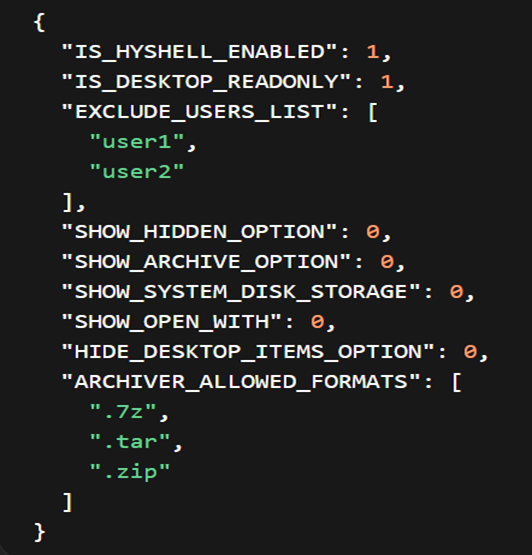
| Parameter | Description | Default Behavior |
|---|---|---|
| IS_HYSHELL_ENABLED | This is the primary flag used to enable or disable HyShell globally on the system. 1: users logging into the SHD session will be presented with the customized HyShell desktop instead of the standard Linux desktop. 0: HyShell is disabled and all users will receive the default desktop environment. |
Enabled (1) |
| IS_DESKTOP_READONLY | This flag determines whether users can modify their desktop environment. 1: the desktop becomes read-only, preventing users from creating, deleting, or modifying files and shortcuts on the desktop. This helps maintain a consistent and controlled user environment. 0: users are allowed to make changes to the desktop as per normal Linux behavior. |
Enabled (1) |
| EXCLUDE_USERS_LIST | This parameter allows administrators to exclude specific users from the HyShell environment, even if HyShell is enabled globally. Useful for administrators, testers, or support users who require full system access for troubleshooting or maintenance purposes. | user1, user2 |
| SHOW_HIDDEN_OPTION | This flag controls whether users are allowed to view hidden files and directories within the file manager. 1: users can enable the option to view hidden files (typically those starting with a dot "."). 0: this option is restricted, preventing users from accessing system or configuration files that are normally hidden, thereby improving security. |
Disabled (0) |
| SHOW_ARCHIVE_OPTION | This flag enables or disables archive-related operations such as extracting or compressing files (e.g., zip, tar). This feature can be desirable in tightly controlled environments. 1: users can perform archive operations through the UI. 0: these options are hidden or disabled, restricting users from handling compressed files. |
Disabled (0) |
| ARCHIVER_ALLOWED_FORMATS | This parameter defines the list of archive formats that users are allowed to work with when archive functionality is enabled. Only the file extensions specified in this list (such as .zip, .tar, .7z) will be permitted. This allows administrators to restrict unsupported or potentially unsafe archive formats and maintain control over file operations. | .7z, .tar, .zip |
| SHOW_SYSTEM_DISK_STORAGE | This flag determines whether system storage devices (such as root partitions or mounted drives) are visible to users. 1: users can view and potentially access system storage locations. 0: these storage locations are hidden, preventing users from accessing critical system directories and enhancing overall system security. |
Disabled (0) |
| SHOW_OPEN_WITH | This flag controls the visibility of the "Open With" option in the context menu. 1: Users can choose different applications to open a file. 0: This option is disabled, ensuring that files are opened only with predefined or controlled applications, which helps maintain application consistency and prevents misuse. |
Disabled (0) |
| HIDE_DESKTOP_ITEMS_OPTION | This flag determines whether desktop icons and items are visible to the user. 1: Desktop items are hidden, resulting in a clean and minimal interface. 0: Desktop items remain visible. This option is useful for organizations that want a clutter-free or highly controlled desktop environment. |
Disabled (0) |
Applying the changes: Restart the service:
sudo systemctl restart edcdvm
Session Monitoring (ARS Integration)
These flags send session data to ARS (Accops Reporting Server).
| Flag Name | Default Value | Possible Values | Description |
|---|---|---|---|
| SendSessionChangeData | false | true / false | Sends session state change events. |
| SendPeriodicSessionData | false | true / false | Enables periodic session data reporting. |
| PeriodicSessionDataIntervalInMins | 30 | Integer | Interval for periodic session updates. |
Applying Changes: After modifying the above configuration flags, restart the Desktop Agent service using the following command:
sudo systemctl restart edcdvm
Agent will start sending the session data to the ARS.
Process Monitoring Configuration (ARS Integration)
To enable process monitoring for user sessions and view this data in ARS (Accops Reporting Server), specific configuration needs to be applied on the Linux VM. This configuration enables real-time process monitoring for user sessions and sends the data to ARS for analysis. It helps administrators:
-
Monitor user activity
-
Identify high CPU/memory usage applications
-
Troubleshoot performance issues
-
Analyze session behavior efficiently
Configuration File Location: Navigate to the following path and open the file:
sudo nano /etc/accops/dvm/usermonitoringinfo.json
Configuration Parameters
Enable or modify the following flags based on your monitoring requirements:
| Flag Name | Description | Recommended Usage |
|---|---|---|
| IsMonitorAllProcess | Enables monitoring of all user processes | Set to true for complete monitoring |
| IsMonitorTopCpuProcesses | Monitors top CPU-consuming processes | Useful for performance analysis |
| IsMonitorTopMemProcesses | Monitors top memory-consuming processes | Helps identify memory-heavy apps |
| MonitoringInterval | Time interval (in seconds) for data collection | Default: 10 seconds |
| TopNProcesses | Number of top processes to track | Default: 5 |
| SendDataInJson | Sends monitoring data in JSON format to ARS | Keep enabled (true) |
Applying Changes
After modifying the above configuration flags, restart the Desktop Agent service using the following command:
sudo systemctl restart edcdvm
Workgroup Environment to Skip User Creation
Following flag in sudo nano /etc/accops/dvm/agentconfig.json can be kept as true, if agent should not process user creation in Workgroup environment.
| Flag Name | Default Value | Possible Values | Updated By | Description |
|---|---|---|---|---|
| SkipCreateUser | false | true / false | Admin | Skips local user creation during session start. |
Restart DVM Agent Service using command sudo systemctl restart edcdvm to apply the changes.
Note
If user does not exist on the target Linux desktop, user connections will fail.