MSIX App Attach
About
MSIX is a Windows app package format that provides a modern packaging experience to all Windows apps. It preserves the functionality of existing app packages, installs files, and enables new, contemporary packaging and deployment features for Win32, WPF, and Windows Forms apps.
MSIX enables enterprises to stay current and ensure their applications are always up to date.
References:
Internals of MSIX App Attach: Stages
For a better understanding of the App Attach, attach a brief overview of the different stages of MSIX App Attach. This section captures the stages, and detailed instructions can be found in Microsoft Official Documentation.
Accops agents will be automatically performing the steps needed for MSIX App Attach to work in remote sessions.
MSIX app attach has four phases that must be performed in the following order:
-
Stage (System Context: once, while first HyShell call, call via SessionHost Service)
-
Register (User Context: on every user login, call via HyShell)
-
Deregister (User Context: automated on user logout, nothing from the SessionHost side)
-
De-stage (System Context: optional on SessionHost service stop or automatically on VM reboot)
Staging
Staging involves two steps:
-
Mounting the VHD(x) or CIM to the VM.
-
Notifying the OS that the MSIX package is available for registration.
Registration
Registration makes a staged MSIX package available to your users. Registration is per user. If you haven't explicitly registered an app for that specific user, they won't be able to run it.
There are two types of registration: regular and delayed.
Regular registration
In regular registration, each application assigned to a user is fully registered. Registration occurs when the user signs in to the session, which may affect how long it takes for them to start using Windows Virtual Desktop.
Delayed registration (default)
In delayed registration, each application assigned to the user is only partially registered. Partial registration means the Start menu tile and double-click file associations are registered. Registration occurs when the user signs in to their session, minimizing the time to start using Windows Virtual Desktop. Registration is complete only when the user runs the application in the MSIX package.
Delayed registration is currently the default configuration for the MSIX App Attach.
De-registration
De-registration removes a user's registered but non-running MSIX package while the user signs out of their session. During de-registration, the MSIX App Attach pushes application data specific to the user’s local user profile.
De-stage
De-staging notifies the OS that an MSIX package or application not running or staged for any user can be unmounted. This removes all reference to it in the OS.
Set the registry value to true, then restart the Session Host Service.
HKLM\SOFTWARE\Accops\Controller\EDC\SESSIONHOST\\(DestageAppsOnServiceStop)
Support and Compatibility
| HyWorks Versions | Supported Windows Server Types | Supported OS Versions |
|---|---|---|
| HyWorks v3.3-HF4 or later | Windows Multi-session | Windows 10 2004/11 Multi-session (AVD) |
| HyWorks v3.6-SP1 or later | Windows Multi-session (Continued support) | Windows 10/11 Multi-session (AVD) |
| Windows Single-session | Windows 11 (version 25H2) |
Important
There are no official references for MSIX App Attach support on Windows 2019 or newer server OSes. Must be tried and tested exhaustively before any production-level deployments.
MSIX App Attach in HyWorks
To use MSIX App Attach in HyWorks following configurations will be needed:
-
Prepare MSIX App Attach Volume
-
Prepare Compatible Windows Desktops for using the MSIX App Attach Disk Image.
-
Publish the desktop pools listed above so users can access the desktops prepared above.
-
Publish MSIX App Attach Disk Image in HyWorks with entitlements.
-
Login and verify.
Let’s try to learn each of these steps in detail.
Prepare MSIX App Attach Volume or Image
The process to create an MSIX App Attach volume can involve 2-3 steps:
Obtaining a Certificate for MSIX Package Signing
All MSIX and Appx packages require a valid code signing certificate. To use these packages with App Attach, you need to ensure the whole certificate chain is trusted on your session hosts. A code signing certificate can be obtained for MSIX packages from:
-
Public CA: certificates from a public CA are trusted by default in Windows and Windows Server.
-
Internal Enterprise CA:
- For session hosts joined to Active Directory, with AD CS configured as the internal enterprise CA, are trusted by default and stored in the configuration naming context of Active Directory Domain Services. When AD CS is configured as a standalone CA, you need to configure Group Policy to distribute the root and intermediate certificates to session hosts. For more information, see "Distribute certificates to Windows devices using Group Policy."
-
Self-signed: install the trusted root to the Trusted Root Certification Authorities store on each session host.
- Self-signed certificates are not recommended for production deployments and should be used only for UAT or testing. Detailed steps can be found here.
Important
Timestamp the package so its validity outlasts your certificate's expiration date. Otherwise, once the certificate expires, you need to update the package with a new valid certificate and ensure that hosts trust the certificate chain again.
Microsoft Reference: https://learn.microsoft.com/en-au/azure/virtual-desktop/app-attach-overview
Create MSIX Package File from the Installer Setup File
An MSIX package file can be created using multiple methods; here, a method is provided for reference. Other methods and tools can be used.
Using MSIX Hero App
-
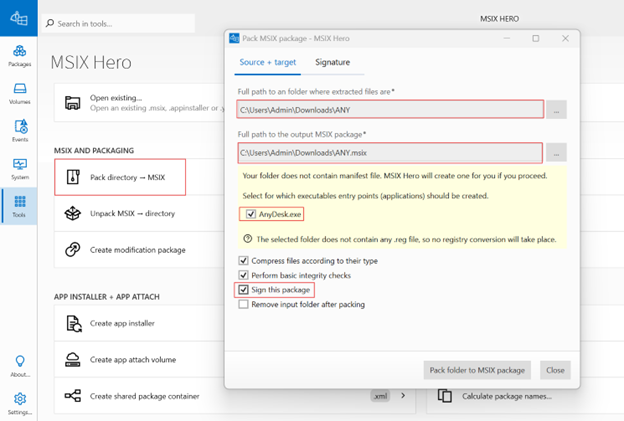
Launch MSIX Hero: Open MSIX Hero and navigate to the Pack Directory to the MSIX option available under the Tools section.
-
Select Source Directory.
-
The Source and Target wizard opens automatically.
-
Select the folder where the application EXE installer is located. MSIX Hero automatically detects the executable file present in the folder.
-
Enable the option to sign the package. This ensures that the MSIX package is digitally signed during creation.

-
-
Configure Certificate and Timestamp
-
Select the option to sign the package using a PFX file.
-
Browse to and select the required PFX certificate file, then provide the certificate password.
-
Configure the timestamp server by selecting a specific timestamp server and providing the DigiCert timestamp URL. Timestamping ensures that the MSIX package remains valid even after certificate expiry.
-
-
Create MSIX Package
-
Initiate the packaging process. MSIX Hero converts the installer and applies the digital signature.
-
Result: A signed MSIX package is successfully created and is ready for App Attach volume creation.
-
Another Method - Using MSIX Packaging Tool
The detailed steps can be found here.
Create an App Attach Disk Image (VHD) from an MSIX file
Using MSIX Hero App
This section explains how to create an MSIX App Attach volume from the signed MSIX package.
-
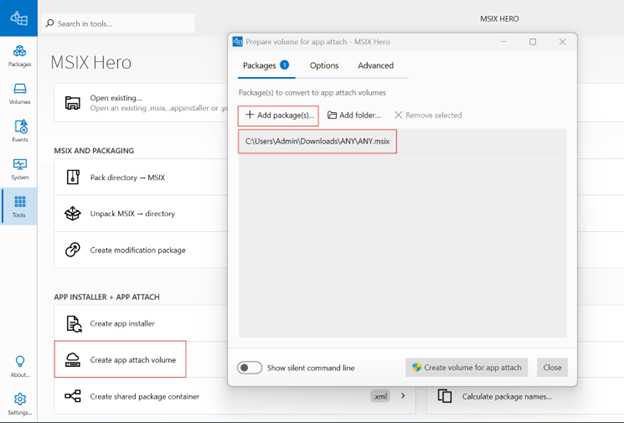
Open App Attach Wizard: In MSIX Hero, navigate to the App Installer and App Attach section and select the option to create an App Attach volume.
-
Add MSIX Package: In the Packages section, add the MSIX package created in the previous section.
-
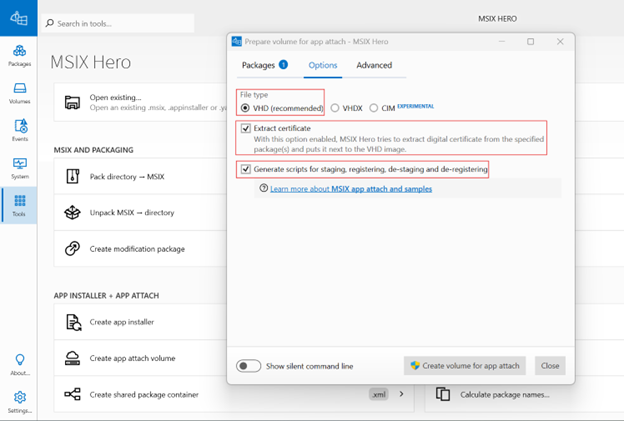
Configure App Attach Options: Configure the following options:
-
Select VHD as the file type (recommended)
-
Enable the option to extract the certificate
-
Enable generation of scripts for staging, registering, de-signing, and de-registering
Note
These scripts are required for managing the App Attach lifecycle on session hosts.
-
-
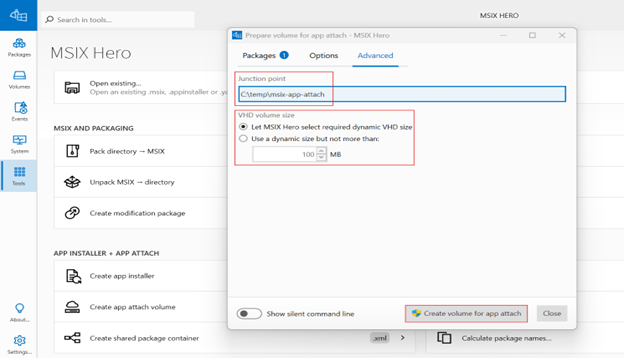
Configure Volume Size
-
Verify that the junction point is displayed.
-
For volume size, select the recommended option that lets MSIX Hero automatically determine the required dynamic VHD size.
-
-
Create App Attach Volume
-
Start the App Attach volume creation process.
-
Result: An MSIX Completed folder is generated containing:
-
The MSIX package
-
The VHD file
-
PowerShell scripts for App Attach operations: If all steps must be done manually, these scripts (stage, register, deregister, destage) can be used.
-
The app-attach.json metadata file: The following information captured in this file (app-attach.json) will be needed while publishing the MSIX App Attach app in HyWorks.
-
VHDFileName: The name of the VHD file generated.
-
parentFolder: The parent folder containing unpacked data inside the VHD.
-
packageName: Name of the package. In HyWorks, this will be captured in the MSIX Name field when publishing the app.
-
volumeGuid: GUID of the MSIX App Attach Disk Image (Volume).
-
-
-
Another Method: Using MSIX Manager
The detailed steps can be found here.
Prepare Windows Desktops for using MSIX App Attach Disk Image
The following steps must be performed on Windows virtual desktops to prepare them for MSIX App Attach usage:
Multi-Session Session Host Servers (Windows only)
Notes
If added manually, the steps must be performed on all session host servers. If it's a deployed desktop pool, the changes can be made on the gold master VM or source image.
Follow the steps below to prepare the session host server:
-
Enabling HyShell and Updating CN names used to Sign the Apps:
-
Open the registry editor with write access to HKLM.
-
Update CN names (Semicolon ';' separated) into the registry on each Session Host Server(s). The information should correspond to the certificate used to sign the application package.
- Registry Location:
HKLM\SOFTWARE\Accops\Controller\EDC\SESSIONHOST\\(AppAttachCnNames)
- Registry Location:
-
Enable HyShell: Set the registry flag IsDesktopCustomizationEnabled to 'true' in the SessionHost Registry.
- Registry Location:
HKLM\SOFTWARE\Accops\Controller\EDC\SESSIONHOST\\(IsDesktopCustomizationEnabled)
- Registry Location:
-
Set HyShell mode to 0 (Native HyShell mode).
- Registry Location:
HKLM\SOFTWARE\Accops\Controller\EDC\SESSIONHOST\\(HyshellMode)
- Registry Location:
-
-
Restart the Session Host service.
-
-
Steps when using Self-signed Certificates:
Important
-
Self-signed Certificates are for UAT or Test Environment only: Though steps are mentioned here, self-signed certificates are not recommended and should be used in Test or UAT environments.
-
For the production environment, use packages signed with the Enterprise CA or the public root CA.
-
Import the exported self-signed certificate:
- Follow the steps in the section "Import self-signed certificate" for a detailed process.
-
Manually stage each application at least once: It is mandatory to manually stage an application created using a self-signed certificate (followed by a Register, De-register, and De-stage operation) on all the session host servers.
-
This process is mandatory for all applications created using the self-signed certificate. Refer to Manual Stage, Register, De-register and De-stage.
-
Single-session Windows Desktops
-
Updating CN names used to sign the Apps:
-
Open the registry editor with write access to HKLM.
-
Update CN names (Semicolon ';' separated) into the registry on each Session Host Server(s). The information should correspond to the certificate used to sign the application package.
- Registry Location:
HKLM\SOFTWARE\Accops\Controller\EDC\SESSIONHOST\\(AppAttachCnNames)
- Registry Location:
-
Restart Desktop Agent and AUEM services from services.msc.
-
-
-
Steps when using Self-signed Certificates: The steps for single-session desktops using self-signed certificates are the same as those for multi-session session host servers (point #2).
Deploy Desktop Pool
Prerequisite:
-
MSIX App Attach Disk Images are appropriately configured.
-
Session host server(s) or personal desktop(s) are prepared.
Steps:
-
Go to Management Console > VDI > Pools section.
-
Create an appropriate type of desktop pool as per the configurations done:
-
Multi-session:
-
Using existing desktops: Create a session team with all session host servers configured with prerequisites for MSIX App Attach. Use this team to create a desktop pool and add users.
-
Deployed desktops: Create a dynamic shared hosted desktop pool using the source image with all prerequisites for MSIX App Attach. Make sure to add users who should have access to these servers.
-
-
Single-session:
-
Using existing desktops: If multiple single-session desktops are configured - non-dynamic single-session desktop pool can be created.
-
Provisioned desktops: A virtual desktop machine prepared with all prerequisites; can be used as a source image to deploy more machines and for the dynamically provisioned desktop pool.
-
-
-
Once desktop pools are ready, the MSIX App Attached disk images can be configured.
Publishing MSIX App Attach Disk Image in HyWorks
Before providing steps to configure the MSIX App Attach Disk Image in HyWorks, the prerequisites must be understood.
Prerequisites for Publishing MSIX App Attach Disk Image
- MSIX App Attach Disk Image Configurations: To configure an MSIX Package App in HyWorks, the following details will be needed:
-
Important: All the above information can be captured while preparing the MSIX App Attach Disk Image. See this section: step# 5.2.4.
-
MSIX App Attach Disk Image (VHD) containing the MSIX-packaged app, kept in a shared location with appropriate permissions (accessible from all Windows desktops).
-
The MSIX Package name is used.
-
Volume GUID.
-
Name of the parent folder.
Publish MSIX App Attach Disk Image in HyWorks
With all prerequisites set, the following steps can be used to configure the MSIX App Attach Disk Image in HyWorks.
Prerequisites:
-
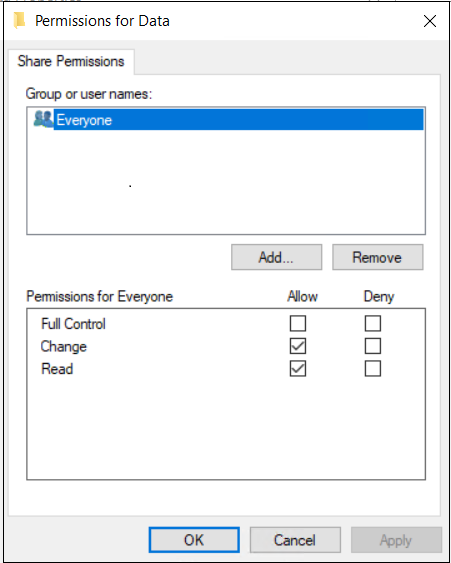
The MSIX App Attach disk image is kept in a remote or local shared location accessible from all virtual desktops, with appropriate permissions.
- For more details, refer to the Network shared folder permission settings.
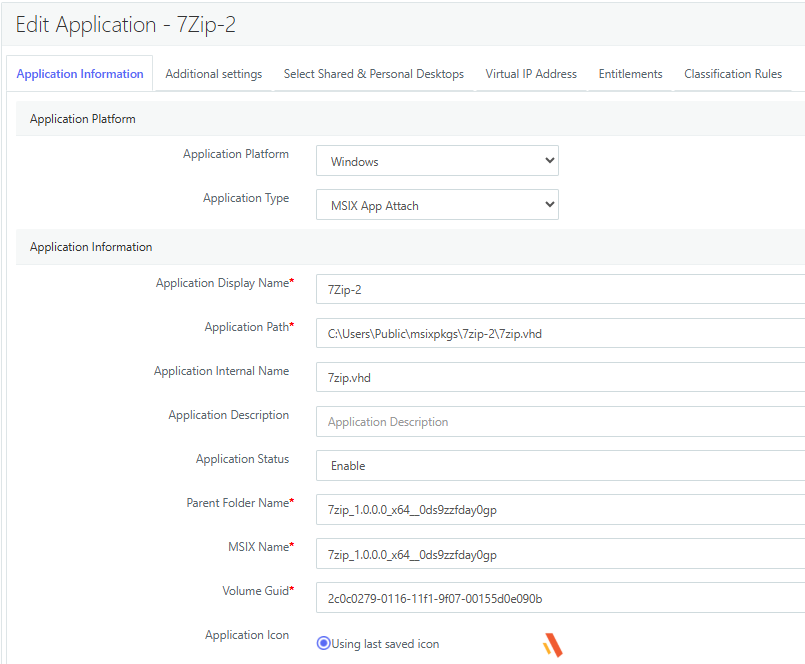
Steps to perform: Settings to configure MSIX App into the Application Information tab
-
HyWorks Management Console > Apps > Add a new application.
-
Application Type Selection: In the Application Type field, select MSIX App Attach.
-
Application Information Configuration: For easier configuration, the administrator should keep the app-attach.json file readily available, as most required values are derived from it.
-
Application Path: Specify the full path to the VHD file.
-
Parent Folder Name: Provide the parent folder name exactly as mentioned in the app-attach.json file.
-
MSIX Name: Provide the MSIX package name as mentioned in the app-attach.json file.
-
Volume GUID: Provide the volume GUID exactly as specified in the app-attach.json file.
-
Application Icon: Select or upload the appropriate application icon.
-
-
Additional Settings:
Note
Only the existing MSIX App-related settings are now visible in the Additional Settings tab.
-
Based on deployment requirements, configure the following options:
-
Create a desktop shortcut on the user’s PC.
-
Create a desktop shortcut on shared and personal desktops.
-
Pin the application to the Start Menu on the user's PC.
-
Pin the application to the Start Menu on shared and personal desktops.
-
-
-
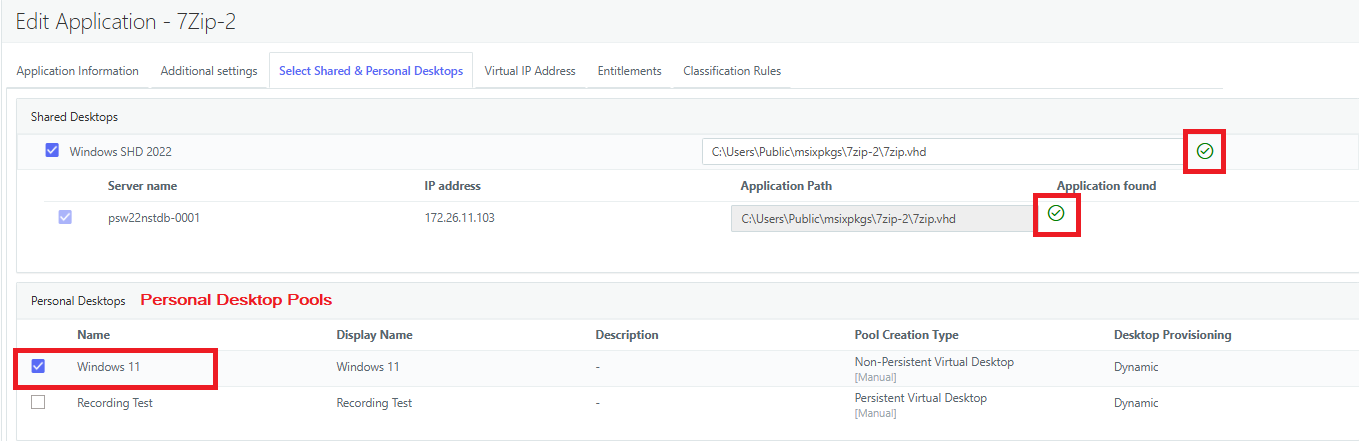
Select Shared and Personal Desktops
-
Multi-session: Select the appropriate SHD Teams or Servers.
- For Shared Hosted Desktop Teams or servers, ensure the provided MSIX path is validated successfully and indicated by a green tick.
-
Single-session: Personal/ Floating Virtual Desktop Pool (from HyWorks or HyLabs).
Supported from HyWorks v3.6-SP1 or later.
-
-
Entitlements and Save.
- Assign user or group entitlements. Review the configuration and save the application.
-
The MSIX App Attach application is successfully published through HyWorks.
Log in and Verify
-
Log in from desktop or web client, launch Shared Hosted or Personal Desktop.
-
Now, HyShell will be executed, and the user can see the shortcuts to the attached applications on the Desktop or Start menu (as configured).
Troubleshooting
Logs
-
Session Host Server:
C:\Program Files (x86)\Accops\HyWorks\SessionHost\Logs\ServiceLogs.txt- Check for [HyShell] and [AppAttach] tags.
-
Single-session Desktops:
-
Desktop Agent:
C:\Program Files (x86)\Accops\HyWorks Desktop Agent\Logs\DesktopAgent.txt -
AUEM: In the local app data of the user.
%localappdata%\Accops\AUEM\AUEM.log
-
App Dependencies
Apps containerized in a container may have dependencies, and not having them on the target Windows virtual desktop machine may cause failures when using MSIX App Attach effectively. Dependencies can be checked very effectively using the MSIX Hero App.
-
Open the MSIX Hero App.
-
Go to Tools > App Installer + App Attach > Show MSIX dependencies.
-
In Analyze Dependencies - MSIX Hero > Browse and select the MSIX Package file.
-
Click Analyze dependencies.
-
It will verify and give a pictorial view of dependencies.
-
An administrator will be needed to ensure these dependencies are resolved appropriately.
Limitations of MSIX App Attach Integration
-
MSIX App Attach applications are accessible from remote desktop sessions.
-
MSIX App Attachments are not supported for delivery as virtual apps.
Appendix
Create and configure a self-signed trusted certificate
Create a self-signed trusted certificate
Launch PowerShell with admin privilege and execute the command: (replace CN=Accops as per your requirement)
New-SelfSignedCertificate -Type Custom -Subject "CN=Accops" -KeyUsage DigitalSignature -KeyAlgorithm RSA -KeyLength 2048 -CertStoreLocation "cert:\LocalMachine\My"

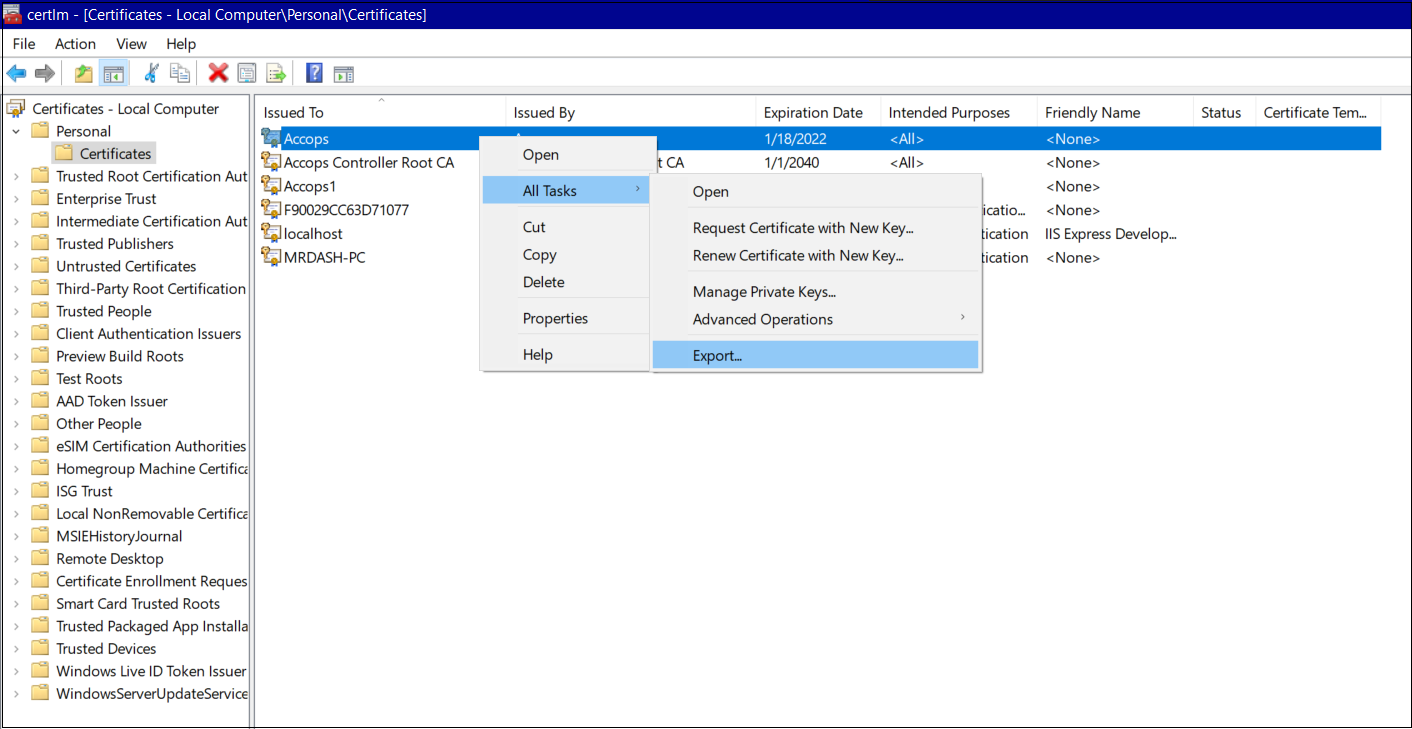
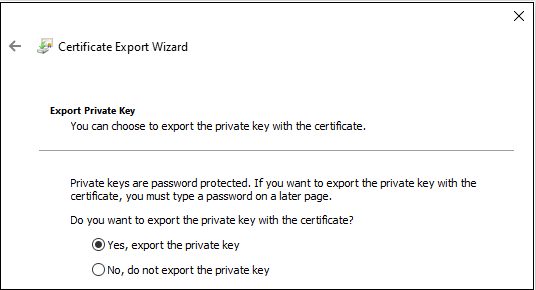
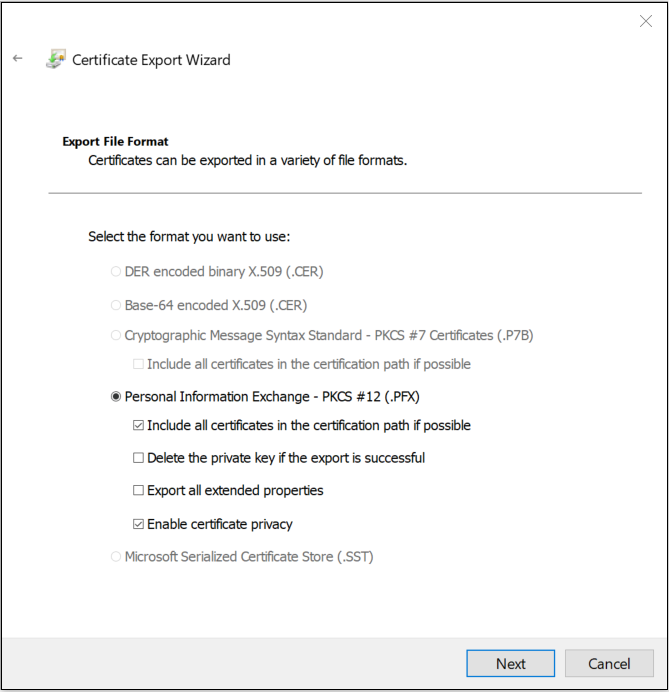
Export self-signed certificate
Export the self-signed certificate as a .pfx file that includes the private key, then use it in the Signing preference menu.
Open "Manage Computer Certificates" from the Start menu [ or via run -> certmgr.msc] and follow the steps below:
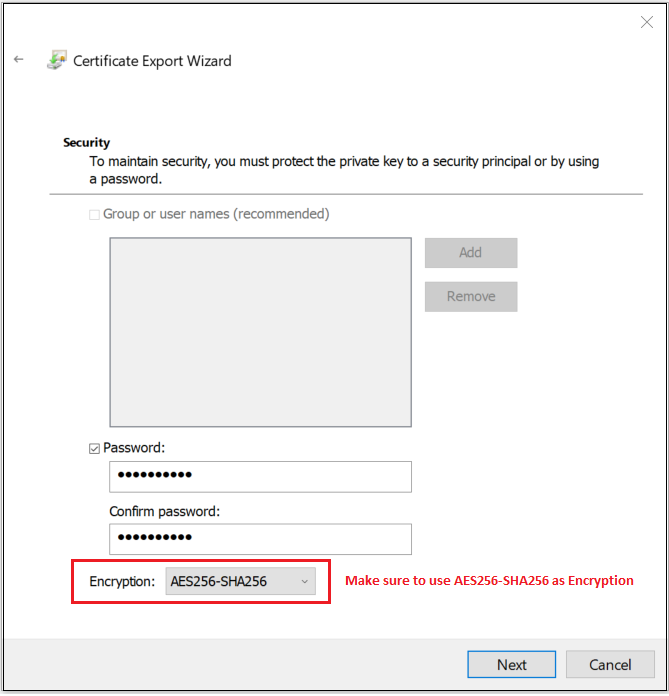
Important
Make sure the Encryption selected in the dropdown is AES256-SHA256.
Import Self-signed Certificates
-
Purpose: This procedure imports an exported self-signed code-signing certificate into the Trusted People certificate store of the Local Computer, ensuring that MSIX packages signed with this certificate are trusted system-wide.
-
Prerequisites
-
Exported certificate file: .cer (recommended), or .pfx (if private key is included)
-
Local administrator privileges on the machine
-
The certificate was created for Code Signing
-
-
Step-by-Step Procedure (GUI Method - Recommended)
-
Step 1: Open Certificate Management Console (Local Computer)
-
Press Win + R
-
Type: mmc
-
Press Enter
-
-
Step 2: Add the Certificates Snap-in
-
In the MMC window, click File - Add/Remove Snap-in
-
Select Certificates
-
Click Add
-
When prompted, select: Computer account
-
Click Next
-
Select: Local computer (the computer this console is running on)
-
Click Finish
-
Click OK
-
-
Step 3: Navigate to the Trusted People Store
- In the left pane:
Certificates (Local Computer) > Trusted People > Certificates
- In the left pane:
-
Step 4: Start Certificate Import Wizard
-
Right-click Certificates under Trusted People
-
Select
All Tasks > Import -
Click Next
-
-
Step 5: Select Certificate File
-
Click Browse
-
Select your certificate file: .cer (public certificate), or .pfx (certificate with private key)
-
Click Next
-
-
Step 6 (Only if importing .pfx)
-
Enter the private key password
-
Mark key as exportable (Optional, but recommended)
-
Click Next
-
-
Step 7: Select Certificate Store (Critical Step)
-
Choose: Place all certificates in the following store.
-
Click Browse
-
Select: Trusted People
-
Click OK
-
-
Click Next
-
-
Step 8: Complete the Import
-
Click Finish
-
Confirm the message: The import was successful.
-
-
Step 9: Verify Certificate Import
-
Navigate to:
Certificates (Local Computer) > Trusted People > Certificates -
Confirm: Certificate is visible.
-
-
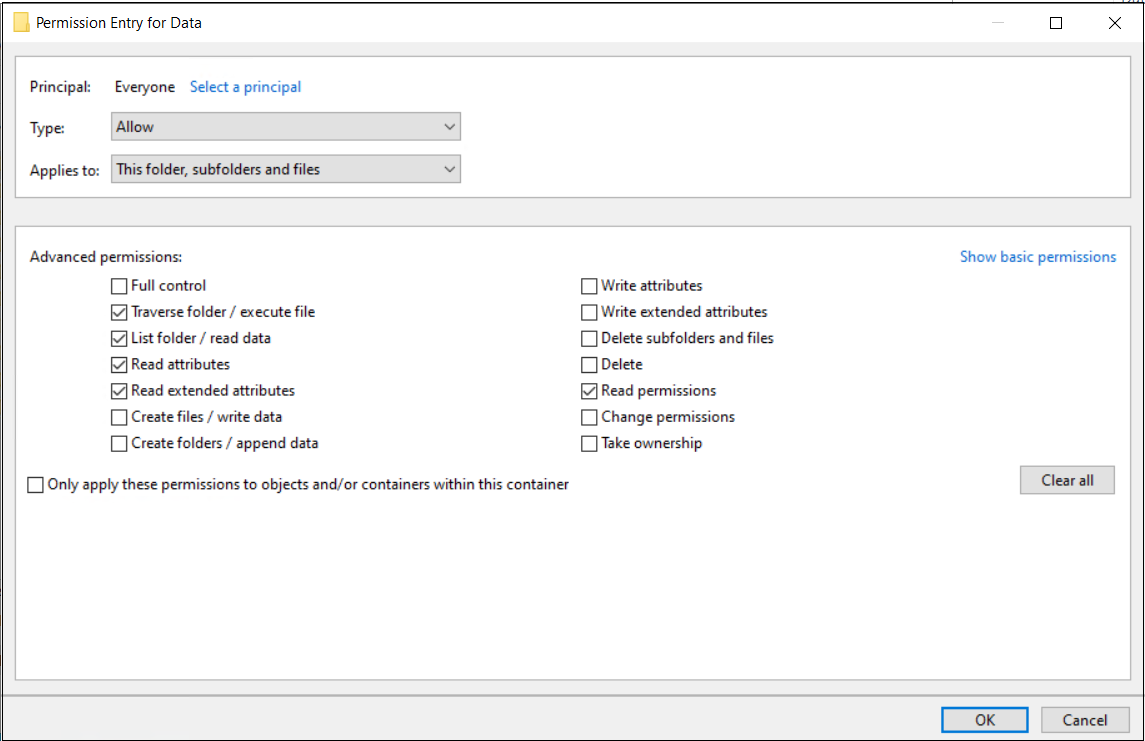
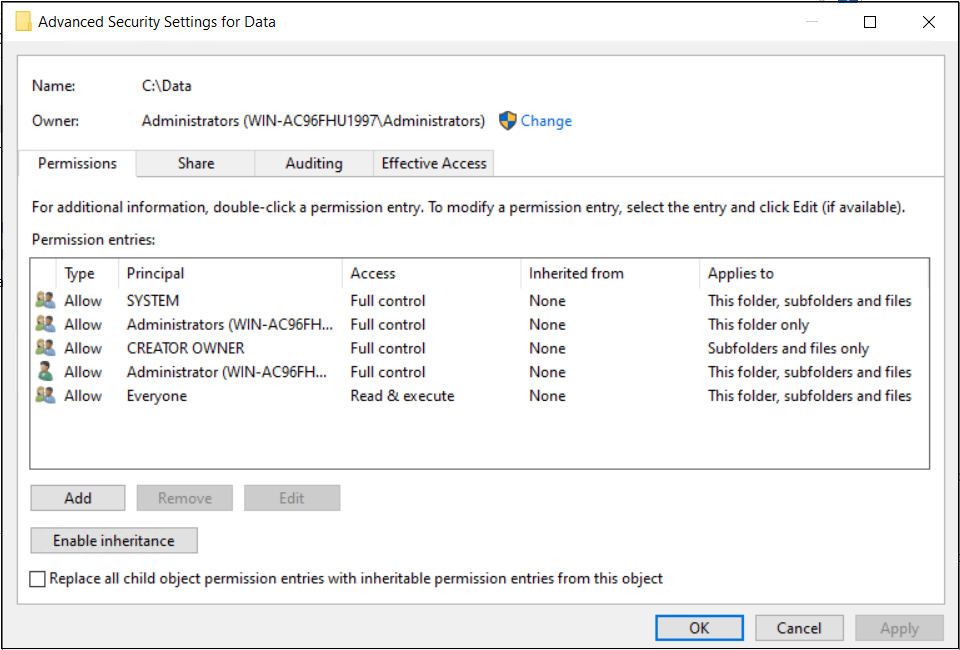
Network shared folder permission settings.
Alternate Methods for MSIX App Attach
Preparing MSIX Package File using MSIX Packaging Tool
Prerequisites (for creating MSIX package):
-
Windows 10, version 1809 (or later)
-
A Microsoft account may require logging in.
-
Install the MSIX Packaging Tool.
-
Launch the MSIX Packaging tool from the Start menu.
-
In the MSIX Package Tool, select "Select Task" and click the "Application package" icon.
-
Check "Create package on this computer."
-
Wait for the "Additional preparations" section to finish scanning; once it's done, select all "recommended action items" and click the "Disable selected" button below.
-
Wait for the previous step to finish, then click on next.
-
Select the installer exe for which you want to make the MSIX package, followed by any arguments(if required). (e.g., C:\Installers\7z1900-x64.exe)
-
Signing Preference:
-
In "Signing Preference," select "Sign with a certificate (.pfx)" and browse the certificate file. Refer to the Obtaining Package Signing Certificate section.
-
If the certificate is password-protected, enter the password in the password box.
-
-
Enter the timestamp server as "http://timestamp.digicert.com" and press Next.
-
Package Name (3 and 50 characters in length that consist of alpha-numeric, period, and dash characters.):
-
Required and corresponds to the package identity Name in the manifest to describe the contents of the package.
-
It is not shown to the end user.
-
-
Package display name:
-
Required and corresponds to the package in the manifest to display a friendly package name to the user in the start menu and settings pages.
-
The field accepts a string of 1 to 256 characters and supports localization.
-
-
Publisher name:
-
Required and corresponds to a package that describes the publisher's information.
-
The Publisher attribute must match the publisher subject information of the certificate used to sign a package.
-
-
Version:
-
Required and corresponds to the package in the manifest to describe the package's version number.
-
This field accepts a version string in quad notation: "Major.Minor.Build.Revision". e.g., 1.9.0
-
-
Set the description and press next.
-
Follow the installer’s installation steps.
-
Click the restart button if required.
-
Press Next and say, “Yes, move on.”
-
Press Next > select destination path > click on Create > Close.
-
The final MSIX package will be available at the path provided. (e.g. 7Zip_1.9.0.0_x64__a222a09sg3tv2.msix)
Prepare MSIX App Attach Disk Image using MSIX Manager and PowerShell Script
Prerequisites to create a VHD file:
- Windows 10 Enterprise, Pro, or Education [Update 20H2]
- The Hyper-V role should be enabled.
Use the PowerShell script below to create a VHD from the previously created MSIX package. Update the following entries:
-
$vhdSrc (full path for output vhd file)
-
$msixSrc (full path of input MSIX file)
-
$parentFolder (parent folder name to be used inside VHD)
-
50MB (replace with an approx size to be used by your package)
-
Download and unzip the msixmgr tool.
-
Replace path [path]\msixmgr.exe for executable and update drive letter "f:" with an available one at the below command:
msixmgr.exe -Unpack -packagePath $msixSrc -destination "f:\$parentFolder" -applyacls
Note
Change the drive letter if the error comes similar to "Failed with HRESULT 0x8bad0001 when trying to unpack
create_vhd.ps1:
#region variables
$vhdSrc = "c:\temp\7Zip_1.9.0.0.vhd"
$msixSrc = "E:\Dash\GIT-HUB\MSIX\7Zip_1.9.0.0_x64__a222a09sg3tv2.msix"
$parentFolder = '7Zip_1.9.0.0'
#endregion

#region cleaneup
try
{
    if (Test-Path -LiteralPath $vhdSrc)
    {
        Remove-Item $vhdSrc
    }
}
catch{}
#endregion


New-VHD -SizeBytes 50MB -Path $vhdSrc -Dynamic -Confirm:$false

$vhdObject = Mount-VHD $vhdSrc -Passthru
$disk = Initialize-Disk -Passthru -Number $vhdObject.Number
$partition = New-Partition -AssignDriveLetter -UseMaximumSize -DiskNumber $disk.Number
Format-Volume -FileSystem NTFS -Confirm:$false -DriveLetter $partition.DriveLetter -Force

E:\Dash\GIT-HUB\MSIX\msixmgr\x64\msixmgr.exe -Unpack -packagePath $msixSrc -destination "f:\$parentFolder" -applyacls

#Unmount the disk
Dismount-DiskImage -ImagePath $vhdSrc
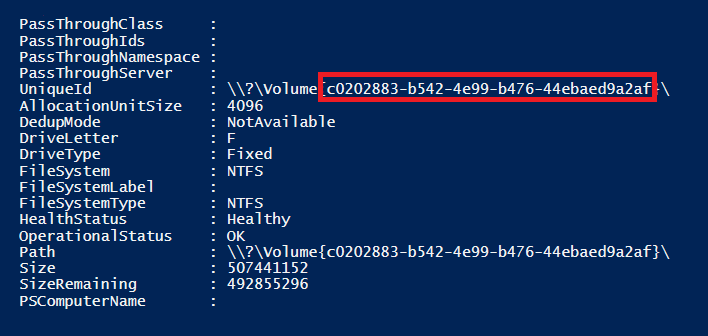
VolumeGuid:
Manual Stage Register, De-register, and De-stage Application
Using MSIX Hero App Generated Scripts
As described in MSIX App Attach Disk Image Creation Process: Point# 5.2.4, all relevant scripts are generated for the prepared App Attach Disk Image. These scripts can be used directly on target Windows desktops.
Using PowerShell Scripts - Manually Scripts Parameter Captured.
Use the PowerShell script(s) below to stage/register/unregister/destage an application on the session host server. Before executing the script, update the values for the following variables:
-
$vhdSrc: Provide the full path of the VHD file.
-
$packageName: Provide the MSIX package name without extension.
-
$parentFolder: Provide the name of the parent folder created inside the VHD.
-
$volumeGuid: Provide the volume GUID obtained during the VHD creation process.
Stage
Use the PowerShell script below to register an application on the session host server. Before executing the script, update the values for the following variable:
-
$vhdSrc: Provide the full path of the VHD file.
-
$packageName: Provide the MSIX package name without extension.
-
$parentFolder: Provide the name of the parent folder created inside the VHD.
-
$volumeGuid: Provide the volume GUID obtained during the VHD creation process.
Stage.ps1
    #MSIX App Attach staging sample

    Set-ExecutionPolicy Unrestricted

    #region variables
    #$vhdSrc="\\172.25.0.11\Public\MSIX\7zip.vhd" #at network location
    $vhdSrc="c:\Apps\7Zip_1.9.0.0.vhd" #at network location
    $packageName = "7Zip_1.9.0.0_x64__0p6e02kja1var"
    $parentFolder = "7Zip_1.9.0.0"
    $parentFolder = "\" + $parentFolder + "\"
    $volumeGuid = "03177d95-8a4e-4c68-92a8-957d5c05814f"
    $msixJunction = "C:\temp\AppAttach\"
    #endregion

    #region cleaneup
    try
    {
        if (Test-Path -LiteralPath $msixJunction\$packageName)
        {
            Remove-AppxPackage -AllUsers -Package $packageName
            Remove-Item -LiteralPath $msixJunction\$packageName -Force -Recurse
            Dismount-DiskImage -ImagePath $vhdSrc -Confirm
        }
    }
    catch{}
    #endregion

    echo $vhdSrc

    #region mountvhd
    try
    {
        Mount-Diskimage -ImagePath $vhdSrc -NoDriveLetter -Access ReadOnly
        Write-Host ("Mounting of " + $vhdSrc + " was completed!") -BackgroundColor Green
    }
    catch
    {
        Write-Host ("Mounting of " + $vhdSrc + " has failed!") -BackgroundColor Red
    }
    #endregion

    #region makelink
    $msixDest = "\\?\Volume{" + $volumeGuid + "}\"

    if (!(Test-Path $msixJunction))
    {
        md $msixJunction
    }

    $msixJunction = $msixJunction + $packageName

    cmd.exe /c mklink /j $msixJunction $msixDest
    #endregion

    #region stage [Init]
    [Windows.Management.Deployment.PackageManager,Windows.Management.Deployment,ContentType=WindowsRuntime] | Out-Null
    Add-Type -AssemblyName System.Runtime.WindowsRuntime
    $asTask = ([System.WindowsRuntimeSystemExtensions].GetMethods() | Where { $_.ToString() -eq 'System.Threading.Tasks.Task`1[TResult] AsTask[TResult,TProgress](Windows.Foundation.IAsyncOperationWithProgress`2[TResult,TProgress])'})[0]
    $asTaskAsyncOperation = $asTask.MakeGenericMethod([Windows.Management.Deployment.DeploymentResult], [Windows.Management.Deployment.DeploymentProgress])

    $packageManager = [Windows.Management.Deployment.PackageManager]::new()

    $path = $msixJunction + $parentFolder + $packageName # needed if we do the pbisigned.vhd
    $path = ([System.Uri]$path).AbsoluteUri

    #endregion stage [Init]

    #region stage [Execution]

    $asyncOperation = $packageManager.StagePackageAsync($path, $null,"StageInPlace")  #StageInPlace
    $task = $asTaskAsyncOperation.Invoke($null, @($asyncOperation))

    $task
    #endregion stage [Execution]
Registration
Use the PowerShell script below to register an application on the session host server. Before executing the script, update the values for the following variable:
- $packageName: Provide the same MSIX package name used in the staging process.
Register.ps1
    #MSIX app attach registration sample

    #region variables
    $packageName = "7Zip_1.9.0.0_x64__0p6e02kja1var"
    $path = "C:\Program Files\WindowsApps\" + $packageName + "\AppxManifest.xml"
    #endregion

    #region register
    Add-AppxPackage -Path $path -DisableDevelopmentMode -Register
    #endregion
De-registration
Use the PowerShell script below to de-register an application on the session host server. Before executing the script, update the values for the following variable:
- $packageName: Provide the same MSIX package name used in the registration process.
De-registration.ps1
    #MSIX app attach deregistration sample

    #region variables
    $packageName = "7Zip_1.9.0.0_x64__0p6e02kja1var"
    #endregion

    #region derregister
    Remove-AppxPackage -PreserveRoamableApplicationData $packageName
    #endregion
De-Stage
Use the PowerShell script below to de-stage an application on the session host server. Before executing the script, update the values for the following variable:
-
$packageName: Provide the same MSIX package name used in the de-registration process.
-
$vhdSrc: Provide the full path of the VHD file.
De-stage.ps1
    #MSIX app attach de-staging sample

    #region variables
    $packageName = "7Zip_1.9.0.0_x64__0p6e02kja1var"
    $vhdSrc="c:\Apps\7Zip_1.9.0.0.vhd"
    $msixJunction = "C:\temp\AppAttach\"
    #endregion

    #region derregister
    Remove-AppxPackage -AllUsers -Package $packageName
    Remove-Item -LiteralPath $msixJunction\$packageName -Force -Recurse
    Dismount-DiskImage -ImagePath $vhdSrc -Confirm
    #endregion