HyID As Authentication
Feature Overview
This feature enables HyWorks to support Azure Active Directory (Azure AD) by using HyID as the authentication server. It addresses enterprise identity management requirements for organizations with hybrid, complex directory structures.
By leveraging HySecure's existing authentication capabilities, this approach avoids duplicate development while ensuring seamless integration, compatibility, and consistency across platforms. The solution simplifies implementation, supports scalable directory management, and aligns HyWorks with modern authentication standards.
Example Use Cases
Seamless SSO for Workspace Access:
Users can log in to the HyWorks Workspace using their Azure AD credentials without maintaining separate HyWorks passwords.
Use cases: - Organizations already using Microsoft 365 / Entra ID
-
Azure AD Domain Join removes dependency on traditional Active Directory and Domain Controllers.
- Fully cloud-managed Accops deployment
-
Azure AD > HySecure > HyWorks trust chain
-
SAML-based federated authentication
-
Identity-based desktop and application access
Key Benefits Summary
- Single identity using Azure AD
- No on-prem AD dependency
- MFA and Conditional Access support
- Cloud-native VDI architecture
- Intune device management
- SAML federation compatibility
- Secure remote access
Deployment and Configurations
Pre-requisites for HyID as Authentication Server
-
HySecure VM(s) deployed on Azure (v7.1 GA or later).
- The first release was done with HySecure v7.0 (version 648) from the Azure Marketplace, with patch 651 and a custom hostedappcgi. These changes are now merged into HySecure GA releases, as mentioned above, and should be used whenever possible.
-
HySecure SSH Access: For HyID deployment using script execution.
-
HySecure database access: Required to perform database operations for creating tables for HyID services and storing data.
-
Internet access to the VM for script execution: Required to install Docker and its components for HyID as auth.
-
HyWorks Controller version 3.6 HF1 or above
-
New or existing Azure tenant
-
Global Azure Administrator in tenant access with Owner role permission in the subscription
-
SAML Configuration (Enterprise Application SSO) needs any one of the following roles:
- Global Administrator
- Cloud Application Administrator
- Application Administrator
- Owner of the Service Principal
-
Reference Link: https://learn.microsoft.com/en-us/entra/identity/enterprise-apps/add-application-portal-setup-sso#prerequisites.
-
Assigning Microsoft Graph API Permissions to an App for reading group and user information
- Application Administrator OR Cloud Application Administrator
- Reference Link: https://learn.microsoft.com/en-us/entra/identity-platform/howto-update-permissions?pivots=portal#prerequisites.
-
Granting Admin Consent for Graph API (Application Permissions)
-
Privileged Role Administrator OR Global Administrator
-
Reference Link: https://learn.microsoft.com/en-us/entra/identity/enterprise-apps/grant-admin-consent?pivots=portal#prerequisites
-
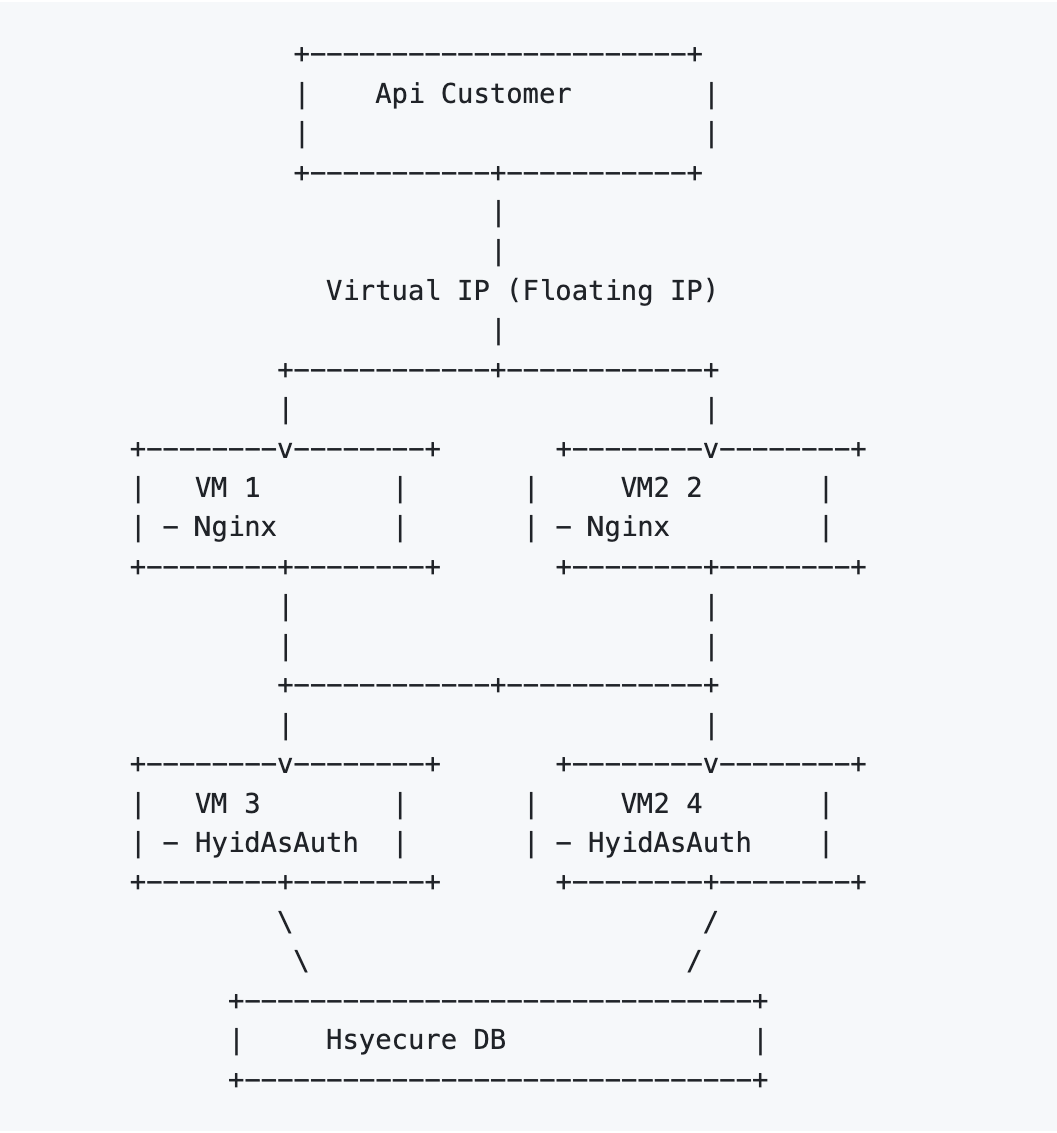
Sample Deployment Diagram
Configuration Flow
A very high-level deployment and configuration flow can be understood from the image below:
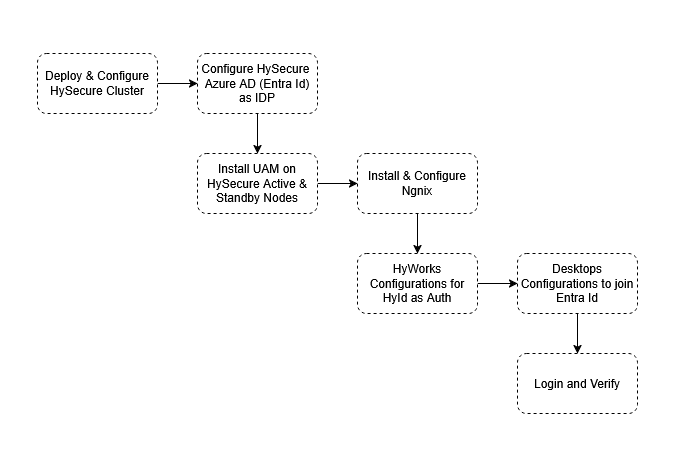
- HySecure VM Deployment and Configuration on Azure
- Configuring HySecure to use Azure AD as IDP
- UAM Configuration on > HySecure VMs
- Install and configure Nginx for HyID as an Auth Load Balancing
- HyWorks Configurations:
- Add HyID as the Authentication Server in HyWorks
- HyWorks Connection Profile Settings
- Desktop Preparations to join Entra Id
- Log in and verify
Configure the HySecure Gateway Cluster
This document will not cover the detailed process of HySecure deployment or cluster configuration on Azure. Instead of the simplicity, it is assumed that following the HySecure deployment is available to be used:
-
HySecure Cluster with Active, standby management nodes and real application gateway servers.
-
HySecure is configured to authenticate with Azure AD (Entra Id).
References:
-
Setting Up HySecure Gateway: https://docs.accops.com/HySecure_5_4/common_pages/content_HySecure_deploying/setup_HySecure_azure.html
-
Configuring HySecure Gateway:
-
Network configuration: [https://docs.accops.com/HySecure_5_4/common_pages/content_HySecure_quickstart/networkConfiguration.html])(https://docs.accops.com/HySecure_5_4/common_pages/content_HySecure_quickstart/networkConfiguration.html)
-
Bootstrap configuration: https://docs.accops.com/HySecure_5_4/common_pages/content_HySecure_quickstart/completing%20bootstrap%20state.html
-
-
Load Balancer Configuration: https://docs.accops.com/HySecure_7_1/common_pages/content_HySecure_quickstart/14_multi_node_azure/multi_node_azure.html
-
Configuring Azure AD as Auth in HySecure: https://docs.accops.com/HySecure_5_4/content_HySecure/knowledgebase_HSG/Azure_AD_as_IDP.html
After this step, the following verified configurations should be available for the next step:
-
A HySecure cluster with minimum active and standby management nodes
-
Having internet access
-
SSH access for HyID as an Auth deployment
-
Configured to have Azure AD (Entra Id) as IDP
-
Post Deployment Verification
The purpose of this section is to ensure that the HySecure cluster is deployed and ready for the next steps. The steps below are examples only and can serve as a reference, but should be extended with additional verifications as needed.
-
After deployment, navigating to the gateway VIP (https://
) in a browser should open the Workspace. -
All services should be up and running. This can be verified by logging in as SO on HySecure active/standby nodes and checking the Service field.
-
After configuring SAML in HySecure, verify that the user can access the application or desktop assigned to them via SAML authentication [IDP verification from Azure] from the Workspace.
-
Admin should have the endpoint IP addresses for all nodes, the Load balancer IP addresses, and the SAML DNS entries configured in Azure and HySecure.
HyID As Auth Deployment and Details
Multi-VM Deployment (HA Setup)
Important
This is just one example configuration. The deployment architecture and the number of nodes per component can be customized as needed for production deployment.
Example Infrastructure Requirements
| VM | ROLE | CPU | RAM | DISK | COMPONENT |
|---|---|---|---|---|---|
| VM1 | HySecure + HyID as Auth - 1 | 4 | 8 GB | 100 GB | UAM API + Gateway |
| VM2 | HySecure + HyID as Auth - 2 | 4 | 8 GB | 100 GB | UAM API + Gateway |
| VM3 | LB For HyID service | 2 | 4 GB | 30 GB | Nginx |
| Load Balancer (LB) | Internal Load Balancer |
Required ports
-
Nginx Load Balancer to > HySecure-1 and > HySecure-2: 5000
-
HyWorks Nodes (Management & Broker) to LB: 5001
Deployment Process:
Prerequisites:
- SSH access to HySecure VM
- Download and copy the User Access Management (UAM) zip on Active and Standby nodes
- Use a two-node (2) gateway setup for better reliability. A single node can work, but any failure or downtime will disrupt service.
Steps for Executing Scripts:
Extract Artifacts (On Both Active and Standby HySecure Nodes)
Unzip artifacts.zip
ls -l
The extracted folder contains all the required setup and environment files.
The environment file hyid_as_auth.env must be updated based on deployment and node, and the remaining two files must be executed in the specified order.
- Update
hyid_as_auth.env - Execute
setup.uam.sh - Execute
setup-config.sh(Detailed instructions are provided below.)
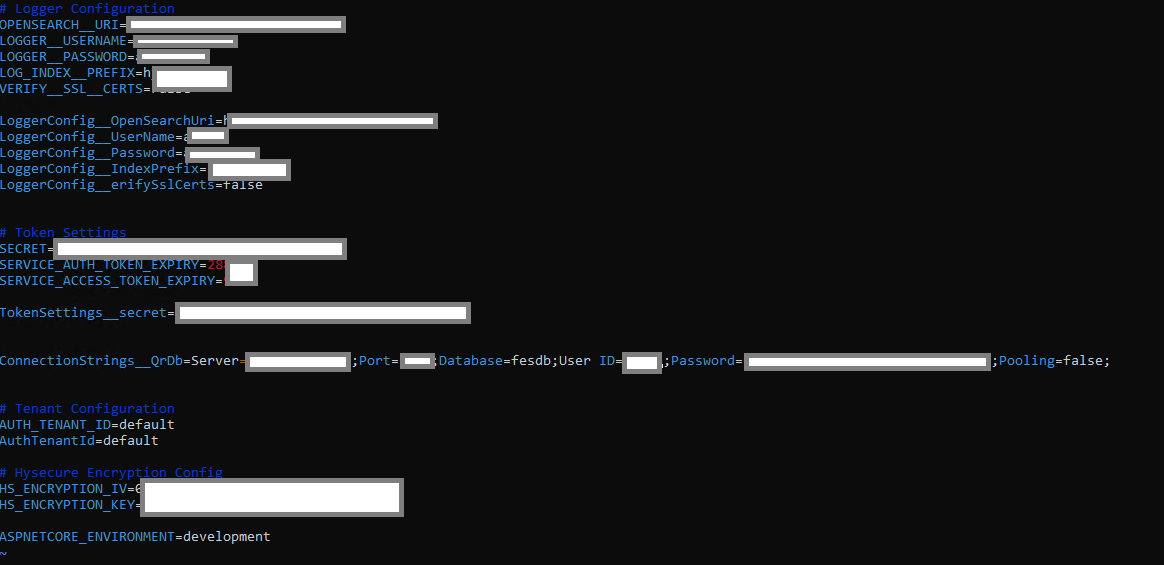
Env File Configuration
The hyid_as_auth_env file needs to be updated on all servers to reflect the environment's details.
-
Navigate to the extracted folder.
-
Run the command
vi hyid-as-auth.envto edit the environment file.
| Variable | Description | Example |
|---|---|---|
| OPENSEARCH_URI | URI for OpenSearch logging (ARS logging ) endpoint | https://192.16..100.4:9200/ |
| LOGGER_USERNAME | Username for OpenSearch logging authentication | admin |
| LOGGER_PASSWORD | Password for OpenSearch logging authentication | ARSADMIN |
| LOG_INDEX_PREFIX | Prefix for the OpenSearch log index | hyidasauth |
| VERIFY_SSL_CERTS | Whether to verify SSL certificates for logging | False |
| SECRET | Secret used for token generation for user authentication | 7e280494-f03c-4171-9ada-b56ffc231e0e |
| SERVICE_AUTH_TOKEN_EXPIRY | Expiry duration for service authentication tokens (in seconds) | 28800 |
| SERVICE_ACCESS_TOKEN_EXPIRY | Expiry duration for service access tokens (in seconds) | 28800 |
| AUTH_TENANT_ID | Tenant ID used for authentication. Also used as verification data for Controller to-Gateway requests | default |
| QR_DB_CONNECTION_STRING | MySQL database connection string | Server= |
| HS_ENCRYPTION_IV | Initialization vector for HySecure encryption | 1234567890123456 |
| HS_ENCRYPTION_KEY | Encryption key for HySecure encryption | 12345678901234567890123456789012 |
Save and verify the contents.
HyID as Auth and Nginx Deployment
SSH to the Active node of the HySecure cluster VMs and navigate to the directory containing the setup-uam.sh file.
| HySecure Active-Node | HySecure Standby Node | Node# 1 for Ngnix | Node# 2 for Ngnix |
|---|---|---|---|
Step# 1: Change File Permissionschmod +x setup-uam.sh |
Step# 1: Change File Permissionschmod +x setup-uam.sh |
Step# 1: Change File Permissionschmod +x setup-uam.sh |
Step# 1: Change File Permissionschmod +x setup-uam.sh |
Verify permissionsls -l setup-uam.shSample Output: -rwxr-xr-x 1 user group 1234 Apr 16 10:00 setup-uam.sh |
Verify permissionsls -l setup-uam.shSample Output: -rwxr-xr-x 1 user group 1234 Apr 16 10:00 setup-uam.sh |
Verify permissionsls -l setup-uam.shSample Output: -rwxr-xr-x 1 user group 1234 Apr 16 10:00 setup-uam.sh |
Verify permissionsls -l setup-uam.shSample Output: -rwxr-xr-x 1 user group 1234 Apr 16 10:00 setup-uam.sh |
Step# 2: Execute HyID as Auth script./setup-uam.shIt will prompt for inputs, to be provided as per the node and deployments. |
Step# 2: Execute HyID as Auth script./setup-uam.shIt will prompt for inputs, to be provided as per the node and deployments. |
Step# 2: Execute HyID as Auth script./setup-uam.shIt will prompt for inputs, to be provided as per the node and deployments. |
Step# 2: Execute HyID as Auth script./setup-uam.shIt will prompt for inputs, to be provided as per the node and deployments. |
| Prompts during script execution: Now, let’s see the prompts and inputs on the HySecure Active node: 1. Do you want to perform database operations (create tables, etc.)? (y/n): y 2. Do you want to set up the HyID as an Auth API container? (y/n): y 3. Do you want to set up the Nginx reverse proxy? (y/n): n 4. Enter MySQL hostname [localhost]: // Make sure only the IP address is mentioned and not localhost. This is the VIP/Internal Load balancer IP 5. Enter MySQL username: admin 6. Enter MySQL password: **** 7. Enter MySQL database name [fesdb]: fesdb |
Prompts during script execution: Now let’s see the prompts and inputs on the HySecure Active node: 1. Do you want to perform database operations (create tables, etc.)? (y/n): y 2. Do you want to set up the HyID as an Auth API container? (y/n): y 3. Do you want to set up the Nginx reverse proxy? (y/n): n 4. Enter MySQL hostname [localhost]: // Make sure only the IP address is mentioned and not localhost. This is the VIP/Internal Load balancer IP 5. Enter MySQL username: admin 6. Enter MySQL password: **** 7. Enter MySQL database name [fesdb]: fesdb |
Prompts during script execution: Now let’s see the prompts and inputs on the HySecure Active node: 1. Do you want to perform database operations (create tables, etc.)? (y/n): n 2. Do you want to set up the HyID as an Auth API container? (y/n): n 3. Do you want to set up the Nginx reverse proxy? (y/n): y 4. Enter Nginx port (e.g., 5001): 5001 5. Enter SSL certificate path: /home/fes/fescommon/certs/sslcert.cer Explanation: HyID as Auth requires a self-signed certificate. The path here is to use HySecure's certificate instead of generating a new one. 6. Enter SSL certificate key path: /home/fes/fescommon/certs/sslcert.pem 7. Enter number of backend VMs: 2 8. Enter IP/hostname for backend VM 1: VM1IP 9. Enter port for backend VM 1: 5000 10. Enter IP/hostname for backend VM 2: VM2IP 11. Enter port for backend VM 2: 5000 12. Select load balancing method: 1) Round Robin (default) 2) Least Connections 3) IP Hash Enter choice [1-3]: 1 |
Prompts during script execution: Now let’s see the prompts and inputs on the HySecure Active node: 1. Do you want to perform database operations (create tables, etc.)? (y/n): n 2. Do you want to set up the HyID as an Auth API container? (y/n): n 3. Do you want to set up the Nginx reverse proxy? (y/n): y 4. Enter Nginx port (e.g., 5001): 5001 5. Enter SSL certificate path: /home/fes/fescommon/certs/sslcert.cer Explanation: HyID as Auth requires a self-signed certificate. The path here is to use HySecure's certificate instead of generating a new one. 6. Enter SSL certificate key path: /home/fes/fescommon/certs/sslcert.pem 7. Enter number of backend VMs: 2 8. Enter IP/hostname for backend VM 1: VM1IP 9. Enter port for backend VM 1: 5000 10. Enter IP/hostname for backend VM 2: VM2IP 11. Enter port for backend VM 2: 5000 12. Select load balancing method: 1) Round Robin (default) 2) Least Connections 3) IP Hash Enter choice [1-3]: 1 |
Run netstat -natp grep 5000.This will give you a process listening on port 5000. API will be listening on http://localhost:5000 |
This will complete the installation of the HyID Auth Api and configuration of the DB Schema in HySecure DB. Run netstat -natp grep 5000.This will give you a process listening on port 5000. API will be listening on http://localhost:5000 |
Loaded image: nginx:latest Nginx container is up. HTTPS endpoint on port 5001. | Loaded image: nginx:latest Nginx container is up. HTTPS endpoint on port 5001. |
| This will complete the installation of the HyID Auth API and configuration of the DB Schema in HySecure DB. | This will complete the installation of the HyID Auth API and configuration of the DB Schema in HySecure DB. | Ngnix-1 is ready. | Ngnix-2 is ready. |
| For Nginx HA (recommended but not mandatory): Nginx-1 and Nginx-2 can be placed behind an internal load balancer on port 5001. And the internal load balancer IP address can be used by HyWorks or other API consumers. |
See remarks in Ngnix-1. |
Script Explanation: The script performs the following operations:
-
Database Setup
- The Script executed above imports the required SQL files into the MySQL database:
- Services.sql - Creates the services table structure
- Tenant.sql - Creates the tenant table structure
-
Docker Image Loading
- Loads the HyID as Auth Docker image from hyid-as-auth.tar
-
Network Configuration
- Creates a Docker network named hyidasauth with subnet 172.35.0.0/20
- Skips this step if the network already exists
-
Auth API Container Deployment
- Runs the HyID as an Auth API container with:
- Port 5000 exposed
- Environment variables from hyid-as-auth.env
- Connected to the hyidasauth network
-
Uses SSL with Nginx for SSL Offloading
- Uses the SSL directory provided by the user as input
-
Loads the Nginx Docker image from nginx-latest.tar
-
Nginx Proxy Setup
-
Builds a custom Nginx Docker image
-
Runs the Nginx container with:
- Port 5001 opened for HTTPS
- Connected to the backend API (port 5000)
- Joined to the hyidasauth network
Postscript Verification:
-
Run
docker ps -aand 2 containers will be deployed- Hyid-nginx
- hyid-as-auth-api
-
DB schema can be verified as follows:
mysql -h "\$DB_HOST" -u "\$DB_USER" -p"\$DB_PASSWORD" "fesdb"-
Verify that Table Service and Tenant exist by using the command
SHOW Tables:-
Table listed under fesDB
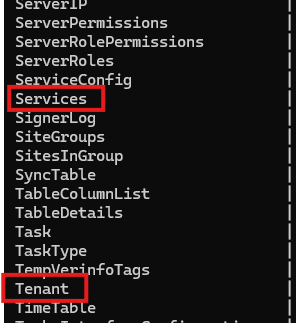
-
-
On executing command
SELECT * FROM Services; andSELECT * FROM Tenant; :-
The table must list the existing Service ID and Tenant ID along with the table metadata.
-
Service Table Structure & Sample Data
id name description service_secret created_at updated_at public_key claims group_id ip_address site_id is_active is_default default default_service Default Service qwertyuiop000asdfghjkl000zxcvbnm 1734692833 NULL -----BEGIN RSA PUBLIC KEY-----MIIBCgKCAQEAiVM3KyGOPY6FvIJdVg/. claim1,claim2 group_001 192.168.1.1 site_001 1 1 -
Tenant Table Structure & Sample Data
id name created_at updated_at private_key public_key alias logo_url_or_data domain is_active is_default is_deleted 123e4567-e89b-12d3-a456-426614174000 Example Tenant 1733902358 NULL PrivateKeyExample PublicKeyExample example-alias logo-path-or-data example.com 1 0 1
-
-
-
Generating Tenant ID, Service ID, and Secret
-
Execute the command on any of the gateway node, for adding executable permission
chmod +x setup-config.sh./setup-config.sh -
On successful execution Tenant ID, Secret ID, and service ID will be produced. Please copy these details to be used in HyWorks configurations.
Note
-
For a Single VM deployment (where HySecure and HyID as Auth are deployed as authentication containers on the same VM), the Nginx container will also be deployed as part of the setup.
- Do you want to perform database operations (create tables, etc.)? (y/n): y
- Do you want to setup the HyID as Auth API container? (y/n): y
- Do you want to setup the Nginx reverse proxy? (y/n): y
- Enter MySQL hostname [localhost]:
// Make sure only VIP/Internal Load balancer address is mentioned and not localhost - Enter MySQL username: admin
- Enter MySQL password: ****
- Enter MySQL database name [fesdb]: fesdb
-
This will complete the installation of the HyID Auth Api and configuration of the DB Schema in HySecure DB
-
Setup can also have same HA node and Nginx on same VM with load balancer
Add HyID as authentication server in HyWorks
Prerequisites: To configure HyID as an authentication server in HyWorks, the administrator must have the following:
- Tenant ID
- Service ID
- Secret ID
- Port reachability from HyWorks to the Load Balancer (LB) on port 5001
Steps:
-
Open HyWorks management console
-
Navigate to Settings > Configure > Authentication > Add
-
Select Server type as HyID
-
Fill details and fetch realms
-
Test connection and Add
Note
-
The Test Connection button is not present, as the Fetch Realms action ensures the connection functionality.
-
Currently, all authentication servers within the selected realm are being stored. In the next phase, users will be able to select a specific authentication server.
-
The Add button will be enabled only after fetching realms. Selecting a realm will automatically fetch the authentication server, after which the Add button will be enabled.
-
The Fetch Realms button is disabled because changing the realm is not allowed once it is selected.
-
The Test Connection button refreshes the authentication server within the selected realm.
HyWorks Connection Profile settings
-
Navigate to: HyWorks Console > Settings > Connection Profiles
-
Select the Profile: Choose connection profile to modified.
-
Go to Protocol Security tab: Select Enable RDP
-
Go to Access Settings tab
-
Locate the section: Access Settings
-
Find the option: Window Client Session Launcher
-
Change from: Built-In (Default)
Important
Supported Client Version v7.2.3.1003 or later.
-
Gold Master VM Configuration
Prerequisites:
-
Devices must be running Windows 11 or Windows 10 Creators Update (build 1709) or later.
- Refer to the following link: https://learn.microsoft.com/en-us/mem/intune/enrollment/windows-bulk-enroll
-
The user creating the provisioning package must have the Cloud Device Administrator role assigned.
-
The device must have an active internet connection.
-
The Gold Master VM must not be joined to Azure Entra ID, as this would cause the cloned VM to automatically join the Azure domain, making it impossible to unjoin.
-
The administrator must create and apply the provisioning package using Microsoft Windows Configuration Designer (WCD) to enable Azure Entra ID domain join.
Provisioning Package Creation
Reference link for provisioning package creation to join a machine to Azure Entra ID domain: https://learn.microsoft.com/en-us/mem/intune/enrollment/windows-bulk-enroll
After creating the package, place the .ppkg file in the following directory at the DVM installation location:
C:\Program Files (x86)\Accops\HyWorks Desktop Agent\AzureAdProvisioningPackage
Steps to Create a Provisioning Package
Note
Package creation can be done on any VM having prerequisites installed. It need not to be Gold master VM.
The VM should have active internet during package creation.
- Install Windows Configuration Designer (WCD) from the Microsoft Store.
- Open Windows Configuration Designer and select Provision desktop devices.
- A new project window opens. Provide the following details:
- Name – Project name
- Project folder – Location to save the project
- Description – Optional
- Enter a device name.
> This name is used only during package creation and will be ignored.
> The final name will be assigned by the Controller during Hyprep customization. - (Optional) Configure Wi-Fi network settings if required.
- Select Enroll in Azure AD.
- Enter a Bulk Token Expiry date and click Get Bulk Token.
- Token validity depends on the selected expiry date.
- Select No, sign in to this app only.
- Click Next after the bulk token is fetched successfully.
- Skip the following sections:
- Add applications
- Add certificates
- Click Create.
- The provisioning package will be created at the specified project location.
Registry Update
The following registry key must be updated on the Gold Master VM to ensure cloned VMs join the Azure Entra ID domain.
Registry Path:
Computer\HKEY_LOCAL_MACHINE\SOFTWARE\Accops\DVMAgent\AzureAdDomainJoin
Registry Value:
- Default Value:
0(Disabled) - Set to:
1(Enable Azure Entra ID domain join)
Network Level Authentication (NLA)
- Ensure Network Level Authentication (NLA) is disabled on the Gold Master VM.
Maintenance and Housekeeping Operations for HyID as Auth
This section covers administrative tasks related to Tenant ID management, authentication server recovery, and UAM service control in HyWorks.
- Generating a New Tenant ID and Service ID with Secret
- Re-Adding Authentication Server in HyWorks When Tenant Details Are Lost
- Stopping UAM Using Docker Commands
Generating a New Tenant ID and Service ID with Secret
This section explains the steps required to generate a new Tenant ID along with the corresponding Service ID and Secret for HyWorks authentication.
Steps to Execute:
-
Navigate to the artifact's directory:
cd artifacts/artifacts/
-
Run the configuration script:
./setup-config.sh
-
When prompted, enter only the following required MySQL parameters:
Enter MySQL host [localhost]: IP Address
Enter MySQL port [3306]:
Enter MySQL username: admin
Enter MySQL password: \<DB password of HySecure>
Enter MySQL database name: fesdb
-
Leave all other fields blank to automatically generate:
-
Tenant ID
-
Service ID
-
Service Secret
-
Re-Adding Authentication Server in HyWorks When Tenant Details Are Lost
Use this procedure when Tenant ID, Service ID, or Secret details are lost and the authentication server needs to be re-registered in HyWorks.
Steps to Retrieve Service Details from MySQL
-
Login to the MySQL CLI:
mysql -u admin -p
You will be prompted to enter the HySecure database password.
-
Select the HyWorks database:
USE fesdb;
-
Query the services table to retrieve stored authentication data:
SELECT * FROM services;
-
Note the following from the result:
-
Service ID - Required for reconfiguration.
-
Service Secret - Used for authentication.
-
Tenant ID - Link to the associated tenant (if needed).
-
Stopping UAM Using Docker Commands
This section describes how to stop the UAM (Unified Access Manager) services using Docker commands.
Key Docker Commands Using Container ID
List Running Docker Containers
To Get the ID from this command: docker container ls
Stop UAM Container
Gracefully stops the container: docker stop \<container Id>
Start Container Again
Starts the stopped container: docker start \<container Id>
Restart Container
Stops and starts the container: docker restart \<container Id>Check Container Status
docker container ls # Running containers
docker container ls -a # All containers
View Real-Time Logs
docker logs -f \<container Id>
Streams logs from the container.
UAM Upgrade for Future Releases
Objective
Replace the existing hyid-as-auth3.tar file with an updated version and re-run the setup-uam.sh script to apply changes.
Steps
-
Log in to the server where UAM is deployed.
-
Navigate to the artifact's directory:
cd artifacts/artifacts/
-
Verify the presence of the existing hyid-as-auth3.tar file:
ls
-
Remove or back up the current hyid-as-auth3.tar file if needed:
mv hyid-as-auth3.tar hyid-as-auth3.tar.bak
-
Copy or place the new hyid-as-auth3.tar file into the same directory.
-
Confirm the new file is present:
ls
-
Run the UAM setup script to apply the upgrade:
./setup-uam.sh
-
Monitor the script output to ensure the setup completes without errors.
-
Verify that all related services are running and functioning as expected.
Known Behavior or Limitations
Windows Version Requirement
- The provisioning package requires:
- Windows 10 Creators Update (build 1709) or later
- Windows 11
Same Username Across Different Domains
- Session management may fail when two users share the same username across different domains (e.g.,
user1@domain1.comanduser1@domain2.com). - In such cases:
- A random string is appended to the username.
- The session may not be correctly associated with the intended user.
Package Expiry
- The provisioning package cannot be used after its expiration date to join Azure Entra ID.
User ID Format
- User ID must be in UPN format only (e.g.,
username@domain.com).
Reference
https://learn.microsoft.com/en-us/entra/identity/devices/howto-vm-sign-in-azure-ad-windows