Configure Microsoft Entra ID (Azure AD) as an Identity Provider (IdP) for Accops HySecure
Purpose of the Document
This document provides step-by-step instructions to configure Microsoft Entra ID (formerly Azure AD) as a SAML Identity Provider (IdP) for Accops HySecure.
The configuration consists of the following two stages:
-
Configure Microsoft Entra ID
-
Configuring the SAML Identity Provider in HySecure
Note
The configuration values in this document are examples and may differ from those in your deployment.
Prerequisites
Before you begin, ensure the following prerequisites are met.
-
Microsoft Entra ID user account: Ensure you have one of the roles listed below:
-
Global Administrator
-
Cloud Application Administrator
-
Application Administrator
-
Owner of the service principal
-
-
Accops HySecure Gateway: Ensure you have the following details ready.
-
The public DNS name of the Accops HySecure Gateway
-
Valid SSL certificate installed on the gateway
-
-
Management console access: You should have access to the Accops HySecure Gateway management console using a Security Officer Account.
Configure the Microsoft Entra ID Application
To configure the Active Directory in Azure. Follow the steps given below:
-
Access the Azure Portal
-
Log in to Azure Portal.
-
Navigate to Microsoft Entra ID > Enterprise applications.

-
-
Create a new application
-
Select New Application.
-
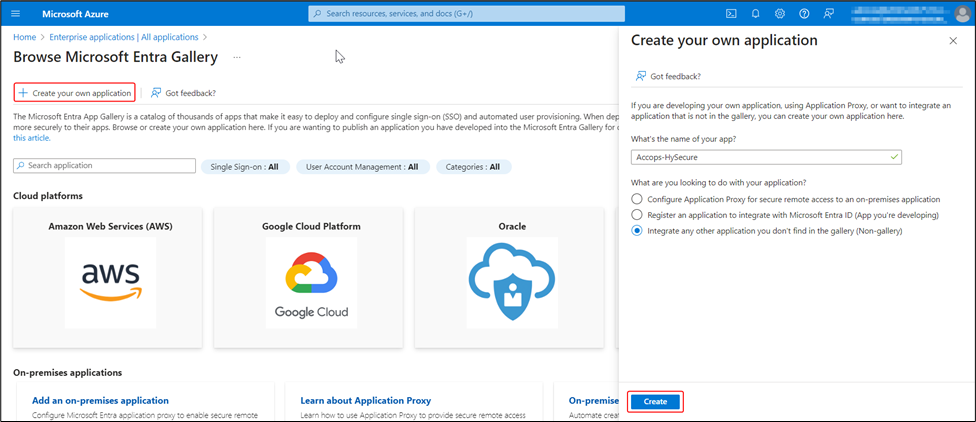
Select Create your own application, specify an application name, and then click Create.
-
-
Configure Single Sign-On (SSO)
-
Navigate to Manage > Single sign-on.
-
Choose SAML to open the SSO configuration page.

-
-
Configure Basic SAML
-
Select Edit, configure the Basic SAML settings as shown below, and then save the configuration.
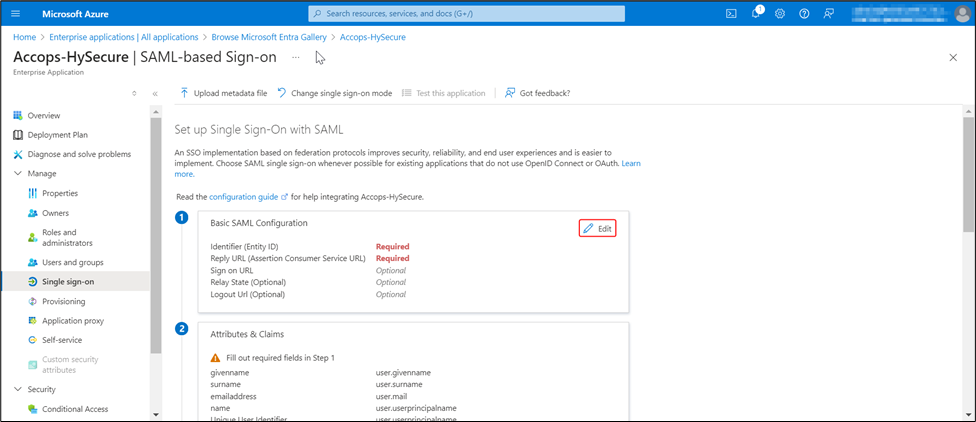
Field Example Identifier (Entity ID) https://hysecure.accops.xyz Reply URL (Assertion Consumer Service URL) https://hysecure.accops.xyz/saml-idp/EntraID Sign on URL https://hysecure.accops.xyz/saml-login/EntraID Relay State (Optional) https://hysecure.accops.xyz Logout URL (Optional) https://hysecure.accops.xyz/saml-slo/EntraID -
Save the configuration and verify the configured SAML settings before proceeding.

-
-
Download the SAML Certificates
-
Download the Certificate (Raw) and Federation Metadata XML files for use during the HySecure configuration.
-
Record the following values for use when configuring HySecure:
-
Login URL
-
Microsoft Entra Identifier
-
Logout URL

-
-
-
Assign User/Group
-
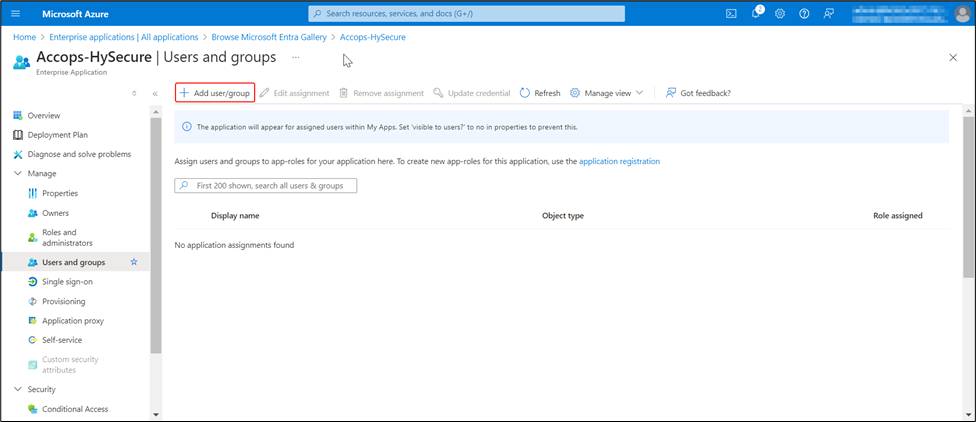
Assign users or groups who require access via SAML Single Sign-On (SSO).
-
-
Copy Application Details
-
Navigate to Microsoft Entra ID > App Registrations, select the application you created and copy the following values:
-
Application (client) ID
-
Object ID
-
Directory (tenant) ID

-
-
-
Create Secrets
-
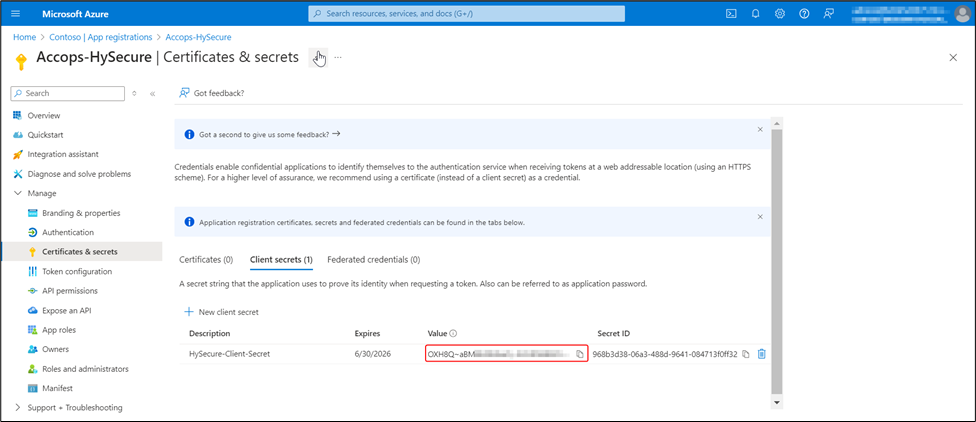
Create a Client Secret for the application.

-
-
Copy the client secret value immediately after it is created.
-
Configure Token Claims
-
Navigate to Token Configuration. Select Add groups claim.
-
Under the Add groups claim section, select Security groups.

-
-
Configure Microsoft Graph API permissions.
-
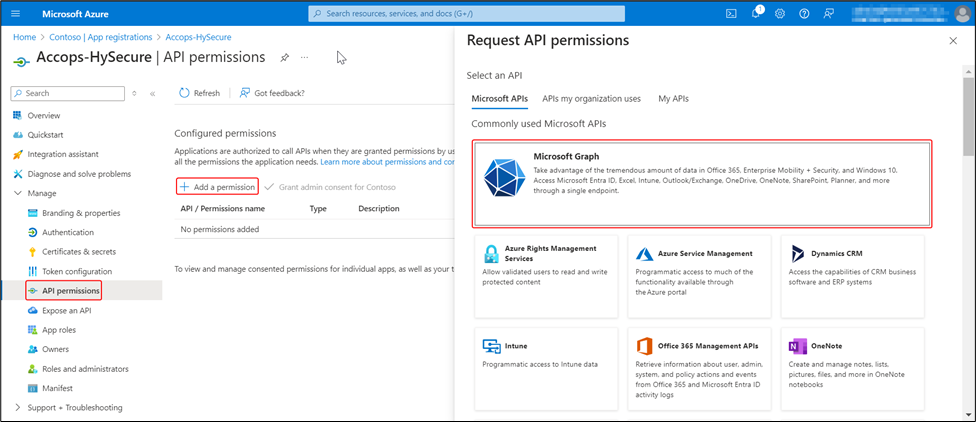
Select API permissions > Add a permission.
-
Select Request API permissions > Microsoft Graph.
-
-
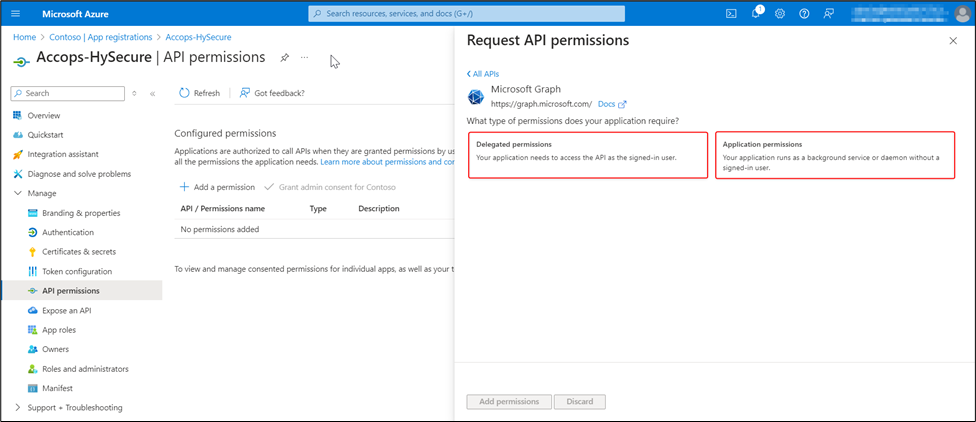
Configure the necessary API permissions.
-
Select Delegated permissions and Application permissions, as shown below.
-
Application permissions: Allow the application to access resources directly without a signed-in user.
Application Permissions Description Group.Read.All Read all groups. GroupMember.Read.All Read group memberships. User.Read.All Read all users' basic profiles. Note
When an on-premises Active Directory is synchronized with Microsoft Entra ID using Microsoft Entra ID Connect or Entra Cloud Sync, the application requires OnPremisesSynchronization.Read.All permission. This permission allows the application to read the on-premises directory synchronization settings without granting the ability to modify them.
-
Delegated Permissions: Allow the application to access resources on behalf of a signed-in user.
Delegated Permissions Description Email Access the user’s email address. Profile Access the user’s basic profile information.
-
-
Grant admin consent
-
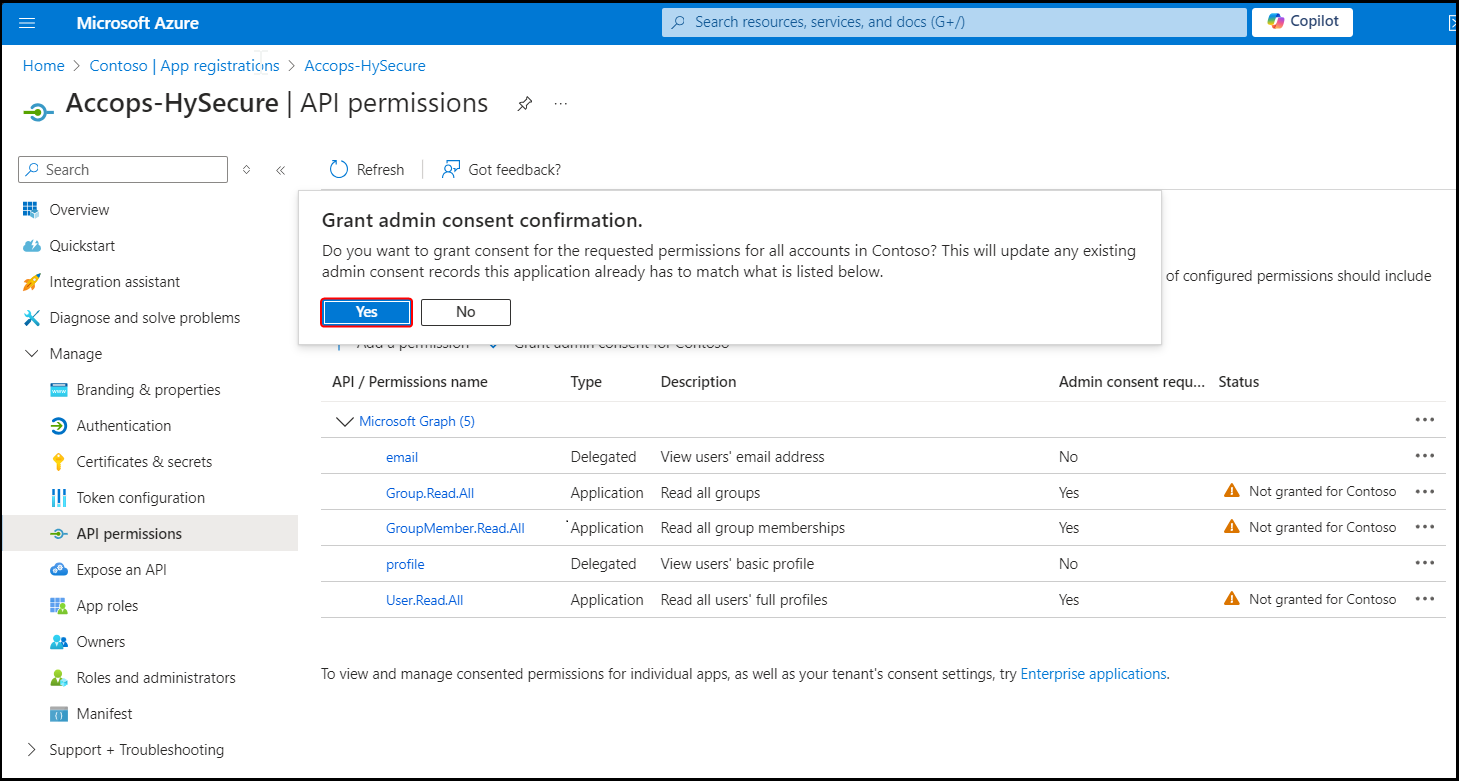
Once the permissions are added, select Grant admin consent for [Your Organization] to grant admin consent for the permissions. It authorizes the application to access the specified resources on behalf of all users in the organization.
-
Confirm the consent request when prompted.
-
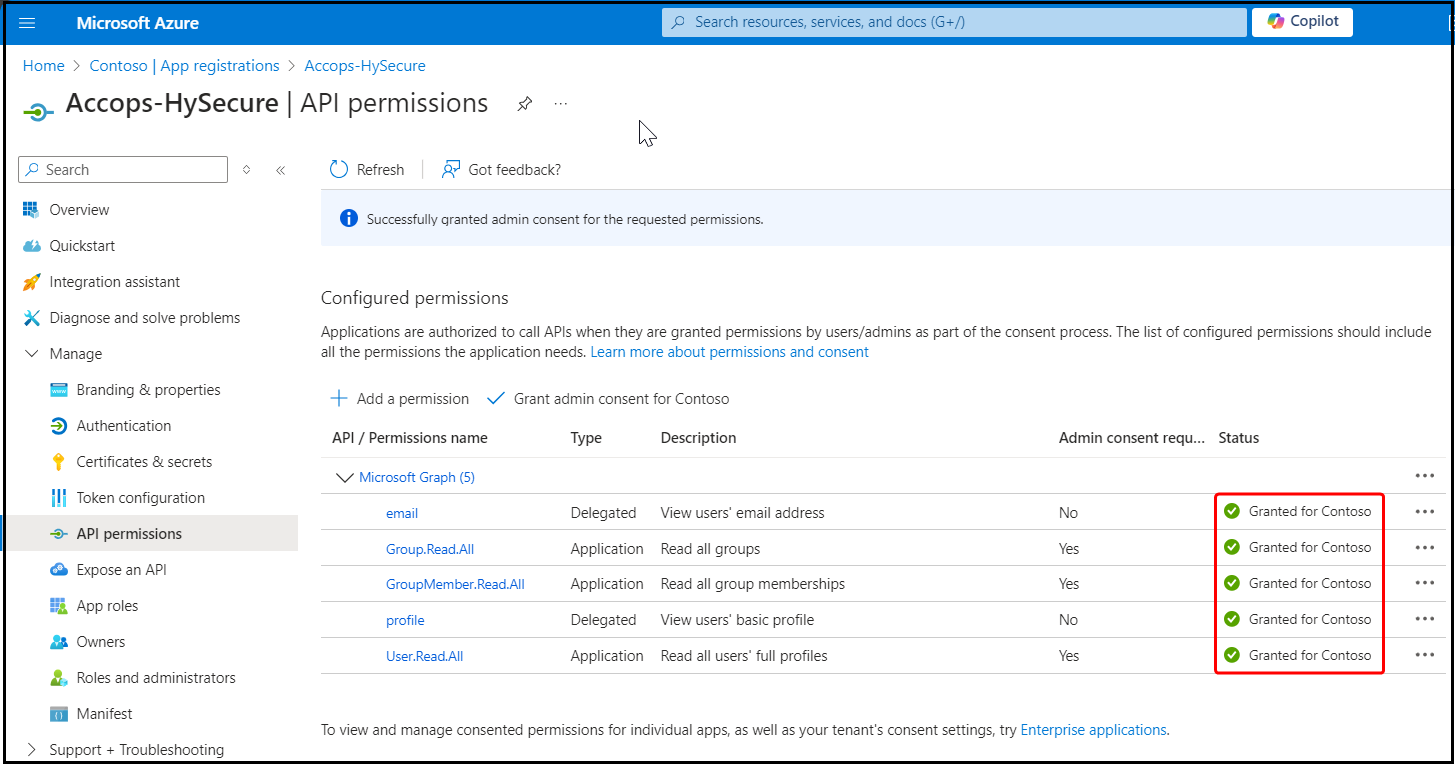
The permissions Status will change to Granted for [Your Organization].
-
This completes the Microsoft Entra ID configuration. Next, configure HySecure to use Microsoft Entra ID as the SAML Identity Provider.
Configure the SAML Identity Provider in HySecure
-
Access the HySecure Management Console
-
Log in to the HySecure Management Console.
-
Navigate to Settings > Authentication > Authentication Servers to create a new Authentication Server for the SAML Identity Provider (IdP). For more information, click here.
-
Enter the details as shown below.
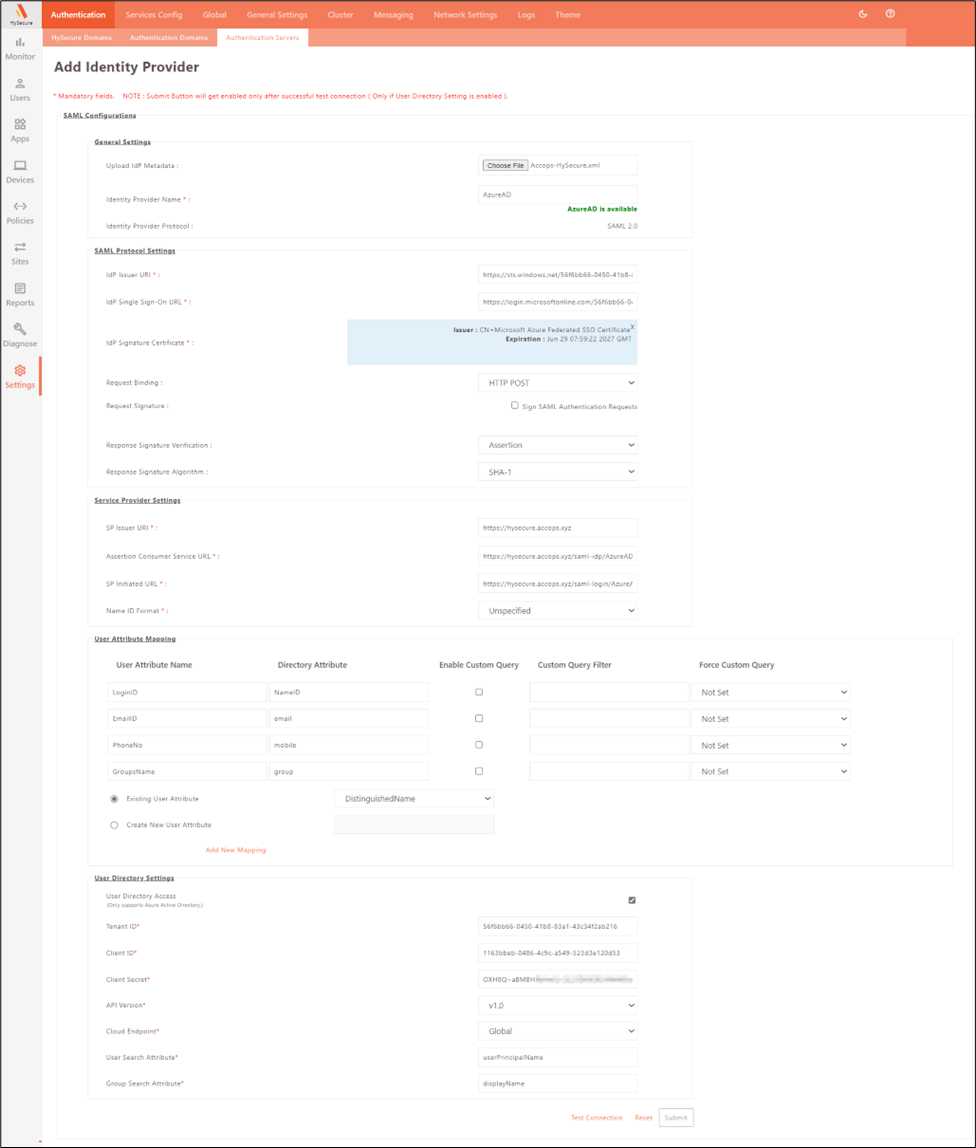
General Settings:
Field Sample value Description Upload IdP Metadata Accops-HySecure.xml Metadata downloaded from the Microsoft Entra ID single sign-on application. Identity Provider Name EntraID Name of the IdP. Identity Provider Protocol SAML 2.0 SAML Version. Note
Ensure the Identity Provider Name matches the one in the IdP Basic SAML Configuration and is used as the post-suffix for the Reply URL (Assertion Consumer Service URL), Sign-on URL, and Logout URL (Optional).
SAML Protocol Settings:
Field Sample value Description IdP Issuer URI https://sts.windows.net/56f6bxxx-04xx-41xx-83xx-43xxxxxxxxxx/ Microsoft Entra ID Identifier IdP Single Sign-On URL https://login.microsoftonline.com/56f6bxxx-04xx-41xx-83xx-43xxxxxxxxxx/saml2 IdP Login URL IdP Signature Certificate - IdP SAML Certificate Request Binding HTTP-POST - Request Signature - - Response Signature Verification Assertion - Response Signature Algorithm SHA-1 SHA-1 or SHA-256 algorithm can be used Service Provider Settings:
Field Sample value Description SP Issuer URI https://hysecure.accops.xyz Accops HySecure Gateway Address Assertion Consumer Service URL https://hysecure.accops.xyz/saml-idp/EntraID - SP Initiated URL https://hysecure.accops.xyz/saml-login/EntraID - Name ID Format Unspecified - User Attribute Mapping:
User Attribute Name Directory Attribute LoginID NameID EmailID Email PhoneNo Mobile GroupsName Group User Directory Services: Enable this option to retrieve users and user groups from Microsoft Entra ID when creating user- or user group-specific access policies using the configured SAML Identity Provider as the Authorization Server. Configure the following settings:
-
Tenant ID: Enter the Directory (Tenant) ID recorded while registering the application in the Azure portal.
-
Client ID: Enter the Application (Client) ID recorded while registering the application in the Azure portal.
-
Client Secret: Enter the client secret generated during Microsoft Entra ID application configuration.
-
API version: Select v1.0.
-
Cloud Endpoint: Select Global.
-
User Search Attribute: Select the Microsoft Entra ID user attribute that HySecure will use to search and retrieve users.
-
Group Search Attribute: Select the Microsoft Entra ID group attribute that HySecure will use to search and retrieve user groups. If the SAML Identity Provider is used only for authentication, leave this option disabled.
-
-
-
Verify the SAML Connection
-
Click Test Connection in the HySecure Management Console to verify connectivity between Microsoft Entra ID and Accops HySecure.
-
Ensure the test completes successfully and confirm that the SAML integration is functional.
-
-
Configure Authentication Domain
-
Navigate to Settings > Authentication > Authentication Domain in the HySecure Management Console, then click Add to create a new Authentication Domain or modify an existing one.
-
Under the Server at Priority 1 field, select the respective Authentication Server (EntraID). For more information, click here.
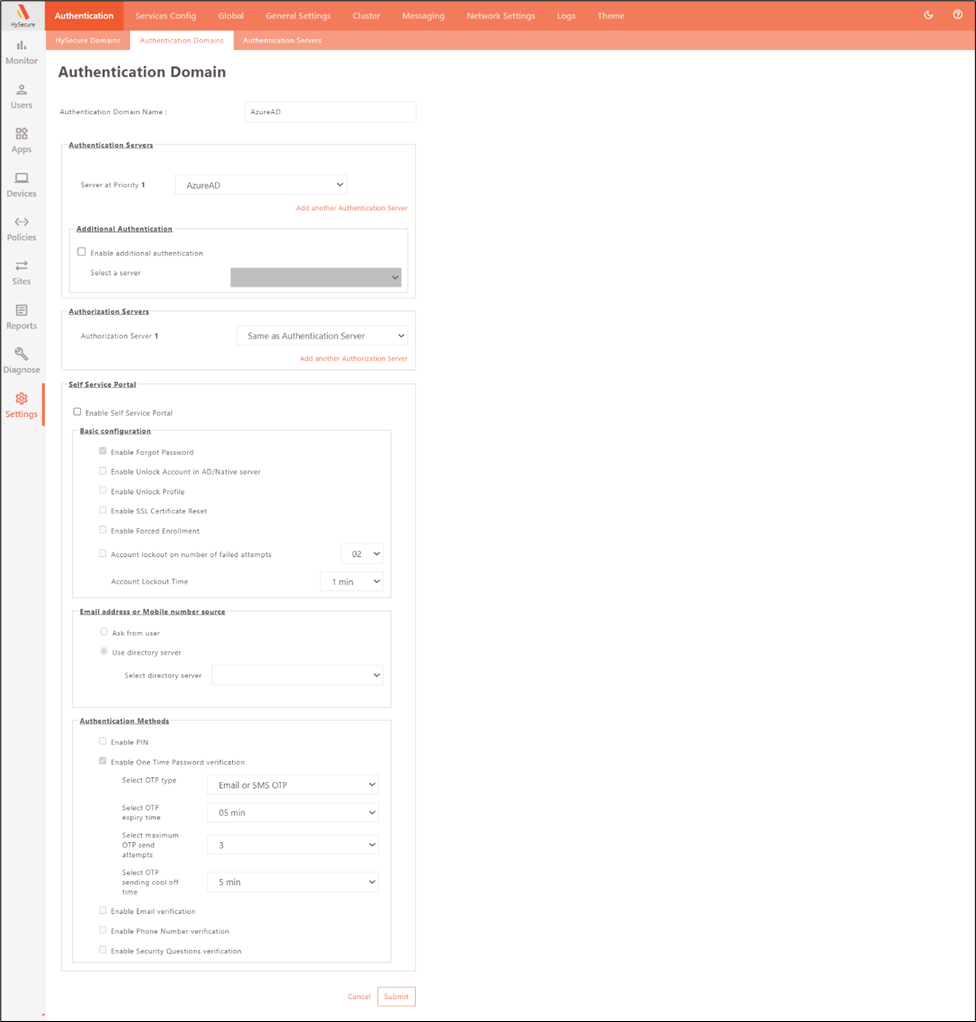
-
-
Configure HySecure Domain
-
Navigate to Settings > Authentication >HySecure Domain, click Add to create a new or modify an existing HySecure domain.
-
Select the respective Authentication Domain (EntraID) under the Select Authentication Domain field. For more information, click here.
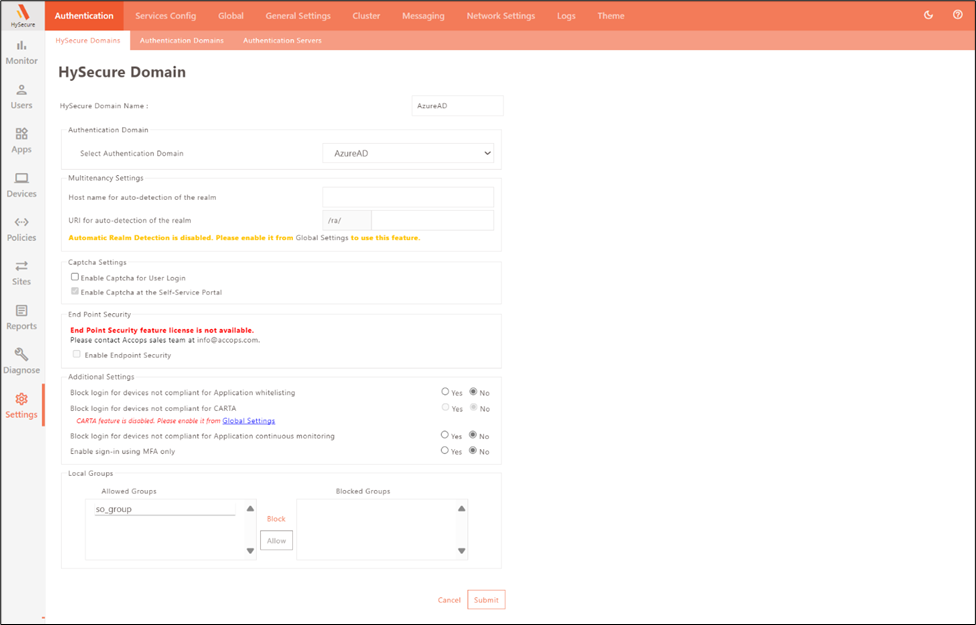
-
-
Configure Application and Application Access ACL
-
Navigate to Apps > Apps, then click Add to create an application to assign to end users and user groups.
-
Navigate to Apps > App Groups, click Add to create an application group, and add the required applications to the App Group.
-
Navigate to Policies > ACL and click Add to create a new Application Access ACL.
-
Configure the ACL with the following settings:
-
ACL Type: Application Access.
-
HySecure Domain: Select the HySecure domain created earlier.
-
Authorization Server: Select the SAML Identity Provider.
-
Users/User Groups: Search for and add the required users or user groups.
-
Application Group: Select the appropriate application group
For more information, click here.
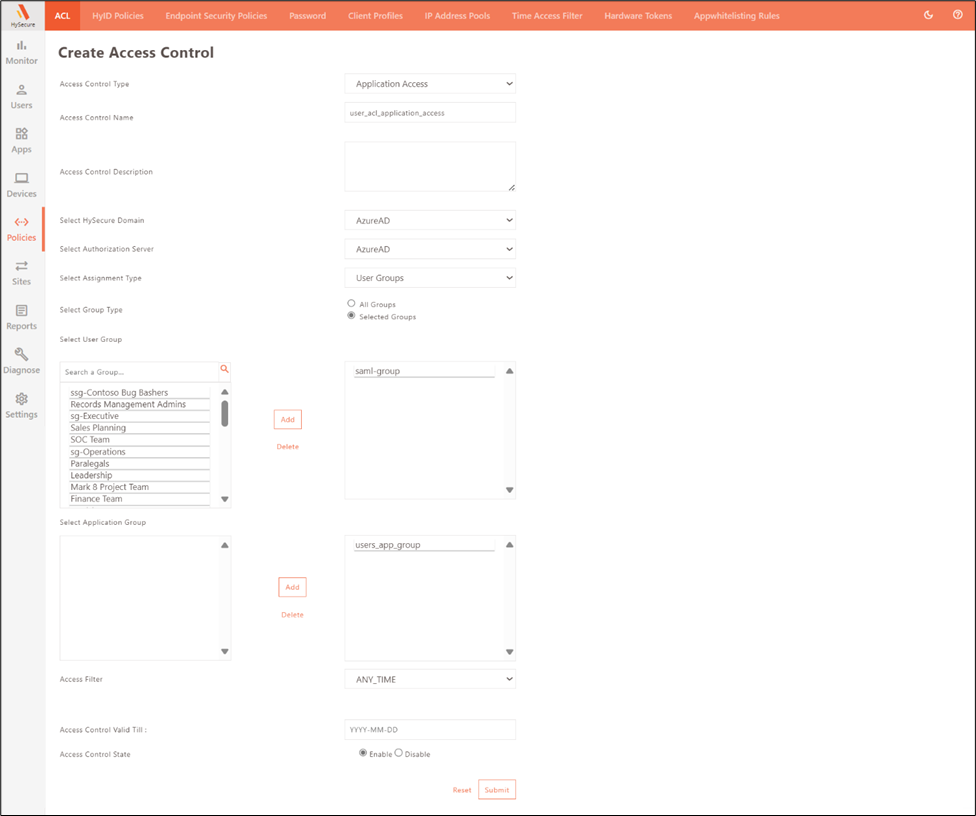
Field Sample value Description Select HySecure Domain EntraID The domain within Accops HySecure uses Microsoft Entra ID for authentication. Select Authentication Domain EntraID The domain for verifying user credentials is configured for Microsoft Entra ID. Selected Group - A specific group of users within HySecure with access to the resources, mapped to Microsoft Entra ID security groups. Select User Group - The user group within HySecure is used to manage and assign collective permissions corresponding to Microsoft Entra ID user groups. Select Application Group - A group of applications within HySecure is assigned collective access permissions, facilitating efficient management. -
-
-
Configure Sites
- Configure the required site in the HySecure gateway so it is accessible via SAML authentication. For more information, click here.

This completes the HySecure configuration for Microsoft Entra ID-based SAML authentication.
Users can now authenticate to HySecure using Microsoft Entra ID through SAML and access the configured resources based on the assigned authentication domain, HySecure domain, and ACL policies.