HySecure DC DR Sync Configuration Guide
Applies To: HySecure Gateway 7.2 and above
Category: Disaster Recovery / High Availability
Overview
This guide explains how to configure DC DR (Data Center - Disaster Recovery) synchronization via the HySecure management console. DC DR sync enables unidirectional synchronization of user configuration and policies from the Data Center to Disaster Recovery sites, ensuring DR site readiness for failover scenarios.
Key Capabilities:
-
Unidirectional sync from DC to DR (data flows DC > DR only).
-
Multiple DR site support (comma-separated virtual IP Addresses).
-
Flexible scheduling: daily sync or regular intervals.
-
Selective configuration sync with recommended or custom feature sets.
-
Token-based secure authentication between sites.
-
Post-recovery DR > DC synchronization support.
Prerequisites
System Requirements:
-
HySecure Gateway 7.2 or higher must be deployed on both DC and DR sites
-
Network connectivity between DC and DR sites
-
Security Officer or Administrator access credentials
Access Requirements:
-
All configurations performed via the Active config node on both DC and DR sites
-
SSH access not required (console-based configuration)
Planning Considerations:
-
The DR restore schedule must be at least 5 minutes later than the DC sync schedule.
-
Both the Data Center (DC) and Disaster Recovery (DR) sites require virtual IP addresses.
-
The token generated on the DC site must be uploaded to the DR site.
Configuration Workflow
Part 1: Configure Data Center (DC) Site
Prerequisites:
-
Log in using the Active node IP address (not Virtual IP).
-
Obtain the DR site Virtual IP address.
Step 1: Access DC DR Configuration
-
Log in to the HySecure management console
-
Connect to the Active node IP address as the Security Officer/Administrator.
-
Navigate to Sites > DC DR > DC-DR Configuration.
-
-
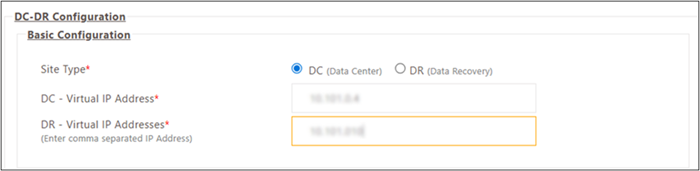
Set Site Type
- Under Basic Configuration, select the Site Type as DC (Data Center).
-
Configure Virtual IP Addresses
-
The virtual IP address for the DC will be auto-populated in the DC – Virtual IP Address field.
-
Enter the DR Site cluster virtual IP address in the DR – Virtual IP Address field.
-
For multiple DR sites: Enter virtual IP addresses separated by a comma.
-
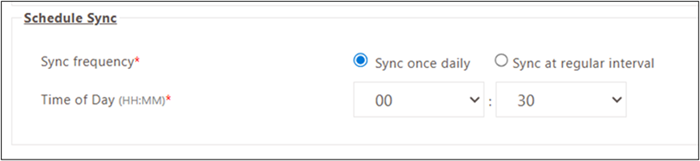
Step 2: Schedule Synchronization
Choose one scheduling option:
Option A: Sync Once Daily
When to use: Configuration and data changes are infrequent, and daily synchronization is sufficient.
-
Select the Sync once daily option.
-
Set Time of Day
-
Select a specific time for daily synchronization.
-
Example: 00:30 (12:30 AM) for daily sync at that time.
-
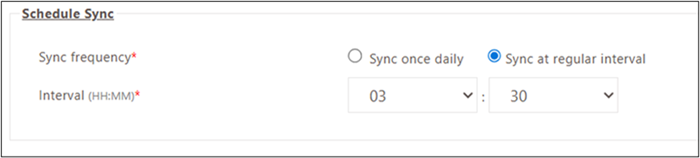
Option B: Sync at Regular Interval
When to use: Frequent configuration and data changes require more frequent synchronization.
-
Select the Sync at regular interval option.
-
Set Interval
-
Select hours and minutes using the dropdown.
-
Example: 3 hours and 30 minutes for sync every 3.5 hours.
-
Step 3: Configure Advanced Settings
Recommendation: Retain the default configuration unless HySecure configuration expertise is available. Modifying the Advanced Settings requires a deep understanding of backup/restore mechanisms.
Configurable Parameters:
-
Number of backups to keep: Count of backup files retained for restoration operations (default recommended).
-
Backup folder location: Absolute directory path where sync backup files are stored (default: system-defined path).
-
Consider Backup within last: Time window in minutes to consider backup files for synchronization (default: system-defined value).

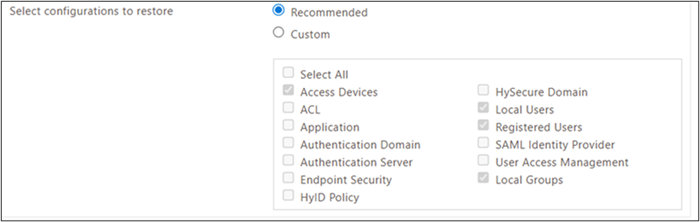
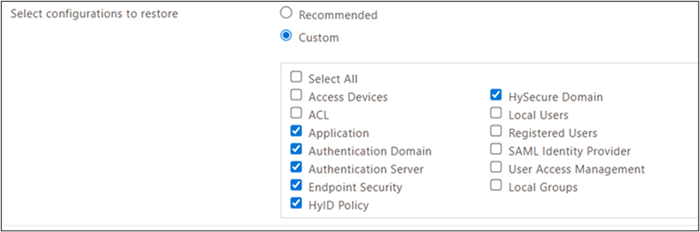
Step 4: Select Configurations to Sync
Choose one configuration option:
Option A: Recommended Configuration (Simplified)
When to use: Standard DC DR setup with essential features only.
-
Select the Recommended Configuration option.
-
Review included features (non-editable):
-
Registered Users
-
Access Devices
-
Local Users
-
Local Groups
Option B: Custom Configuration (Advanced)
When to use: Specific feature synchronization requirements beyond essential features.
-
Select the Custom Configuration option.
-
Choose features for synchronization
-
Select specific features from the available list.
-
Dependent features automatically included (can be deselected if not required).
-
-
Review selections before proceeding. Click Submit.
Step 5: Generate and Download Token
-
Click the Download token button
-
The Token file downloads to the local system.
-
This Token is required for the DR site configuration.
-
-
Secure Token file
-
Store the Token securely for the DR site upload.
-
Token establishes secure communication between DC and DR sites.
-
Part 2: Configure Disaster Recovery (DR) Site
Prerequisites:
-
DC Site configuration completed.
-
Token file downloaded from the DC Site.
-
Log in using the Active node IP address (not Virtual IP).
Step 1: Access DR Site Configuration
-
Log in to the HySecure Management Console
-
Connect to the Active node IP address as the Security Officer/Administrator.
-
Navigate to Sites > DC DR > DC-DR Configuration.
-
-
Set Site Type
- Under Basic Configuration, select Site Type as DR (Data Recovery).
-
Configure Virtual IP Addresses
-
Enter the DC Site cluster virtual IP address in the DC – Virtual IP Address field.
-
DR Virtual IP Address populated automatically.
-
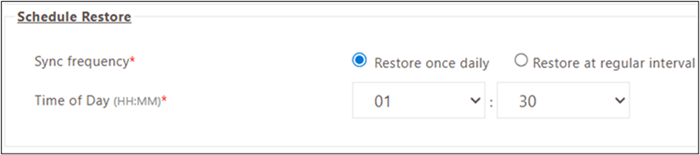
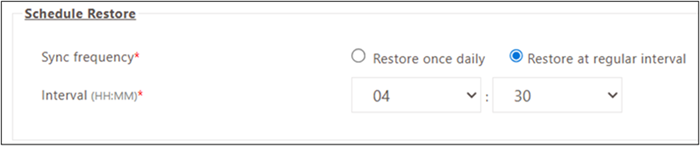
Step 2: Schedule Restore
Critical: DR restore schedule must be at least 5 minutes later than DC sync schedule
Choose one scheduling option:
Option A: Restore Once Daily
When to use: Daily synchronization pattern matching the DC sync schedule.
-
Select the Restore once daily option.
-
Set Time of Day
-
Select a specific time for daily restoration.
-
Example: 01:30 (1:30 AM) - 60 minutes after DC sync at 00:30.
-
A minimum of a 5-minute gap from DC sync time is required.
-
Option B: Restore at Regular Interval
When to use: Regular interval synchronization matching the DC sync pattern.
-
Select the Restore at regular interval option.
-
Set Interval
-
Select hours and minutes using the dropdown.
-
Example: 4 hours and 30 minutes.
-
Ensure the interval allows a minimum 5-minute gap after DC sync completion.
-
Step 3: Configure Advanced Settings
Important: Keep the advanced configurations the same as the DC Site for consistency.
-
Configure identical parameters as the DC Site Advanced Settings.
-
Maintain consistency in backup retention and timing parameters.
Step 4: Upload Token
-
Click the Upload token button.
-
Select token file
-
Browse to the token file downloaded from the DC Site.
-
Upload the token to establish secure communication.
-
-
Verify token upload
-
Confirm successful token upload message.
-
Token establishes a necessary seamless communication channel between DC and DR sites.
-
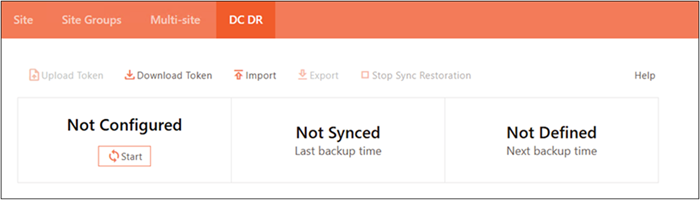
Part 3: Operational Procedures
Enable DC DR Sync
Perform on both DC and DR sites:
-
Log in to the HySecure Gateway
- Access the Active node IP address as the Security Officer/Administrator.
-
Navigate to the DC DR section
- Navigate to Sites > DC DR
-
Start synchronization
-
Click the Start button.
-
Synchronization activates based on the configured schedule.
-
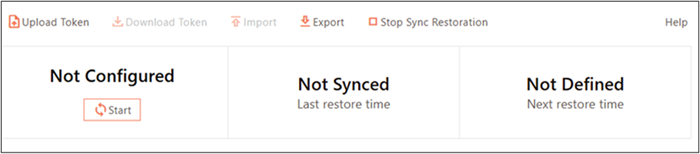
Verification:
- Confirm sync status shows Active or Running.
- Monitor first sync cycle completion.
Disable DC DR Sync
Perform on both DC and DR sites when sync is no longer required:
-
Log in to the HySecure Gateway
-
Security Officer or Administrator credentials.
-
Access via the Active node IP address.
-
-
Navigate to the DC DR section
- Navigate to Sites > DC DR.
-
Stop synchronization
-
Click the Stop button.
-
Synchronization disabled immediately.
-
Post-Disable Actions:
-
Verify sync status shows Stopped or Inactive
-
No automatic synchronization occurs after disabling.
Post-Recovery Synchronization from DR to DC
Scenario: DC Site was offline, DR Site operated as the primary gateway. After DC Site recovery, synchronize the configuration and user data created during DC downtime back to DC Site.
Workflow:
On DR Site:
-
Log in to the DR Site
-
Security Officer or Administrator credentials.
-
Access via the Active node IP address.
-
-
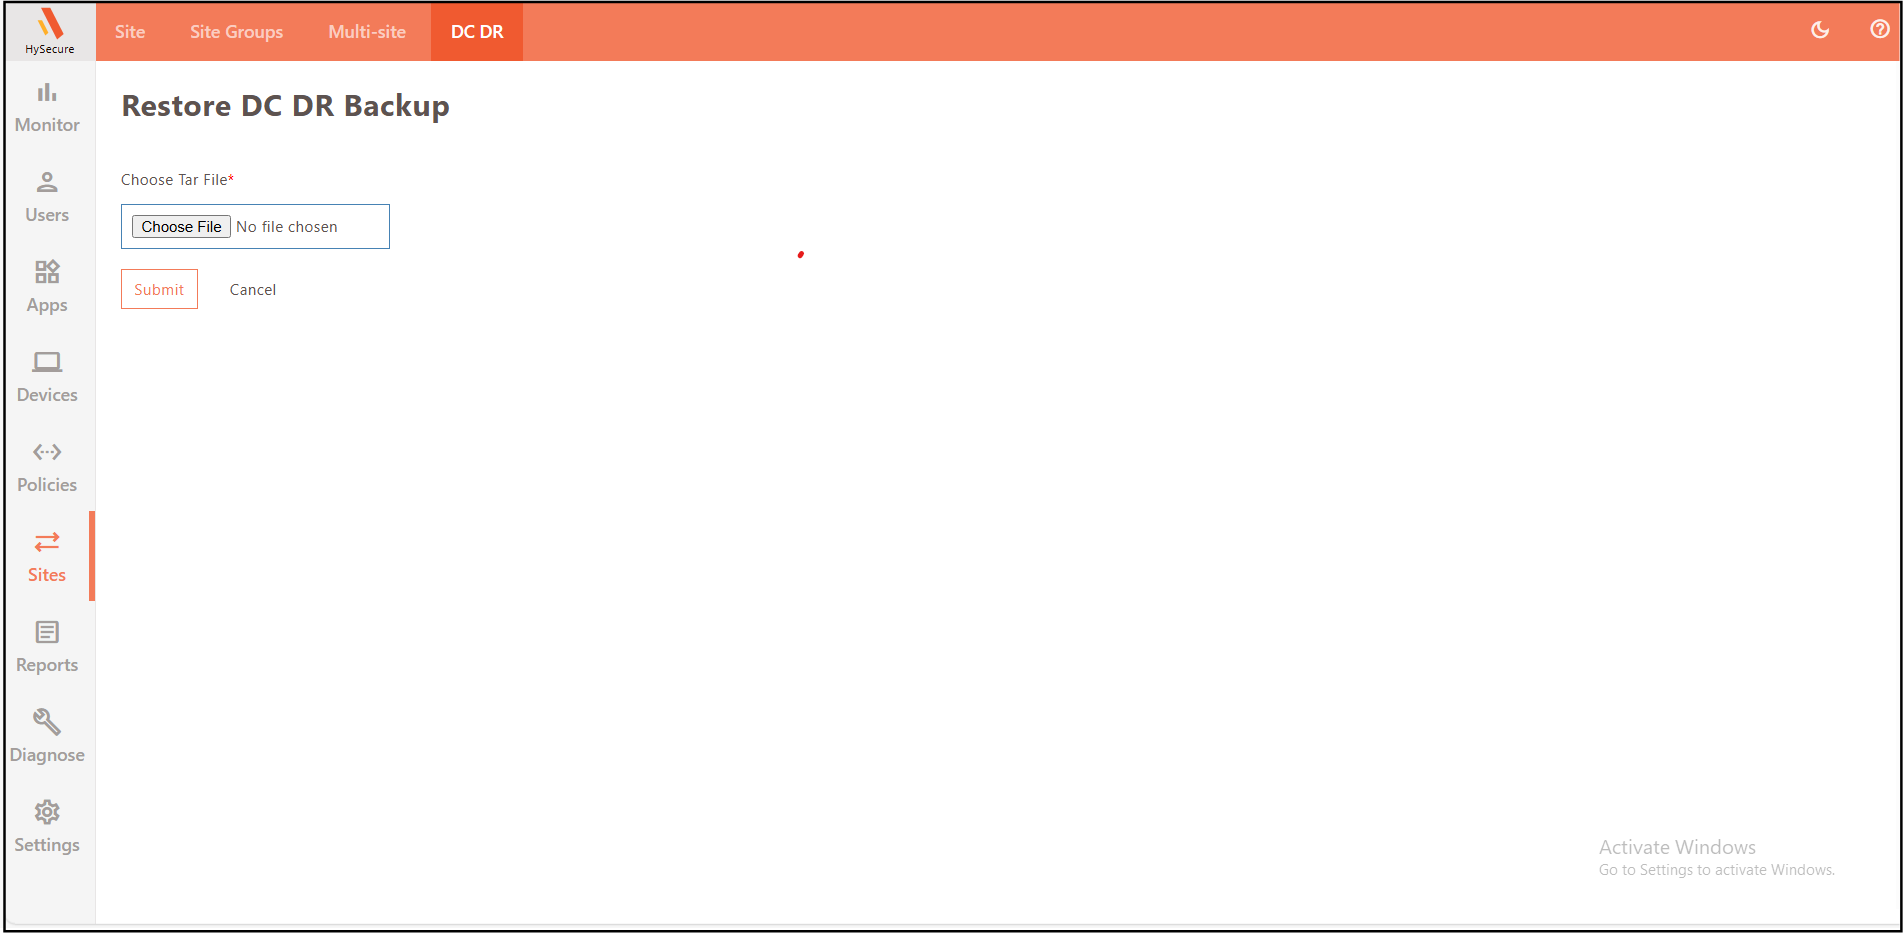
Export the latest backup
-
Navigate to Sites > DC DR.
-
Click the Export button.
-
Download the latest backup file to the local system.
-
On DC Site:
-
Log in to the DC Site
-
Security Officer or Administrator credentials.
-
Access via the Active node IP address.
-
-
Import DR backup
-
Navigate to Sites > DC DR.
-
Click Import.
-
Select and upload the backup file downloaded from the DR Site.
-
-
Verify import
-
Confirm successful import message.
-
Configuration and user data created during DC downtime are now synchronized to the DC Site.
-
Result: DC Site updated with all configuration changes and user data created while DC Site was offline.
DC-DR Site Switchover
Steps to switch between DC and DR Sites
Disabling Synchronization Before DC-DR Site Switchover
Follow the steps listed below on both DC and DR sites to disable synchronization before switching roles, ensuring that no incorrect data is synced during the process:
-
Log in as Security Officer/Administrator.
-
Navigate to Sites > DC DR, click Stop to disable synchronization among DC and DR Sites.
Converting DR to DC
-
Log in as Security Officer/Administrator.
-
Navigate to Sites > DC DR. Change Site Type to DC.
-
Enter the DR Virtual IP Address. DC Virtual IP Address will be auto-populated.
-
Schedule Sync as described in the earlier section.
-
Configure Advanced Settings, if required.
-
Click Submit to save the configuration.
-
Click Download token to download the token.
Converting DC to DR
-
Navigate to Sites > DC DR. Change Site Type to DR.
-
Enter the DC Virtual IP Address, DR Virtual IP Address will be auto-populated.
-
Schedule Restore as described in the earlier section.
-
Configure Advanced Settings, if required.
-
Click Submit to save the configuration.
-
Click Upload token to upload the token downloaded from the DC Site.
Starting Synchronization
Follow the steps on both DC and DR Sites:
-
Log in as Security Officer/Administrator.
-
Navigate to Sites > DC DR, click Start to enable synchronization among DC and DR Sites.
Known Limitations
The following modules related to the available sync configuration will not sync with the DC Site:
-
Custom Client Configuration
-
Turbo Interface
-
IP Address Pools: Turbo Tunnel & App Tunnel
-
FIDO Tokens & PC Tokens
-
Anonymous Users
-
Azure AD User Directory Configuration
-
Host Scan Policies:
-
Operating System
-
Security Agent
-
Encryption Agent
-
-
External MDM Configuration
Configuration Parameters Reference
Sync Schedule Options
Sync Once Daily:
-
Configuration synchronized once per day at a specified time.
-
Use for environments with infrequent configuration changes.
-
Lower network utilization.
-
Time specified in 24-hour format.
Sync at Regular Interval:
-
Configuration synchronized at defined intervals (hours and minutes).
-
Use for environments with frequent configuration changes.
-
Higher network utilization based on interval frequency.
-
Interval range: configurable via dropdown selections.
Restore Schedule Considerations
Timing Requirement:
-
DR restore must occur a minimum of 5 minutes after DC sync completes.
-
Ensures DC sync fully completes before DR restore begins.
-
Prevents restore timing conflicts.
Recommended Gap:
-
30-60 minutes between DC sync and DR restore for large configurations.
-
Allows adequate time for DC sync completion and network stability.
Feature Selection Guidelines
Recommended Configuration Features:
-
Registered Users: User accounts registered on the gateway.
-
Access Devices: Device registrations and fingerprints.
-
Local Users: Locally defined user accounts.
-
User Groups: Local user group definitions.
Custom Configuration Considerations:
-
Select only features requiring synchronization.
-
Dependent features are automatically included.
-
Review dependencies before deselecting auto-included features.
-
More features = longer sync time and higher network utilization.
Advanced Settings Parameters
Number of backups to keep:
-
Default value recommended for most deployments.
-
Higher value = more storage consumption.
-
Lower value = fewer recovery point options.
Backup folder location:
-
Default system path recommended.
-
Custom path requires adequate storage space.
-
Path must exist on all cluster nodes.
Consider Backup within the last (minutes):
-
Default value recommended.
-
Defines the freshness window for backup consideration.
-
Lower value = more frequent backup generation.
Important Notes
Synchronization Behavior
Unidirectional Sync:
-
Normal operations: Data flows DC > DR only.
-
Post-recovery: Manual export/import required for DR > DC sync.
-
No automatic bidirectional synchronization.
Sync Scope:
-
Only selected features synchronized.
-
Configuration changes outside selected features are not synchronized.
-
Logs not synchronized (only configuration and user data).
Multiple DR Sites:
-
A single DC Site can sync to multiple DR Sites.
-
Enter comma-separated DR virtual IP addresses in the DC configuration.
-
Each DR Site is configured independently with the same token.
Backup and Recovery
Configuration Backup Limitation:
-
DC DR Sync configuration not included in User Backup.
-
DC DR Sync configuration not included in Whole System Backup.
-
Reconfigure DC DR Sync after restoring backups.
Sync Failure Handling:
-
Failed sync attempts are logged in system logs.
-
Next scheduled sync occurs regardless of previous failure.
Network and Connectivity
Network Requirements:
-
Stable network connectivity between DC and DR sites is required.
-
Firewall rules must permit communication.
-
VPN or dedicated connection recommended for security.
Virtual IP Accessibility:
-
DC and DR virtual IPs must be mutually accessible.
-
DNS resolution not required (IP addresses used directly).
-
Verify connectivity before configuring DC DR Sync.
Performance Considerations
Sync Duration:
-
Depends on the selected features and data volume.
-
Large user populations increase sync time.
-
Network bandwidth affects sync completion time.
Resource Utilization:
-
Sync operations consume CPU and network bandwidth during execution.
-
Schedule sync during low-usage periods when possible.
-
Monitor system resources during the first sync cycles.
Operational Best Practices
Initial Setup:
-
Test DC DR Sync in a non-production environment first.
-
Verify sync completion before relying on the DR site.
-
Document sync schedule and configuration selections.
Ongoing Operations:
-
Monitor sync logs regularly for failures.
-
Test the DR site functionality periodically.
-
Update the DR restore schedule when changing the DC sync schedule.
Disaster Recovery Testing:
-
Perform regular DR failover tests.
-
Verify the DR site currency with the DC site.
-
Test post-recovery synchronization procedures.
Token Management:
-
Store the DC DR token securely.
-
Regenerate the token if security is compromised.
-
Update the token on all DR sites if regenerated.
Troubleshooting Common Issues
Sync Not Starting
Symptoms: DC DR Sync status remains stopped or inactive.
Resolution:
-
Verify the Start button is clicked on both DC and DR sites.
-
Check NTP synchronization on all nodes.
-
Verify network connectivity between DC and DR sites.
-
Review system logs for error messages.
Sync Timing Conflicts
Symptoms: DR restore begins before DC sync completes.
Resolution:
-
Increase the gap between DC sync time and DR restore time (minimum 5 minutes, recommend 30+ minutes).
-
Adjust the DR restore schedule to allow adequate DC sync completion time.
-
Monitor sync duration to determine the appropriate gap.
Configuration Not Syncing
Symptoms: The DR site does not reflect the DC site configuration changes.
Resolution:
-
Verify the feature included in the sync configuration selection.
-
Review sync logs on both sites for errors.