Installing Accops Offline Package
This step for Linux VDI server preparation is mandatory for Linux dedicated VM preparation.
To get details of currently installed packages, run the following command:
\~\$ cat /opt/Accops/linuxVDIVersion.txt
[LinuxVDI]
OSname=AccopsLinuxVDI
Version=u9
BuildDate=04092018
Here the tag BuildDate indicates the offline package version.
Download OS-specific Packages
It is critical to download packages specific to OS being deployed:
- Offline packages of Ubuntu: Applicable for Ubuntu-GNOME VMs and Accops Linux SHD Servers
- Offline packages of CentOS: Applicable for CentOS-GNOME VMs
The package name uses following format: OSName_offline_VersionNumber_LinuxVDI_Tag.tgz e.g. ubuntu16_offline_13082019_linuxvdi_hyshell.tgz for Ubuntu/ Linux SHD Server and centos7_offline_04122019_linuxvdi.tgz for CentOS
Offline Package Installation process
Accops offline package installation process is same for both Ubuntu and CentOS except:
-
For Ubuntu, the package supports online mode for installation of dependency packages, if the OS version does not match the recommended version [v16.04.3]
-
For CentOS, the package supports only offline mode only for minor versions 1708 and 1804 only. It will not prompt or install dependency packages over the internet.
Follow the below given steps for installing Accops Offline Package:
-
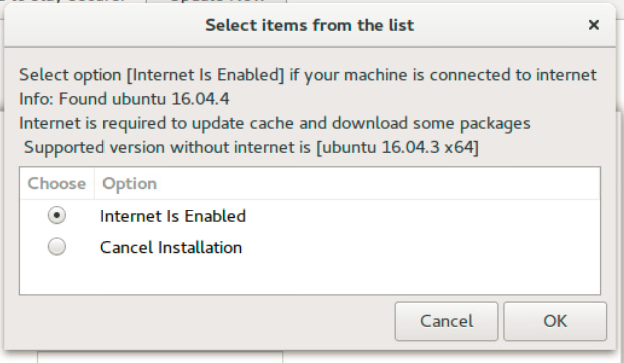
Enable internet on the Linux VDI machine to update cache and download packages while installing offline package
-
Copy offline package to user's home directory
-
Open Terminal and execute below commands in terminal: > cd /home/[USER]/
-
Execute below given commands to extract all the required packages in a directory with package name:
tar -xvf \<Accops Offline package.tgz>
> e.g. tar -xvf ubuntu16_offline_13082019_linuxvdi_hyshell.tgz -
Execute Command:
cd \<Accops Package Name>
e.g. cd ubuntu16_offline_13082019_linuxvdi_hyshell
-
Execute the following command if you have sudo rights. If you do not have sudo rights change the user context using command 'su adminusername' before executing the command.
sudo ./execute_installer.sh
-
Once the Package installation starts, you will be prompted to choose some options as:
-
Installation script will verify if the available packages are enough for the base Ubuntu VM (Applicable for Ubuntu-based OS only). If additional packages are required you will be prompted to confirm the internet connection so that packages can be downloaded via internet. Click OK to proceed with download.
-
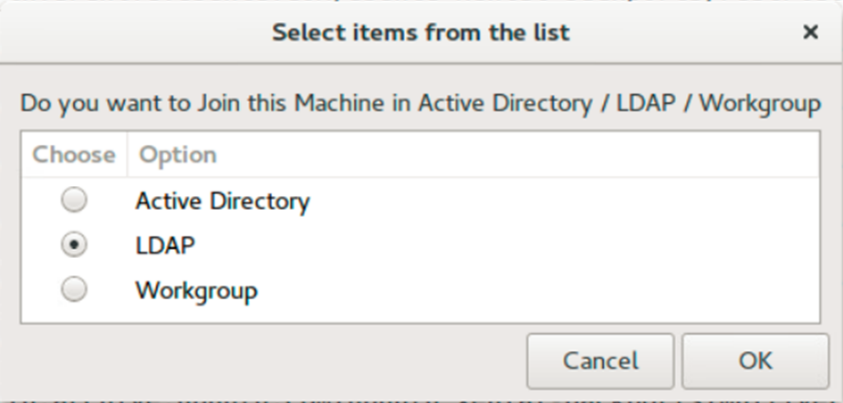
Select the deployment environment for the VM previously configured
-
Active Directory: If this VM or VMs to be cloned from it; should be joined to active directory
-
LDAP to install dependency packages while joining machine in LDAP
-
Workgroup: If VM or cloned VMs to be kept in workgroup
Note
-
The selection is important and should be done carefully, as dependency packages are installed based on the selected option.
-
Once installed for specific environment, moving the machine to some other environment may cause issues.
-
Moving from Active Directory to LDAP works fine but not the vice versa and thus once packages are installed for LDAP it should not be used for AD-based deployments.
-
-
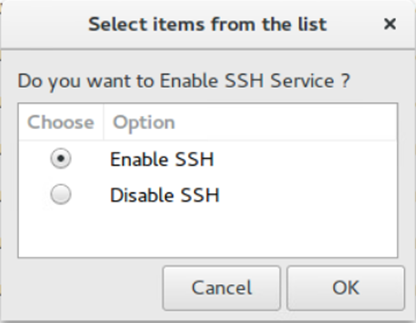
Choose whether you want to enable/disable SSH service as per your requirement
-
You will be prompted to reboot once the installation is complete.
!!! important Though you are prompted for reboot wait for few mintues before rebooting. There are chances of some backgroud tasks still under process.
-
Click OK and reboot the machine. This completes upgrade/installation of Ubuntu offline package is completed
Note
- While upgrading from previous offline packages, ldap and nfs configuration will be retained.
- If you want to configure the deployment environment in LDAP, Accops offline package should be installed as above procedure selecting LDAP from displayed list in point b.
-
Upgrade HyWorks DVM Tools for Linux (Conditional)
Skip this section if the latest version of DVM Tools are already installed as a part of offline package.
Check the version installed by executing following command on the Terminal:
cat /etc/edcdvm/linuxDVM/productInfo.txt
Follow the below given steps to install/upgrade Linux DVM Tools on Ubuntu-GNOME or CentOS-GNOME VM:
-
Download latest HyWorks DVM Tools for Linux from the Accops official website/Support portal. It is provided with following name format:
[format: HyWorksDvmTools_Linux_merged _[VERSION].tgz]
-
Copy the DVM tools file on user's home directory
-
Open Terminal
-
Change the directory
cd /home/[USER]/
-
To extract the DVM files in the directory linuxDvmAgentInstaller and start installation, execute following commands:
tar -xvf \<LinuxDVMTools.tgz>
e.g. HyWorksDvmTools_Linux_merged _3.3.1.12.tgz cd linuxDvmAgentInstaller sudo ./linux_Exec_Installer.py
-
-
Desktop will reboot automatically once installation is complete and admin can start configuring it.
If required check the DVM Tools installation logs, by executing command can be run on the Terminal:
vi /etc/edcdvm/linuxDVM/Logs/linuxDvmAgentInstallerLog.txt