Basic HyWorks Configuration
Basic HyWorks configuration is for organizations with a Single Organization structure, in which logical separation of resources is not required. It also includes configuration of the authentication mode.
Refer to the configuration steps mentioned in the Multi-Organization Deployment section in case a logical separation of resources is required.
HyWorks Deployment in a Single Organization
While this flowchart depicts the entire configuration, this section describes steps of the basic configuration only.
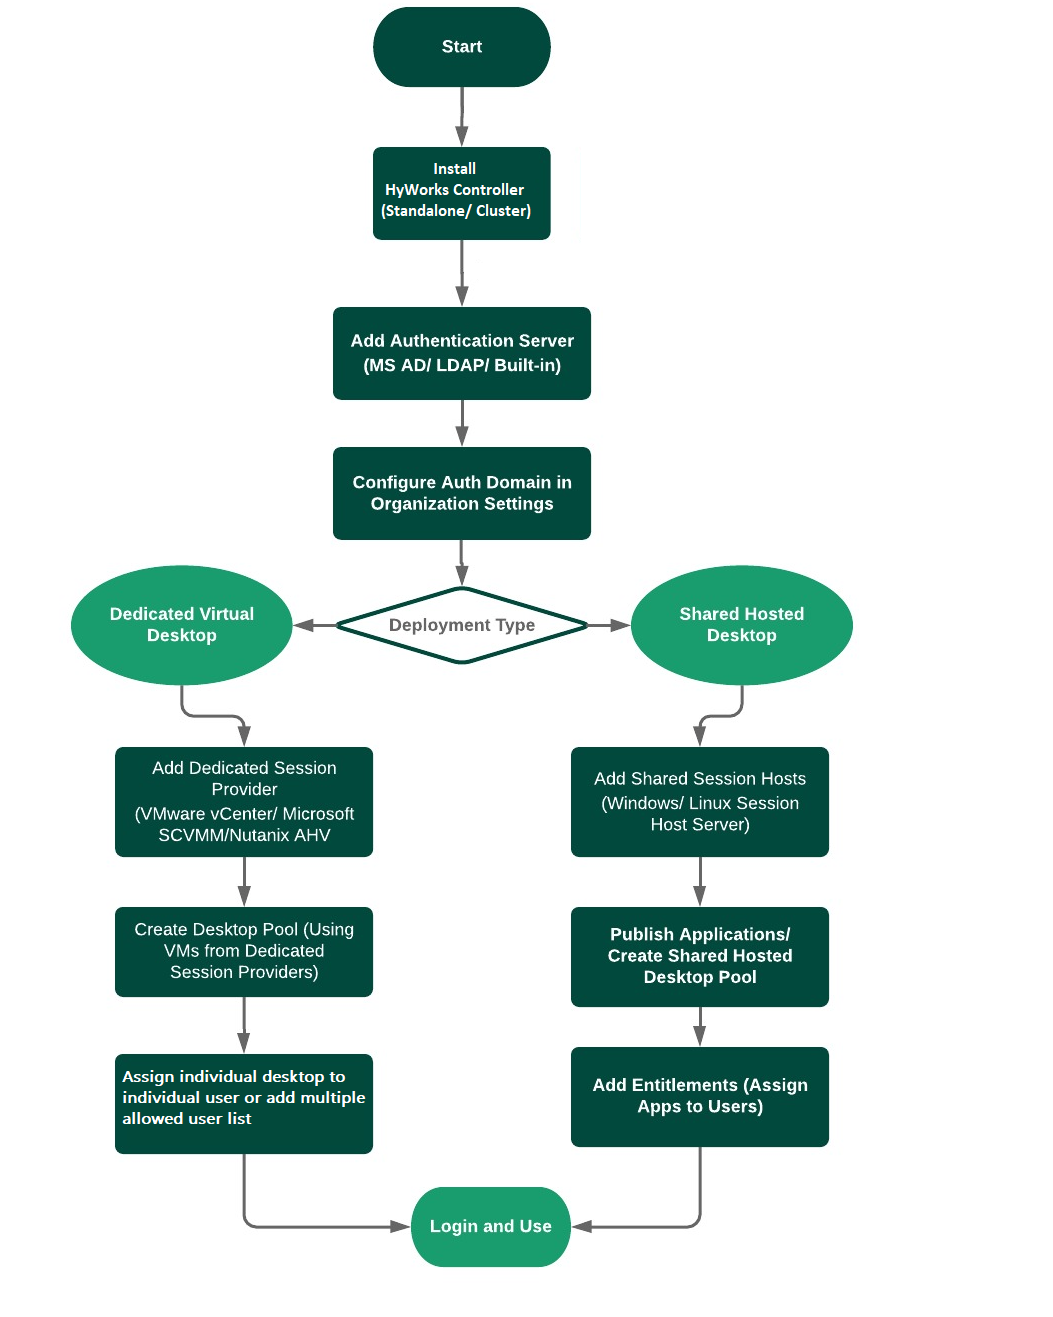
Step 1: Install the HyWorks Controller service and Management console
HyWorks Controller supports two types of deployments:
-
Standalone (HyWorks without High Availability)
The HyWorks Controller must be installed with the SQL Servers. Refer to the HyWork Controller Installation section for details.
-
Cluster
HyWorks Controllers must be installed with the SQL Server with some additional prerequisites. Refer to the HyWorks Controller Installation For Cluster section for details.
Use the Installation Wizard to install the HyWorks Controller and Management console. Refer to the HyWorks v3.3 Installation section for the entire flow of installation.
Step 2 Add the Authentication server and the Authentication Domain configuration
Once the installation process is complete, the next step is to add the authentication server and configure the authentication domain to specify the authorization and authentication servers.
HyWorks supports the following authentication servers:
- Microsoft Active Directory
- Novell Directory/Open LDAP
- Built-in (available by default)
Configure Authentication Server:
-
Go to Configuration -> Server -> Authentication and click Add
-
In the Authentication Server window, select the Server Type, for example Microsoft Active Directory, Novell Directory/Open LDAP and specify the following information:
-
Enter the display name for the authentication server. This is to uniquely identify the server.
-
Provide the server address, for example, 192.168.1.1 or Accops.com
-
Provide an appropriate Domain name which could be the NetBIOS Name for domain (this domain name information will be used for signing into the remote sessions).
-
The Port Number to be used to communicate with the authentication server (default is 389).
-
Enable SSL: Check this checkbox if the configured Active Directory supports secure communication (the default port for SSL communication is 636).
-
Provide the Base DN information (mandatory for LDAP type authentication server and for Active Directory configurations, when the Active Directory options value under System -> Advance Config is set as 6, which uses the LDAP search method to communicate with AD).
-
All the users, groups and OUs will be fetched if the Base DN information is not provided.
-
On providing the specific Base DN information, users, groups or OUs will be fetched accordingly.
-
-
The User DN (mandatory for LDAP type authentication server and for Active Directory configurations, when the Active directory options value under System > Advance Config is set as 6, which uses the LDAP search method to communicate with AD ). This is the user that will be used to communicate with the Active Directory server. The user should have privileges to fetch the user, group, OU information under the specified base DN.
-
Username: The username of the user from authentication to be used to communicate with the Active Directory server, the user should have privileges to fetch user, group, OU information. This field is available for Active Directory type authentication server configuration only.
-
A valid Password for the user configured in step# 7-8.
-
Select an appropriate Login Attribute: User Id, User Principal Name, Mail Id, Phone number. The selected attribute will be used to authenticate user the on logon.
-
User Id: Map the username entered by the user with the User Id field of HyWorks
-
User Principal Name: Map the username entered by the user with the User Principal Name field of HyWorks. HyWorks will form the User Principal Name using the following methods:
-
User logon using only the username without a domain name: HyWorks will generate the UPN using the domain name configured in the authentication server configuration. For example, the user logs-in using john.test => john.test@domain.com
-
User logon using the domain name\username: HyWorks will generate the UPN using the domain name and the username provided by the user. For example, the user logs-in using domain.com\john.test => john.test@domain.com
-
User logon using the full UPN in format username@domain-name: HyWorks will use the credentials as provided. For example, the user logs in using john.test@domain.com => john.test@domain.com
-
-
Mail Id: Map the username entered by the user with the Mail Id field of HyWorks
-
Phone Number: Map the username entered by the user with the Phone Number field of HyWorks
Note
- Default login attribute for configuring the Active directory is SAMAccountName and for configuring the LDAP is CN. These attributes (SAMAccountName with AD and CN with LDAP server) are most commonly the user login attribute.
-
-
Log Attributes in Login: Optional, specify the AD attributes that will be logged in logs along with each user login event. This field can be used to create additional information in the log file to generate a customer report.
-
Skip Login Attribute Verification: By default is enabled but when unchecked, all four underlying attributes will be checked on the AD, whether they are present or not when configuring the AD. If checked and it is found that any attribute is missing in the AD, then an error will be reported during user login. For example, if the "Phone Number" attribute is specified as the "telephoneNumber" AD attribute and this attribute does not exist in the AD, an error will be reported during login.
-
Add secondary authentication server: By default is unchecked, select and provide details of the secondary authentication server for Active Directory failover conditions. The provided secondary authentication server must be in sync with the primary Active Directory server.
-
-
Click Test Connection.
-
If the connection is established successfully, click Add.
This completes the Authentication Server configuration. For detailed information, refer to the Authentication Server Configuration Section in Admin Guide.
Configure Authentication Domain:
- Authentication domain defines the server to be used for authentication and the server to be used for authorization (entitlements).
- Authentication and authorization servers can be the same or different, based on the requirement.
- The Domain name to be used for connections, etc.
To configure the Authentication domain, follow the steps given below:
-
Go to Configuration -> Workspace -> Organizations
-
Select default or child organization and click Edit.
-
In the Edit Organization wizard, go to the Authentication Domain section and specify:
-
Authentication Server: This server will authenticate the user at login.
-
Authorization Server: All assignments and entitlements will be done from this server.
-
The Domain Name will be fetched from:
- Authentication Server
- Authorization Server
- Custom Domain
-
If you are using the Built-in Authorization server, provide the following information:
-
User creation on RDS: Choose Manual synchronization to synchronize manually or set as Automatically on logon or Do not create.
-
User credentials for RDS: Select Built-in directory credential if you want to connect to HyWorks using the built-in credentials. If you do not select this option, the connection will be made using the logged-in user credentials (user-provided credentials).
-
Populate users into the built-in directory : Define how users will be populated in the Built-in directory.
- Create Users in the Built-in Directory - If you choose this option, the Administrator will have to add users manually or by importing them from CSV files.
- Import Users from the Authentication Server - If you choose this option, you will be able to import users from other authentication servers into the Built-in directory.
Note
- If the authentication and authorization servers are using different search attributes, it may result in logon failure or authorization issues.
-
-
-
Go to the Desktop Client Settings and click Save.
This completes the configuration of the Authentication domain.
The subsequent steps will depend on the kind of session delivery mechanism.
Resource configurations in Shared VDI
HyWorks supports delivery of applications and Shared Hosted Desktops from the following platforms:
-
Windows
-
Windows Server 2019 (essential not supported)
-
Windows Server 2016
-
Windows Server 2012 R2
-
Windows Server 2008 R2-SP1
-
Windows Server 2003 (limited features supported)
-
-
Linux SHD Server
-
Xubuntu 20.04.0/1 (Legacy Kernel)
-
Xubuntu 18.04.0/1 (Legacy Kernel)
-
Customized Xubuntu 16.04.4 (available from Accops Support)
-
Add Session Providers
-
Go to Configuration -> Server -> Session Provider Section and click Add.
-
In the Add Session Provider wizard,
-
Select the Category as Shared Session Host, the Type as Microsoft RDS Server or Linux RDS Server.
-
Provide an appropriate Name for the session provider, enter the IP address or Hostname of the RDS server in the Host Address field.
Note
- The Windows Remote Desktop Session Host role must be installed with the Accops HyWorks Session Host Server module.
-
Enter the RDP Port number to connect from the client.
-
Select the Session Team. Session Teams are created for load balancing among the Session Host Servers. By default, two session teams - one for Windows configuration and one for Linux configuration, are created that cannot be deleted. Linux SHD Servers and Windows SHD Servers should be created in the Linux Session teams and Windows Session teams respectively.
- As per the session team selection, the Weight field can be enabled, which represents the respective weightage of the server and should be set as per the server capabilities, as compared to other servers in the team.
-
Set the Max Session count to restrict the maximum number of sessions to be given from this Session Host Server. Set Zero for unlimited sessions.
-
Select the Active to enable the Session Host Server for session delivery. Inactive Session Host Servers are not used for giving sessions.
-
Set the Advance Configuration as per the requirement
- Enable Diagnostics
- Enable Remote Control
- Enable Virtual-IP
-
Select the Assign Applications to display options to associate already published applications in HyWorks with the Session Host Servers. Ignore if the Session Host Server is added for Shared Hosted Desktop delivery only or if applications have to be published later.
-
Click Add. The Session Host Server should now be configured and should be ready for the Shared Hosted Desktop or application deliveries.
-