HyWorks Controller Installation
This section details the installation process for the HyWorks Controller.
Note
- Copy the HyWorks setup locally on the the target server. Running the HyWorks setup from the UNC path is not supported and will result in a failure.
- Running the HyWorks setup may also fail during the file extraction process, if the logged in user has a roaming profile. Hence it is recommended to log in with local administrator user credentials.
Installation Steps
Installer will run in the fresh installation mode if there has been no previous installation of the Accops HyWorks Controller and only the Administrator will be able to install the Accops HyWorks Controller or the Session Host Server. Follow the below steps to install Accops HyWorks Controller on the system in the fresh installation mode:
-
Log in to the Windows Server using user credentials with administrative rights.
-
Copy the Accops HyWorks Controller Installer to the Windows Server with all the prerequisites configured. Refer to the Software Requirements section to check the Software Requirements for the Accops HyWorks Controller.
-
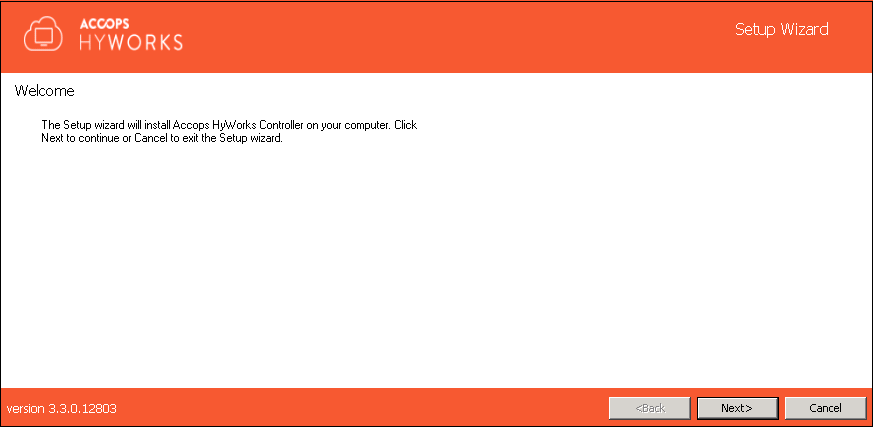
Right click the Installer to launch the Installation wizard and select the option Run as Administrator.
-
Click Next to proceed with the installation.
-
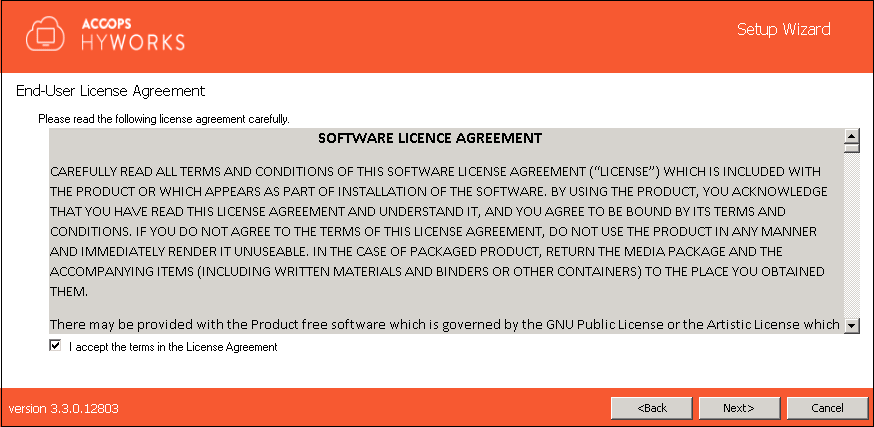
Accept the License Agreement and click Next to proceed.
-
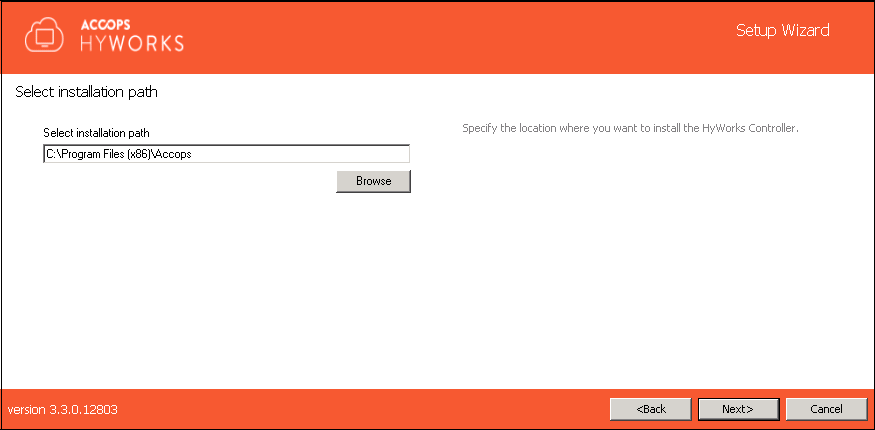
Change the Installation Directory, if required, and click Next to proceed. The default Installation Folder is "C:\Program Files (x86)\Accops".
-
Select the following HyWorks Components to be installed
-
Accops HyWorks Controller Service
-
Accops HyWorks Management Console
-
Accops HyWorks Reservation Management Service
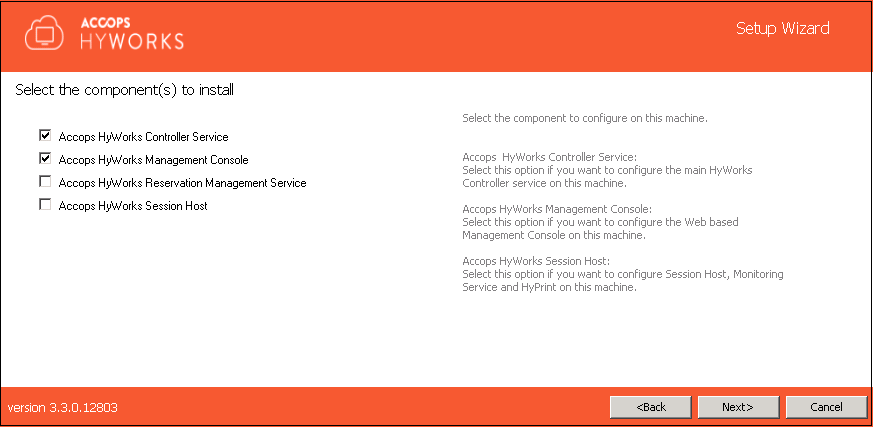
Important
Do not check the Accops HyWorks Session Host, if you do not want to use this server for the Shared VDI or for Application Delivery.
-
-
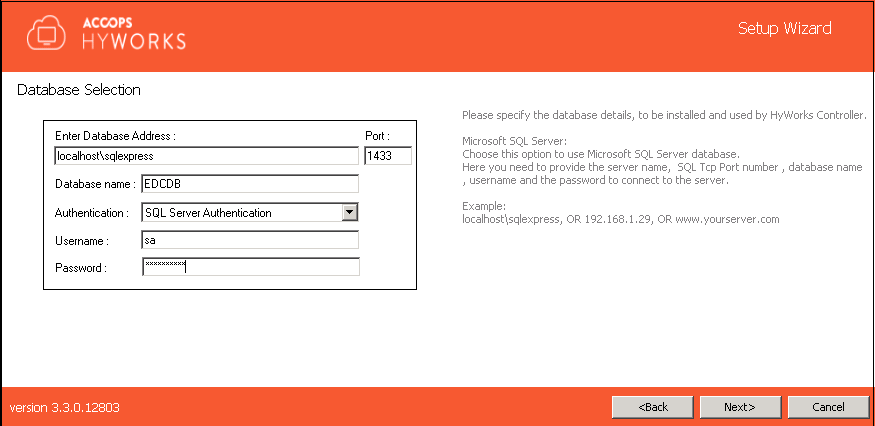
Click Next and proceed to select the database.
-
Provide the Database Address in the format - \<Server IP or FQDN>\\<SQL Instance Name>. For example, if the SQL Express is installed on the same instance, then the Database Address could be localhost\SQLExpress for the Microsoft SQL Server Standard and Enterprise: localhost\MSSQLSERVER (for the named instance)
-
Provide the static port of Microsoft SQL Server e.g. 1433 (Default TCP Port for SQL Server)
-
Provide the name of the database that needs to be created. The default name is EDCDB.
-
Select the appropriate authentication mechanism
-
SQL Server Authentication: It will require the SQL Server User and Password.
-
Windows Authentication: Use the Windows user credentials to connect to the SQL Server.
-
Warning
-
In HyWorks v3.2, support for the embedded database for the service has been depreciated and thus, the installation process is supported with the SQL Servers only.
-
Upgrading the existing HyWorks deployments using the embedded database should not be attempted in order to avoid data loss and setup corruption. Contact Accops Support for the guidance on existing setup upgrades.
-
The VM Scale Booster feature does not support Windows Authentication.
-
-
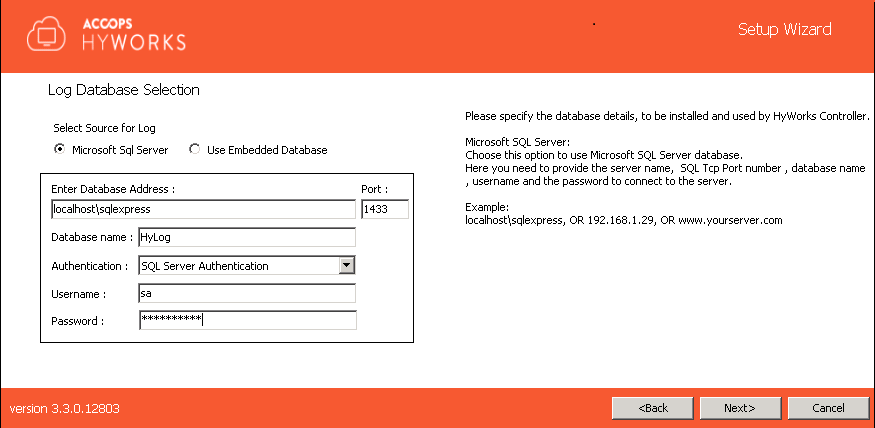
Click Next to proceed to configuring the Log Server in the Log Database Selection section. You can either use the Embedded Database (uses SQL CE 4.5 for Logs) or the Microsoft SQL Server (uses SQL Server for Logs). We recommend using the Microsoft SQL Server.
SQL Server Logging has the following advantages over the Embedded Log Server:
-
Faster log viewing in the HyWorks Management Console
-
Ability to keep more logs
-
Explicit queries can be used to filter logs in the SQL Management Studio
Select the log server as per your requirement. Configuring the Embedded Log server does not require any additional configurations. However, the following parameters need to be set to configure the SQL Server for logging:
-
Provide the Database Address in the format \<Server IP or FQDN>\\<SQL Instance Name>. For example, if the SQL Express is installed in the same instance, then the Database Address could be localhost\SQLExpress.
-
Provide the static port for the Microsoft SQL Server e.g. 1433 (Default TCP Port for SQL Server)
-
Provide the name of the database to be created. Default name is HyLog.
-
Select the appropriate authentication mechanism from the following:
-
SQL Server Authentication: It will require SQL Server User and Password.
-
Windows Authentication: It will use Windows user credentials to connect to the SQL Server.
-
Important
If you are configuring SQL Logging Server
-
It is recommended to use a separate instance than the one used for the HyWorks Database Server.
-
"sa" authentication should be used for logging to avoid any misconfigurations.
-
Configure the Windows Authentication for the Log Server if the HyWorks database configuration is also using Windows Authentication and both the SQL instances are configured to accept the credentials used to run the HyWorks service.
-
-
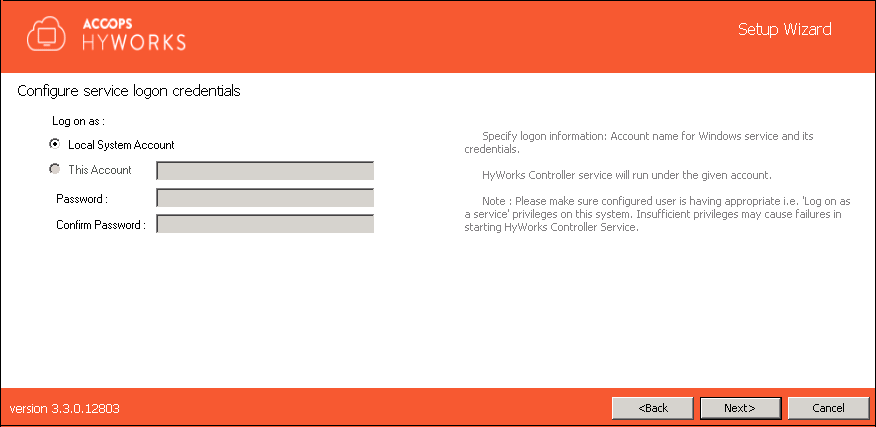
Click Next to configure the Service Logon Credentials for the HyWorks Controller service. You can either set the Local System Account or use the current account to log on.
-
Local System Account: (Recommended) The HyWorks controller service will run using Local System Account as the service logon credentials. The option will be used when HyWorks Controller service database configuration uses the SQL Server Authentication.
-
This Account: Configuring the SQL Server with Windows Credentials requires logon credentials to run the HyWorks Controller service. When the HyWorks Controller database connection is made using Windows Authentication, the option to run the service with specific user credentials is shown. When the service runs with specific user credentials, the same user is used to connect to the SQL server.
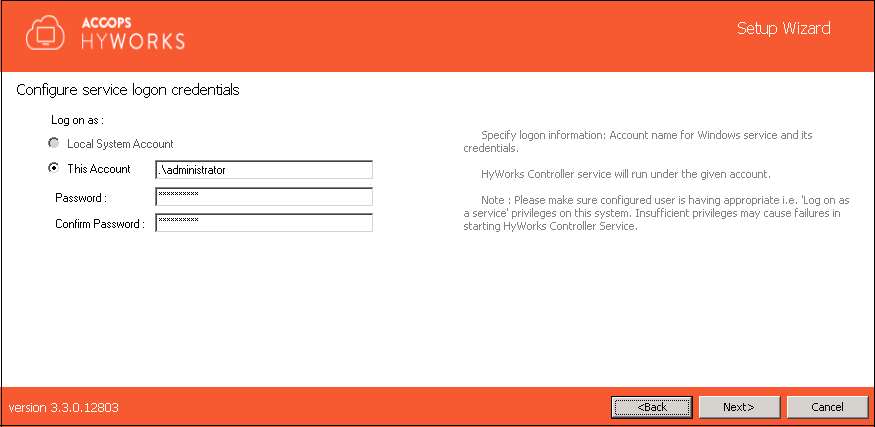
Important
The HyWorks Controller service will fail to start after installation if the configured account does not have logon as a service privileges on the system.
Follow the steps listed below to configure the users' accounts with logon as a service privilege:
-
Click Start, point to Run, type mmc, then click OK.
-
On the File menu, click Add/Remove Snap-in.
-
Click Add > Add Standalone Snap-in, double click Group Policy Object Editor.
-
Click Browse and select the Group Policy object (GPO) that you want to modify and click OK > Finish.
-
In the Console Tree, click User Rights Assignment. This option is available at the following location:
GroupPolicyObject\ [\Computer Name] Policy >> Computer Configuration >> Windows Settings >> Security Settings >> Local Policies >> User Rights Assignment
-
In the details pane, double click *Log on as a service*.
-
If the security setting has not yet been defined, select the Define these policy settings.
-
If the security setting has not been defined yet, select the Define these policy settings checkbox.
-
Click Add User or Group.
-
Add the appropriate account to the list of accounts that possess the Log on as a service right.
-
-
Click Next to select the database to be restored. Click Next to proceed.
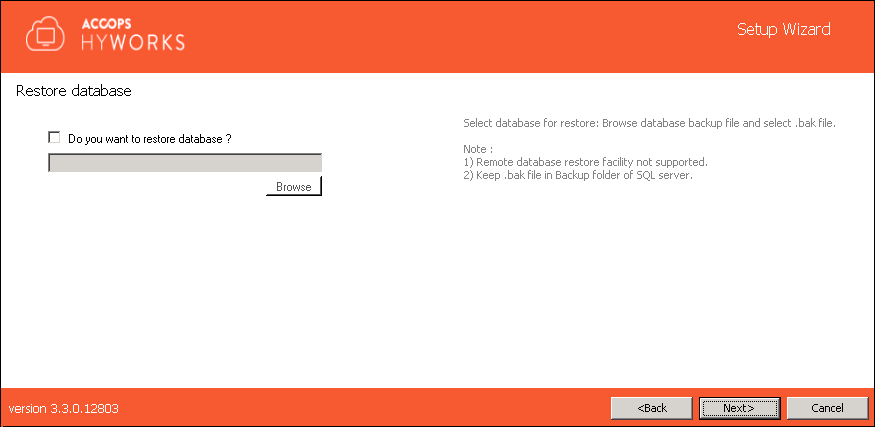
Refer to the HyWorks Backup and Restore section for instructions on the restoration process.
-
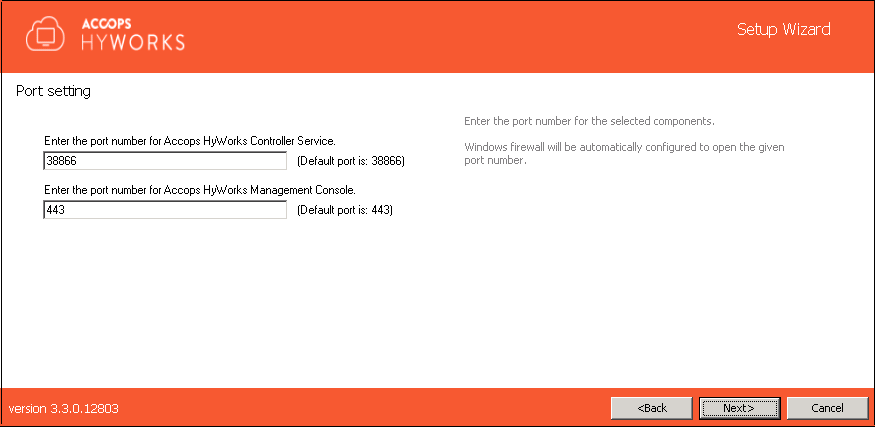
Click Next to configure communication ports.
- The default port for the Accops HyWorks Controller Service is 38866. Changed, if required.
-
The default port for the Accops HyWorks Management Console is 443. Changed, if required.
-
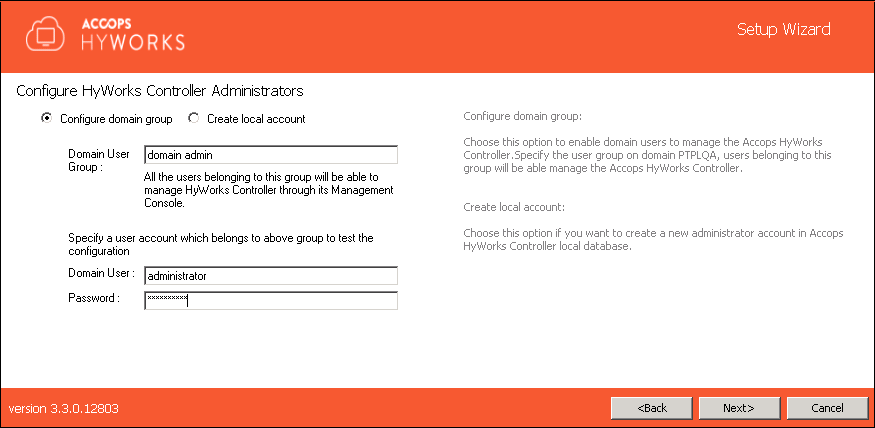
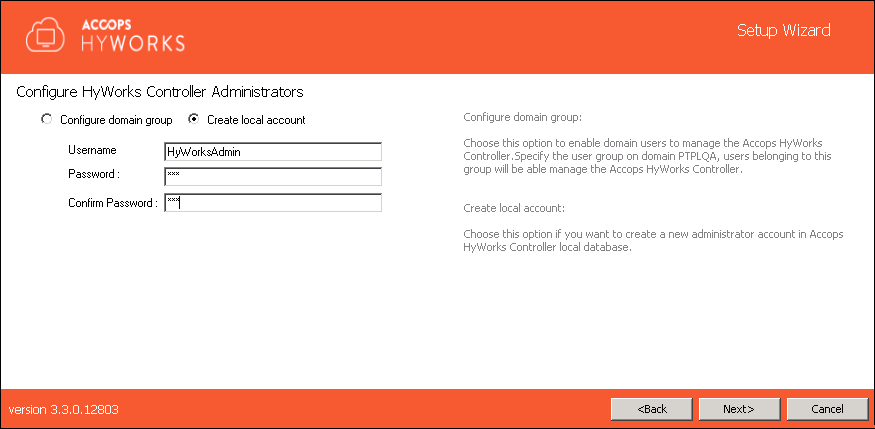
Click Next to configure the HyWorks Controller Administrators. You can either set the Domain User Group or a Local User as Administrator:
-
Domain Group Configuration: Domain User Group configured as Super-administrator. To configure a Domain User group, ensure that the:
-
The system is in domain
-
The user is logged in with the domain credentials and has administrative previleges on the server.
-
-
Local User Configuration: A local HyWorks user created and designated as the Super-administrator. To create a local user Administrator, provide the username (the default is HyWorksAdmin) and password.
-
-
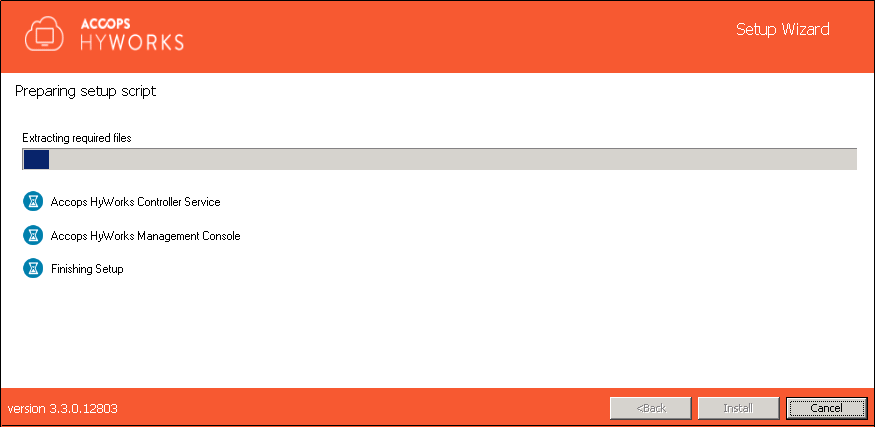
Click Next. Verify the information and click Install to start the installation process.

-
This will start the installation process and appropriate roles and features will be installed. The screen will display the status and installation progress as follows:
-
The component being installed
-
The Installation status of the component
-
The Progress bar and related information for the changes being made to the system
-
-
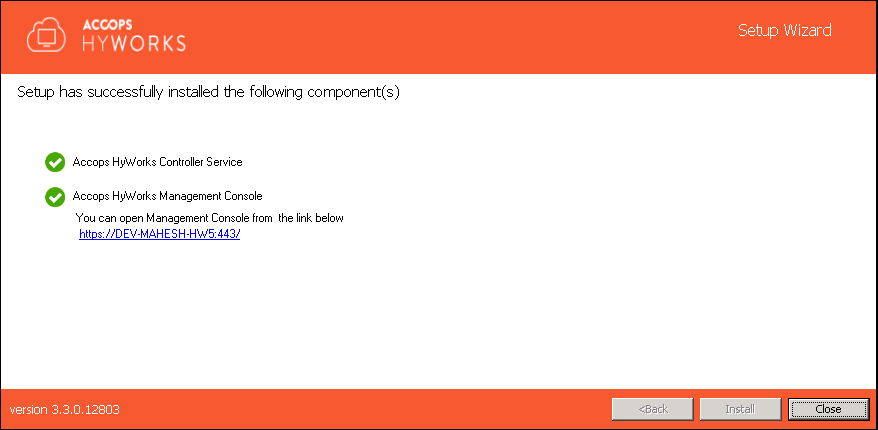
Once the installation process is complete, the screen will display the installation status of the individual components and the URL of the Accops HyWorks Management Console (if installed).
-
The wizard will prompt to reboot the machine if the HyWorks Session Host is selected for installation. Click Yes to reboot.
Installation Verification
The Administrator can check whether the installation has been successful by verifying that the installation logs and services are running as per the information given below:
-
Setup Status Prompt - Setup Status is displayed on the last screen of the Installation wizard. It displays details about all the installed components and their respective statuses.
-
Access and log in to the Accops HyWorks Management Console
-
After the successful installation, open a browser - IE11, Firefox or Google Chrome; and browse to https://\<IP of HyWorks Controller>:\<port number>
-
Provide appropriate credentials to log in.
-
Installation Logs
HyWorks installation logs can be used for troubleshooting or verification purpose. Installation logs are created at the following location:
%appdata%\HyWorksController\Logs