Azure VM Disk Encryption
Overview
Azure managed disks can be encrypted with Azure Storage encryption, which uses server-side encryption (SSE) to protect your data and to help you meet your organizational security and compliance commitments. Azure Storage encryption automatically encrypts your data stored on Azure managed disks (OS and data disks) at rest by default.
Data in Azure managed disks is encrypted transparently using 256-bit AES encryption, one of the strongest block ciphers available, and is FIPS 140-2 compliant. Azure Storage encryption does not impact the performance of managed disks and there is no additional cost.
Objectives: Objective of this feature in HyWorks is to automate Azure VM Disk encryption process and eliminate any possible manual intervention in VM deployment process on Microsoft Azure, when working with Accops HyWorks.
Azure VM Disk Encryption in HyWorks
Encryption Types supported in HyWorks
Following types of disk encryption mechanisms are supported in HyWorks:
- Server-side encryption using Platform Managed Key (PMK)
- Server-side encryption using Customer Managed Key (CMK)
- Azure Disk Encryption (ADE)
Platform Managed Key (Azure's Default)
Azure uses Server Side Encryption (SSE) with Platform Managed Key (PMK), as default. HyWorks will not perform any additional encryption on deployed VM disk.

To check default disk encryption on VM,
- Go to VM on Azure portal
- Go to disk option and check Encryption column on Disk grid
- It will show SSE with PMK
Customer Managed Key
You can choose to manage encryption at the level of each managed disk, with your own keys. Server-side encryption for managed disks with customer-managed keys offers an integrated experience with Azure Key Vault.
In this type of encryption, we need to create Disk Encryption Set from Azure portal.
While configuring Disk Encryption Set in Azure following two types of encryption methods can be used:
- Using Customer Managed Key (CMK) only
- Using CMK and Platform Managed Key (PMK) both
Configuring Disk Encryption Types as CMK in HyWorks, Disk Encryption Set resource ID is required.
Follow instructions given in section Create and configure Disk Encryption Set
Azure Disk Encryption
Azure uses Server Side Encryption (SSE) with Platform Managed Key (PMK), with Azure disk encryption (ADE). For ADE , on Windows platform Bitlocker used and on Linux platform crypto used. Check Azure for Linux platform support.
For this type of disk encryption, we need Azure Vault resource Id and Azure Key URL.
Follow below process to configure ADE:
First you need to create Azure Key vault and key in vault. find process for how to create key Vault and create key under same vault, refer section Creating Azure Key vault and Creating a new Key in above.
Enable disk encryption for Azure VM
This section will provide detailed step by step process to enable disk encryption in HyWorks.
Assumptions:
While using Azure VM disk encryption with Accops HyWorks, following assumptions are made:
-
GM is non-encrypted. (HyWorks does not verify, if source VM or gold master disk is encrypted or not)
-
VM disk encryption is done after sysprep/hyprep (if configured)
Process to enable Disk Encryption in HyWorks: Disk encryption can be enabled in Pool Add/Edit wizard and is applicable for Microsoft Azure only.
-
In Add/ Edit Desktop Pool wizard (for Dynamically provisioned desktop pool with Microsoft Azure)
-
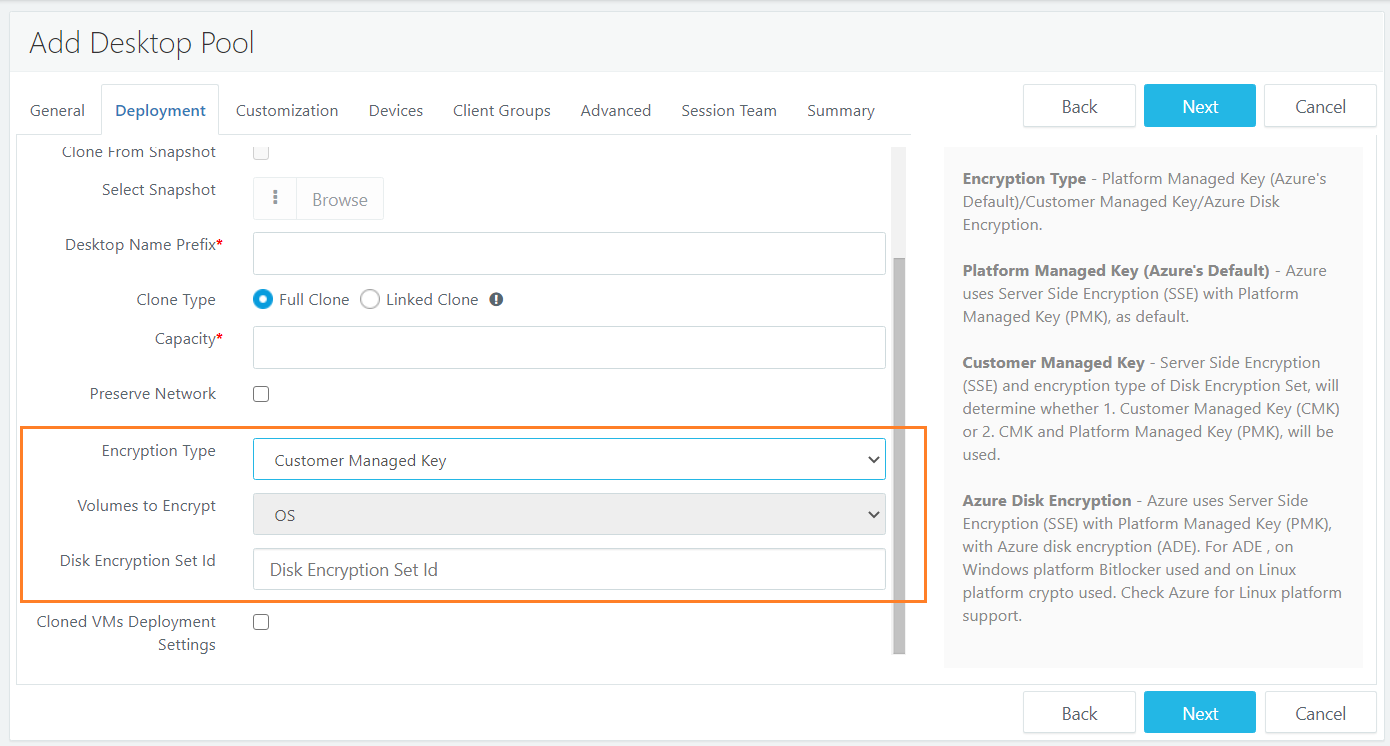
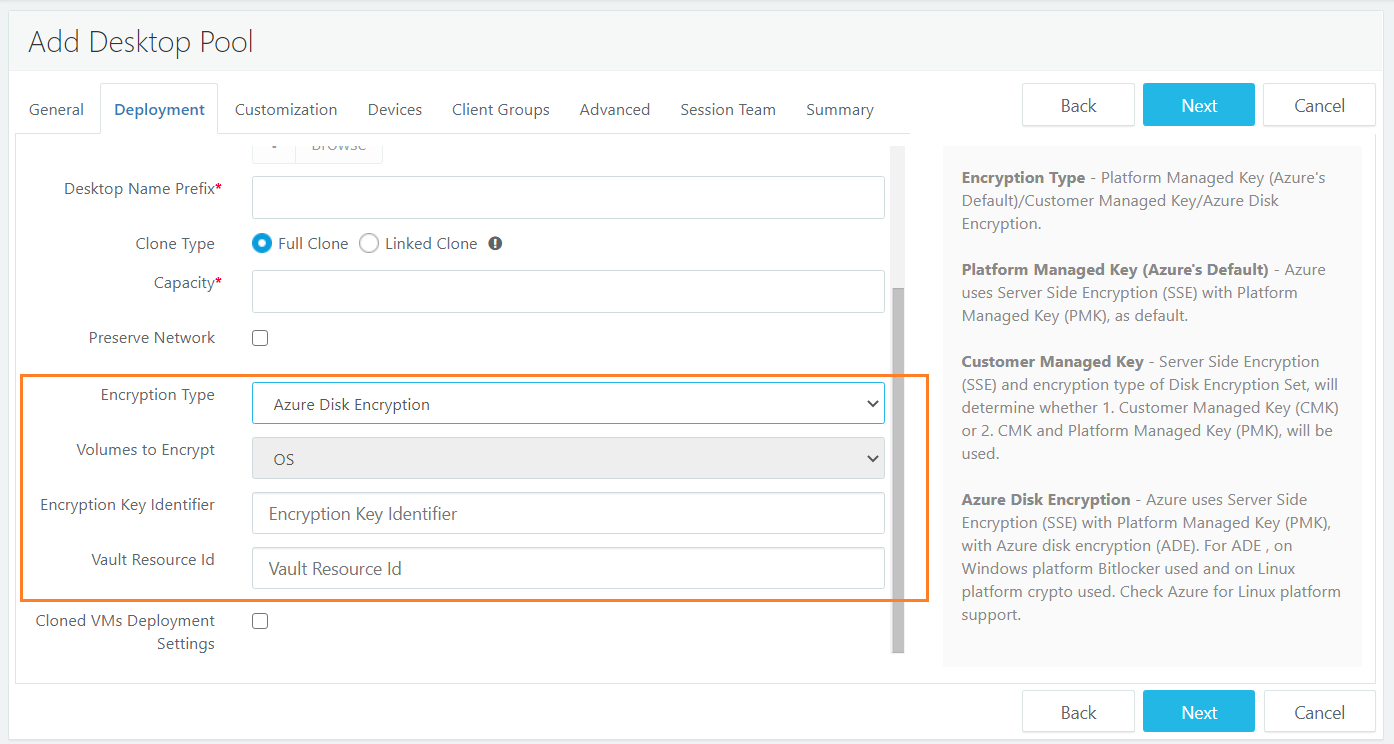
In Deployment screen, select following option Encryption Type as per requirement:
-
Platform Managed Key (Azure's Default)
- No other options need to be selected
-
Customer Managed Key, requires
-
Disk Encryption Set Id
-
Disks to encrypt (Only OS Disk encryption is supported)
-
-
Azure Disk Encryption, requires
-
Encryption Key Identifier
-
Vault Resource Id
-
Disks to encrypt (Only OS Disk encryption is supported)
-
-
-
HyWorks will deploy/ redeploy VMs as per selected disk encryption type and following flow will be used to encrypt.
Disk Encryption Flow in HyWorks
Once desktop pools are deployed as per above options, below flow will be used:
- Admin creates deployed pool in Microsoft Azure.
- Controller Start cloning : Deploy VM
- After VM creation, Controller update VMs details Like IpAddress,
- If Customization is enabled on VM, then wait for customization.
- Controller Call Azure API for encryption and send encryption details, update DVM status as initiated.
- Once encryption done (job completed), update DVM status as completed.
Check Disk Encryption Information Post Deployment
To check disk encryption status, go to Desktop VMs page, click on VM Name to open Desktop Details dialog, which consists of field Encryption Info.

-
This information will be valid only for Azure provider VMs
-
Following could be possible status as per operation -
-
Not configured: For existing desktop pools in upgraded setups
-
Required: Disk encryption required
-
Initiated: Disk encryption initiated
-
Completed: Disk encryption completed
-
Failed: Disk encryption failed
-
Fixing Desktops having failed or not completed Encryption
If deployed desktop is having disk encryption status as Failed or not required then, Fix desktop option will be shown with below information:

Limitations
- If encryption job is going on VM and Controller service is stopped/VM restarted/ Server state moves to (non-primary) then VM encryption status is not updated. Workaround : Recreate VM.
- In Azure Disk encryption the secrets are currently un-managed, and thus residual secrets are left in Azure subscription.
- Linux support is pending.
- Volume Type : OS (All /data is not supported)
- SSE (CMK / CMK+PMK) based encryption is done after customization, ideally this should be done at the disk creation time.
Configurations in Azure for Disk Encryption
Creating a Disk Encryption set
To create disk encryption set, following Azure configurations should be pre-configured:
-
Azure Key Vault is created, if not configured, follow instructions in section Creating Azure Key vault
-
A key is created in Azure Key Vault, if not configured, follow instructions in section Creating a new key
-
Log in to the Azure portal with a valid account. Select All Services → Disk Encryption Set
-
Click Create Disk Encryption set.
-
Creating a disk encryption set in Azure involves three steps Basics, Tags and Review and create
-
Basics: Provide details of:
1. Azure Subscription and resource group (if exists or create new) in the Project Details section. 2. Provide a name for the new Azure subscription set and select the Azure region where you want to deploy this Azure Disk Encryption Set. 3. Choose the encryption type from the available drop-down list - Encryption at rest with a customer-managed key - Double encryption with platform managed and customer-managed key !!! Note If you are using the Azure Disk Encryption set for the first time. You may need to [create a new Azure key vault](#creating-azure-key-vault) to store your keys before creating an Azure Disk Encryption set. 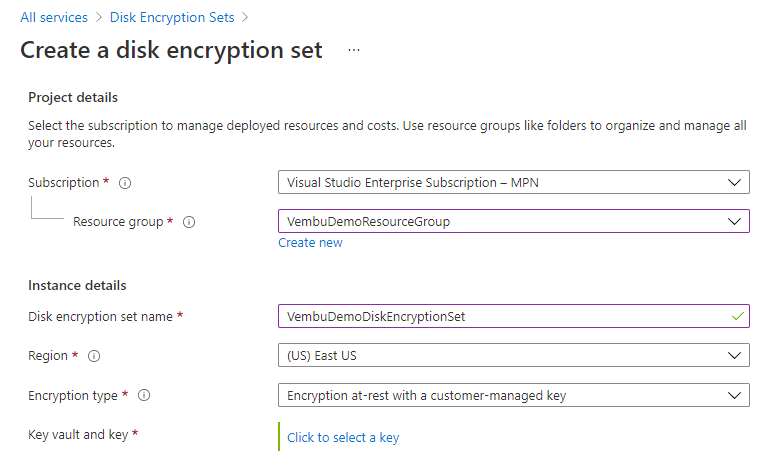 4. Select the key vault and key to continue creating creating an Azure Disk Encryption set. Click Select to proceed further as shown below. 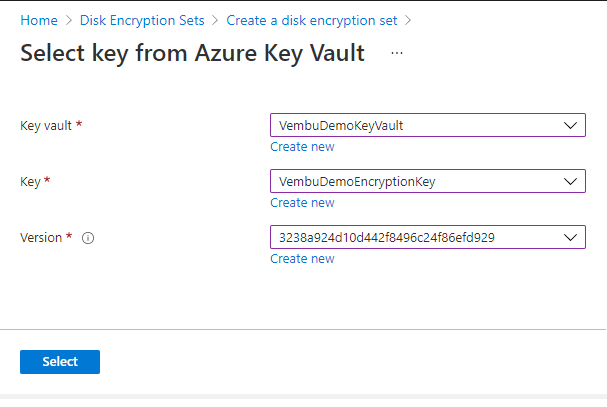 5. Key and key vault values will be updated in the Azure Disk Encryption set creation page, as highlighted in screenshot below below. 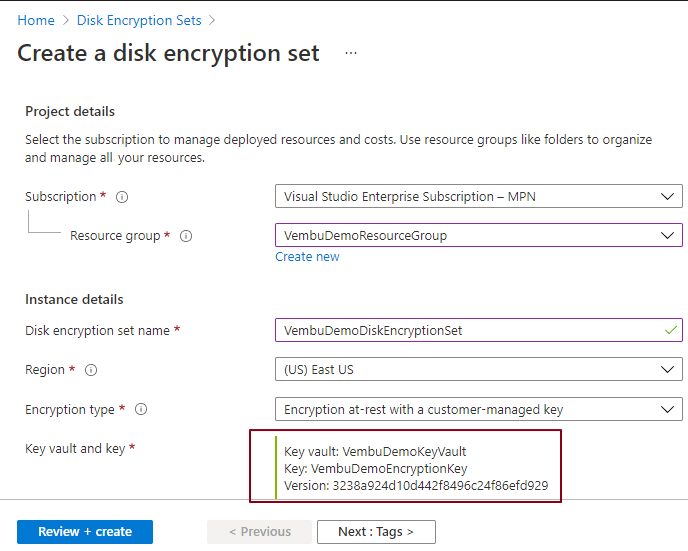 -
Click on Next and go to Tags > Tags are name/value pairs that enable you to categorize resources and view consolidated billing by applying the same tag to multiple resources and resource groups. This is an optional step.
-
Click on Review + create to proceed, the validation process will be done, and you will get a validation passed the message on the screen. Now you can click the create button to proceed further. You will get a deployment progress notification for a few minutes and get a Deployment succeeded message.
-
After creating the Azure Disk Encryption set, click on the “Go to Resource” button, and will redirect to the newly created Azure Disk Encryption set page. You will be asked to grant permission to use the newly created key in the Azure Disk Encryption set in the subsequent step to use the encryption key.
-
Managing & Working with the newly created Azure Disk Encryption set
Choose Home → Disk encryption set → Name of the newly created encryption set. You will be landed on the Overview page of the newly created encryption set.
Following administrative options are available:
-
Access Control (IAM) for the disk encryption set resource: Check access, provide role assignments, add roles, adding deny assignments, etc.
-
Check access – Review the level of access a user, group, service principal, or managed identity has to this resource.
-
Add role assignments – By adding role assignments granting access to this resource from other Azure resources.
-
View access to this resource – Currently logged in user can view the role assignments that grant access to this and other resources
-
View deny assignments – Currently, logged-in users can view the role assignments that have been denied access to specific actions at this scope.
-
-
Assigning other azure resources to this disk encryption set
-
Changing the key value
-
Adding a resource lock for the encryption set
-
Providing automation tasks wherever this disk encryption key is used through templates, etc.

Note
- Not every option is explained in detail. Kindly refer Microsoft documentation for detailed information on any of above topics.
Creating Azure Key Vault
Azure Key Vault is a cloud service used to manage keys, secrets, and certificates. Key Vault eliminates the need for developers to store security information in their code.
It allows you to centralize the storage of your application secrets which greatly reduces the chances that secrets may be leaked. Key Vault also allows you to securely store secrets and keys backed by Hardware Security Modules or HSMs. Besides, the key vault provides logs of all access and usage attempts of your secrets so you have a complete audit trail for compliance.
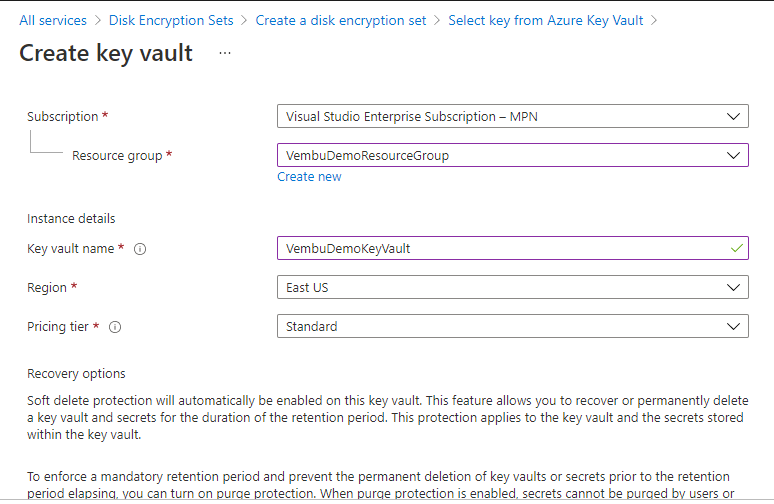
Creating an azure key vault comprises five steps described as Basics, Access policy, Networking, Tags, Review & create steps.
Here too, you may need to provide your Azure Subscription and Resource group name. Provide a name for the key vault and choose the region you want to deploy the key vault resource. Also, choose the pricing tier Standard or Premium
Recovery options – Soft delete protection will automatically be enabled on this key vault. This feature allows you to recover or permanently delete a key vault and secrets for the duration of the retention period. This protection applies to the key vault and the secrets stored within the key vault. To enforce a mandatory retention period and prevent the permanent deletion of key vaults or secrets before the retention period elapsing, you can turn on purge protection. When purge protection is enabled, secrets cannot be purged by users or by Microsoft.
Days to retain deleted vaults – It can be configured for between 7 to 90 days. Once it has been set, it cannot be changed or removed.
Purge protection – Enabling “purge protection” on a key vault is an irreversible action. Once the purge protection property has been set to “true”, it cannot be changed or removed
The option “Disable purge protection” allows key vaults and objects to be purged during the retention period. The option “ Enable purge protection “ enforces a mandatory retention period for deleted vaults and vault objects.
Access policy – In this step, you can enable access to these three major Azure resources :
Azure Virtual machines for deployment – Specifies whether Azure Virtual Machines are permitted to retrieve certificates stored as secrets from the key vault Azure resource manager for template deployment – Specifies whether Azure Resource Manager is permitted to retrieve secrets from the key vault Azure Disk Encryption for volume encryption – Specifies whether Azure Disk Encryption is permitted to retrieve secrets from the vault and unwrap keys Permission model – You can choose either vault access policy or Azure role-based access control. You can also view current access policies which shows the list of users with Key permission, Secret permission, and Certificate permission details ( by default Global administrator will be added as a first user )

Networking – In this section, you can specify how your Azure key vault will be accessible on the internet. You can connect to this key vault either publicly, via public IP addresses or service endpoints, or privately, using a private endpoint.
Tags – Tags are name/value pairs that enable you to categorize resources and view consolidated billing by applying the same tag to multiple resources and resource groups. This step is optional, you may not provide the details.
Review & Create – In this final step, the validation process will check your inputs and allow you to create a new Azure key vault after you will get a validation passed message as shown below.
Creating a new Key
The steps provided here to create to a new Key assumes administrator to be on Azure Disk Encryption Set creation page.
To create a new key from Azure Disk Encryption page:
-
Click Create new button.
-
Provide name for new key, Key Type and RSA key size.
-
Keep other options (Set activation date - Unchecked, Set expiration data - Unchecked, Enabled - Yes) as default
-
Click on Create button
-
A new key will be created in a few seconds.
-
Key will be ready to use immediately after creation.

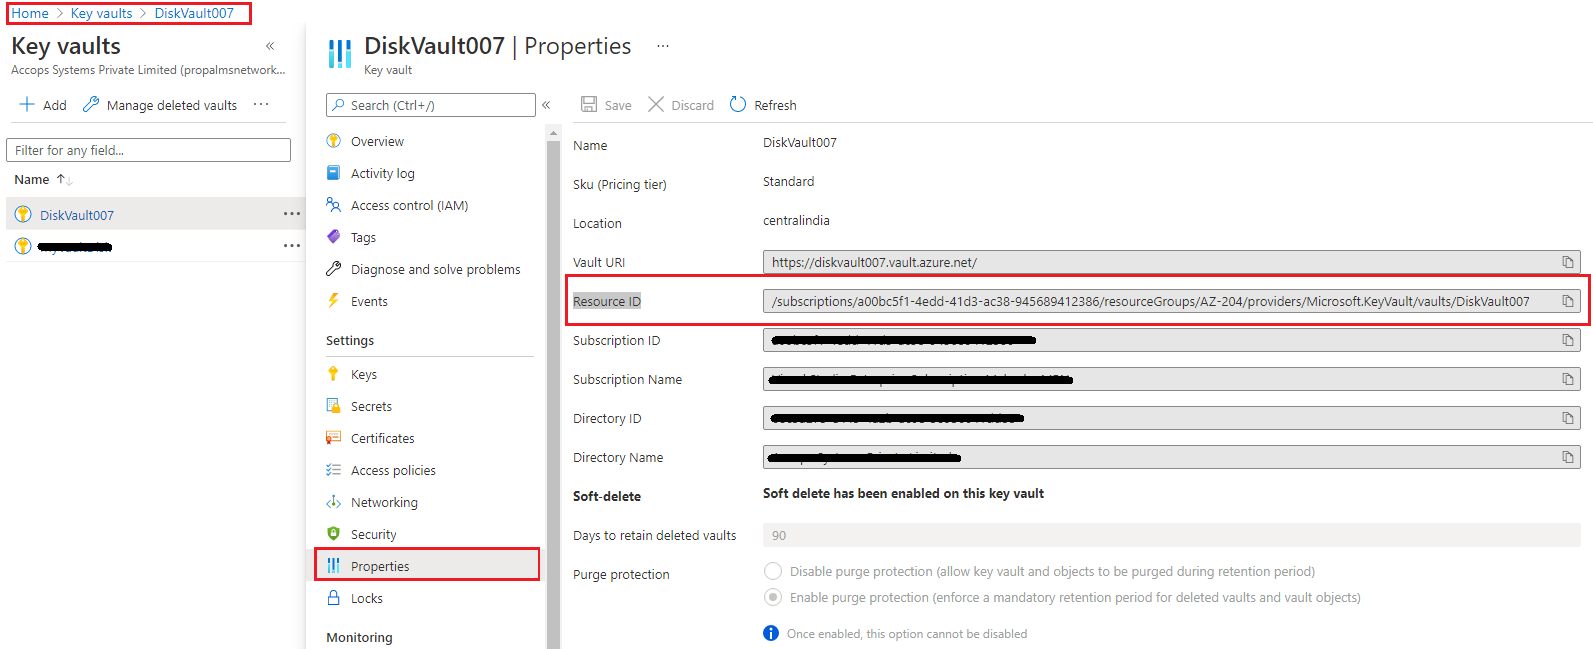
How to find Azure Vault resource Id
-
After creation of Vault, select respected vault.
-
Click on Property -> Locate Resource ID and copy it , refer below image:
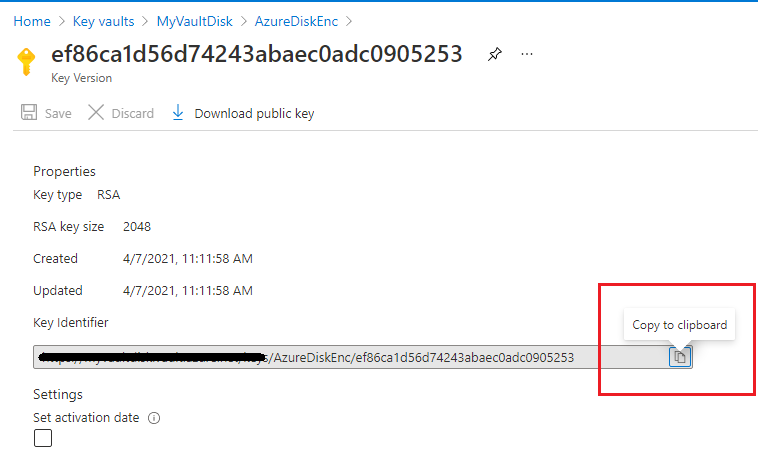
How to find Key under Key Vault
-
After creation of key vault and key under same vault, Select Azure Key Vault ->
-
Click on keys in left side menu.
-
Find particular key -> click on key name.
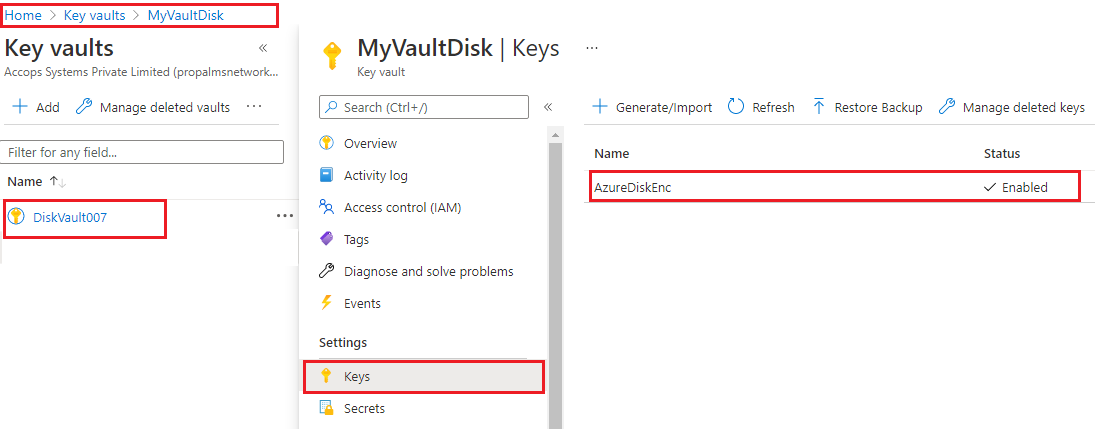
-
Locate current version of key and click on it. It will open the key details.
-
Find the Key Identifier and copy URL, Refer below image: