Preparation
Audience
- AWS Cloud Administrators
Pre-Requisite
- AWS Account, You can get started with Amazon EC2 using the AWS Free Tier.
Create HySecure VM using Hyper-V/Esxi
Step 1: Prepare HySecure VM with below configuration on any hypervisor of your choice for example: Esxi/Hyperv/VMware Workstation/Virtual Box.
Important
CPU: 2vCPU
RAM: 4GB
HDD: 30GB (For QA/POC/Testing) or 60GB (For Production )
Installation option: **Install Accops Gateway Appliance for Cloud**
Step 2: Post successful installation of Accops HySecure VM below screen should be shown on VM console in hypervisor.

Login to console with default login credentials and update below settings.
    1: systemctl disable NetworkManager
    2: Check DHCP IP is getting assigned by default or not ( Dont set any Static IP )
    3: If DHCP IP Address is not getting assigned please use below command to correct it.
        cat << EOF > /etc/sysconfig/network-scripts/ifcfg-eth0
        DEVICE=eth0
        ONBOOT=yes
        BOOTPROTO=dhcp
        TYPE=Ethernet
        USERCTL=no
        PEERDNS=yes
        IPV6INIT=no
        NM_CONTROLLED=yes
        PERSISTENT_DHCLIENT=yes
        EOF
    4: Disable predictable network interface names by adding the net.ifnames=0 option to the GRUB_CMDLINE_LINUX line in /etc/default/grub.
Replicate HySecure VM using (https://docs.aws.amazon.com/server-migration-service/latest/userguide/console_workflow.html#configure_replication)
- AWS SMS automatically replicates live server volumes to AWS and creates an Amazon Machine Image (AMI) as needed.
Sign in to the Console
-
Sign in to the AWS Management Console.

Note
To deploy latest HySecure Gateway, please use Replication of HySecure VM to deploy it in AWS cloud.
Create AWS Network Security Group
-
A security group acts as a virtual firewall for your instance to control inbound and outbound traffic. When you launch an instance in a VPC, you can assign up to five security groups to the instance. Security groups act at the instance level, not the subnet level. Therefore, each instance in a subnet in your VPC can be assigned to a different set of security groups.
-
For Accops HySecure Gateway below Security Group need to be created and attached to all Instance for Example : Active, Standby & Real Node.
Inbound Rules
| Type | Protocol | Port Range | Source | Description |
|---|---|---|---|---|
| Custom TCP | TCP | 939 | Anywhere-IPv4 : 0.0.0.0/0 | Heartbeat Communication |
| Custom TCP | TCP | 3636 | Anywhere-IPv4 : 0.0.0.0/0 | Cluster Communication |
| Custom TCP | TCP | 3306 | Anywhere-IPv4 : 0.0.0.0/0 | Database Communication |
| Custom TCP | TCP | 443 | Anywhere-IPv4 : 0.0.0.0/0 | HTTPS Internal Communication |
| Custom TCP | TCP | 51234 | Anywhere-IPv4 : 0.0.0.0/0 | Remote Meeting Hosting (Optional) |
| Custom TCP | TCP | 22 | Anywhere-IPv4 : 0.0.0.0/0 | SSH Between the Cluster |
| ALL ICMP-IPV4 | ICMP | All | Anywhere-IPv4 : 0.0.0.0/0 | Allow Ping Between the Cluster |
Outbound Rules
| Type | Protocol | Port Range | Destination | Description |
|---|---|---|---|---|
| ALL Traffic | All | All | Custom : 0.0.0.0/0 | Default Outbound Rule |
Info
Above Inbound and outbound rule can be restricted as per requirement above rule is created for allow communications form any source and destination IP.
Step 1: Open the Amazon EC2 console at https://console.aws.amazon.com/ec2/
Step 2: In the navigation pane, under Network & Security, choose SecurityGroups.

Step 3: Choose Create target group.

Step 4: Add Basic Details as Security Group Name, Description and VPC info.

Step 5: Add Inbound Rules

Step 6: Add Outbound Rule.

Step 7: Add tags and Create Security Group.

More info about Security Groups
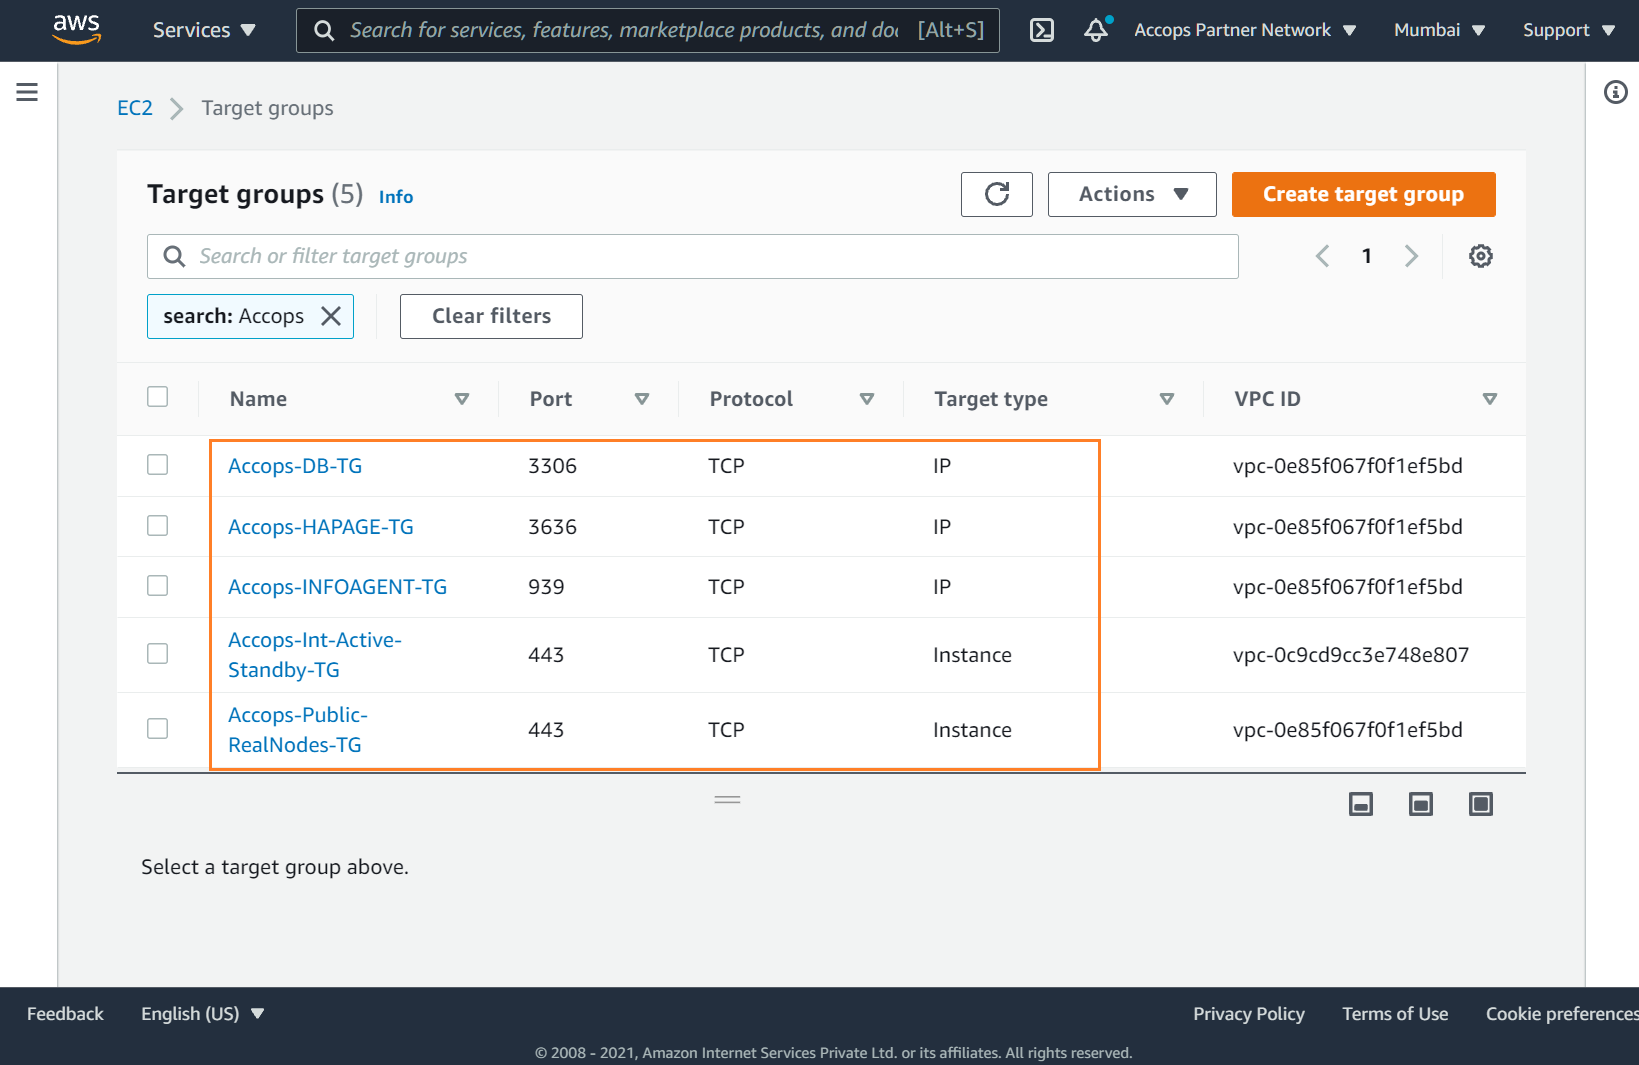
Create AWS Target Groups & Listeners
- Target group, which is used in request routing. The rule for your listener routes requests to the registered targets in this target group. The load balancer checks the health of targets in this target group using the health check settings defined for the target group.
Create below Target Groups & Health Check Listeners
| Name | Port | Protocol | Target Type | Health Check Protocol | Advance Health Check Settings | Remarks |
|---|---|---|---|---|---|---|
| Accops-Infoagent-TG | 939 | TCP | IP | TCP | Port: Traffic Port | Heartbeat Commmunications |
| Accops-HAPAGE-TG | 3636 | TCP | IP | TCP | Port: Traffic Port | Cluster Communications |
| Accops-DB-TG | 3306 | TCP | IP | TCP | Port: Override:3636 | Database Communications |
| Accops-Int-Active-Standby-TG | 443 | TCP | Instance | HTTPS | Path: /statuscheck | HTTPS Internal Communications |
| Accops-Public-RealNodes-TG | 443 | TCP | Instance | HTTPS | Path: /hapage.html | HTTPS End User Communications |
| Accops-Remote-Meeting-TG | 51234 | TCP | IP | TCP | Port: Traffice Port | Remote Meeting Hosting (Optional) |
Steps to Create Infoagent Target Group.
Purpose : Heartbeat Communication between Nodes.
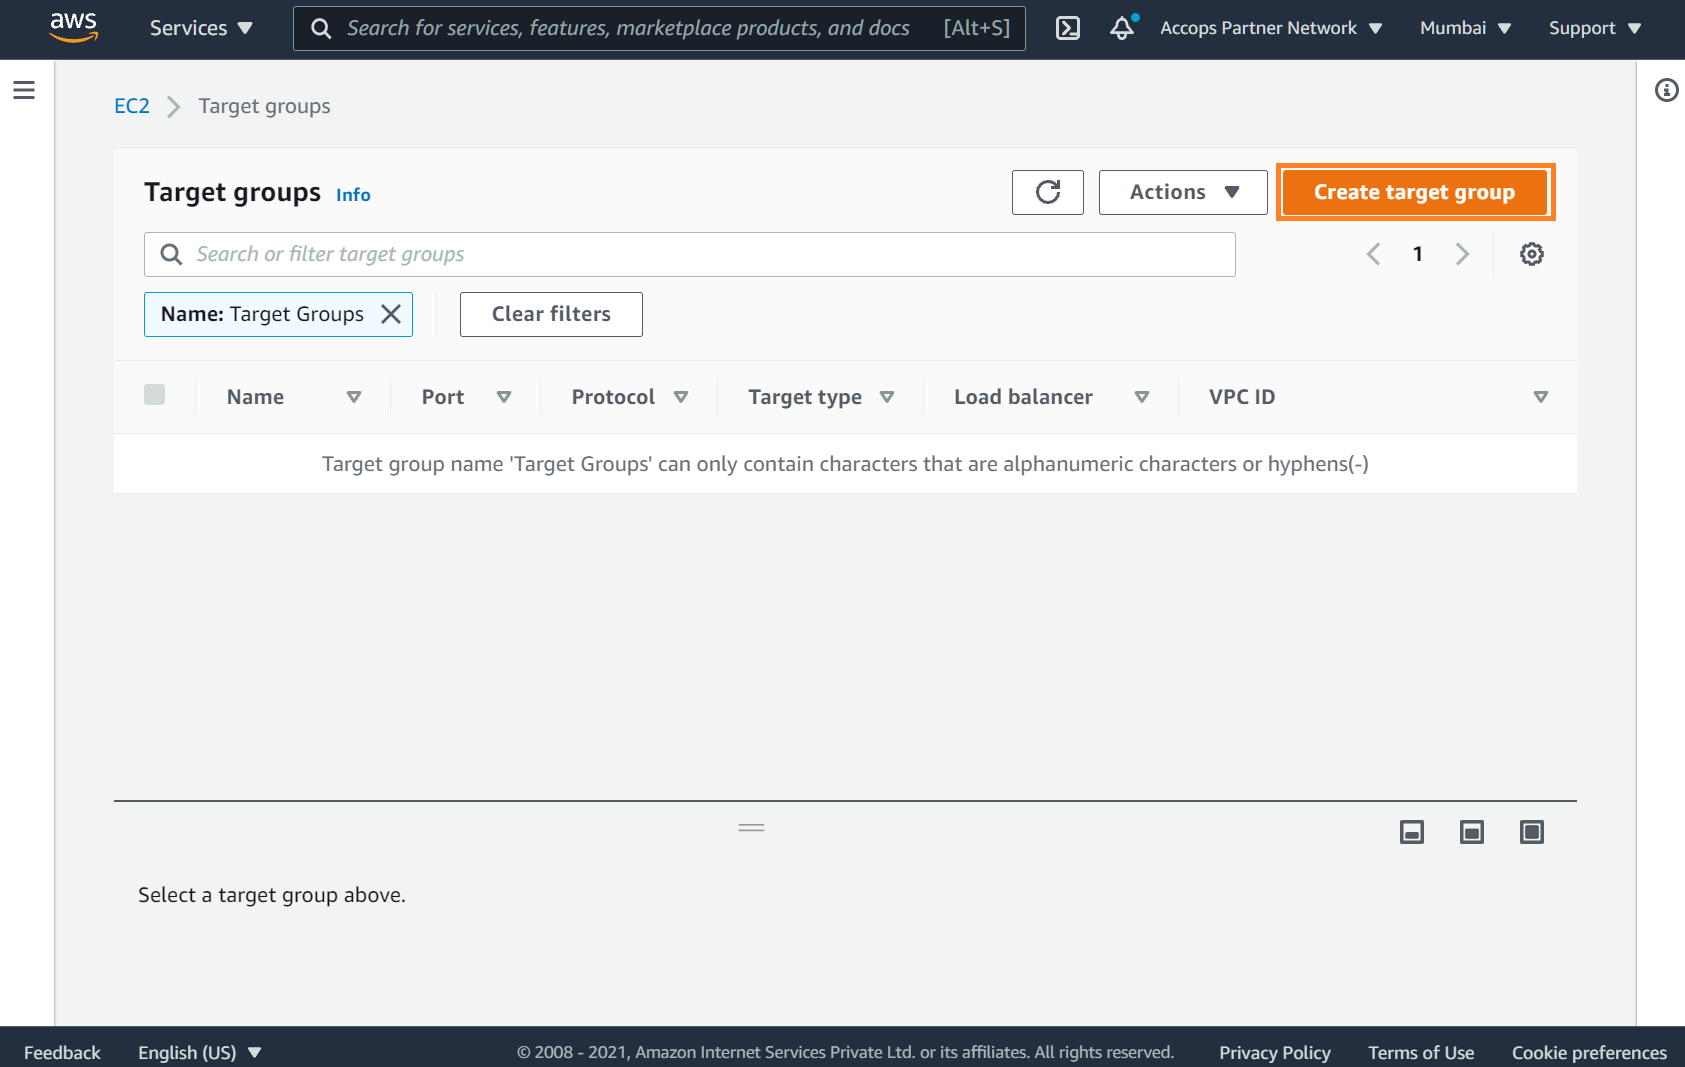
Step 1: Open the Amazon EC2 console at https://console.aws.amazon.com/ec2/
Step 2: In the navigation pane, under Load Balancing, choose Target Groups.

Step 3: Choose Create target group.
Step 4: Choose Target type as IP addresses
Step 5: For Target group name, enter a name for the new target group as Accops-Infoagent-TG.
Step 6: Keep Protocol as TCP, and Port as 939.
Step 7: Select the VPC containing your instances. Keep the protocol version as HTTP1.
Step 8: For Health checks, keep the default settings.

Step 9: Click on Next
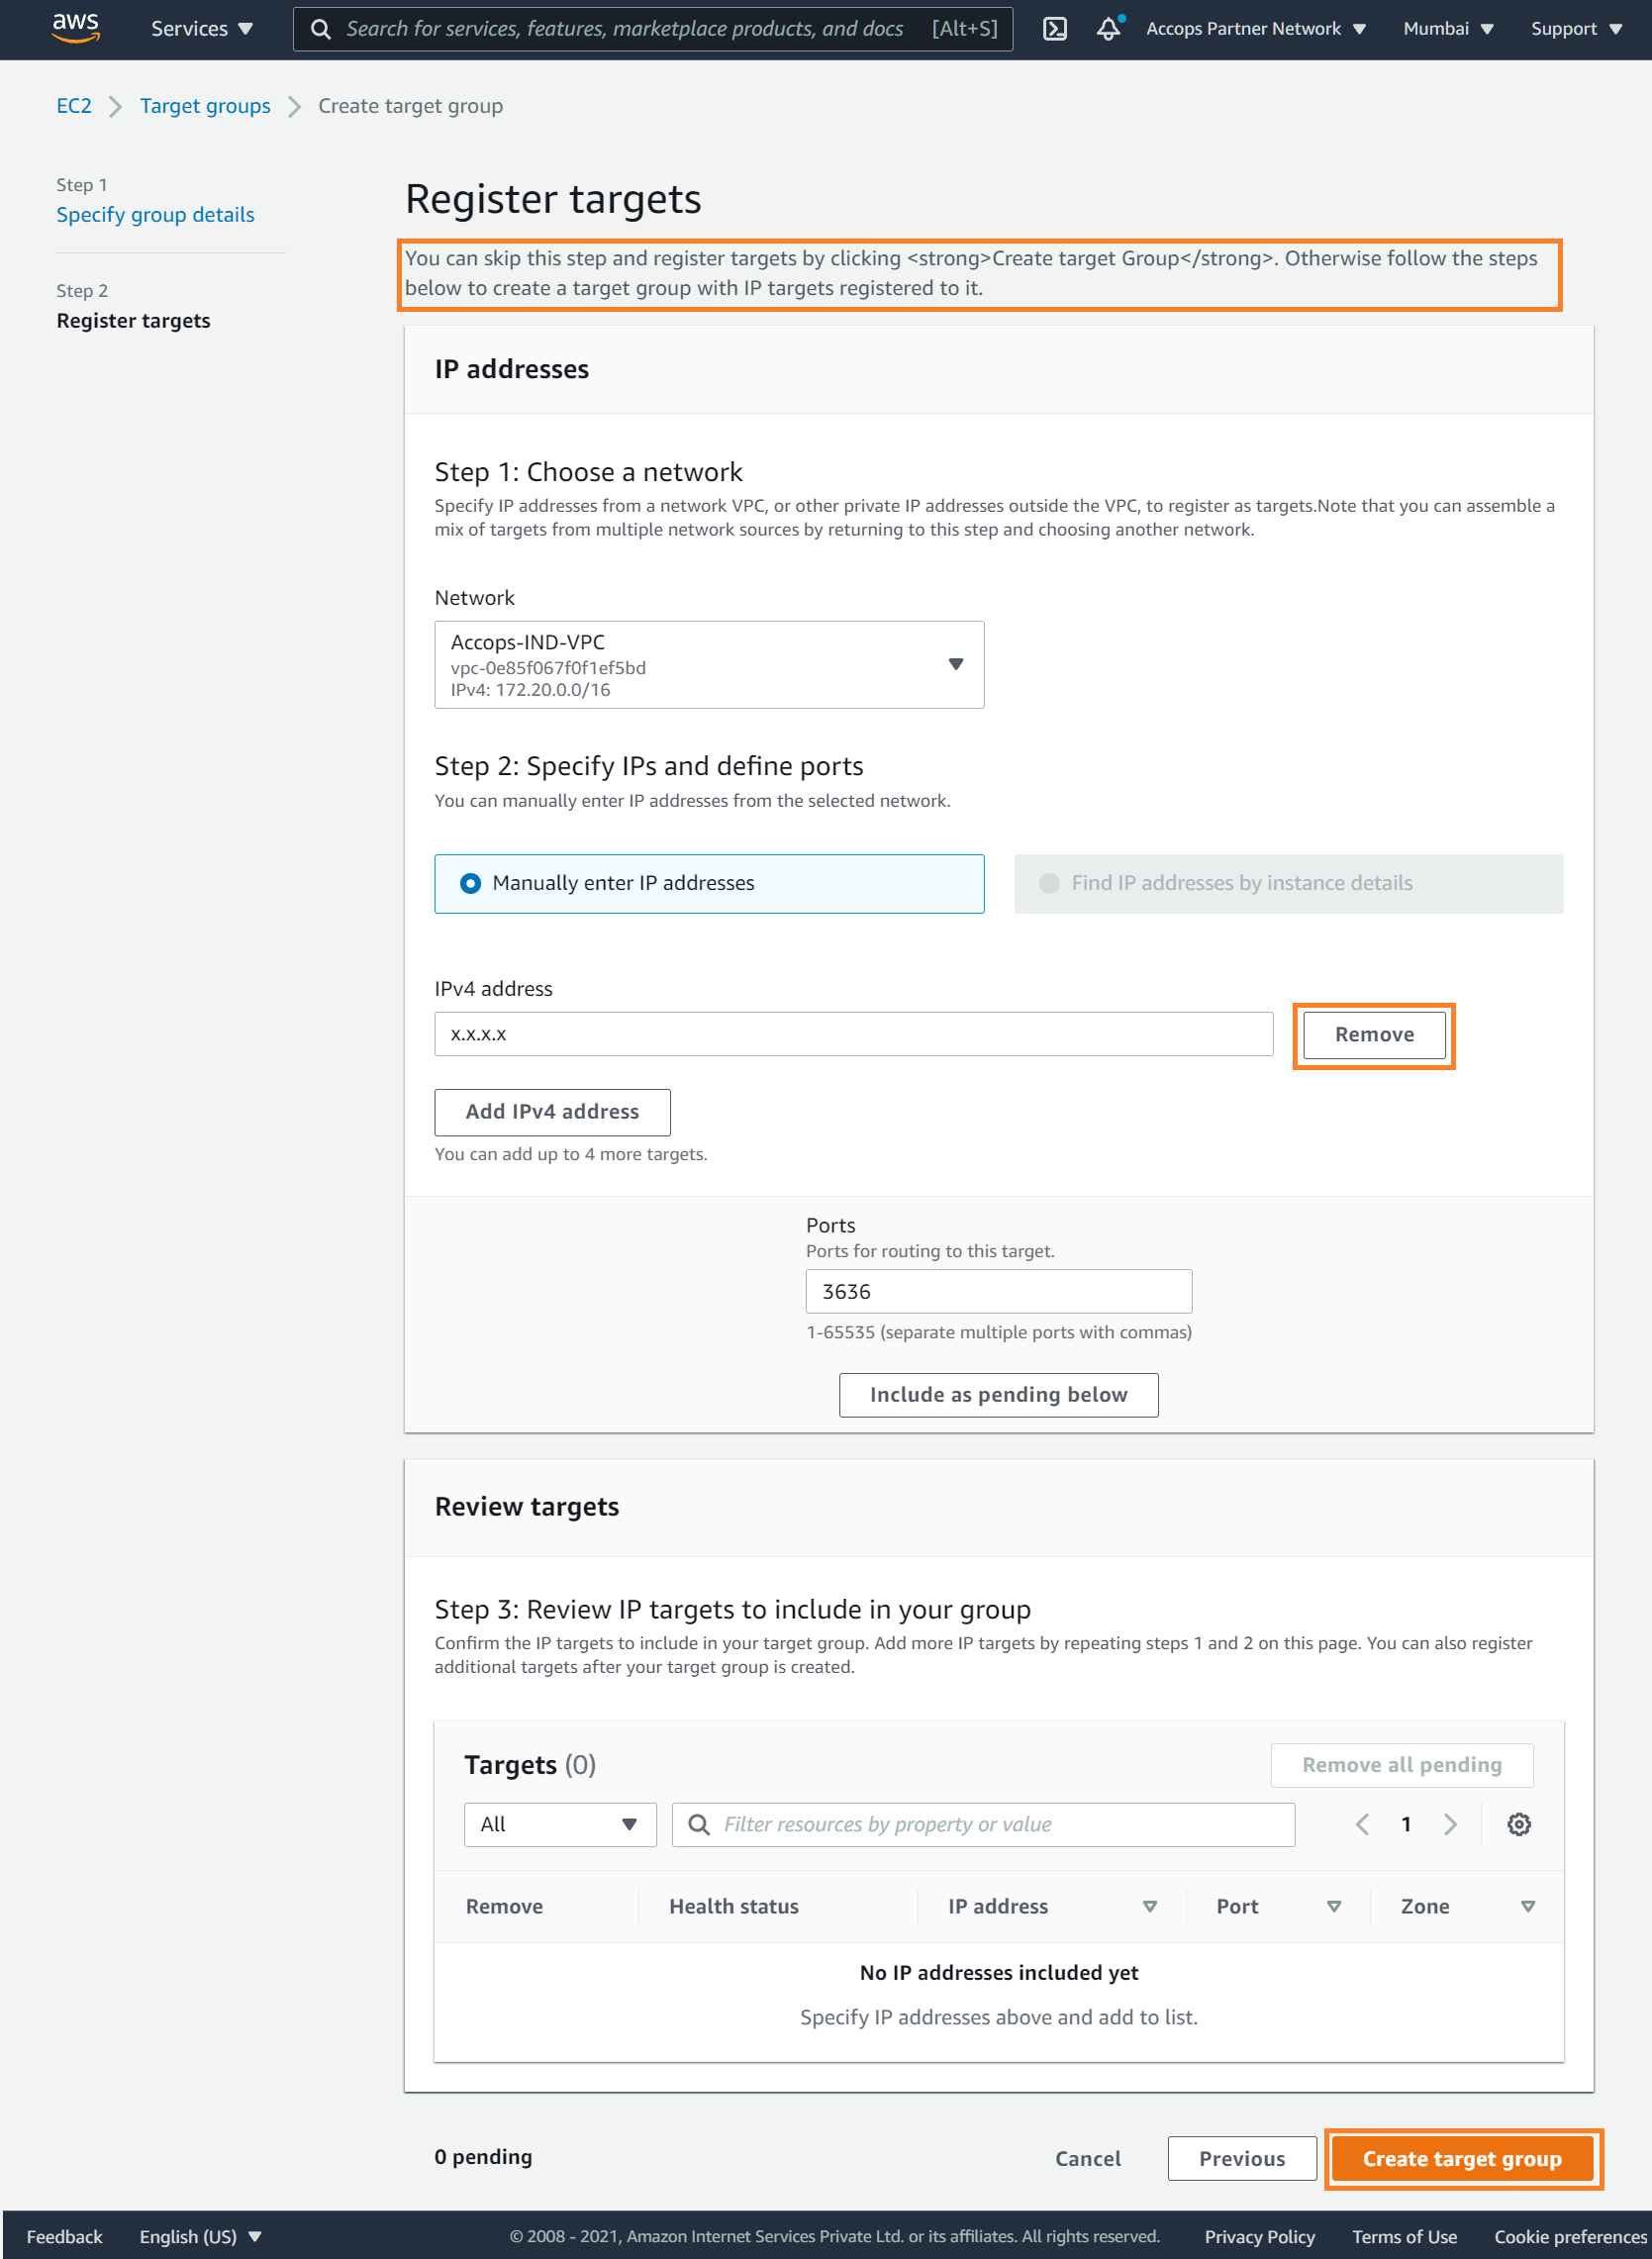
Step 10: On the Register targets page, complete the following steps. This is an optional step to create a target group. However, you must register your targets if you want to test your load balancer and ensure that it is routing traffic to your targets.
Add IPv4 Address of Active Gateway if it is already provisoned, Keep the default port 939, and choose Include as pending below.
or skip it to update this target group later, once Active Node is ready.
Step 11: Choose Create target group.

Steps to Create HAPAGE Target Group.
Purpose : Cluster Communication between Nodes.
Step 1: Open the Amazon EC2 console at https://console.aws.amazon.com/ec2/
Step 2: In the navigation pane, under Load Balancing, choose Target Groups.
Step 3: Choose Create target group.
Step 4: Choose Target type as IP addresses
Step 5: For Target group name, enter a name for the new target group as Accops-HAPAGE-TG.
Step 6: Keep Protocol as TCP, and Port as 3636.
Step 7: Select the VPC containing your instances. Keep the protocol version as HTTP1.
Step 8: For Health checks, keep the default settings.
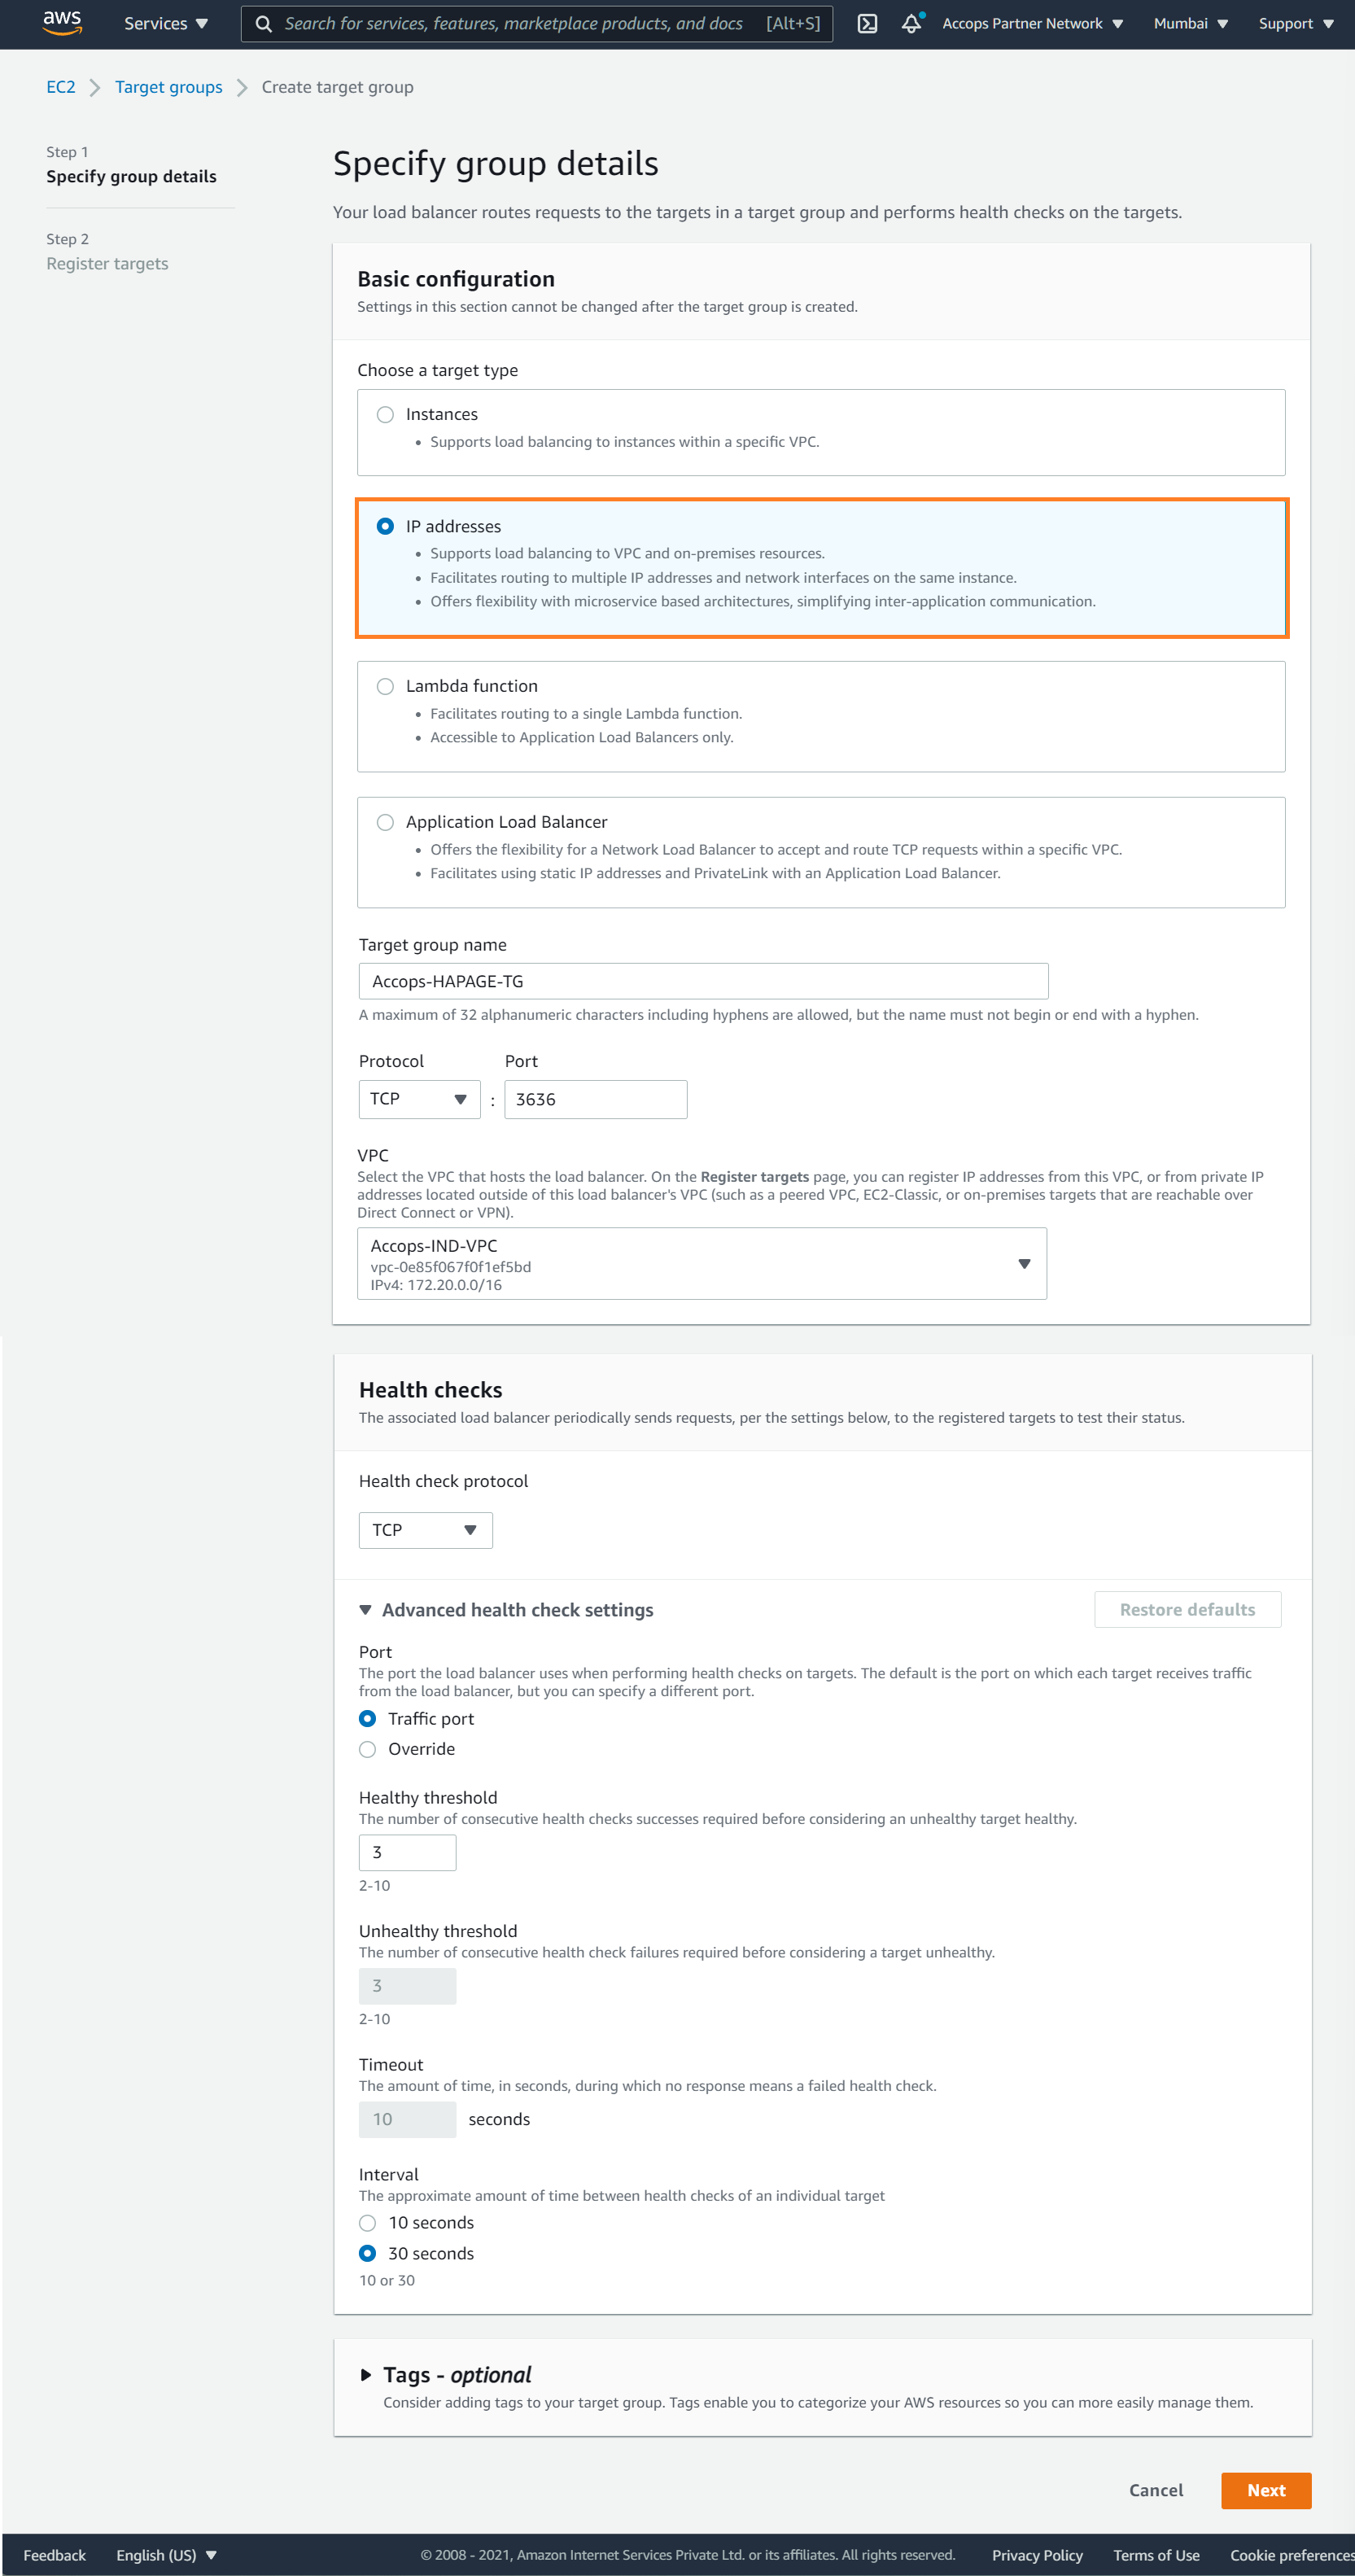
Step 9: Choose Next
Step 10: On the Register targets page, complete the following steps. This is an optional step to create a target group. However, you must register your targets if you want to test your load balancer and ensure that it is routing traffic to your targets.
Add IPv4 Address of Active Gateway if it is already provisoned, Keep the default port 3636, and choose Include as pending below.
or skip it to update this target group later, once Active Node is ready.
Step 11: Choose Create target group.
Steps to Create Database Target Group.
Purpose : Cluster Communication between Nodes.
Step 1: Open the Amazon EC2 console at https://console.aws.amazon.com/ec2/
Step 2: In the navigation pane, under Load Balancing, choose Target Groups.
Step 3: Choose Create target group.
Step 4: Choose Target type as IP addresses
Step 5: For Target group name, enter a name for the new target group as Accops-DB-TG.
Step 6: Keep Protocol as TCP, and Port as 3306.
Step 7: Select the VPC containing your instances. Keep the protocol version as HTTP1.
Step 8: For Health checks, keep the Health check protocol as TCP and oveeride Advance health check settings Port as 3636.

Step 9: Choose Next
Step 10: On the Register targets page, complete the following steps. This is an optional step to create a target group. However, you must register your targets if you want to test your load balancer and ensure that it is routing traffic to your targets.
Add IPv4 Address of Active Gateway if it is already provisoned, Keep the default port 3306, and choose Include as pending below.
or skip it to update this target group later, once Active Node is ready.
Step 11: Choose Create target group.

Step to Create HTTPS Target Group.
Purpose : Cluster Communication between Nodes.
Step 1: Open the Amazon EC2 console at https://console.aws.amazon.com/ec2/
Step 2: In the navigation pane, under Load Balancing, choose Target Groups.
Step 3: Choose Create target group.
Step 4: Keep Target type as Instance.
Step 5: For Target group name, enter a name for the new target group as Accops-Int-Active-Standby-TG.
Step 6: Keep Protocol as TCP, and Port as 443.
Step 7: Select the VPC containing your instances. Keep the protocol version as HTTP1.
Step 8: For Health checks, keep the default settings.
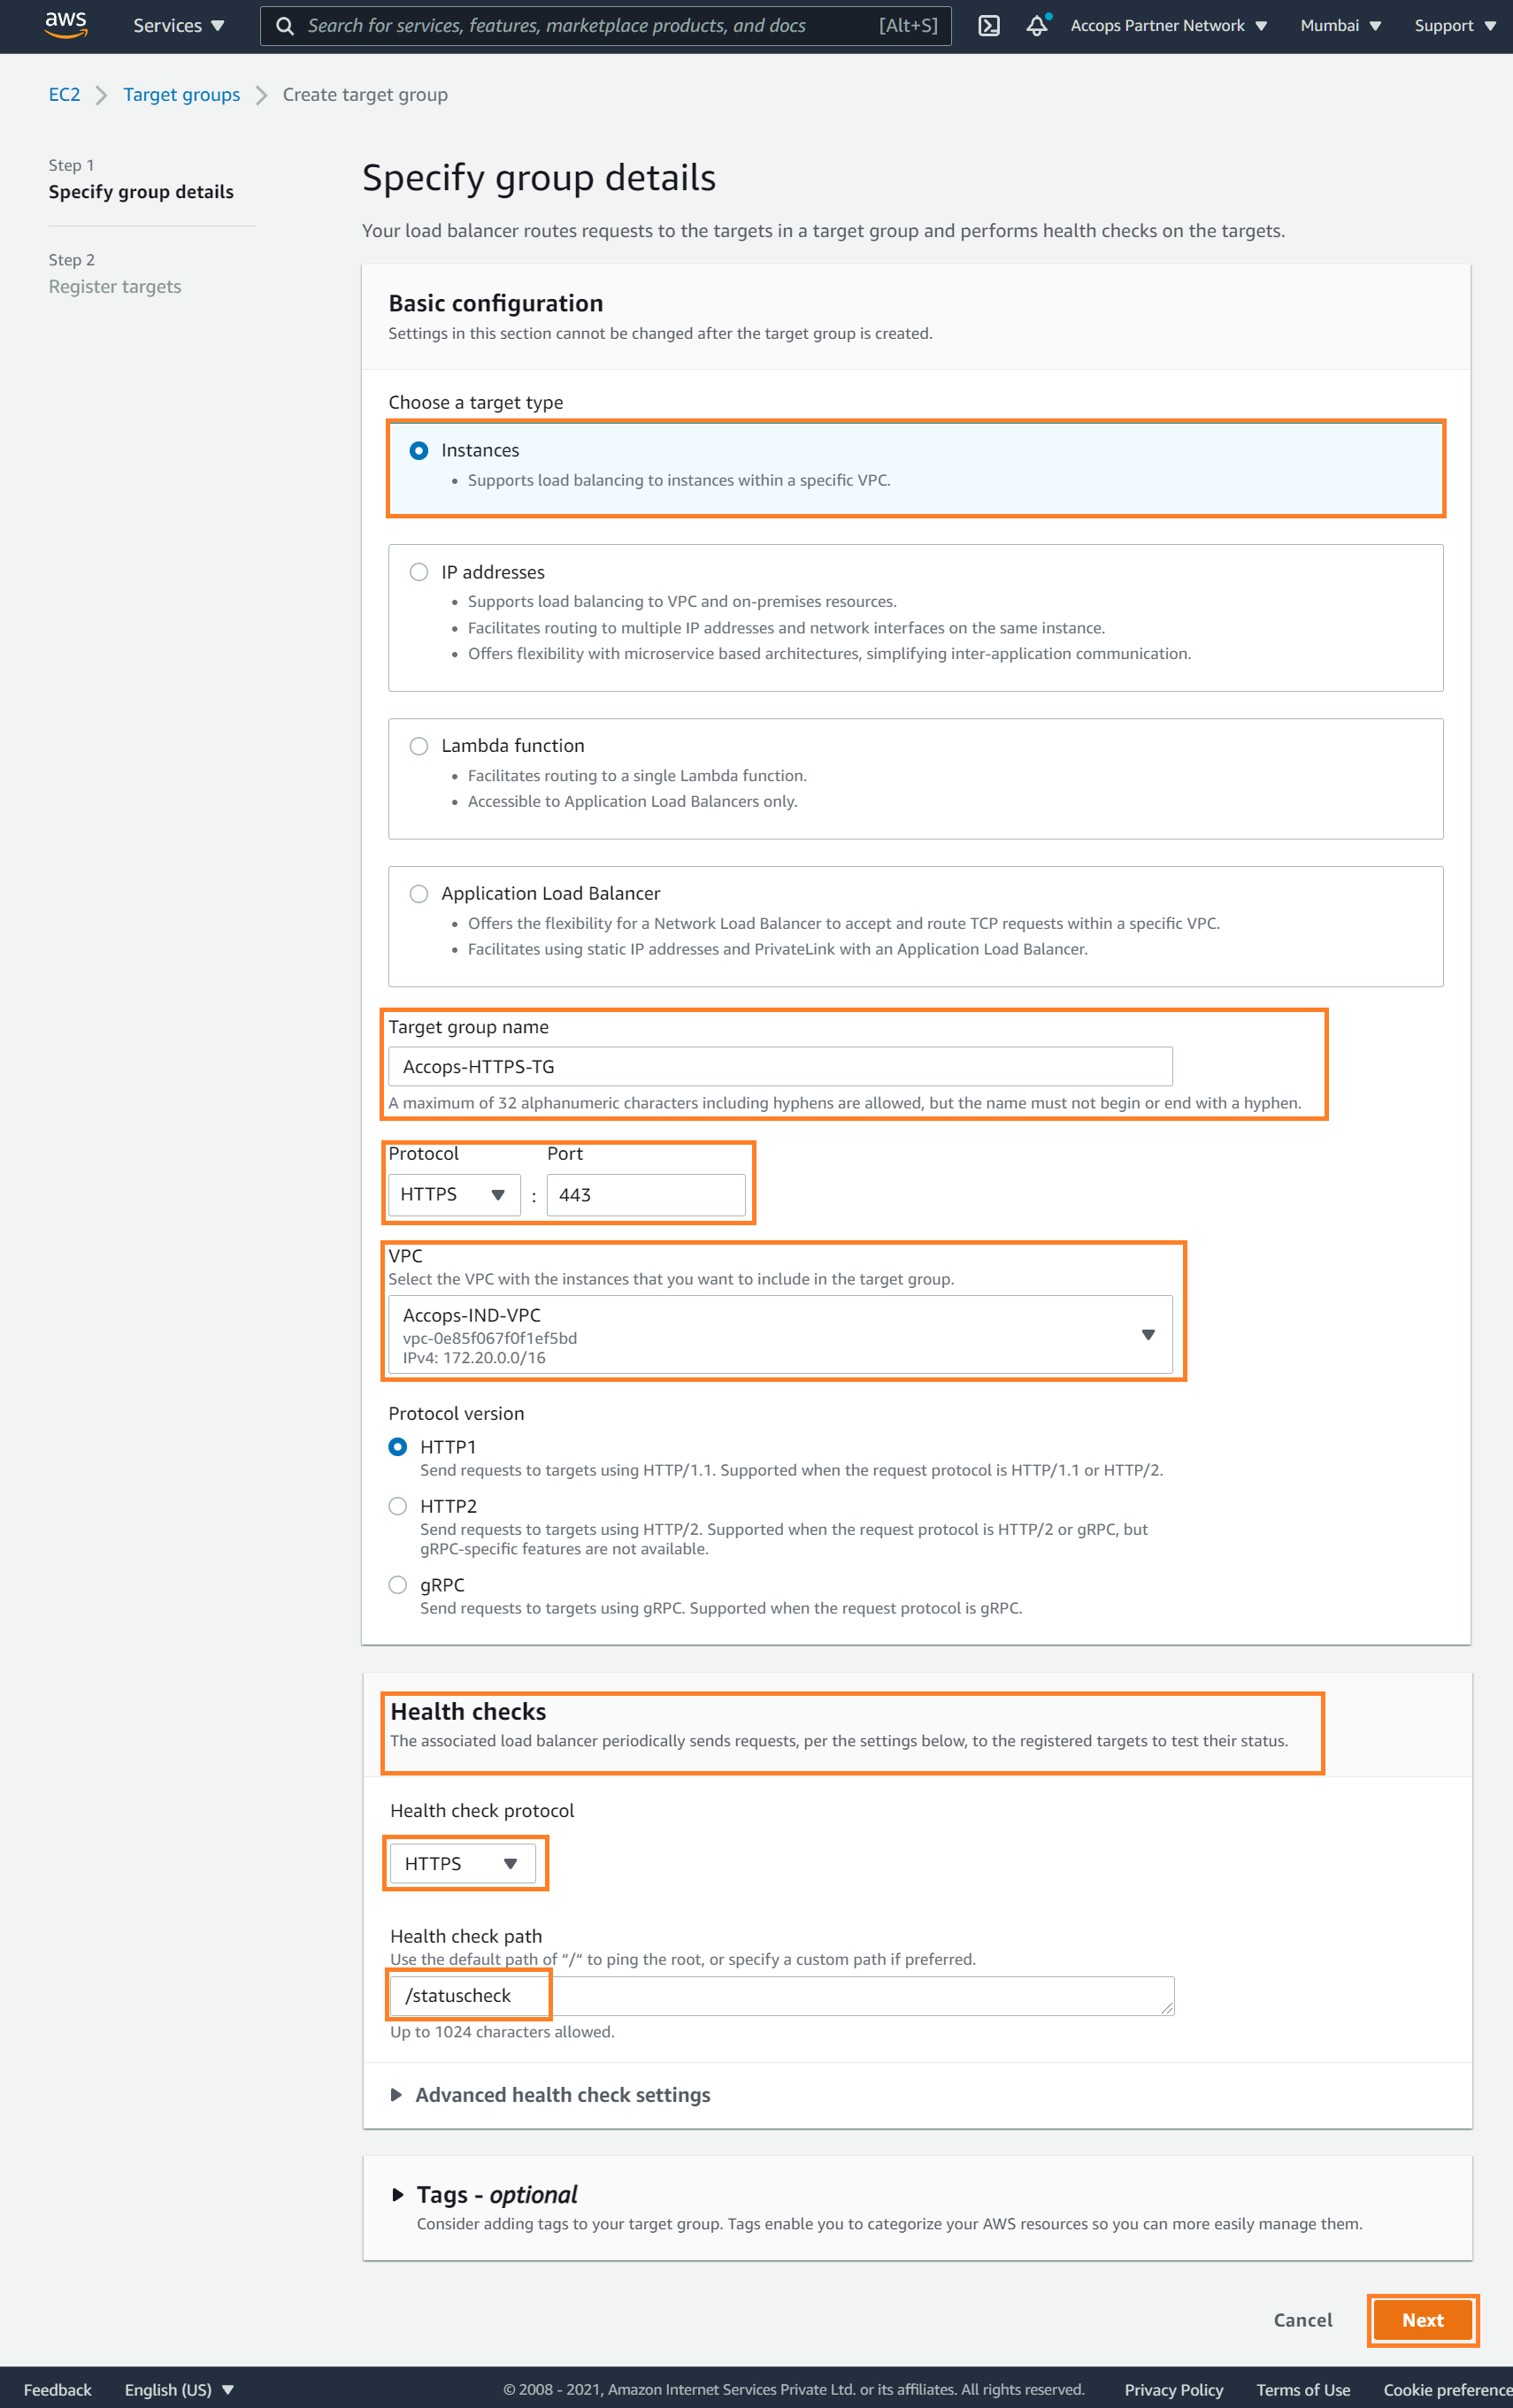
Step 9: Choose Next
Step 10: On the Register targets page, complete the following steps. This is an optional step to create a target group. However, you must register your targets if you want to test your load balancer and ensure that it is routing traffic to your targets.
For Available instances, select one or more instances if it is already provisoned, Keep the default port 443, and choose Include as pending below.
or skip it to update this target group later, once Active Node is ready.
Step 11: Choose Create target group.

Required Target Groups
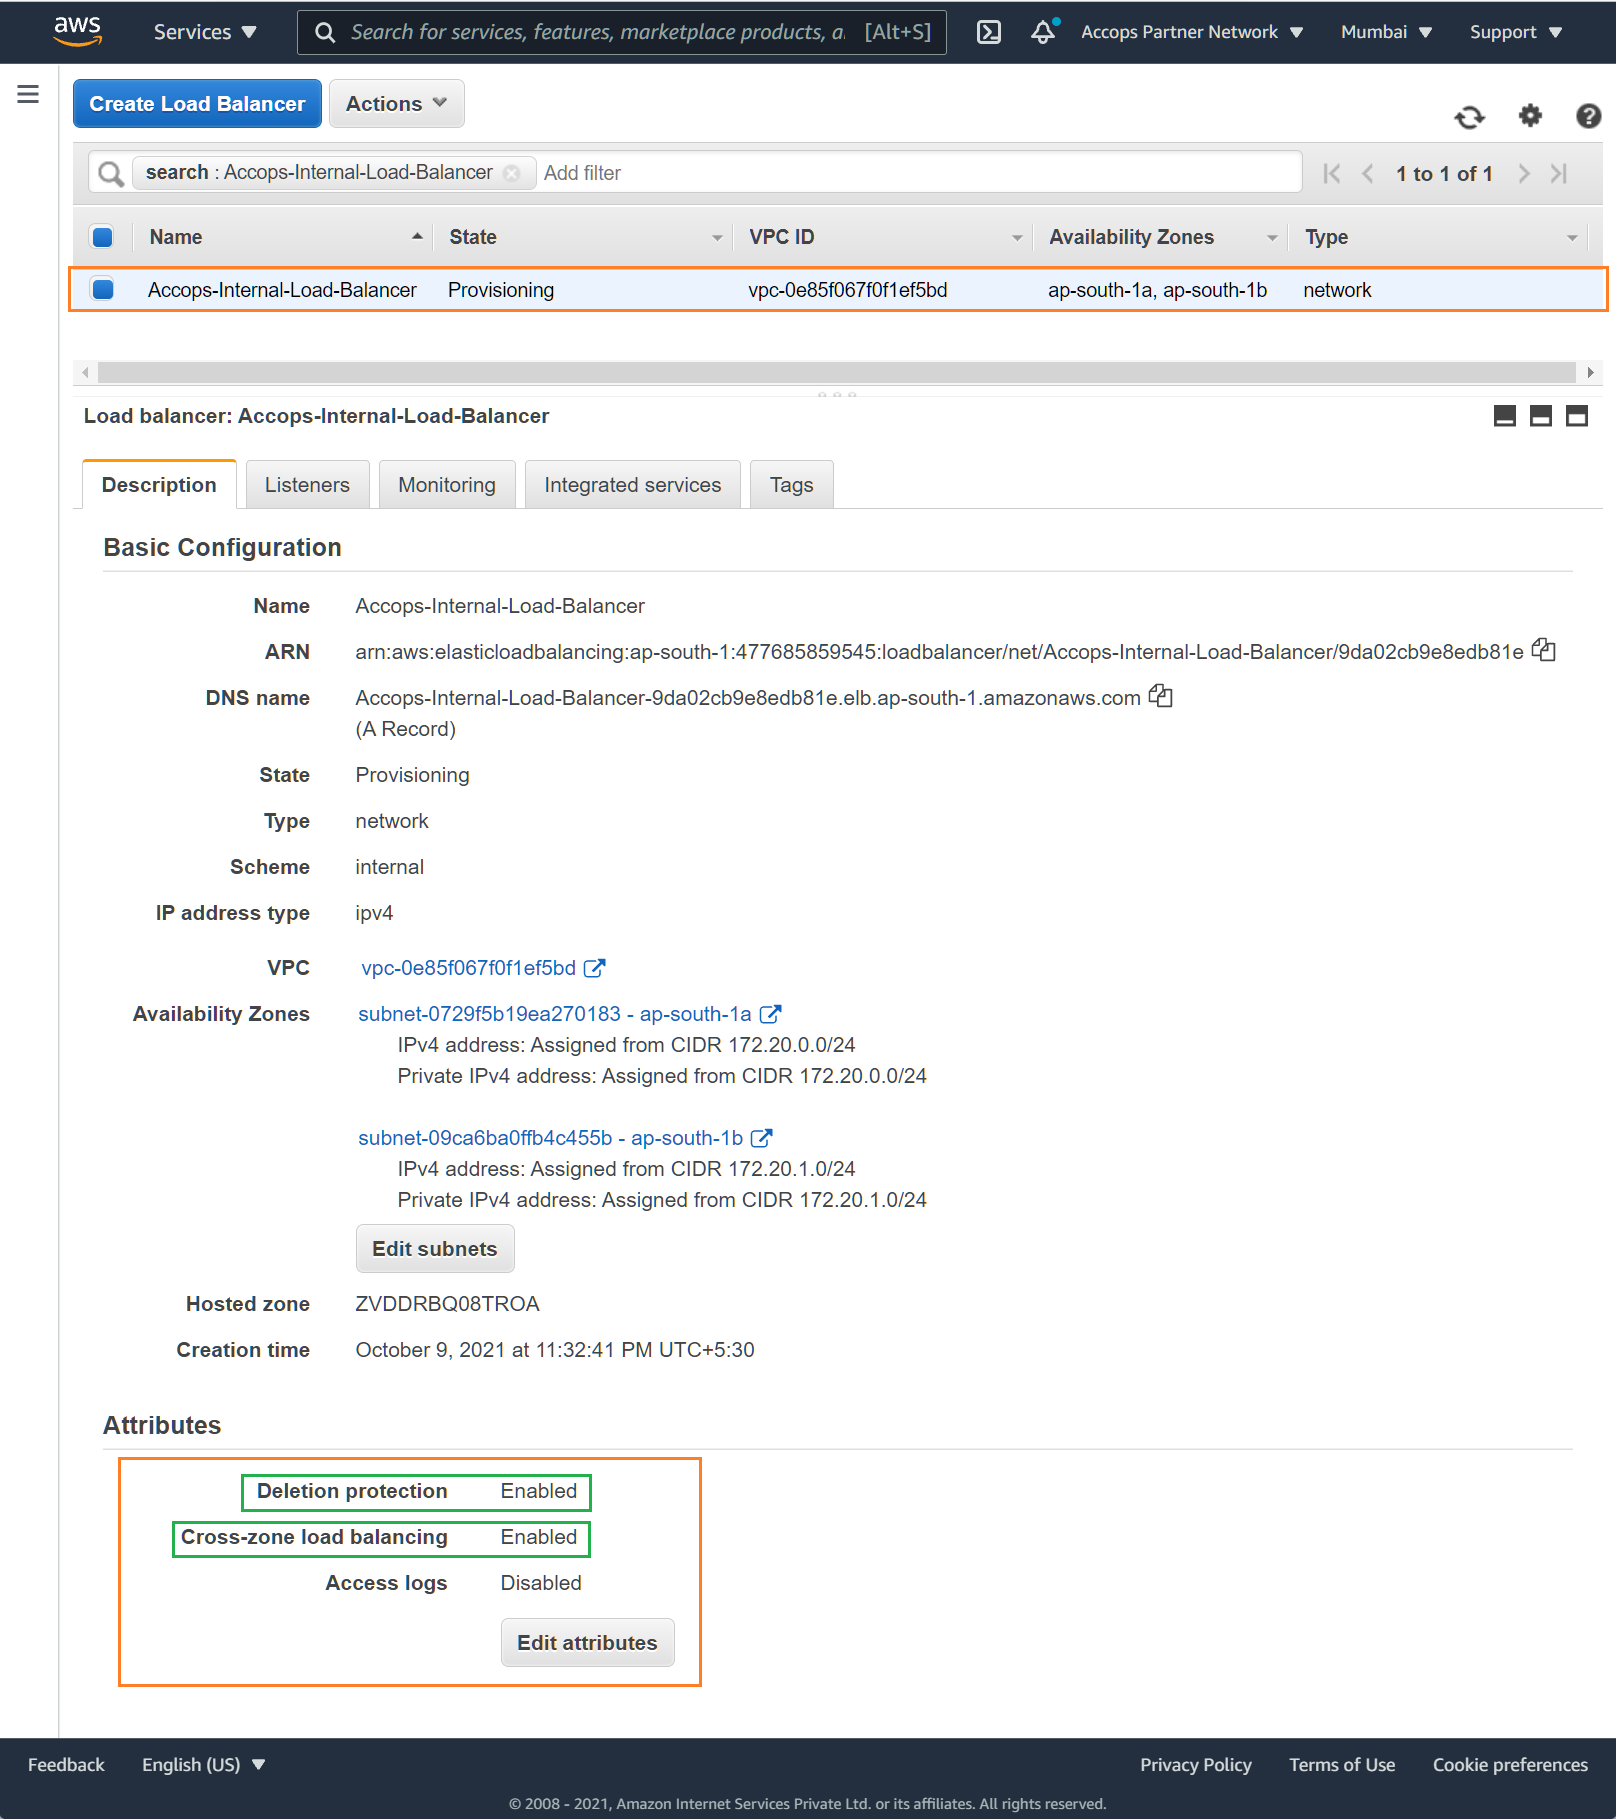
Create an Internal Network Load Balancer.
Before you begin
-
Decide which Availability Zones you will use for your EC2 instances. Configure your virtual private cloud (VPC) with at least one public subnet in each of these Availability Zones. These public subnets are used to configure the load balancer. You can launch your EC2 instances in other subnets of these Availability Zones instead.
-
Launch at least one EC2 instance in each Availability Zone. Ensure that the security groups for these instances allow TCP access from clients on the listener port and health check requests from your VPC. For more information, see Target security groups.
-
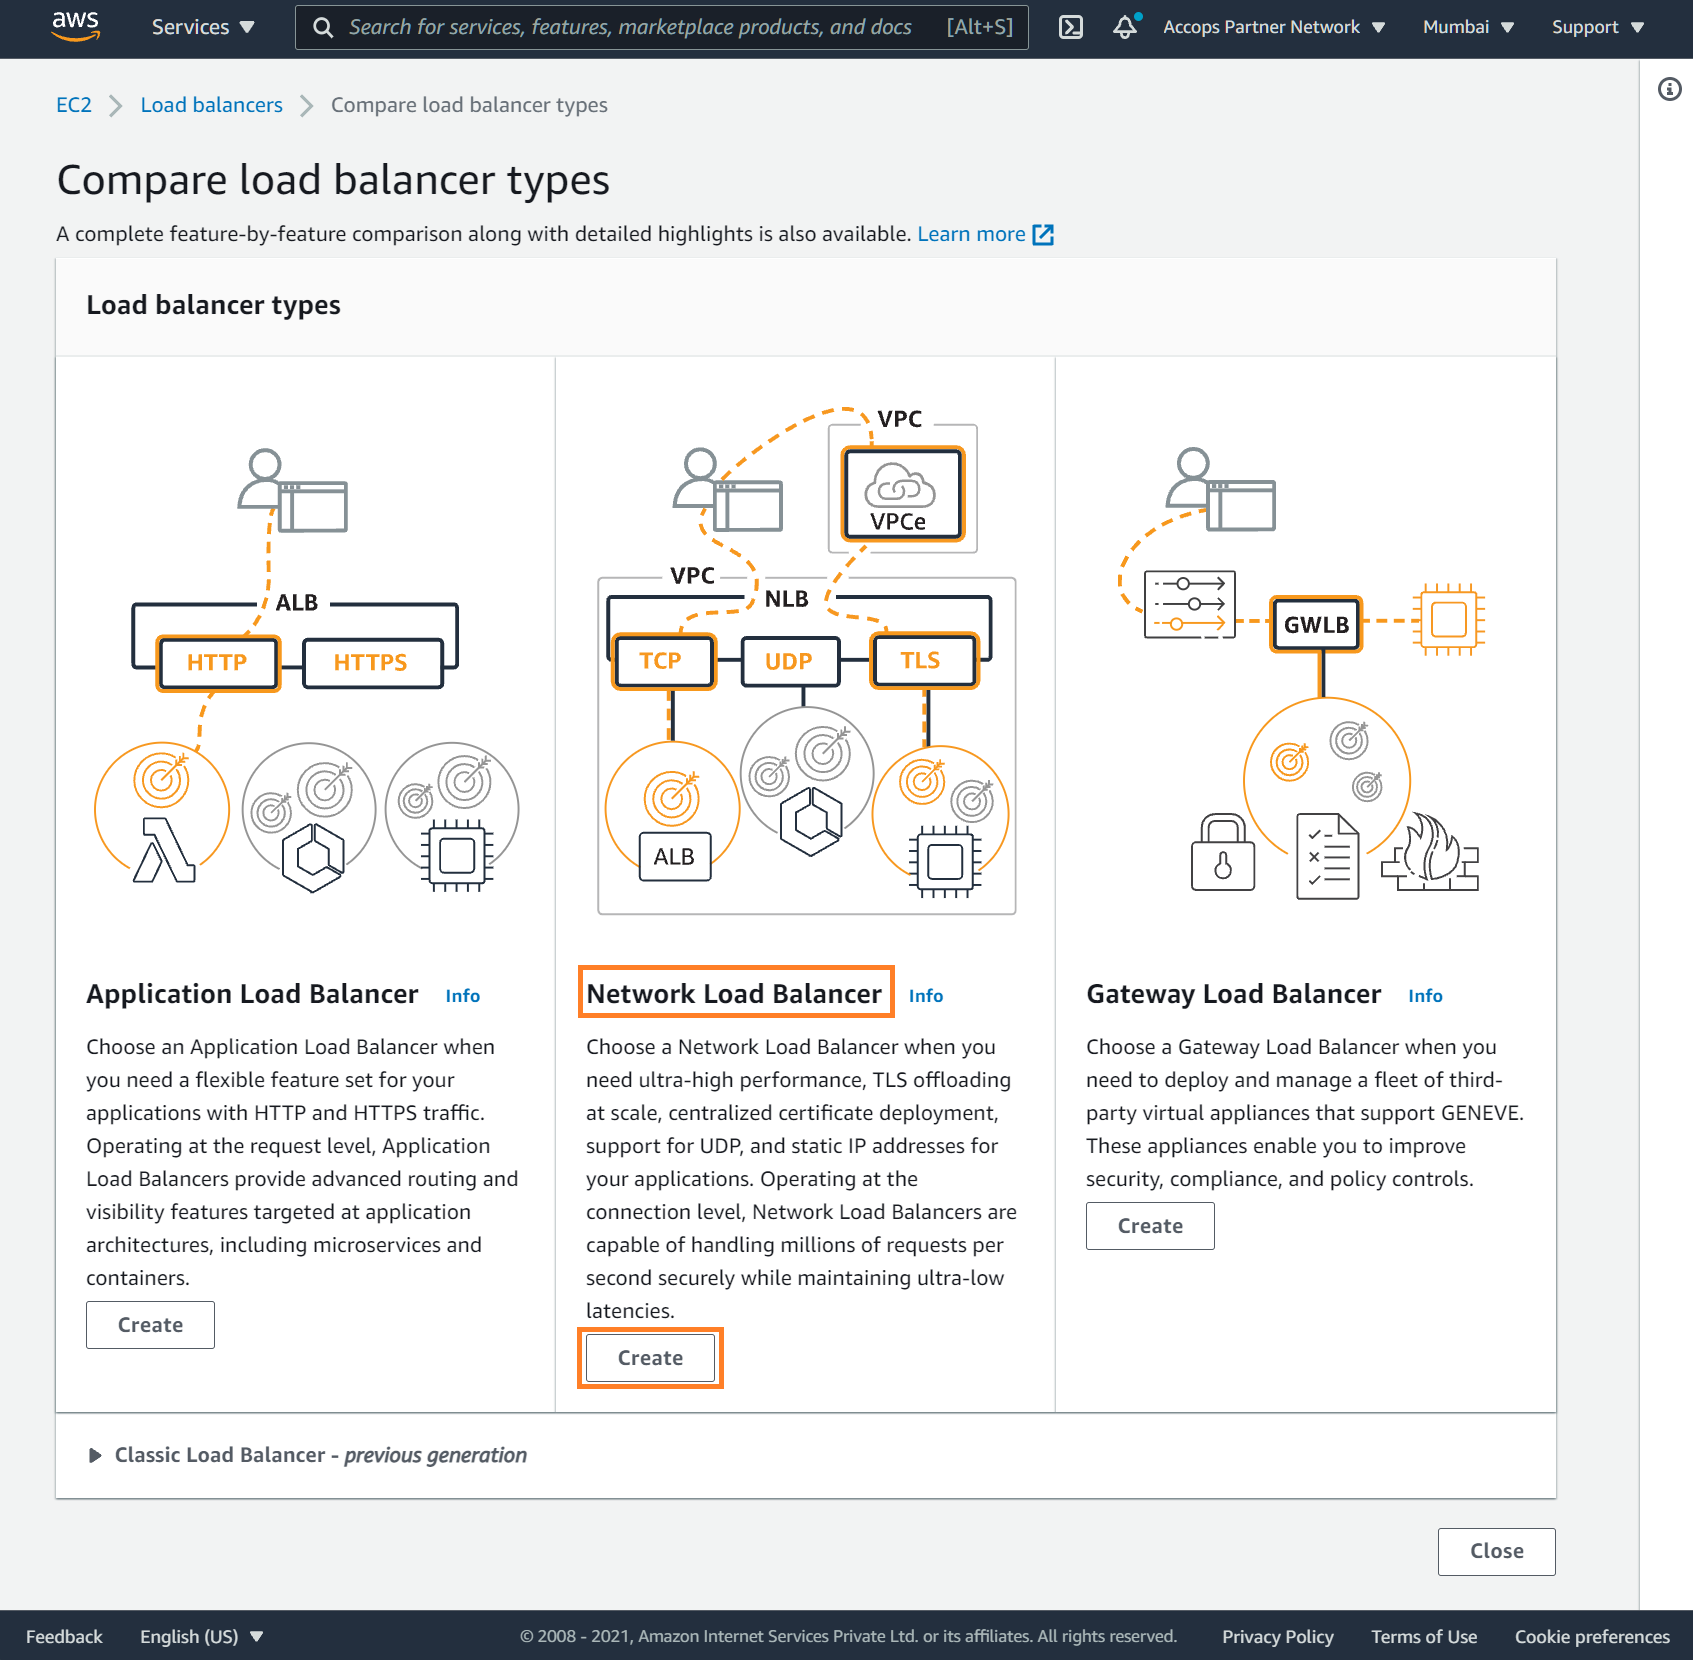
Elastic Load Balancing supports different types of load balancers. For this tutorial, you create a Network Load Balancer.
To create a Network Load Balancer
Step 1: Open the Amazon EC2 console at https://console.aws.amazon.com/ec2/.
Step 2: On the navigation bar, choose a Region for your load balancer. Be sure to choose the same Region that you used for your EC2 instances.
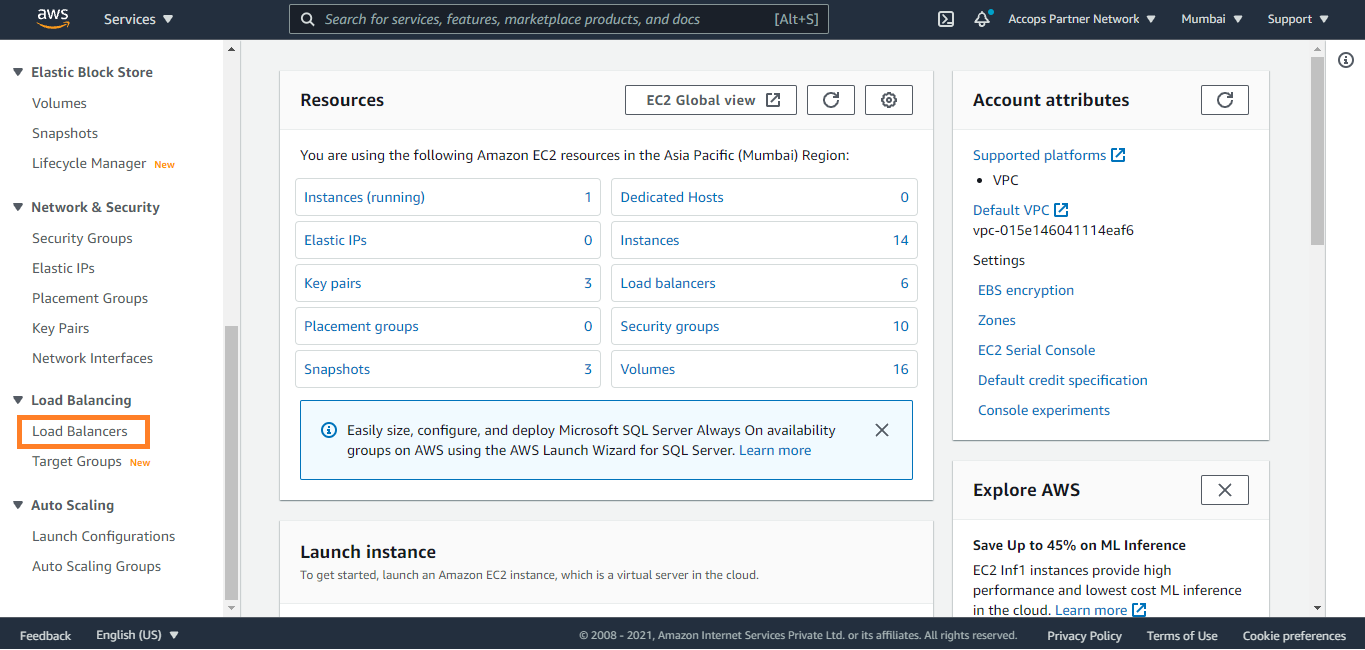
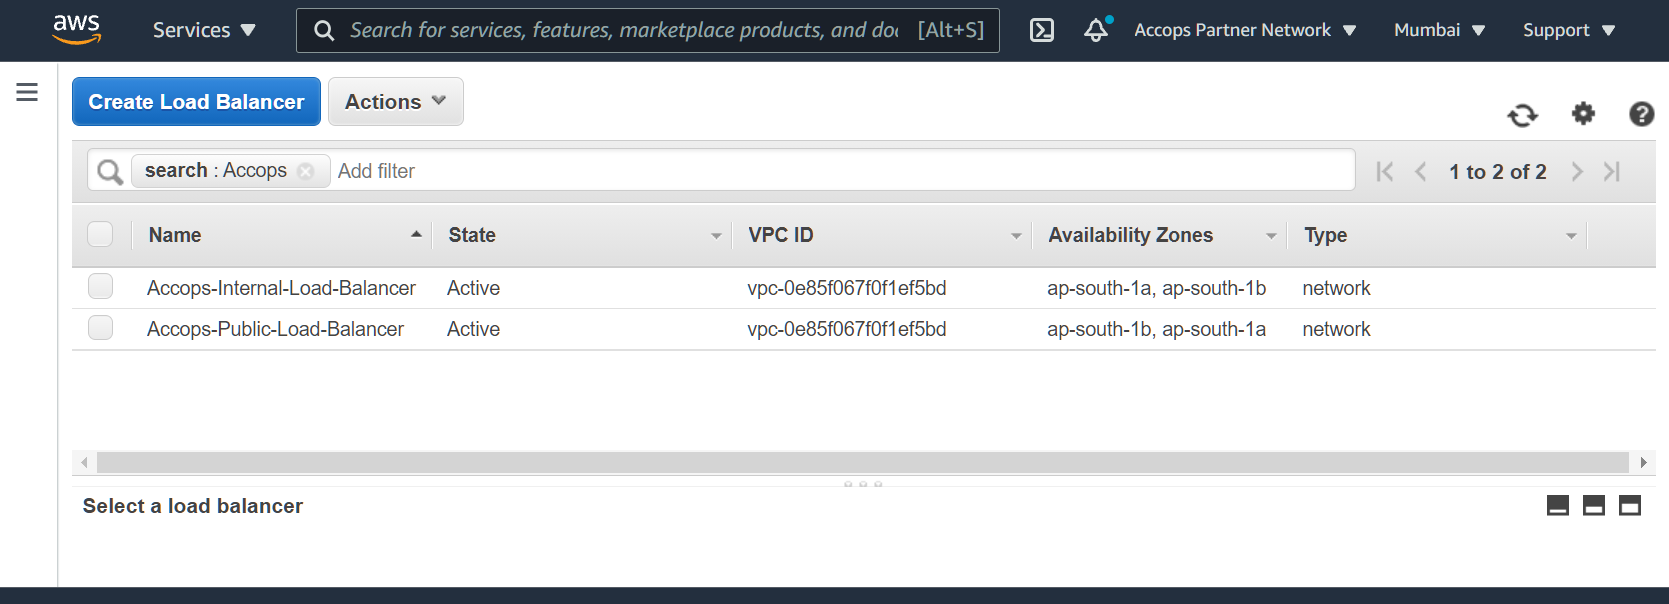
Step 3: In the navigation pane, under Load Balancing, choose Load Balancers.
Step 4: Choose Create Load Balancer.

Step 5: For Network Load Balancer, choose Create.
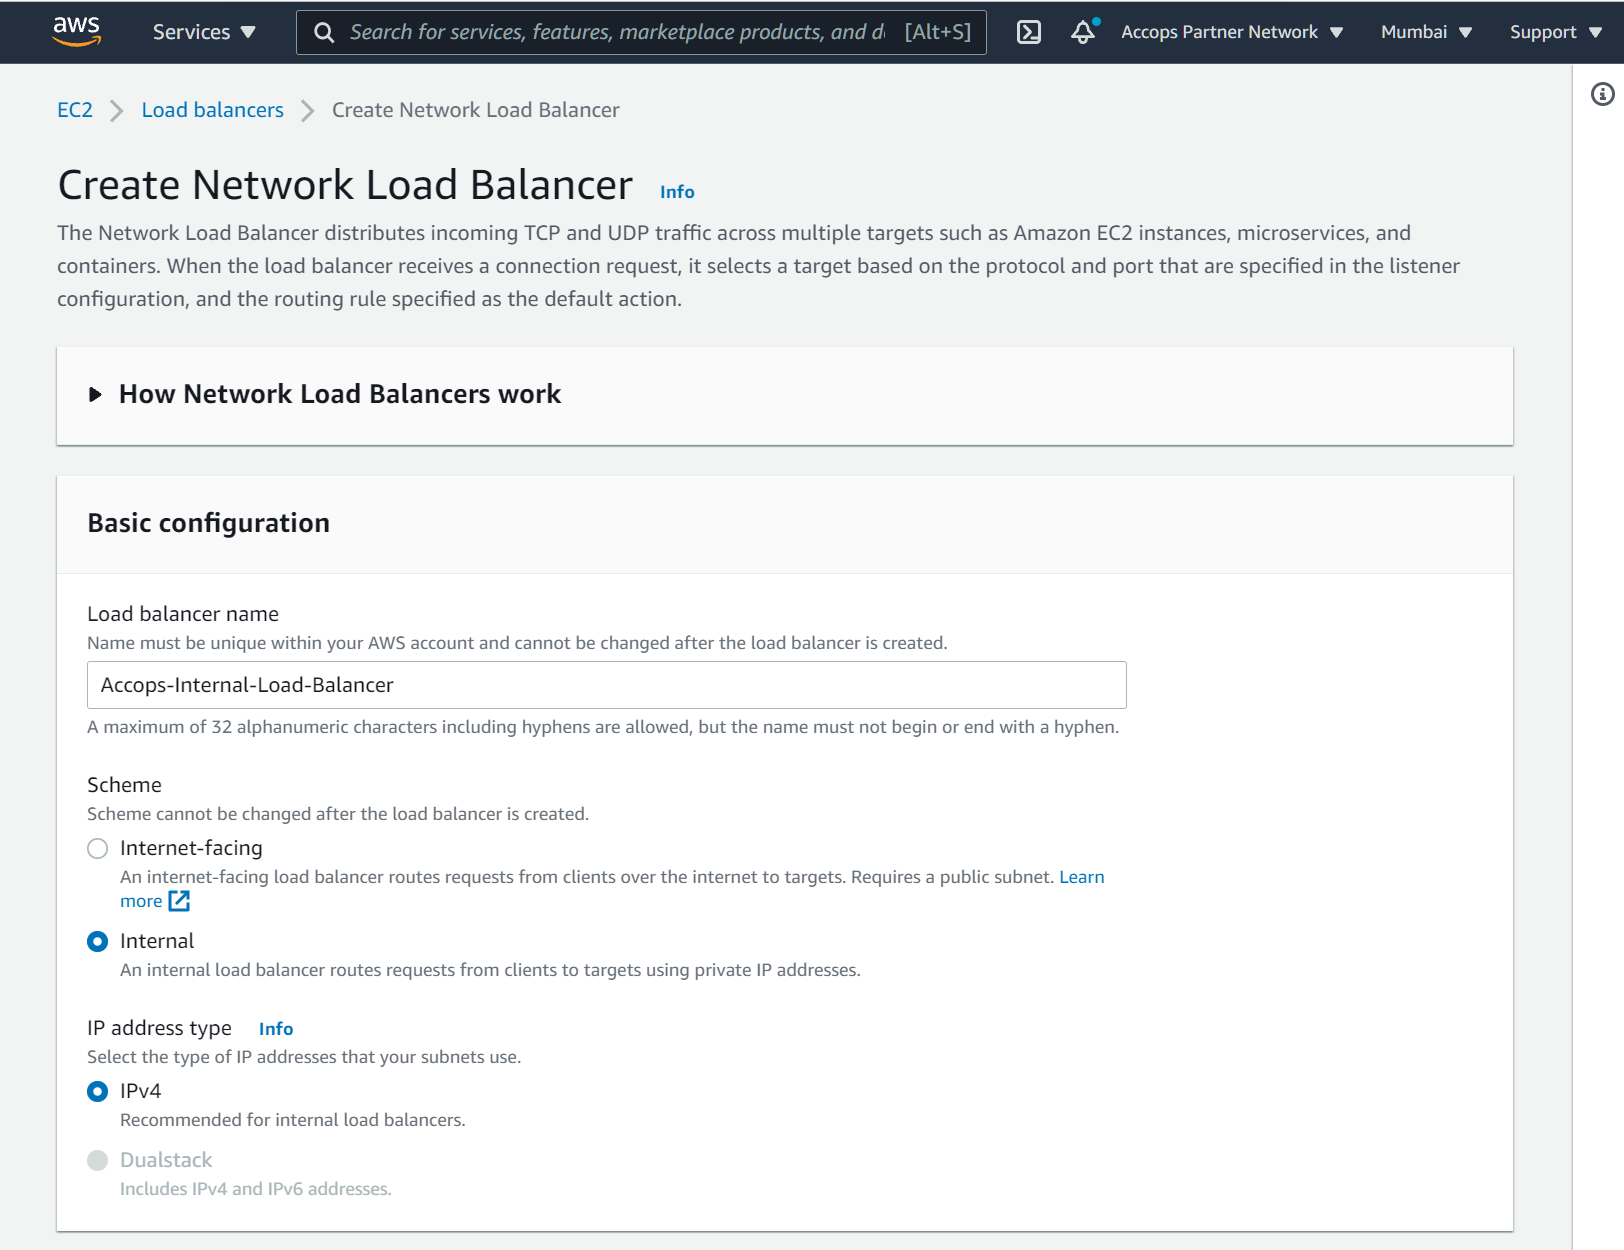
Step 6: Add Basic Configurations
| Load Balancer Name | Scheme | IP Address Type |
|---|---|---|
| Accops-Internal-Load-Balancer | Internal | IPV4 |
Step 7: Add Network Mapping
Select VPC and Network Mapping of at least two Availability Zones and one subnet per zone.

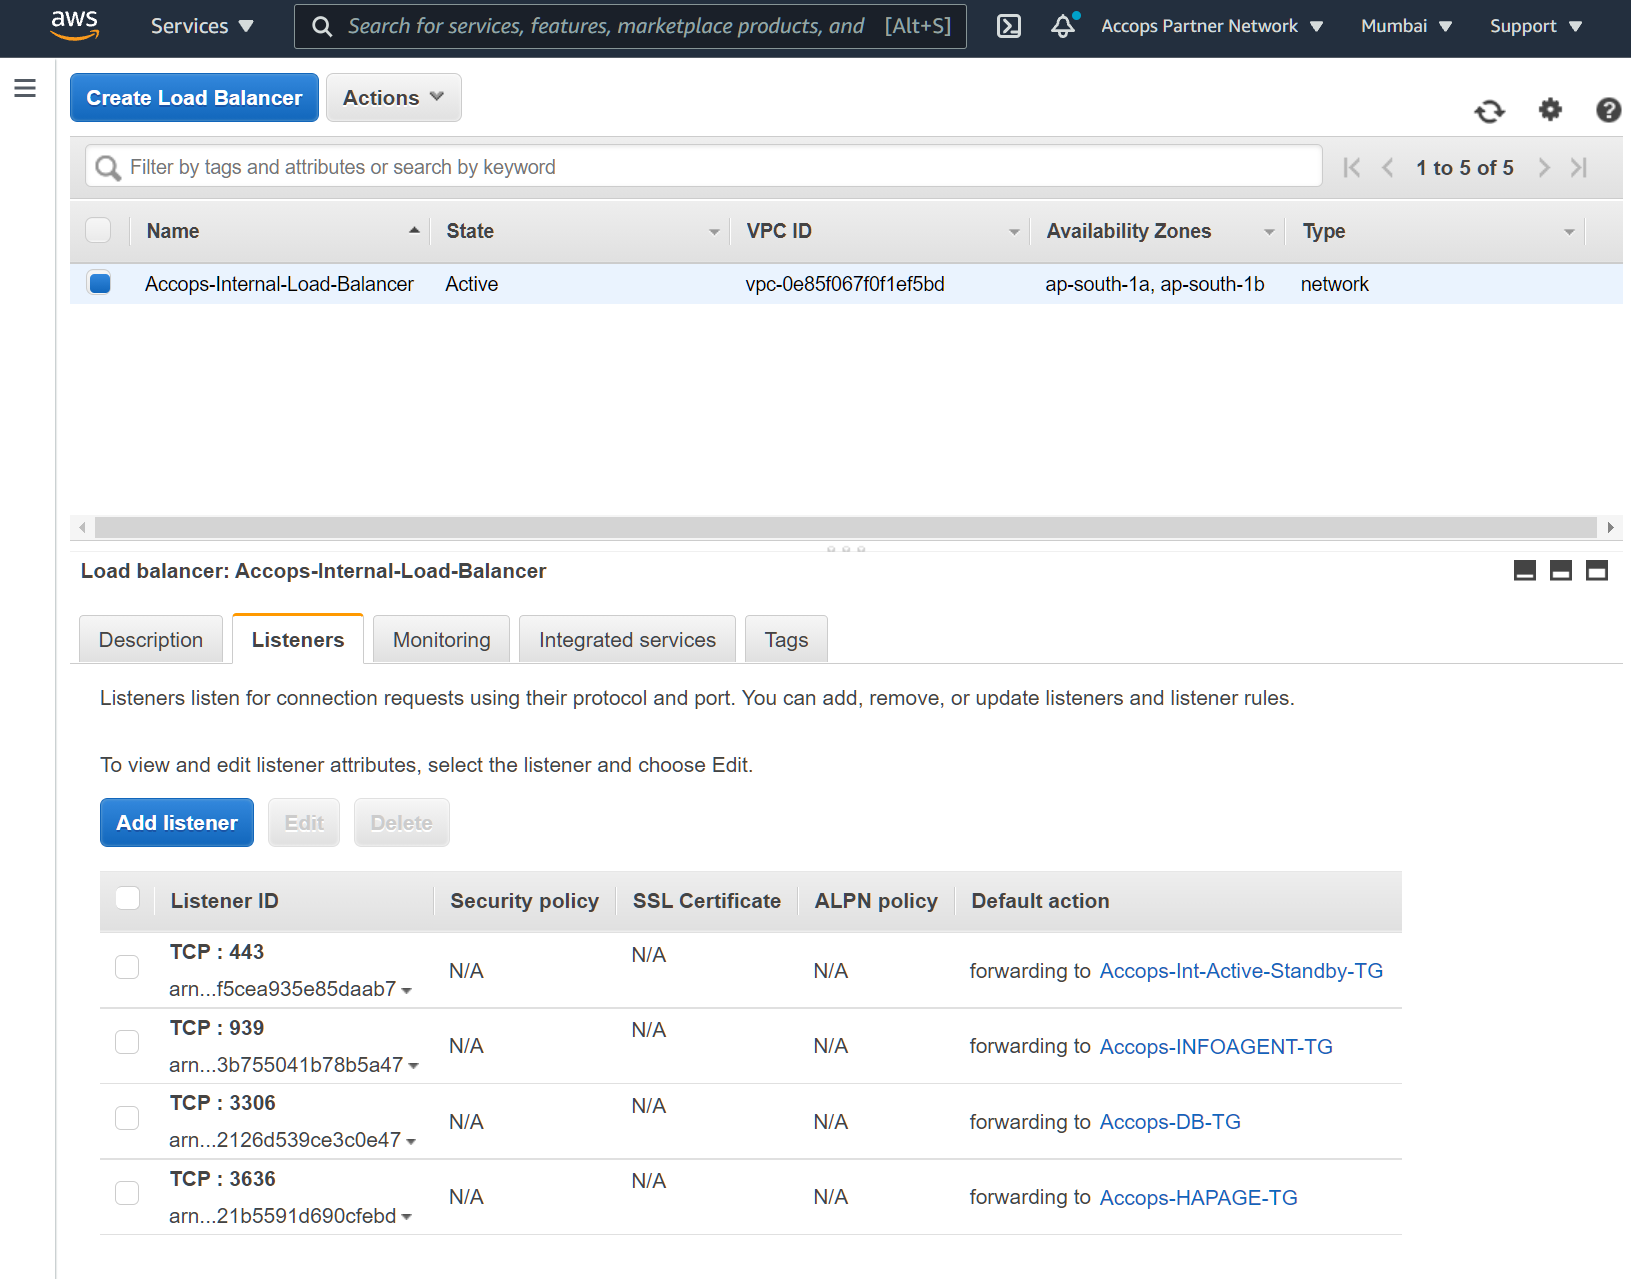
Step 8: Add Listeners and routing
| Listener | Protocol | Port | Forward to Target Group | Remarks |
|---|---|---|---|---|
| TCP:939 | TCP | 939 | Accops-Infoagent-TG | - |
| TCP:3636 | TCP | 3636 | Accops-HAPAGE-TG | - |
| TCP:3306 | TCP | 3306 | Accops-DB-TG | - |
| TCP:443 | TCP | 443 | Accops-Int-Active-Standby-TG | - |
| TCP:51234 | TCP | 51234 | Accops-Remote-Meeting-TG | Optional |

Step 9: Add Tag, Review Summary and then click on Create Load Balancer.

Step 10: Review Load Balancer and update Attributes for Cross-Zone Load Balancer.
Step 11: Review Load Balancer and Listeners.
Create an Internet facing Network Load Balancer.
Before you begin
-
Decide which Availability Zones you will use for your EC2 instances. Configure your virtual private cloud (VPC) with at least one public subnet in each of these Availability Zones. These public subnets are used to configure the load balancer. You can launch your EC2 instances in other subnets of these Availability Zones instead.
-
Launch at least one EC2 instance in each Availability Zone. Ensure that the security groups for these instances allow TCP access from clients on the listener port and health check requests from your VPC. For more information, see Target security groups.
-
Elastic Load Balancing supports different types of load balancers. For this tutorial, you create a Network Load Balancer.
** To create a Internet facing Network Load Balancer
Step 1: Open the Amazon EC2 console at https://console.aws.amazon.com/ec2/.
Step 2: On the navigation bar, choose a Region for your load balancer. Be sure to choose the same Region that you used for your EC2 instances.
Step 3: In the navigation pane, under Load Balancing, choose Load Balancers.
Step 4: Choose Create Load Balancer.
Step 5: For Network Load Balancer, choose Create.
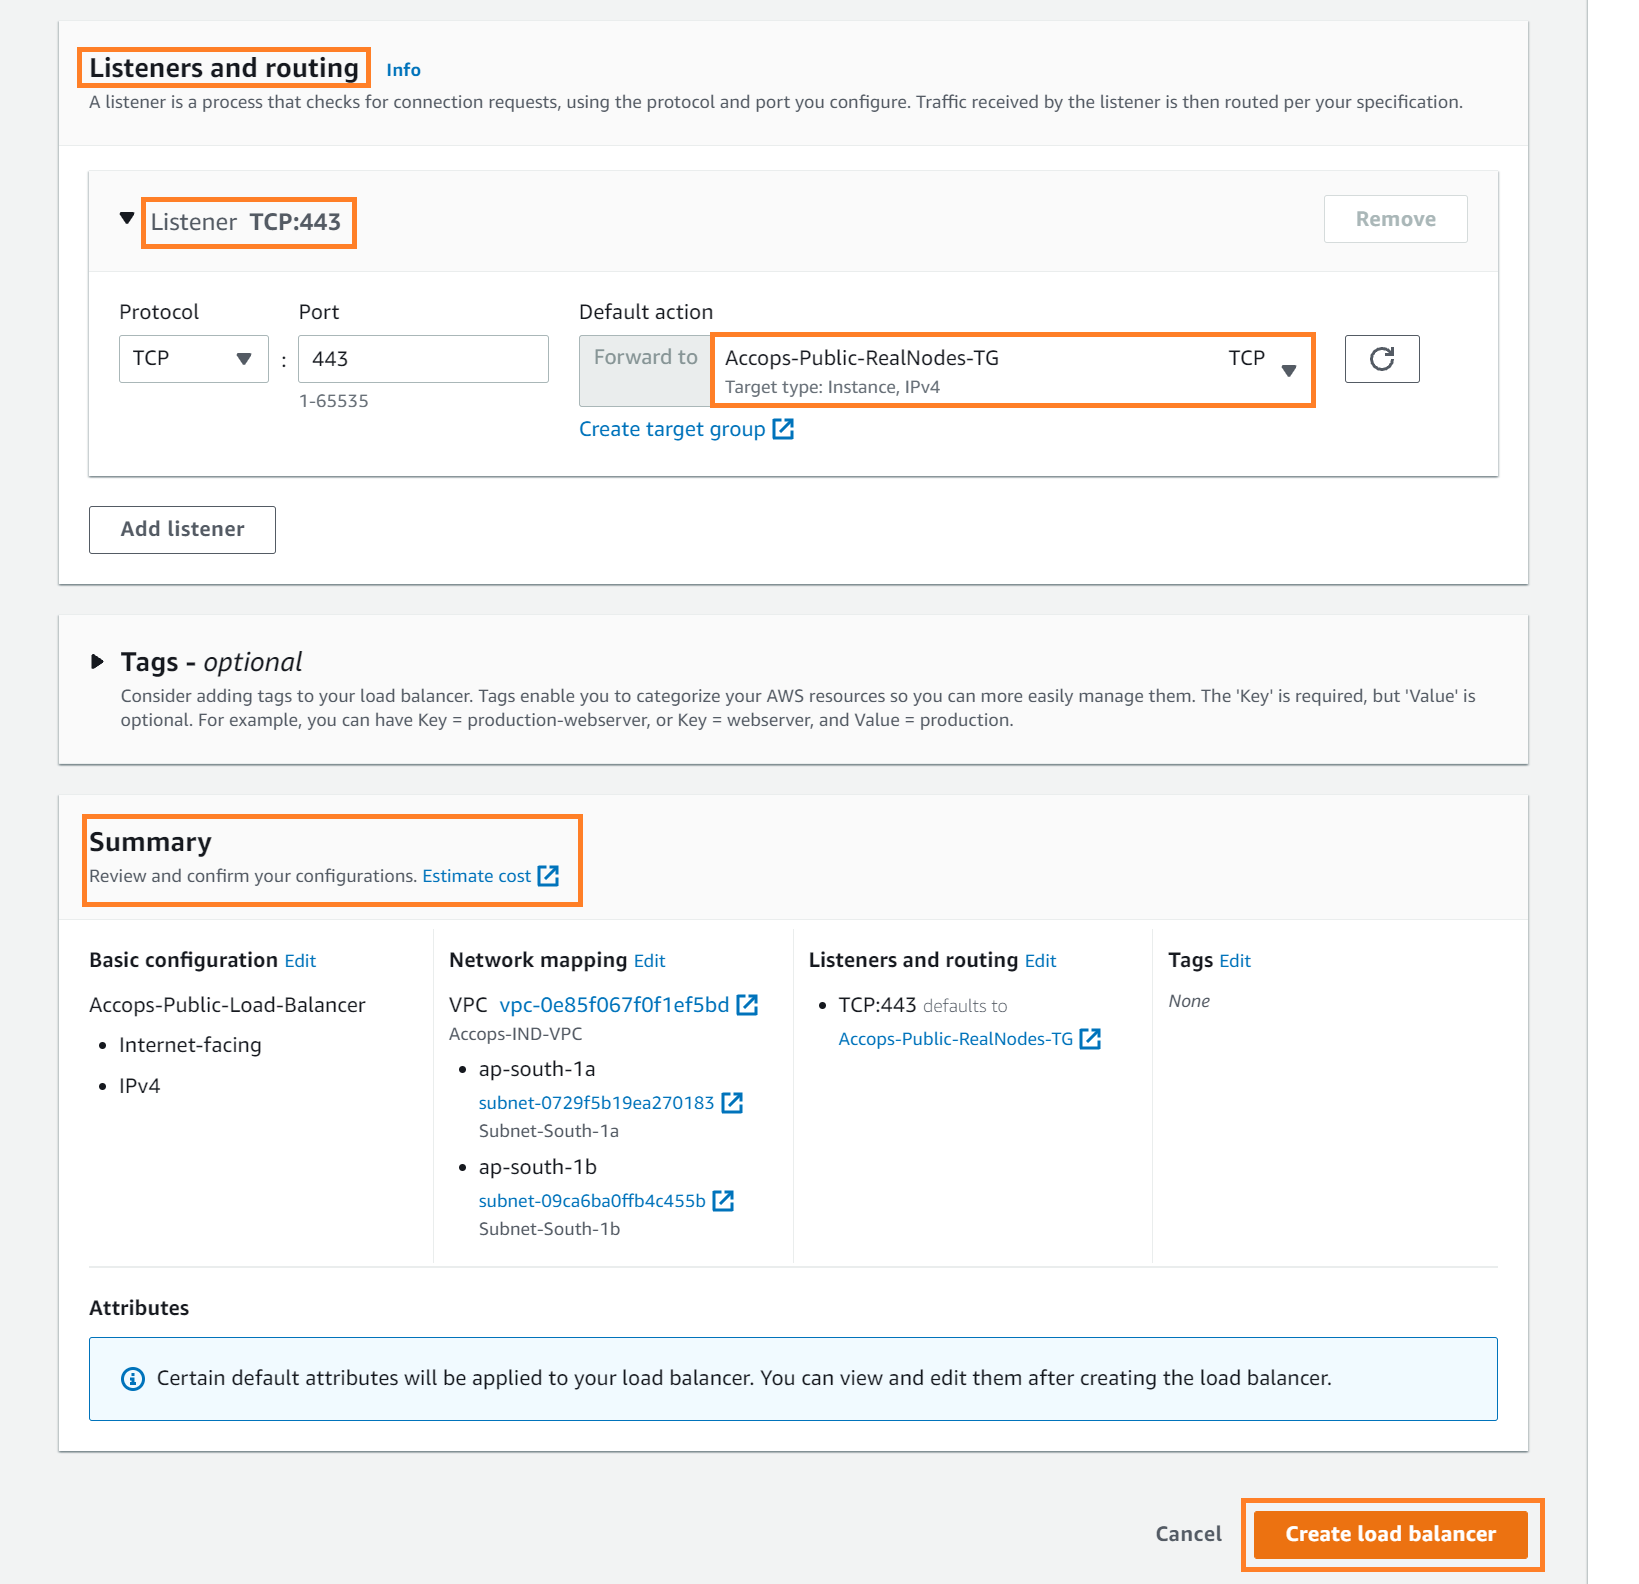
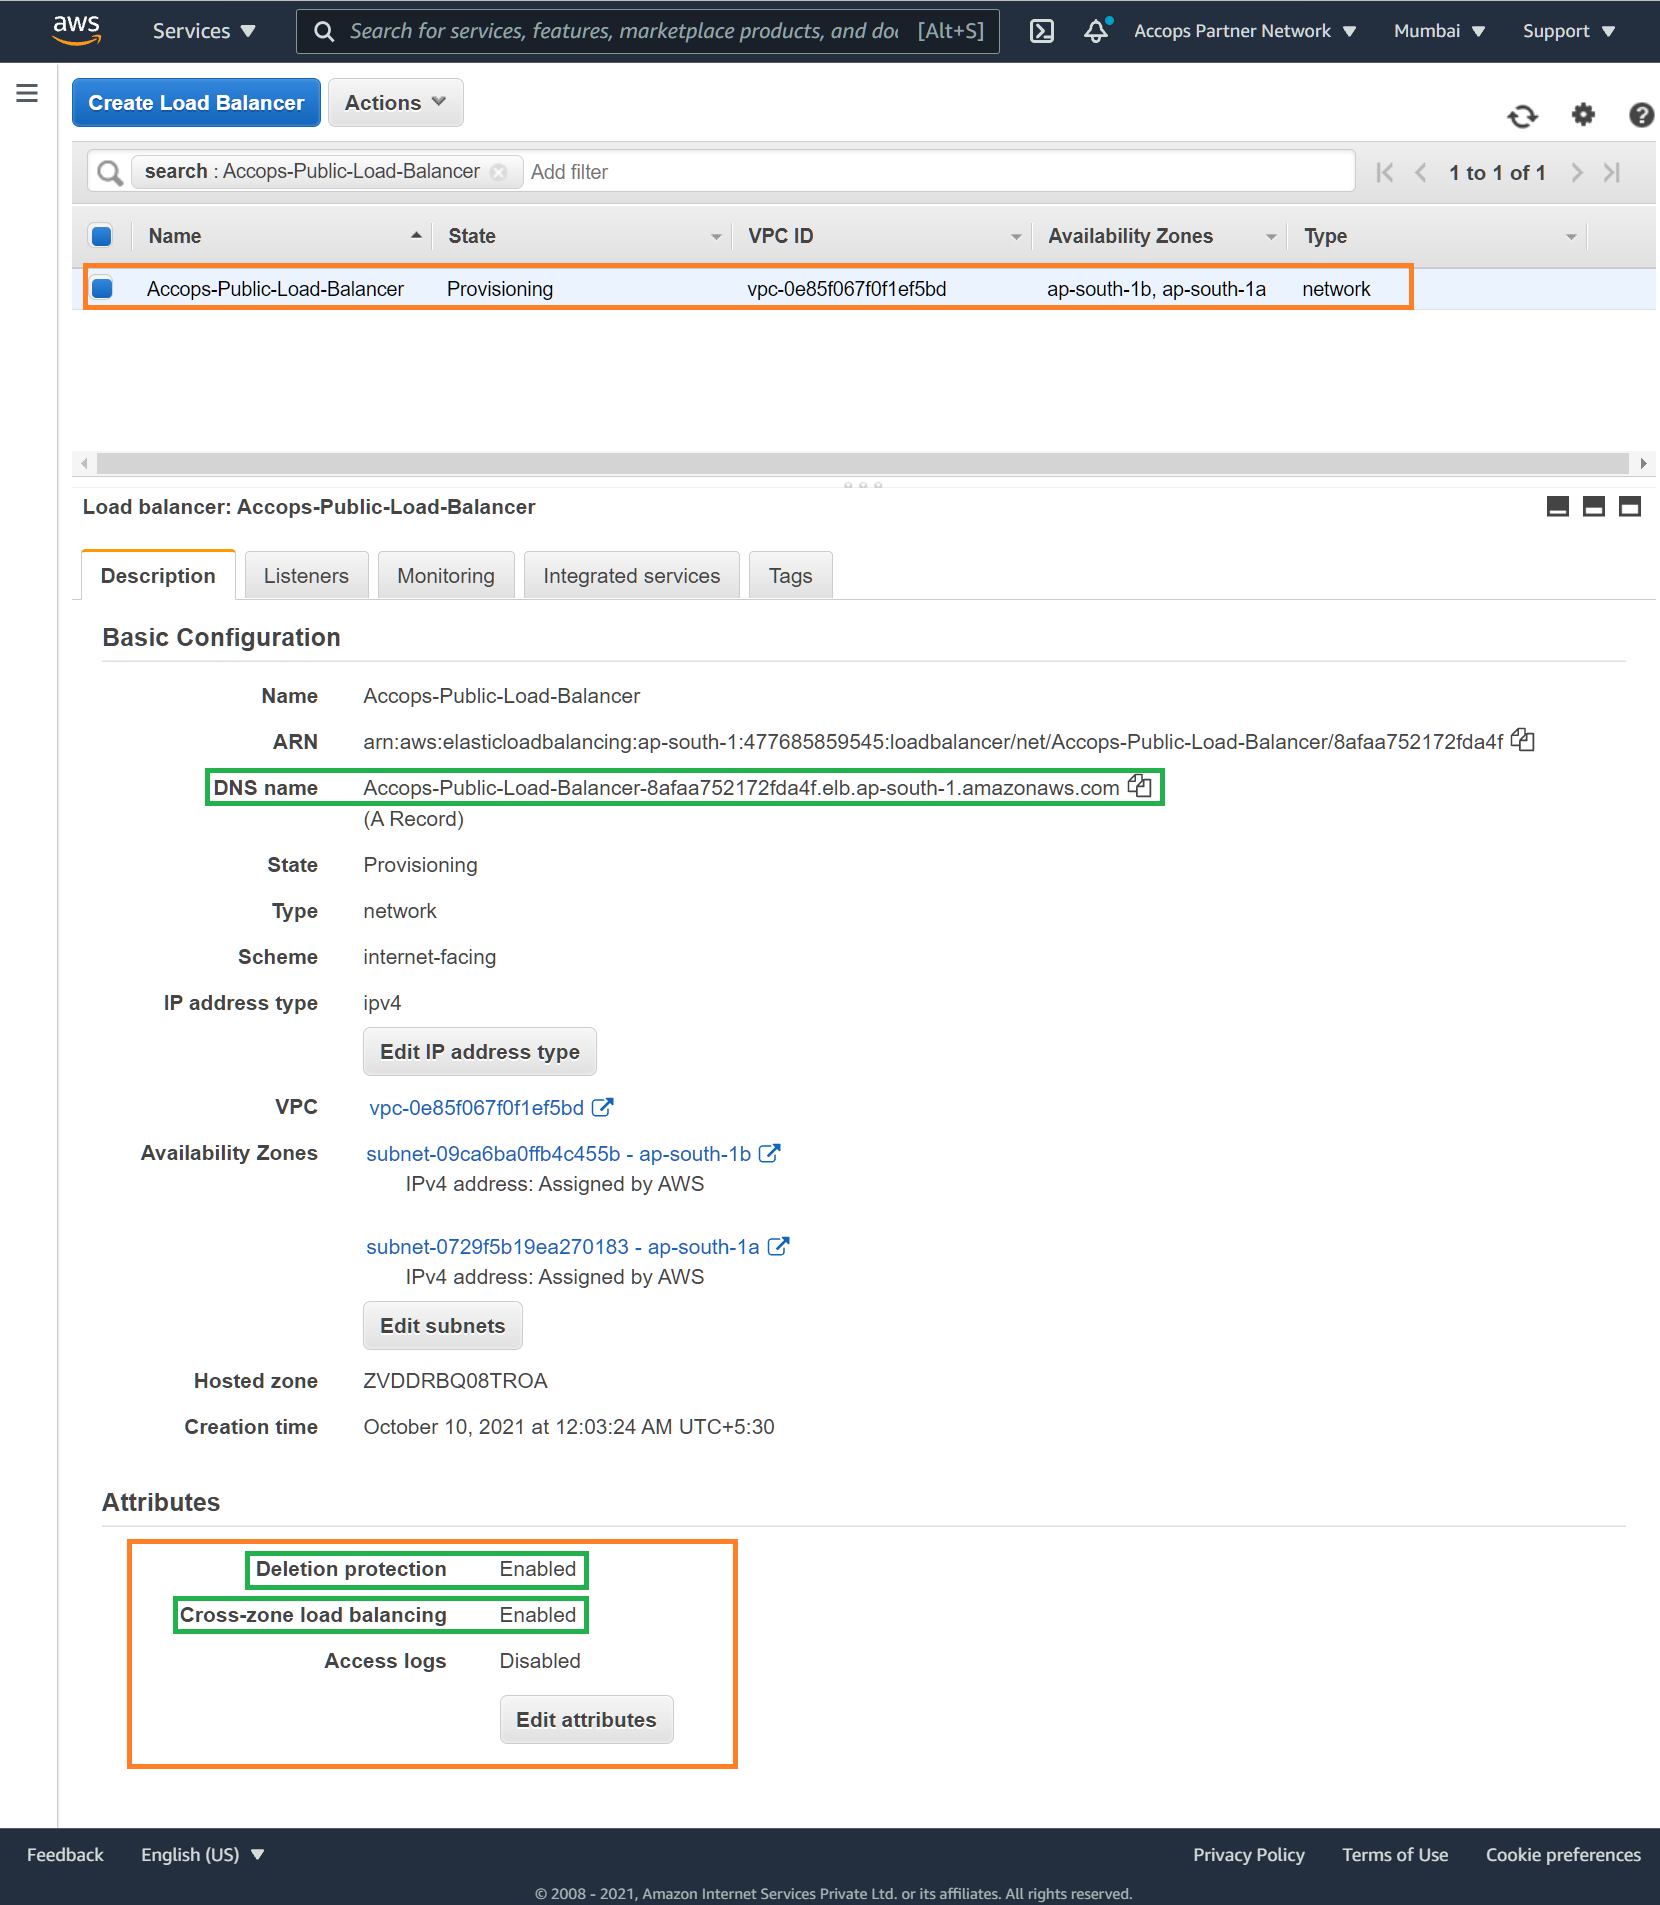
Step 6: Add Basic Configurations
| Load Balancer Name | Scheme | IP Address Type | | ----- | ---- | ----- | ------ | |Accops-Public-Load-Balancer| Internet-facing | IPV4|

Step 7: Add Network Mapping
Select VPC and Network Mapping of at least two Availability Zones and one subnet per zone.
Step 8: Add Listeners and routing, Add Tag, Review Summary and then click on Create Load Balancer.
| Listener | Protocol | Port | Forward to Target Group | Remarks |
|---|---|---|---|---|
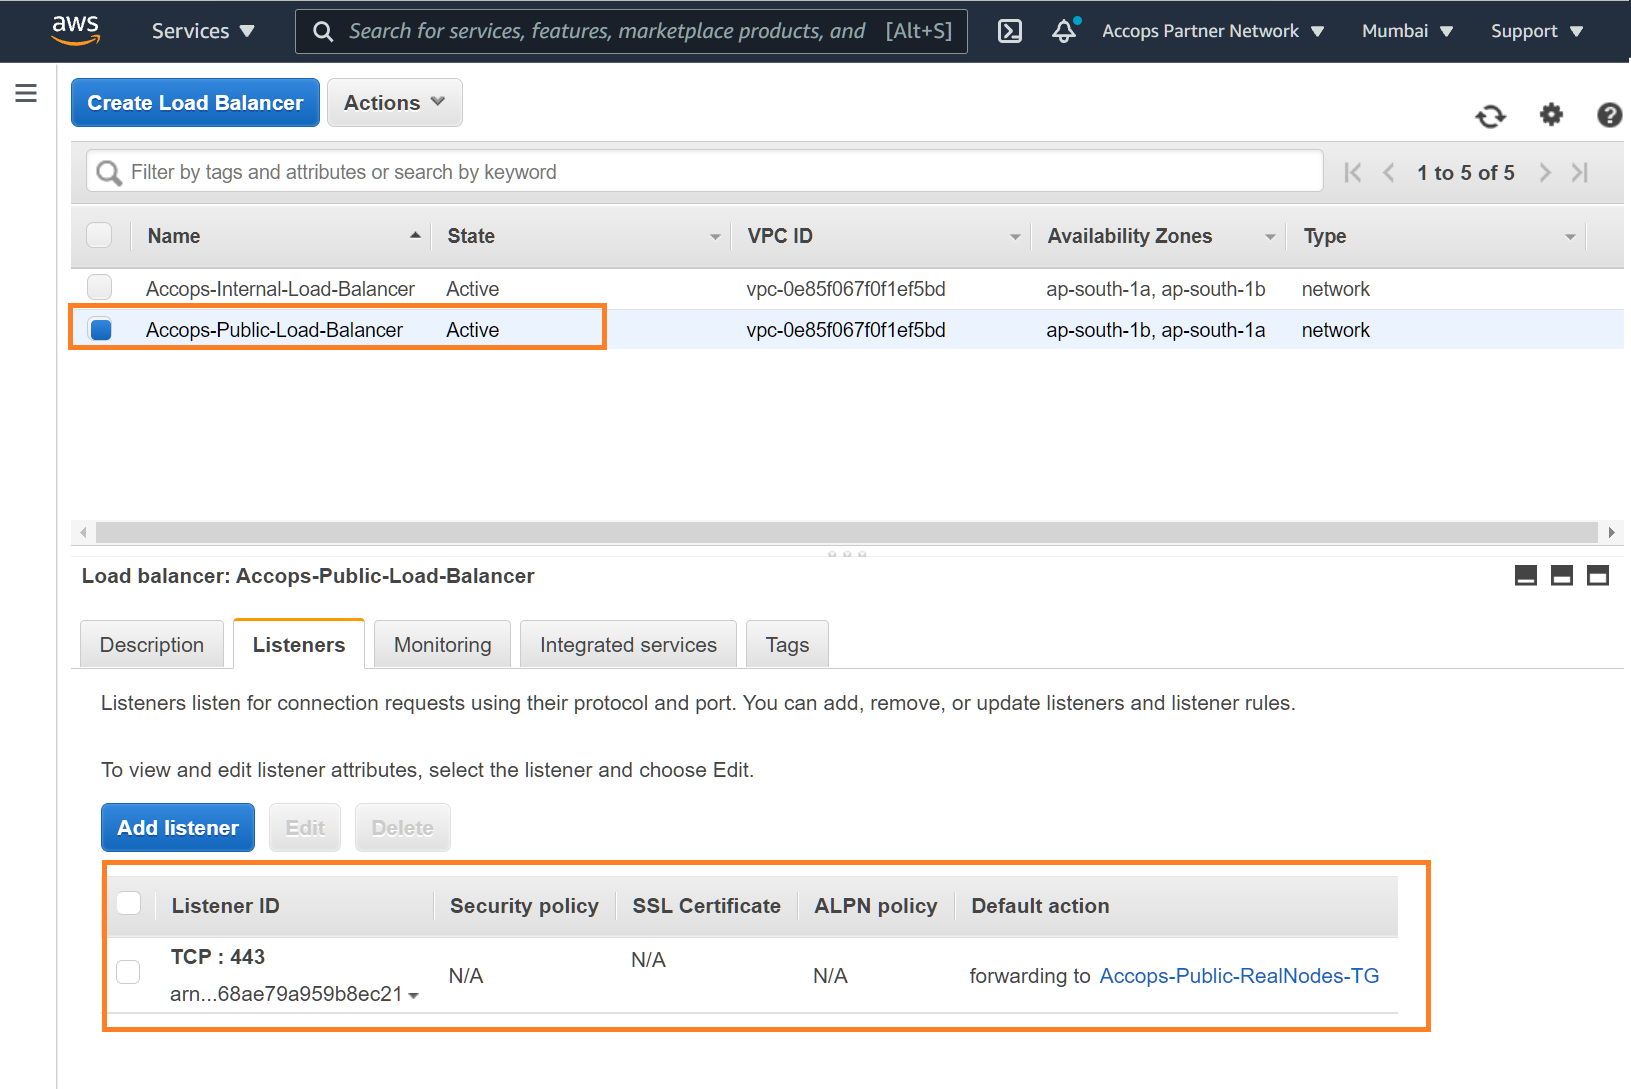
| TCP:443 | TCP | 443 | Accops-Public-RealNodes-TG | - |
Step 10: Review Load Balancer and update Attributes for Cross-Zone Load Balancer.
Step 11: Review Load Balancer and Listeners.
Network Load Balancers
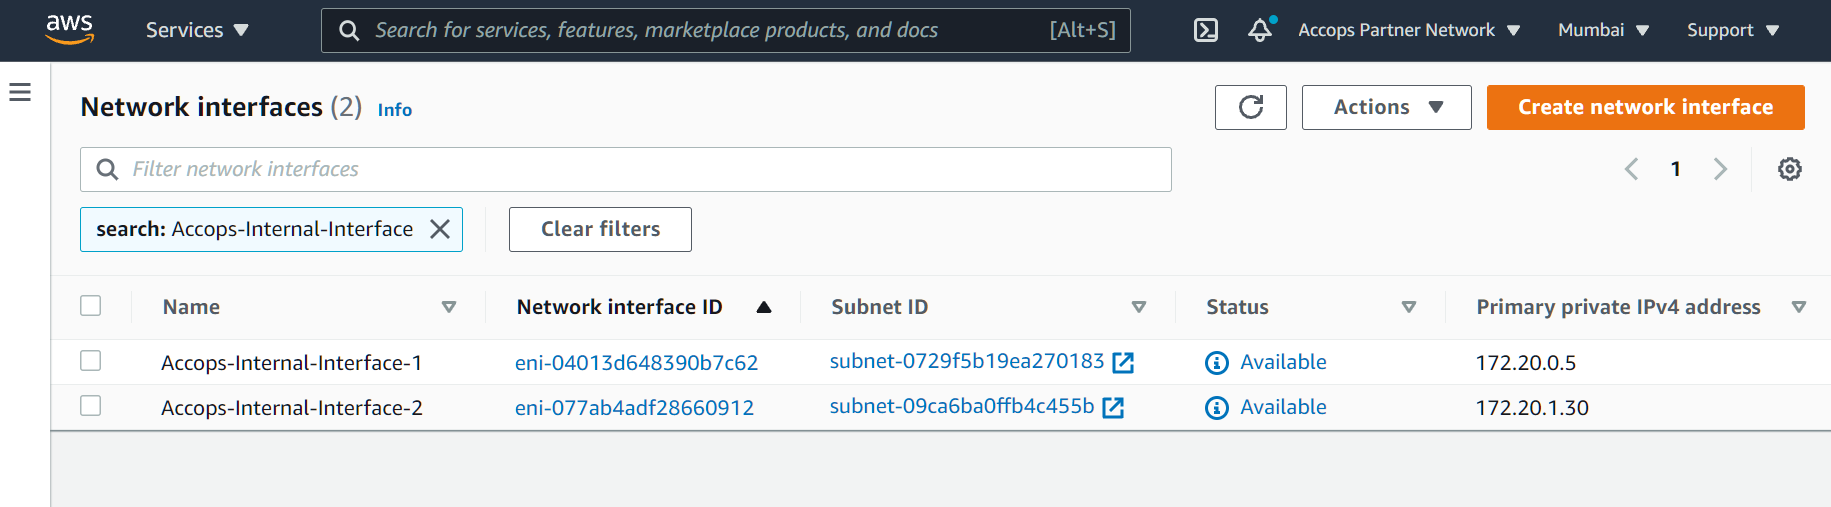
AWS Network Interfaces
Reserve Network Instance for Accops Gateway.
Note: If HySecure Gateway is deployed in two zone then Please reserve one IP address in each subnet.
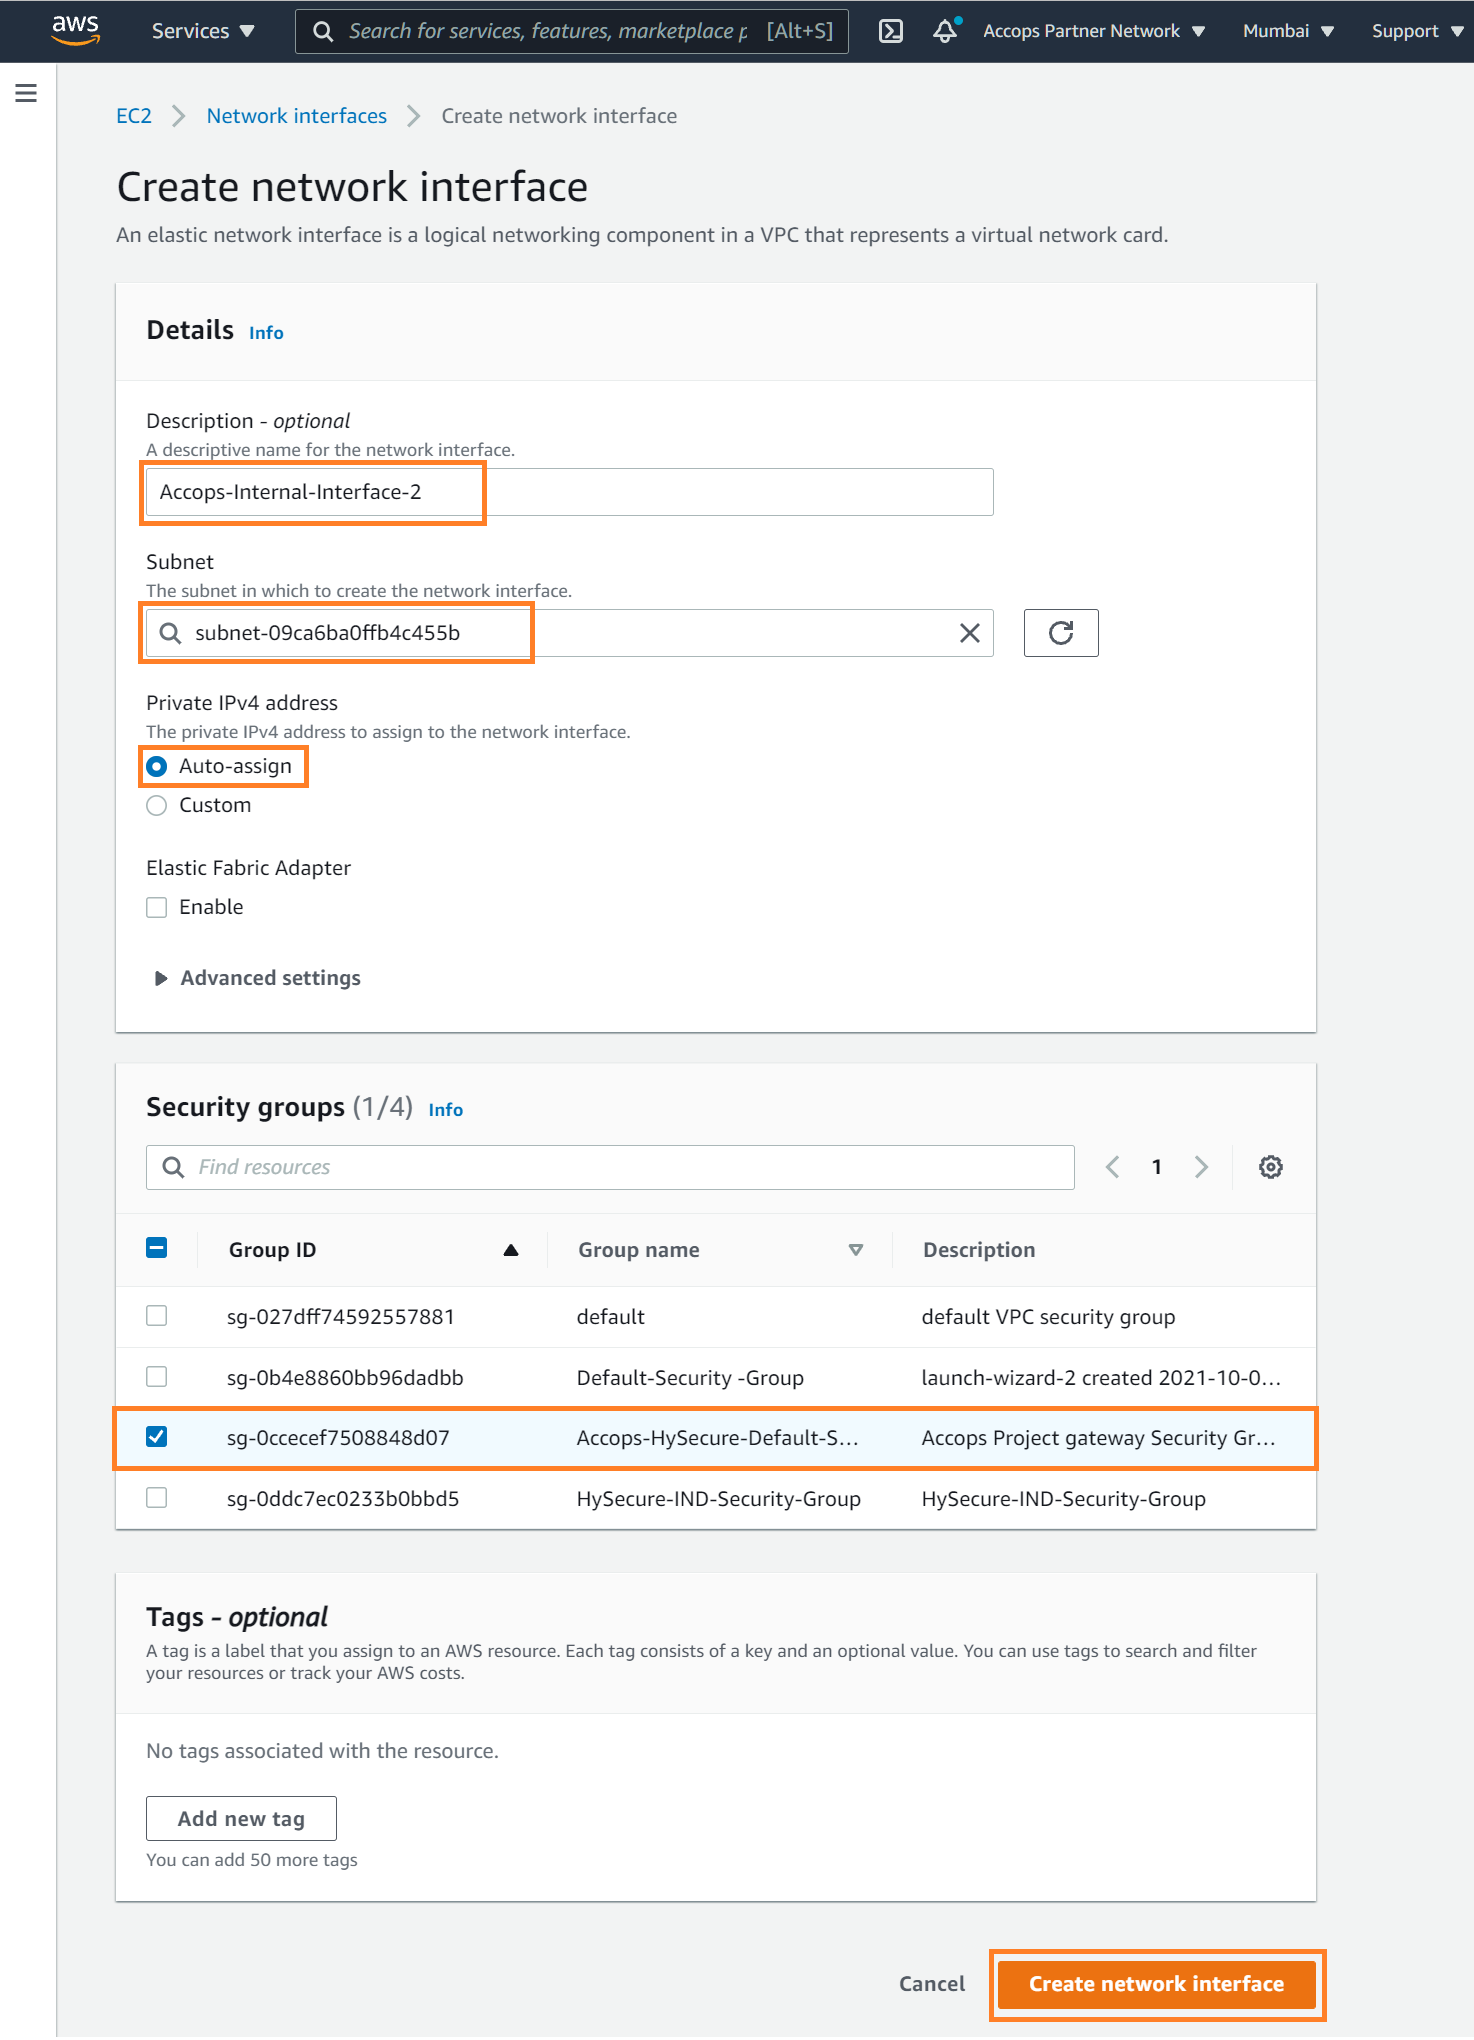
To create a Network Interface for Availability Zone Subnet-1
Step 1: Open the Amazon EC2 console at https://console.aws.amazon.com/ec2/.
Step 2: On the navigation bar, choose a Region for your load balancer. Be sure to choose the same Region that you used for your EC2 instances.
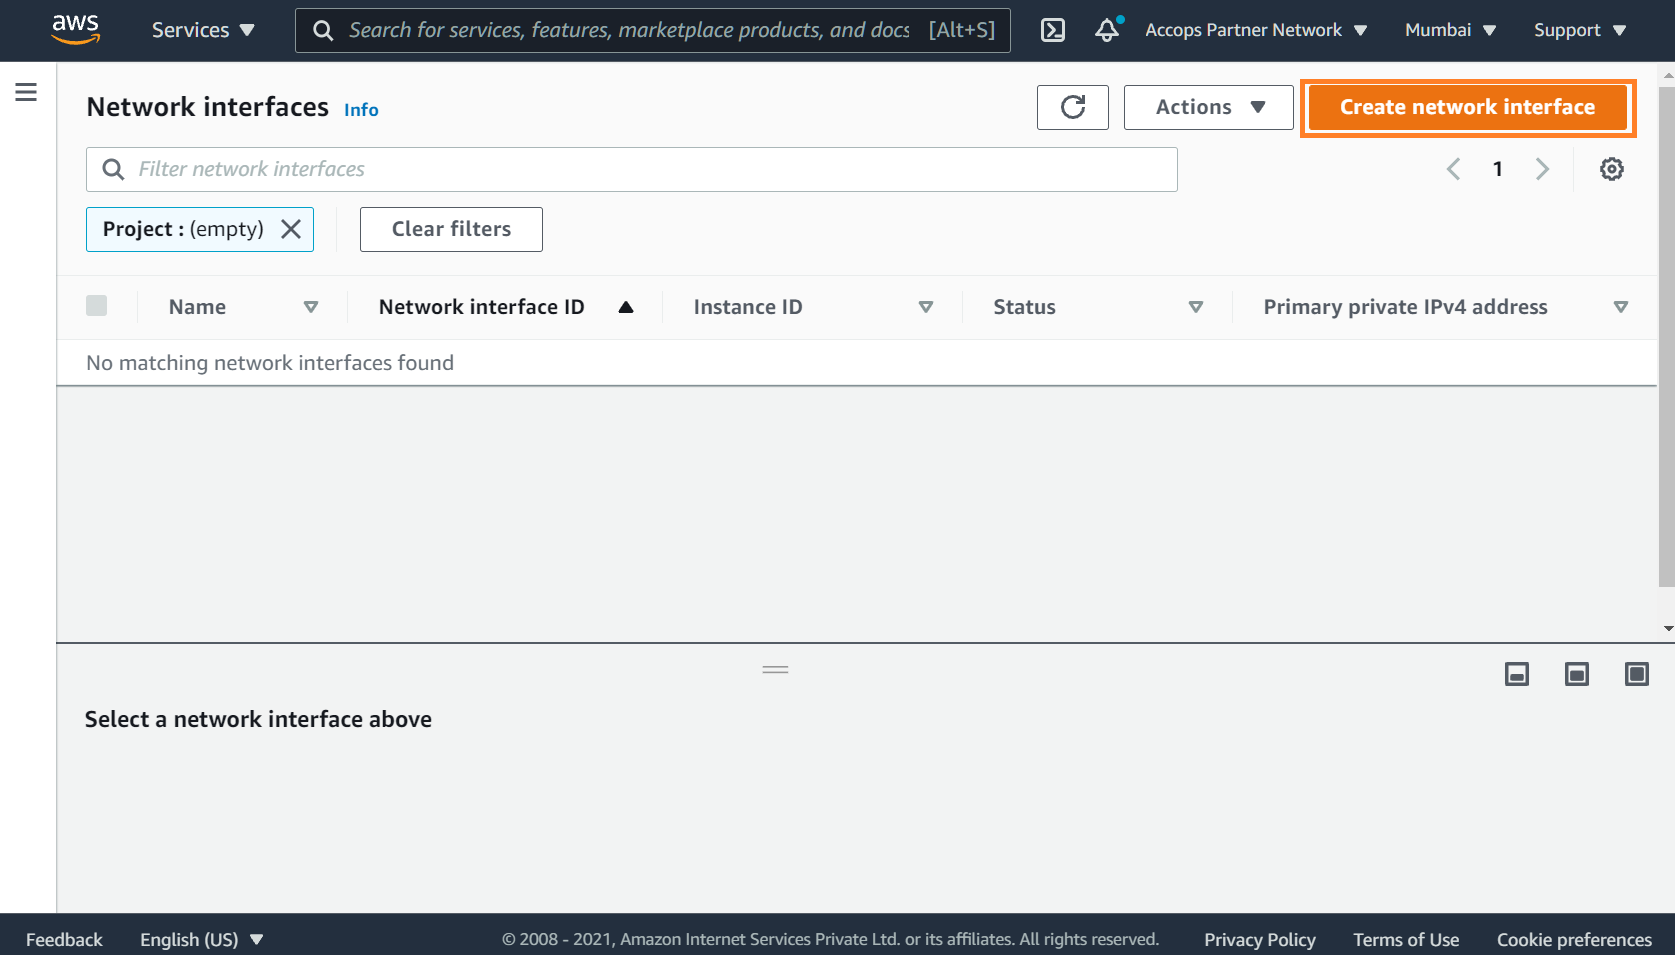
Step 3: In the navigation pane, under Network & Security, choose Network Interfaces.
Step 4: Choose Create Network Interface.
Step 5: Add Details, Choose Subnet and Private IPv4 Address assignment.
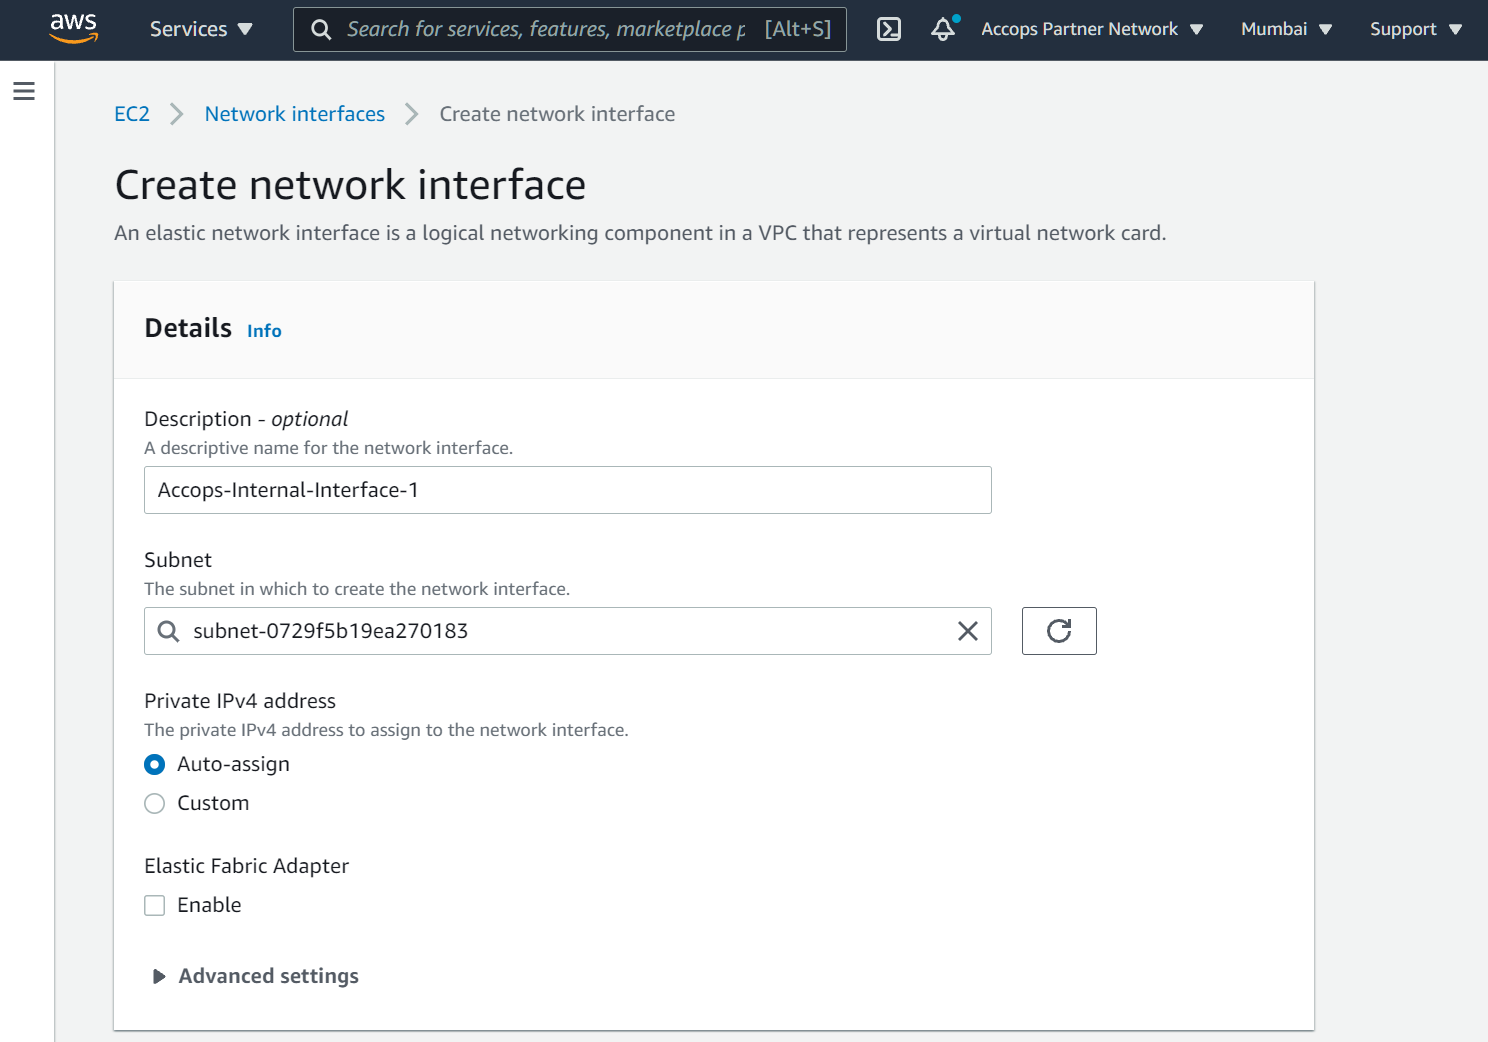
Step 6: Select HySecure Security Group, Add Tagss nad then click on create Network Interface.
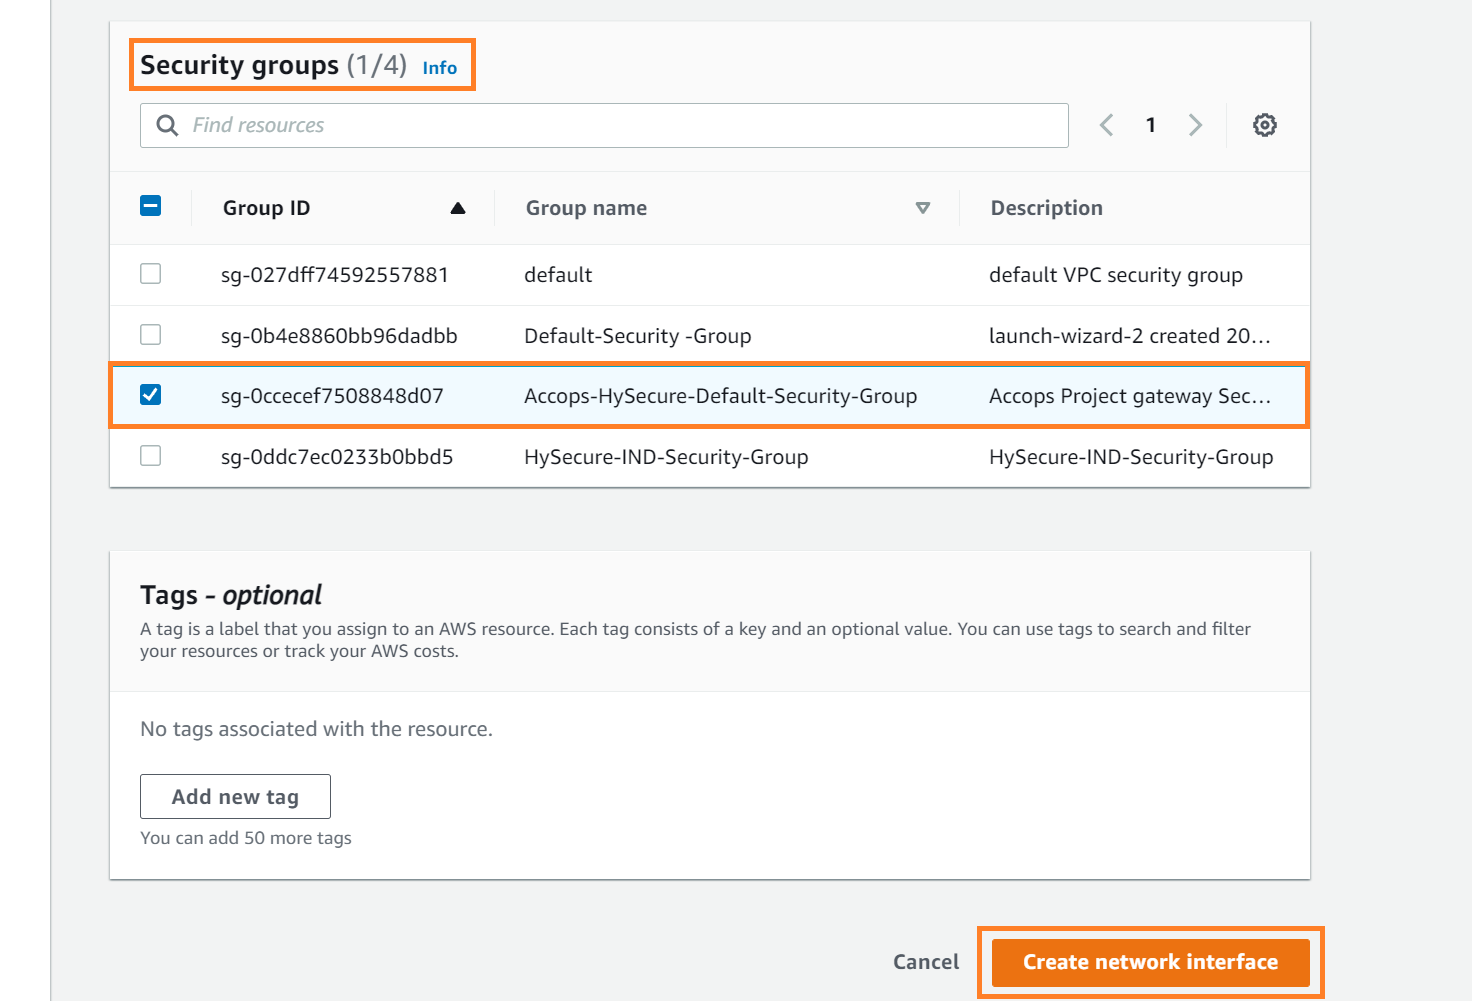
To create a Network Interface for Availability Zone Subnet-2
Step 1: Open the Amazon EC2 console at https://console.aws.amazon.com/ec2/.
Step 2: On the navigation bar, choose a Region for your load balancer. Be sure to choose the same Region that you used for your EC2 instances.
Step 3: In the navigation pane, under Network & Security, choose Network Interfaces.
Step 4: Choose Create Network Interface.
Step 5: Add Details, Choose Subnet and Private IPv4 Address assignment.
Step 6: Select HySecure Security Group, Add Tagss nad then click on create Network Interface.
Network Interface
Whats' Next
Help/Support
Please send a mail to support@accops.com for further Help/Support.