New Features in Accops Workspace Windows Client version 7.0.0.1042
Support for login without the HyWorks Controller
Users can now log in to the HySecure Gateway even if controller applications are not assigned.
In previous versions of the Workspace client, HyWorks Controller applications had to be assigned to users to connect to the HySecure Gateway. This feature is supported on the client modes below and with HySecure Gateway v5.4 SP6 and versions 7.0 and above.
| Supported Client modes and OS | HySecure 5299 | HySecure 5.3 | HySecure 5.4 -SP2/5.4 SP5 | HySecure5.4 SP6 | HySecure 7.0 |
|---|---|---|---|---|---|
| Client Types/Modes: - Full Admin Client on all supported Windows OS - HyLite |
No | No | Yes | Yes | Yes |
Passwordless login support
Passwordless authentication allows users to log in using a registered authentication device instead of the legacy username and password.
An Auth device is a device on which the Accops HyID app is installed, and the user is registered for a mobile token. However, to access Hosted Apps and Desktops, the SSO application user must enter the password explicitly after scanning the QR code for passwordless, in the Domain password prompt, or during application access.
This feature is supported on the client modes below and with HySecure Gateway v5.4 SP6, versions 7.0 and above.
| Supported Client modes and OS | HySecure 5299 | HySecure 5.3 | HySecure 5.4 -SP2/5.4 SP5 | HySecure5.4 SP6 | HySecure 7.0 |
|---|---|---|---|---|---|
| Client Types/Modes: - Full Admin Client on all supported Windows OS - HyLite | No | No | No | Yes (With Limitations) | Yes |
HySecure Gateway configuration
To configure passwordless login on the HySecure Gateway follow the steps below:
Note
Accops HyID must be enabled and the mobile token must be registered for the user.
Client Login
-
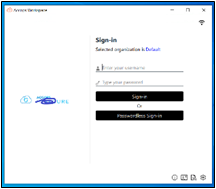
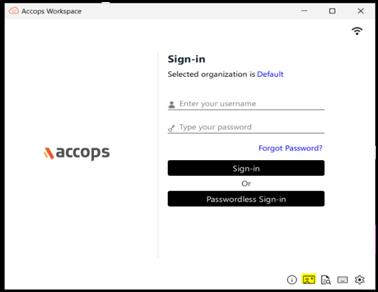
Enter the HySecure Gateway address and select the domain.
-
Click the Passwordless Sign-in button on the login page.
-
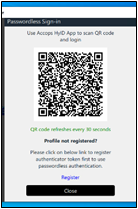
Open Accops HyID and scan the QR code.
-
The user will be logged in after scanning the QR code.
-
If the SSO-based or HyWorks app is assigned to the user to access SSO applications, the user will be prompted to enter a domain password after logging in.
-
Once the password is entered, the user can access the SSO applications.
The configuration and workflow will be the same as those for the HySecure Client.
For more details, refer to the older GA release notes of the HySecure client.
Certificate-based Security Officer (SO) user login
This version of the Windows Workspace Client supports certificate-based user enrollment and login for standard users, L1 Support users, and Monitor users.
This feature is supported on the following client modes and types with HySecure Gateway v5.4 and HySecure Gateway v7.0.
| Supported Client modes and OS | HySecure 5299 | HySecure 5.3 | HySecure 5.4 -SP2/5.4 SP5 | HySecure5.4 SP6 | HySecure 7.0 |
|---|---|---|---|---|---|
| Client Types/Modes: Full Admin Client on all supported Windows OS | Yes | Yes | Yes | Yes | Yes |
| HyLite - Hybrid mode | NA | NA | NA | NA | NA |
HySecure Gateway Configuration
- Create a Security Officer (SO) user on the HySecure Gateway.
- Save its passphrase.
Client Login
-
Enter the server address and fetch the realm. The user will be redirected to the login page with a certificate login icon.
-
The user can log in as an Admin (SO user) by clicking the icon
 .
. -
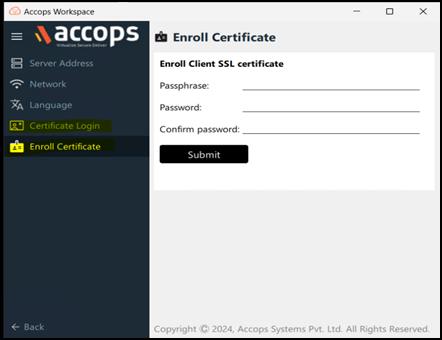
The user can enroll in the SO passphrase from the Settings page. The SO user can log in from the Settings page.
Fake Domain Detection through Domain EPS Policy
Each domain consists of a domain name and an identifier. While two separate domains can share the same name, they cannot have the same identifier. In previous versions of the HySecure client and HySecure Gateway, domain policies were applied solely based on the domain name. However, from this Unified Workspace Client and HySecure Gateway version 7.0, policies can also be applied based on the Domain Security Identifier. This enhancement allows for more effective checks against users attempting to utilize fraudulent domains.
What is SID?
An SID (Security Identifier) is a unique identifier for identifying accounts or security principals.
What does SID look like?
S-1-5-21-1958373648-3835490011-4153573704-1002
- S: Indicates an SID
- 1: Revision level of the SID structure
- 5: Identifier Authority
- 21: Denotes that this SID is generated by the domain or local computer.
- 1958373648-3835490011-4153573704: Sub authority representing a domain or computer and is unique for every domain.
- 1002: Unique Relative Identifier for user or group of domain/local computer.
To retrieve a user's SID: Navigate to Command Prompt on the user’s system and type whoami /user. This will give you the user's SID.
Configuration changes: A new field, SID, must be configured in the EPS section while creating an allow or block policy for the Domain in HySecure Gateway. This SID is the domain from which users can log in.
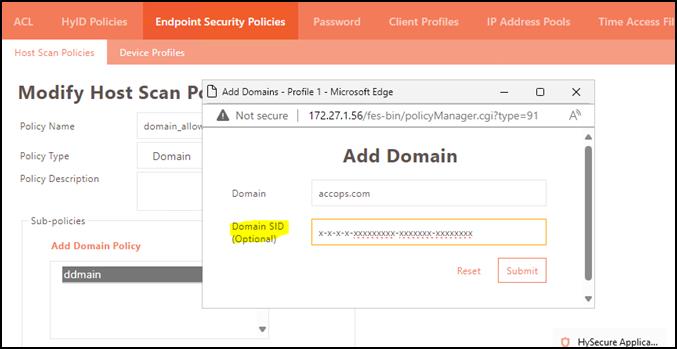
Note
This change applies to SP6 Build 999 + tar file. Contact the Support to implement SID.
User Login: If the HySecure Gateway configuration is correct, the user can log in as a Domain user. Otherwise, a Login failed due to an EPS failure message will be displayed. Check details like SID in UAC logs.

Supported Client platforms and Gateway compatibility
This feature is supported on the client modes and types below, with HySecure Gateway v5.4.
| Supported Client modes and OS | HySecure 5299 | HySecure 5.3 | HySecure 5.4 -SP2/5.4 SP5 | HySecure5.4 SP6 | HySecure 7.0 |
|---|---|---|---|---|---|
| Client Types/Modes: - Full Admin Client on all supported Windows OS | No | No | No | Yes (tar file needs to be applied over SP6 gateway) | No |
| - HyLite - Hybrid mode | No | No | No | No | No |
Antivirus Support
From this version onwards, we support some new antiviruses with the help of av.json and WMI, as well as the detection of new AVs from files and folders.
Earlier versions supported only registry paths for antivirus in av.json, but this version allows antivirus details to be fetched from the paths of files and folders mentioned in av.json.
By default, the following antivirus software are now supported:
- BitDefender Endpoint Security Tools Anti-Malware
- BitDefender Total Security
- Kaspersky Internet Security
- Kaspersky Anti-Virus
- F-secure (WithSecure™ Elements Agent)
- Symantec Endpoint Protection
- Kaspersky Endpoint Security for Windows
- Sophos Intercept X
- Sophos Home v2023.2.2.2
- Avast Antivirus v24.5.6116
- Avira Security v1.0.2405.3401
- TotalAV 6.0.1028
- McAfee Total Protection v1.22.200.1 (McAfee)
- Trend Micro Apex One Security Agent v14.0.11564
- Kaspersky Small Office Security (WMI)
- Windows Defender (WMI)
- CrowdStrike Falcon Sensor (WMI)
Contact Support to create a policy for any other third-party Antivirus software.
Supported Client Platforms and Gateway Compatibility
| Supported Clientmodes and OS | HySecure v5299 | HySecure v5.3 | HySecure v5.4 SP2 | HySecure v5.4 SP5 | HySecure v5.4 SP6 | HySecure v7.0(Build: 500) onwards |
|---|---|---|---|---|---|---|
| Client Types:Full Admin Client on all supported Windows OS | No | No | Yes (Requires backend changes in the Gateway) | Yes (Requires backend changes in the Gateway) | Yes (Requires backend changes in the Gateway) | Yes |
| HyLite | No | No | No | No | No | No |
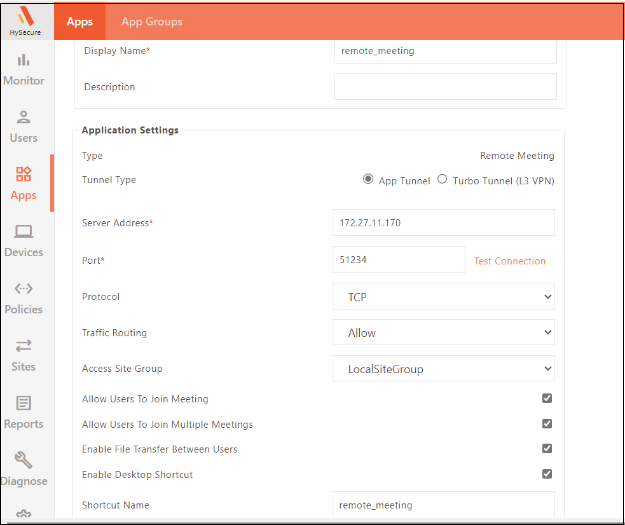
Remote Meeting
The remote meeting feature is supported in the Unified Workspace Client with the same configurations on the HySecure Gateway as for the older version of the HySecure client.
Supported Client Platforms and Gateway Compatibility
This feature is supported for the client modes and types below with HySecure Gateway 5.4 SP6 and HySecure Gateway version 7.0.
| Supported Clientmodes and OS | HySecure v5299 | HySecure v5.3 | HySecure v5.4 SP2 | HySecure v5.4 SP5 | HySecure v5.4 SP6 | HySecure v7.0(Build: 500) onwards |
|---|---|---|---|---|---|---|
| Client Types:Full Admin Client on all supported Windows OS | No | No | Yes | Yes | Yes | Yes |
| HyLite | No | No | No | No | No | No |
HySecure Gateway Configuration
-
Create a remote meeting application in the HySecure Gateway.
Client Login
-
Enter the server address and log in to the client.
-
The user will see a Remote Meeting tab after logging in.
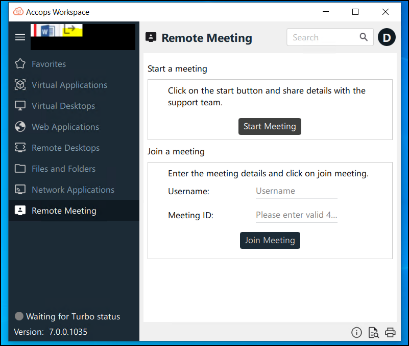
-
Click Start Meeting. A Username and Meeting ID will be generated for the user to join the remote meeting.
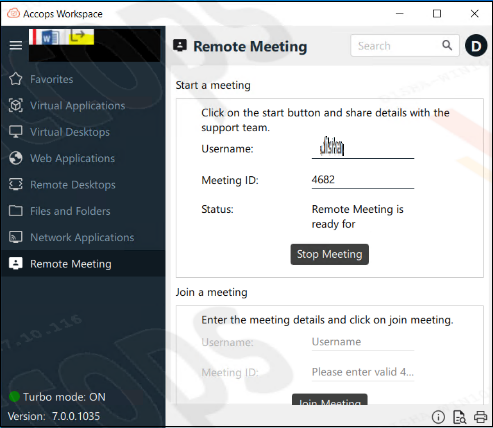
-
When the other user enters the Username and Meeting ID, the remote meeting will start.
-
PrograteViewer.exe will run in the background.
Anti-keylogger (Beta Feature)
Anti-keylogger prevents or blocks a keylogger from capturing and logging keystrokes on the user’s system.
Keyloggers are a form of spyware or malware that records a user's keystrokes, potentially stealing sensitive information such as passwords, credit card numbers, or other personal data.
List of Accops binaries protected through Anti-keylogger
- VFVPNClientExe.exe
- EDCLaunch.exe
- EDCClient.exe
Enable Ani-keylogger
- The Anti-keylogger is disabled by default. Contact Support to enable and configure the registry key on the user’s system. The configuration required admin privileges.
PCoIP Client for Japanese OS
The Unified Workspace Client supports launching remote desktop sessions via Teradici (PCOIP) on Japanese OS.
New Shell APP Behavior
Multiple applications are launched within a single shell rather than opening multiple windows, improving resource management, reducing window clutter, and providing a more streamlined user experience.
It provides:
- Simplified Task Management: Fewer windows open at once, making it easier for users to switch between applications.
- Improved Performance: Consolidating applications can reduce the system's memory and processing load, leading to faster overall performance.
- Organized Workspace: A cleaner, more organized desktop environment helps users stay focused and productive without the distraction of multiple open windows.
This approach enhances usability and efficiency, mainly when multiple applications are frequently launched.
USB Control
USB redirection control is a crucial feature in virtual desktop environments. It allows administrators to manage which USB devices can be redirected to desktop sessions. By enabling or restricting specific devices, this feature helps maintain security, compliance, and resource management.
The USB redirection control determines which USB devices can be redirected in the Desktop Sessions. This feature enables administrators to manage the use of USB devices within the organization and restrict devices that do not comply with the organization’s policy. The built-in USB redirection driver only supports USB control from the HyWorks Controller.
Follow the steps given below to configure USB controls:
-
Log in to the HyWorks Controller Management Console.
-
Navigate to the Policies > USB Control.
-
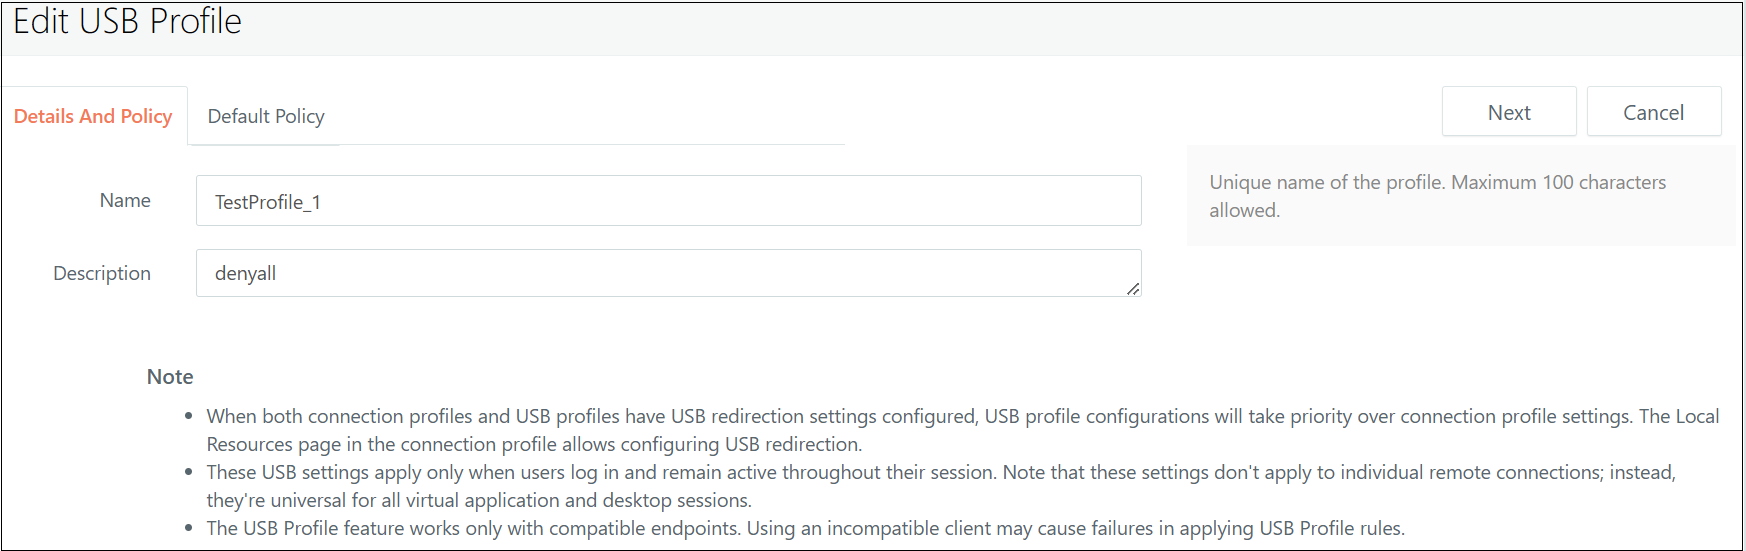
Click the Add Profile to create a new profile.
-
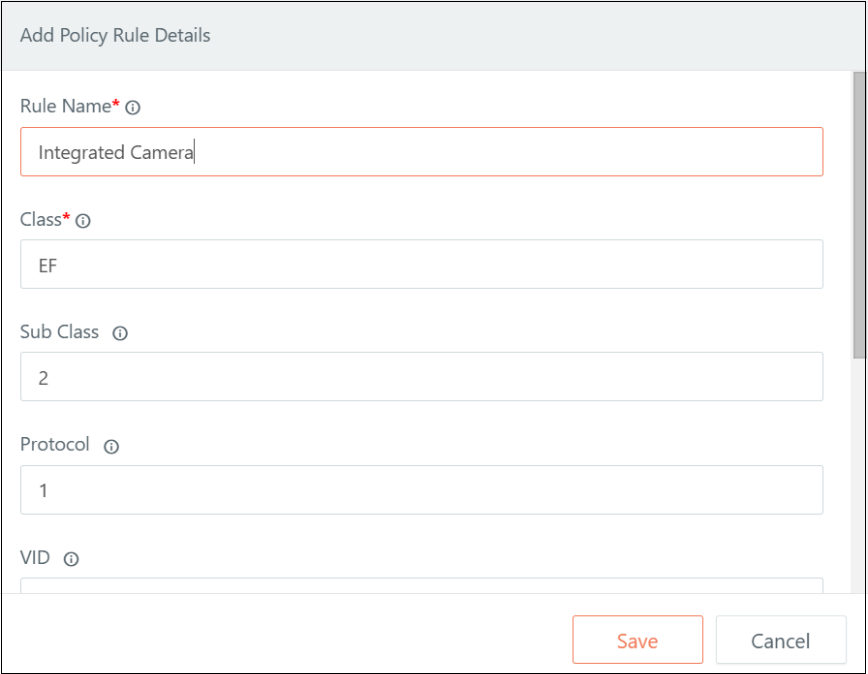
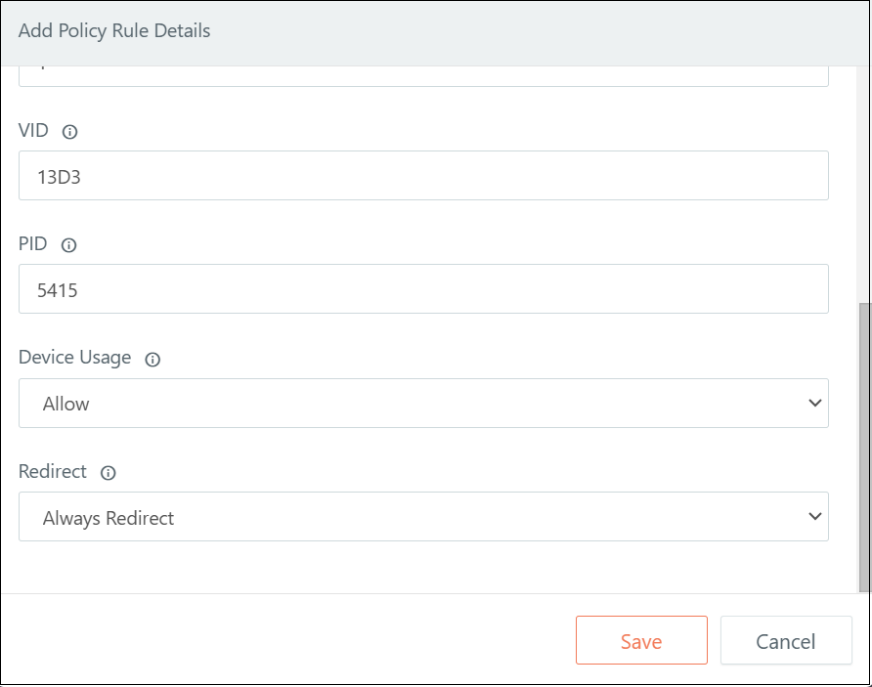
Configure Policies: After adding the profile, you can specify the USB device classes, sub-classes, vendor identifiers (VID), and product identifiers (PID) to allow or restrict USB devices based on your requirements.

Create USB Redirection Policy Rules
In the USB control profile, the following rules can be configured:
-
Allow or Block USB Devices
-
Based on Class: Rules can be applied based on the USB class of the device, which categorizes devices (e.g., storage, Webcam, printer, etc.).
-
Based on Class, Subclass, Protocol, VID, and PID: For more precise control, administrators can configure rules based on:
-
Subclass and Protocol: Further refine the device category and communication methods.
-
Vendor ID (VID) and Product ID (PID): Specifically target devices from manufacturers or models.
-
This provides a high level of customization for USB device management.
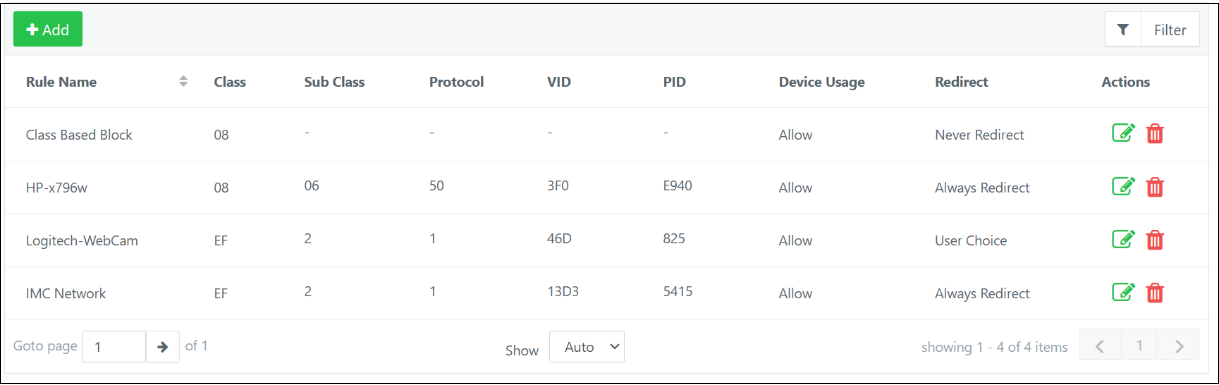
Redirect Settings:
| Device Usage | Redirect Rule |
|---|---|
| Allow | Never Redirect, Always Redirect, User Choice |
| Block | N/A |
Action for USB Device:
The log also records the action applied to the device based on its classification.
The USB_DEFAULTACTION=”” setting specifies the default action to be applied to USB devices if they do not match any predefined rules in the USB control profile. The values and corresponding actions are:
-
1 = Share: The device will be allowed and shared.
-
2 = Unshare: The device will be unshared, preventing access.
-
3 = Hide + Share: The device will be hidden from the local environment but still shared remotely.
-
4 = Hide + Unshare: The device will be hidden and unshared, effectively blocking it.
This information can help create or modify USB control profiles based on Class, Subclass, Protocol, VID, and PID.
Retrieving USB devices’ PID and VID from Logs
The VID and PID information for USB devices can be found in the edcservice.log file. To retrieve the details for a specific device, follow these steps:
-
Search for the Device Name: Look for the device name in the edcservice.log file.
-
Find the VID and PID Information: The log entry will include details such as the device's class, subclass, protocol, VID (Vendor ID), and PID (Product ID).
For example:
The following keywords can be used to search for PID and VID in the ecoservice logs. By searching with these keywords, administrators can quickly identify and retrieve the necessary device information to configure USB control profiles.
-
"Device Port Name": Locates the specific device being logged.
-
"CheckForUSBAction": Displays the details of the USB action, including the PID, VID, class, subclass, and device protocol.
] [DEBUG] [ ELTIMA ] Device port Name = Integrated Camera / shared 17477 key = Port_2 keyCount = 3
[19-09-2024] [08:59:29_003][T014452] [ 5524 ] [DEBUG] [ ELTIMA ] CheckForUSBActionForUsbProfile USB details form base device: class = Decimal [239] Hexa [EF] subclass = Decimal [2] Hexa [2] protocol = Decimal [1] Hexa [1] PID = Decimal [21525] Hexa [5415] VID = Decimal [5075] Hexa [13D3] iDefaultAction = 2 iDefaultUserControl = 1
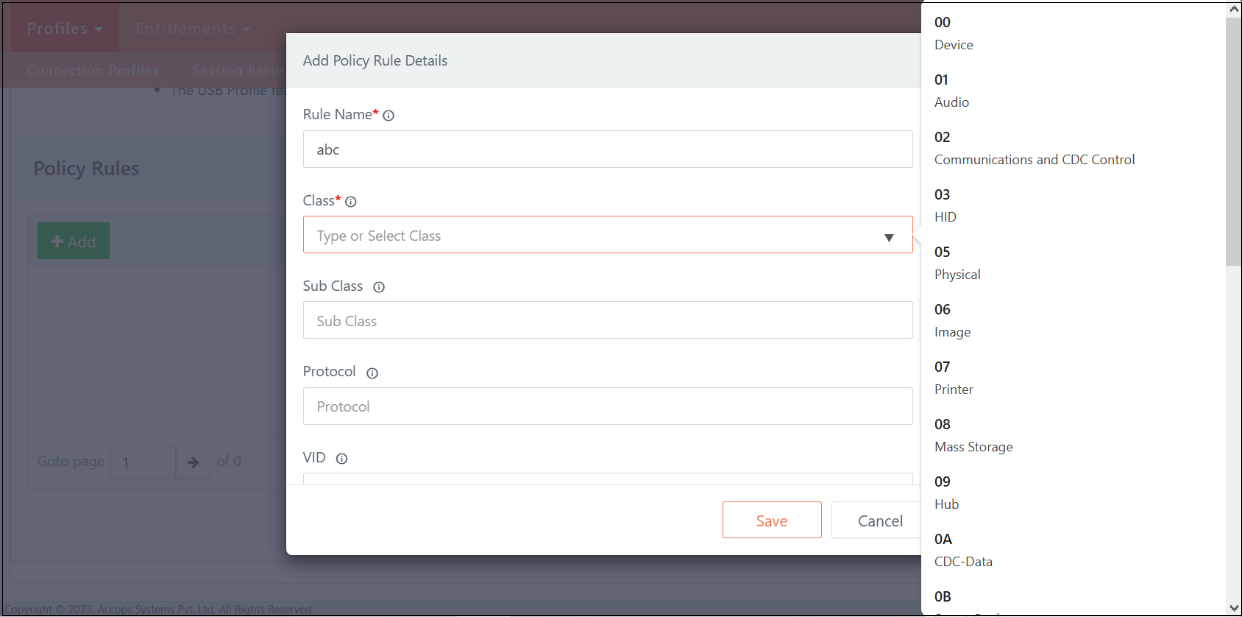
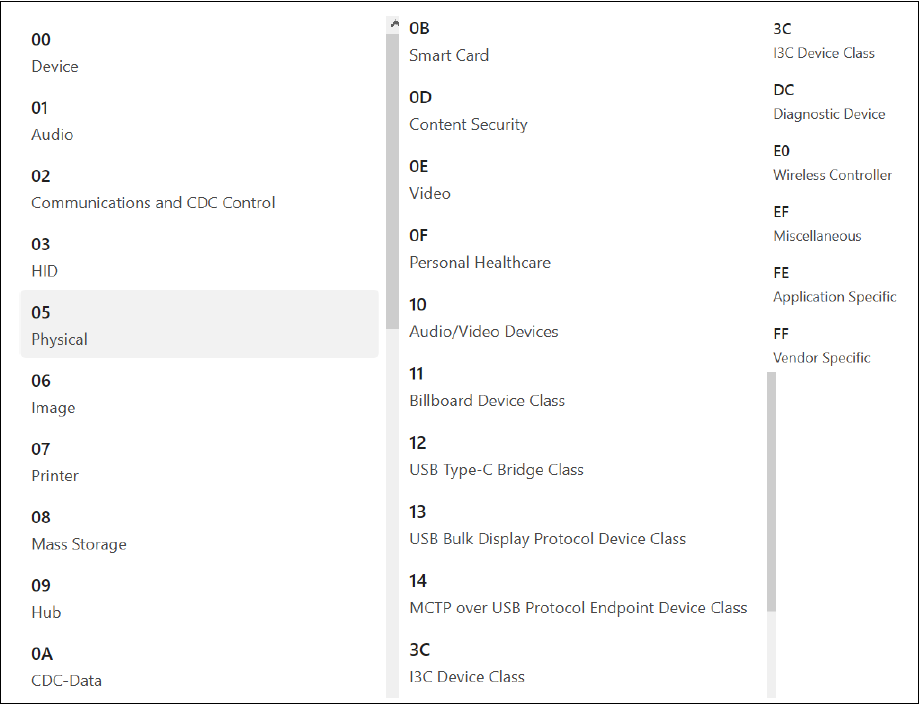
Classes of USB devices
Below is the set of predefined classes for USB devices in the Add Policy Rule details.
Connection Profile settings
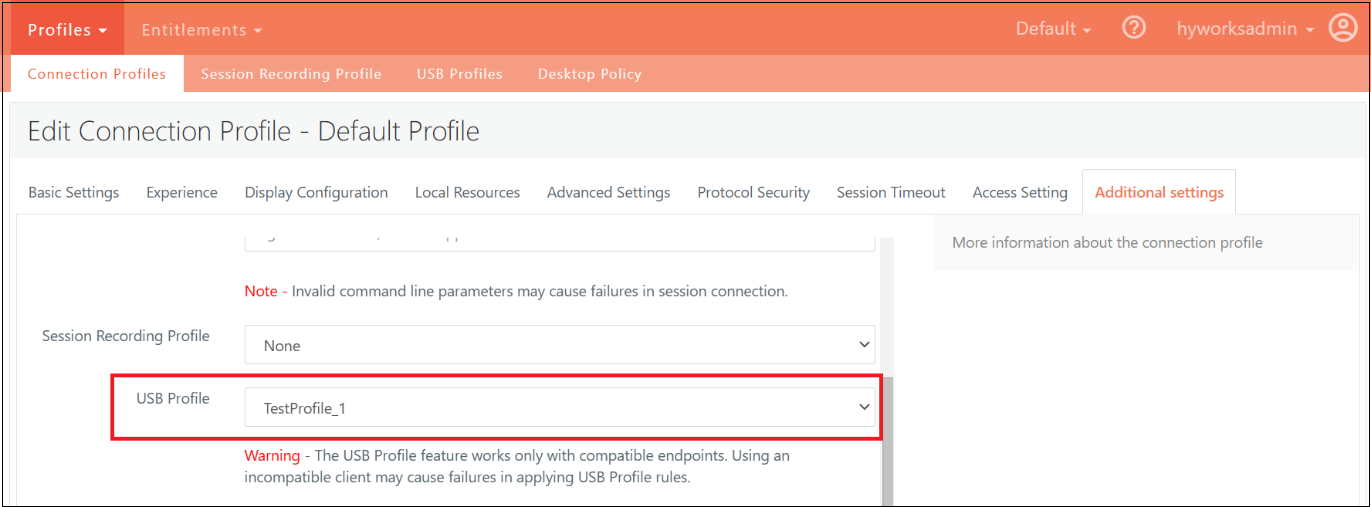
To apply a specific USB profile in the HyWorks Management Console:
-
Navigate to Policies > Connection Profile and edit the profile.
-
Click Additional Settings.
-
Choose the desired USB profile. If "None" is selected, no USB rule will be applied. Therefore, no USB control will be enforced from that connection profile, effectively disabling any USB management for the session or user associated with that profile.
-
Save the settings to apply the specific rules to control connected USB devices.
Smart Clipboard (Windows Only)
The Smart Clipboard feature enhances control and flexibility in managing clipboard data between the client and VDI/SHD/Apps environments. This feature enables:
-
Controlled Data Flow: Administrators can define clipboard transfer directions based on organizational requirements, whether bidirectional (client-to-remote desktop and remote desktop-to-client) or unidirectional.
-
Data Type and Size Restrictions: The ability to restrict specific data types (such as text or images) and impose maximum transferable content size limits helps mitigate security risks and improve system performance.
HyWorks Controller Configuration
Steps to apply Accops Smart Clipboard
-
Log on to the HyWorks Management Console.
-
Navigate to Policies.
-
Select and edit the required Connection Profile.
-
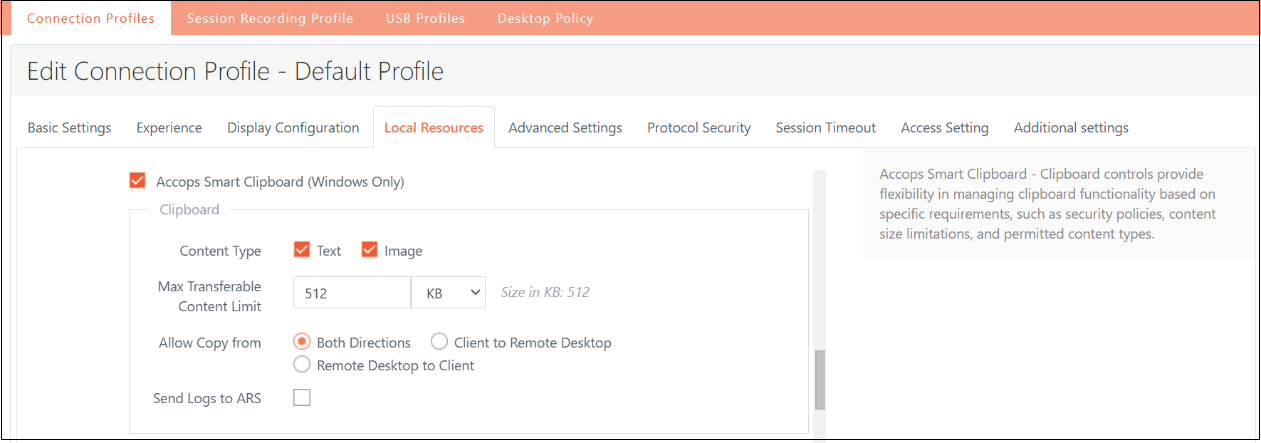
Click Local Resources Settings.
-
Select Accops Smart Clipboard: Choose the desired settings
-
Content Type: Define the allowed content type (e.g., text or image)
-
Max Transferrable Content Limit: Set a limit for the maximum content size.
-
Allow Copy from: Control clipboard actions by choosing one of the following:
-
Both Directions: Allow clipboard copying between the client and the remote desktop both ways.
-
Client to Remote Desktop: Allow copying only from the client to the remote desktop.
-
Remote Desktop to Client: Allow copying only from the remote desktop to the client.
-
-
-
Save the settings to apply them.
Workspace Client Configuration
The Smart Clipboard feature allows seamless clipboard data exchange between the client and VDI/SHD/Apps environments. On the client side, it provides the following functionality:
-
Login to Workspace Client
Start by logging into the Workspace client.
-
Launch VDI/SHD/Apps
Access desired Virtual Desktop Infrastructure (VDI), Shared Hosted Desktop (SHD), or applications.
-
Allow Clipboard in Both Directions
When the Smart Clipboard is configured to allow copying in both directions (Client ↔ Remote Desktop), and both text and image content types are selected in the connection profile, you will be able to copy content (text or images) from Remote Desktop files to Client files, and vice versa.
-
Allow Clipboard from Remote Desktop to Client Only
If the Smart Clipboard is configured to allow copying only from the Remote Desktop to the Client, with both text and image options selected, you can copy content from Remote Desktop files to Client files. However, copying content from Client files to Remote Desktop (VDI/SHD/Apps) will be restricted.
-
Allow Clipboard from Client to Remote Desktop Only
When the Smart Clipboard is set to allow copying only from Client files to Remote Desktop files, and both text and image are selected, you can copy content from Client files to the Remote Desktop. Copying content from Remote Desktop files to the Client will be restricted.
-
Restrict Clipboard Based on Content Type
-
If "text" is selected, image copying will be restricted.
-
If "image" is selected, text copying will be restricted.
-
-
Restrict Clipboard Based on Content Size
If a predefined size limit is configured, any attempt to copy content that exceeds this limit will restrict clipboard operations.
| Condition | Clipboard Direction | Content-Type | Clipboard Behavior |
|---|---|---|---|
| Allow Both Directions | Client ↔ Remote Desktop | Text & Image | Allows copying content (text or images) between the remote desktop and the client, and vice versa. |
| Allow Remote Desktop to Client Only | Remote Desktop → Client | Text & Image | Allows copying content (text or images) from the Remote Desktop to the Client only. Restricts copying from Client to Remote Desktop. |
| Allow Client to Remote Desktop Only | Client → Remote Desktop | Text & Image | Allows copying content (text or images) from Client to Remote Desktop only. Restricts copying from the Remote Desktop to the Client. |
| Restrict Content-Type: Text Only | Client ↔ Remote Desktop | Text Only | Allows copying text only. Image copying is restricted. |
| Restrict Content Type: Image Only | Client ↔ Remote Desktop | Image Only | Allows copying images only. Text copying is restricted. |
| Restrict Based on Content Size | Client ↔ Remote Desktop | Text or Image | If the content size exceeds a predefined limit, clipboard operations are restricted in both directions. |
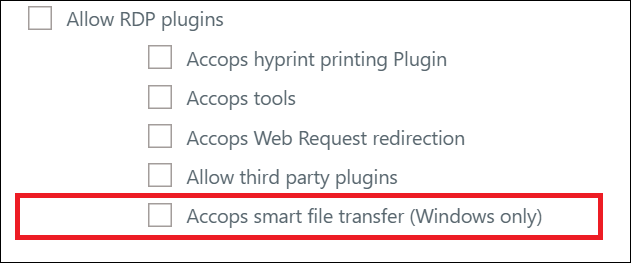
Smart File Redirection (Windows Only)
Enable Accops File Transfer: Plugins must be enabled to access Smart File Redirection. The plugin configuration can be done from HyWorks Controller > Connection Profile > Local Resources.
| Setting | Condition/Value | Definition |
|---|---|---|
| File Transfer Direction | Allow Both Directions: Client ↔ Remote Desktop Allow Remote Desktop to Client Only: Remote Desktop → Client. Allow Client to Remote Desktop Only: Client → Remote Desktop. | Allows file transfer between the Client and the Remote Desktop in both directions.Allows file transfer only from Remote Desktop to Client.Allows file transfer only from Client to Remote Desktop. |
| Max Transferable File Size | In KB, MB, and GB | It defines the maximum file transfer size and restricts transfers above that size. |
| Allowed File Type | * (All file types allowed) Define permitted file extensions (e.g., txt, docx) | * Allows all file types for transfer. Define permitted file extensions for transfers between the VDI and the client, allowing only files with specified extensions while restricting others from transfer. |
| Blocked File Type | Enter comma-separated values (e.g., png, jpeg, pdf) | Specify restricted file extensions for transfers between VDI and client, enhancing security by preventing the transfer of files with specified extensions and reducing the risk of malware transmission or unauthorized data access. |
| Compression Disabled for File Types | zip, tar, 7z, tgz, exe, msi, rar | Disable compression for files with specified extensions during transfer, ensuring data integrity and structure preservation despite potentially larger file sizes. The default value includes zip, tar, 7z, tgz, exe, MSI, and rar extensions. |
| Timeout Duration | 5000 ms (Duration in milliseconds: 5000) | Set a time limit on file transfers, with a default value of 5000 milliseconds. This will ensure that transfers automatically halt if they exceed the limit, promoting efficiency and reliability in file transfer operations. |
File Transfer Direction:
-
Allow Both Directions: This setting enables file transfers between the Client and the Remote Desktop in both directions. You can move files from the Client to the Remote Desktop and vice versa, providing complete flexibility for file transfer.
-
Allow Remote Desktop to Client Only: This setting restricts file transfers to one direction—only from the Remote Desktop to the Client. It prevents files from being transferred from the Client to the Remote Desktop, enhancing security by limiting data transfer.
-
Allow Client to Remote Desktop Only: In this case, file transfers are permitted only from the Client to the Remote Desktop. This prevents files from being transferred from the Remote Desktop to the Client, which could help protect client-side data integrity.
Max Transferable File Size:
- The maximum file size allowed for transfers can be defined in kilobytes (KB), megabytes (MB), or gigabytes (GB). Setting a size limit ensures that large files do not overwhelm the system or the network, and it helps manage the performance of file transfers. Any file exceeding the predefined limit will be restricted from being transferred.
Allowed File Type:
-
By default, all file types are allowed (*). This allows transferring any file between the Client and Remote Desktop.
-
You can also define specific permitted file extensions (such as txt, docx, pdf), allowing only files with those extensions to be transferred. This adds a layer of control by restricting the types of files that can be transferred, ensuring that only the intended file formats are shared between environments.
Blocked File Type:
- To enhance security, you can specify file types that should be blocked during file transfers by entering their extensions as comma-separated values (e.g., png, jpeg, pdf). Blocking these file types can prevent the transfer of sensitive or potentially harmful files, such as images or documents that could carry malware or unauthorized data. This setting provides additional protection for sensitive environments.
Compression Disabled for File Types:
- Compression can be disabled for specific file types such as zip, tar, 7z, tgz, exe, msi, and rar. This ensures that files transferred in these formats retain their original structure and integrity, as compression might alter their content. Disabling compression can also prevent issues with certain file types often used for distributing software, archives, or compressed packages.
Timeout Duration:
-
By default, a timeout duration of 5000 milliseconds (5 seconds) is set, which defines the maximum time allowed for a file transfer. The operation is halted automatically if a file transfer exceeds this time limit. Setting a timeout ensures that file transfers do not run indefinitely, which could affect system performance or cause delays in other operations.
-
On base machine
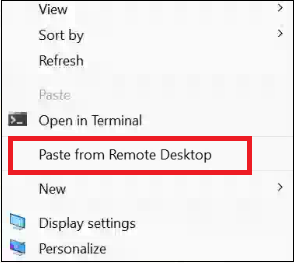
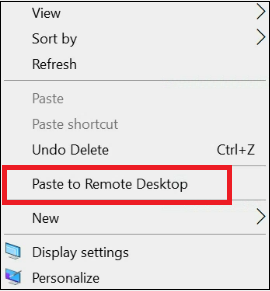
-
On VDI/SHD
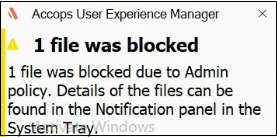
-
When other than allowed data type and data size notification message.
Async Force Client Upgrade
Async force client upgrade involves downloading and installing the upgrade file across different user logins to prevent any impact on user login.
In the previous versions of the HySecure Client, upgrading required users to download and install the Client in a single login session. This often led to issues if users had slow network connections or experienced interruptions. If the upgrade failed, users had to log in to the HySecure Gateway and could not use the Client during the upgrade process.
The new version of the Workspace Client for Windows features an Enhanced Upgrade Flow. Users connect to the HySecure Gateway during the first login, and the upgrade files are downloaded in the background. The next time users log in, they receive a notification to install the Client only if the upgrade files have been successfully downloaded. This change reduces upgrade time by separating the downloading and installation processes.
Supported version of Client for Async Force Upgrade
| Supported Client modes and OS | HySecure 5299 | HySecure 5.3 | HySecure 5.4 -SP2/5.4 SP5 | HySecure5.4 SP6 | HySecure 7.0 |
|---|---|---|---|---|---|
| Client Types/Modes: - Full Admin Client on all supported Windows OS | Yes (Requires backend changes in the Gateway) | Yes (Requires backend changes in the Gateway) | Yes (Requires backend changes in the Gateway) | Yes (Requires backend changes in the Gateway) | Yes (Requires backend changes in the Gateway) |
| - HyLite - Hybrid mode | No | No | No | No | No |
HySecure Gateway configuration (old to Workspace client)
-
Login into the Management Console
-
Navigate to Settings > Global > Clients.
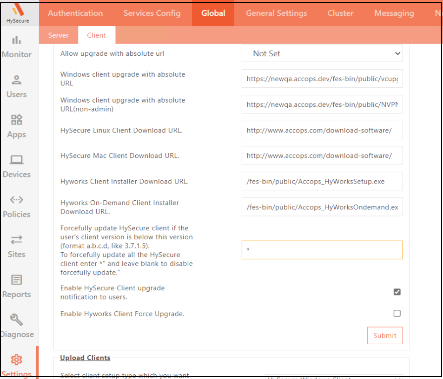
-
Enable the force client upgrade tag by entering the “*.”
-
All other configurations will be the same as the manual new-client upgrade flow (as provided in the client upgrade section above).
Client Login
-
Log in to the older client. The upgrade file will be downloaded during the first login. (In the HySecure client, async upgrade flow is supported on or above 5.2.3.8827 client with force update enabled).
-
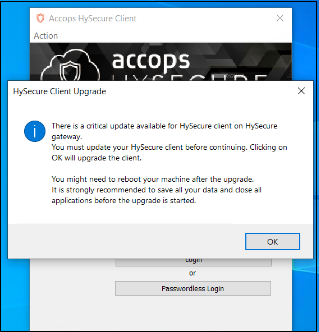
After the second login, the user will receive the force client upgrade prompt (only when the client installer has been successfully downloaded to the user’s system) following the realm fetch.
-
Click Yes. The client will be upgraded to the latest version.
HySecure Gateway configuration (Workspace to Workspace)
-
To enable the force upgrade from unified to unified client. Enable the below tag on the HySecure Gateway.
-
Take backend access of HySecure Gateway and go to the location /home/fes/public
-
In the globalsetting.js file, add the tag WINDOWS_SINGLE_CLIENT_FORCE_ENABLED and set it to true to enable the force client upgrade.
-
All other settings will be the same as in the manual client upgrade (in the client upgrade section above).
Client Login
-
Log in to the older Unified client; the upgrade file will be downloaded during the first login.
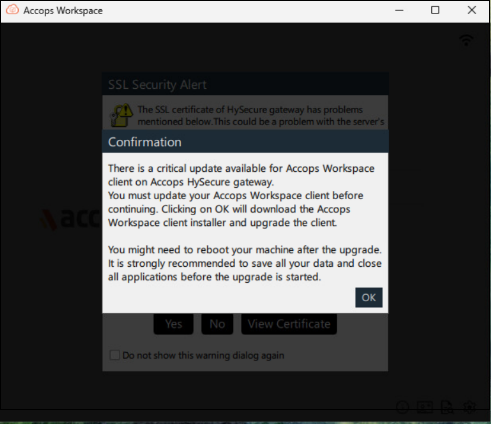
-
After the second login, the user will receive the force client upgrade prompt following the realm fetch.
Force async client upgrade is supported in HySecure Client versions 5.2.3.8827 and above, and on the unified client.
Mobile Token Registration with Passwordless and Push Notification
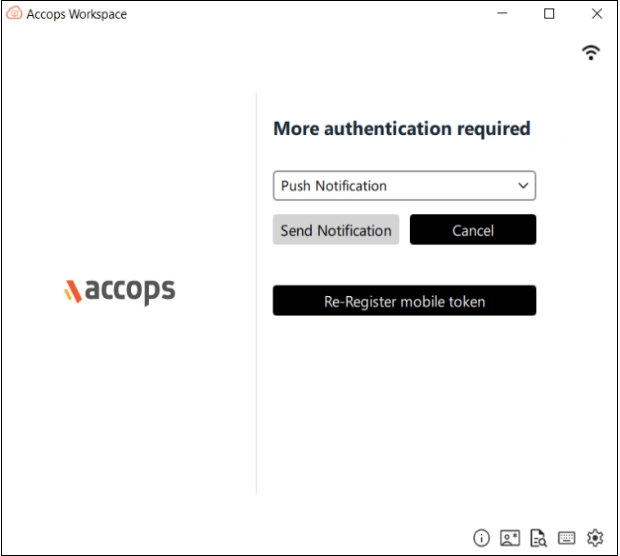
Previously, to register a Mobile Token, it was selected as an option in the 2FA drop-down, and there was no option to register the token for Passwordless login or Push Notification as a 2FA method.
In this version, the Register mobile token option will be available for Push Notifications and passwordless login, easing the user login process when the user's mobile token has not been registered before.
Mobile token registration with passwordless is supported in HySecure Gateway version 7.0 (Build:500) and later.
There is no dependency on the HySecure Gateway to support Mobile token registration with push notifications.

Supported Client Platforms and Gateway Compatibility
| Supported Client modes and OS | HySecure 5299 | HySecure 5.3 | HySecure 5.4 -SP2/5.4 SP5 | HySecure5.4 SP6 | HySecure 7.0 |
|---|---|---|---|---|---|
| Client Types/Modes: - Full Admin Client on all supported Windows OS | No | No | No | Yes (with temporary gateway changes) | Yes |
HySecure Gateway Configuration
-
Log in to the HySecure Management Console.
-
Navigate to Policies > HyID Policies, create one if it doesn't already exist, and apply the setting below to enable the above option on the client launchpad.
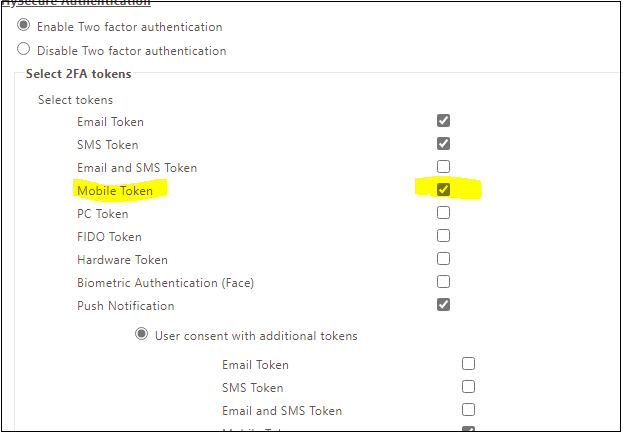
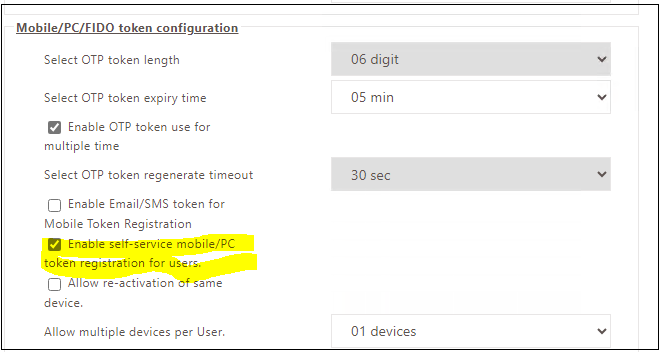
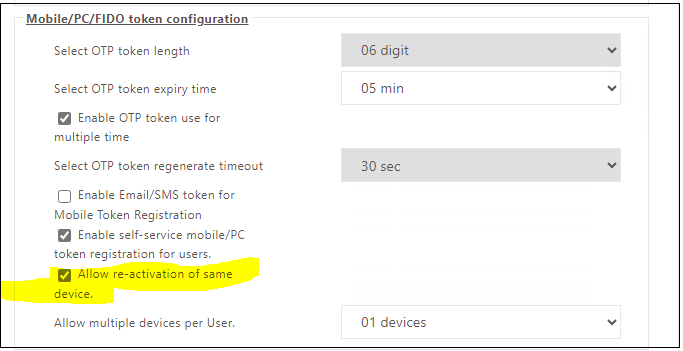
For the Re-register option, follow the configuration below.
For Mobile token registration through a Passwordless QR code. For older HySecure Gateways, contact Accops Support to add a tag to the Gateway.