KB014: Configure OAuth SMTP Authentication
Last Updated: July 22, 2025
Applies To: HySecure Gateway 7.1 Service Pack 1 and above
Category: Authentication & Identity Enhancements
Overview
This guide explains how to configure OAuth-based authentication for SMTP server integration in HySecure Gateway. This enhancement provides secure email server authentication supporting modern OAuth protocols alongside traditional username/password methods, ensuring future-proof integration with Microsoft Exchange (Office 365) environments.
Prerequisites
-
HySecure Gateway 7.1 Service Pack 1 or higher.
-
Security Officer or Administrator access to HySecure management console.
-
Microsoft Exchange (Office 365) environment.
-
Azure Active Directory with application registration capabilities.
-
Valid Exchange Online mailbox for sending emails.
Supported Email Providers
Current Support
Microsoft Exchange (Office 365) Only:
-
Exchange Online (Office 365)
-
Microsoft 365 Business environments
-
Enterprise Exchange Online plans
Part 1: Configure Azure AD Application
Register the HySecure Gateway in Microsoft Exchange and provide the API permissions.
Part 2: Configure HySecure SMTP Settings
Step 1: Access SMTP Configuration
-
Login to HySecure Management Console
-
Login as Security Officer or Administrator.
-
Navigate to Settings > Messaging > SMTP.
-
-
Edit SMTP Server Settings
-
Locate existing SMTP server configuration.
-
Click Edit to modify settings.
-
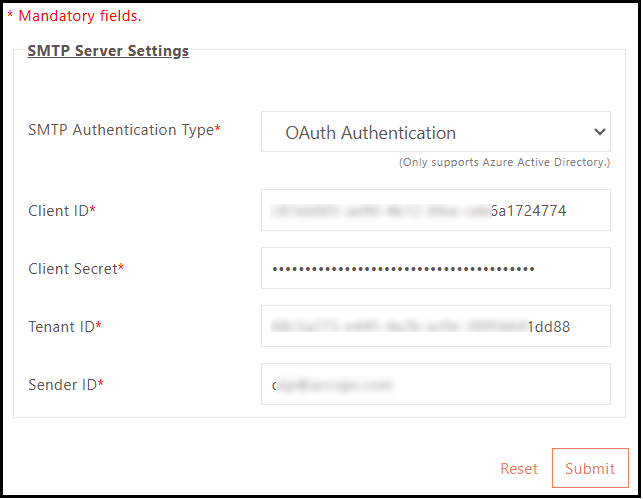
Step 2: Configure OAuth Authentication
-
Set Authentication Type
-
SMTP Authentication Type: Select OAuth Authentication.
-
Server Details: Configure Exchange Online SMTP settings.
-
-
Configure OAuth Parameters
-
SMTP Authentication Type: Select the option as, OAuth Authentication.
-
Client ID: Enter Azure AD App's Client ID (Application ID).
-
Client Secret: Enter Azure AD App's Client Secret (from Step 1).
-
Tenant ID: Enter Azure Active Directory Tenant ID.
-
Sender ID: Enter configured email address from Exchange Online.
-
-
Save Configuration
-
Click Submit to save SMTP configuration.
-
Verify that the configuration is applied successfully.
-
Step 3: Test and Validate Configuration
- Use Send Test Email functionality to verify email delivery to test recipient.
Log Analysis
Email Delivery Failure:
-
Navigate to Reports > Logs > Admin Logs.
-
Locate system generated logs for SMPT server related issues.
Monitoring OAuth Authentication
Contact Support: support@accops.com for OAuth configuration assistance.
Accessing Authentication Logs:
-
Navigate to Monitoring > System Logs.
-
Filter by SMTP and authentication events.
-
Review OAuth-specific log entries.
-
Monitor for authentication failures.
Diagnostic Steps
Manual OAuth Token Test:
# Test OAuth token acquisition
curl -X POST https://login.microsoftonline.com/{tenant-id}/oauth2/v2.0/token \
  -H "Content-Type: application/x-www-form-urlencoded" \
  -d "client_id={client-id}&client_secret={client-secret}&scope=https://graph.microsoft.com/.default&grant_type=client_credentials"
Migration from Basic Authentication
Migration Planning
Assessment Phase:
-
Current Configuration: Document existing basic authentication settings.
-
Dependencies: Identify systems using SMTP notifications.
-
Testing Plan: Plan for OAuth configuration testing.
-
Rollback Plan: Prepare fallback to basic authentication if needed.
Note
- OAuth authentication currently supported for Microsoft Exchange (Office 365) only.
- Client secret expiration must be monitored and renewed regularly.
- Network connectivity to Azure AD and Exchange Online required.
- Basic authentication may still be needed for other email providers.