Push Notification Configuration Guide
Accops Push Notification Service Configuration Guide
Overview
This guide provides a step-by-step procedure for configuring geo-fencing-based login control that uses the user's geo-location to log in to the HySecure gateway. The feature relies on Accops HySecure, Accops HyID, and Accops Cloud-based push notification service (APNCS).
System Design
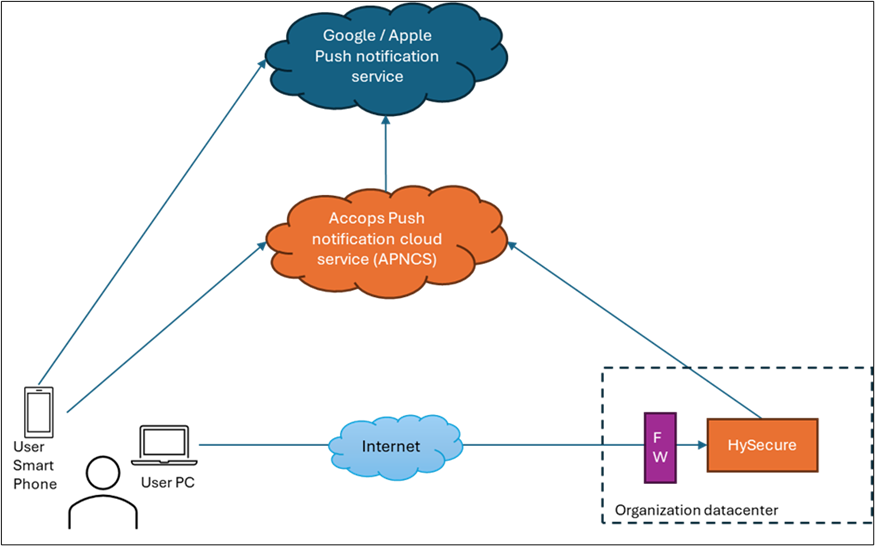
The following provides a high-level overview of Push Notifications.
The user downloads the Accops HyID mobile app onto their smartphone. The moment the HyID app is installed, it registers itself with Accops Push Notification Cloud Service (APNCS) as well as Google/Apple push notification service. It is not yet usable until the user registers with the app.
The Accops HySecure gateway establishes an outbound connection to APNCS to generate a QR code or receive the user's device registration data.
The User PC communicates exclusively with Accops HySecure.
All the communication between the user's mobile device, APNCS, and HySecure is encrypted using asymmetric keys. APNCS cannot view any data shared between the user device and HySecure, as the data forwarded by APNCS is encrypted using the public keys of the device or HySecure; therefore, APNCS cannot determine the contents of the data. APNCS stores only anonymized data about the device and the registered user. No other user-identifiable details are stored within the APNCS service.
APNCS is a multi-tenant service; therefore, each organization receives its own tenant account. All devices registered by the organization's users are stored in a dedicated, isolated tenant within the organization.
System Components
-
HyID Mobile App: Installed on the user's mobile device for authentication.
-
HySecure Gateway: The core service responsible for authentication and access.
-
Accops Push Notification Cloud Service (APNCS): Accops' cloud-based service for managing users' mobile devices and acting as a communication hub between users' mobile devices and Accops HySecure.
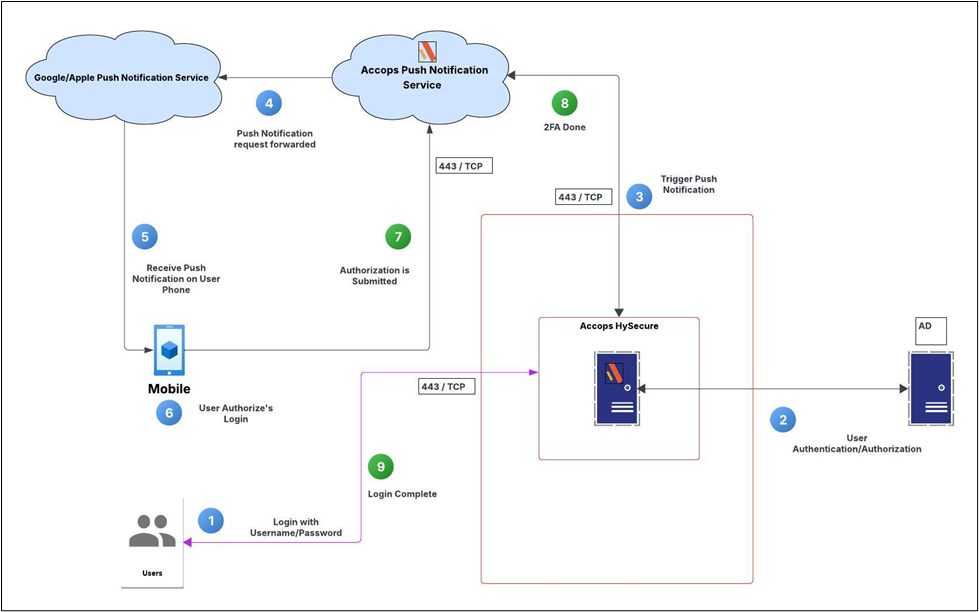
Workflow Diagram
Prerequisites
Before proceeding with the configuration, ensure the following prerequisites are met:
Version Requirements
-
HySecure Gateway: Version 5.4 SP6 or above.
-
HyID Mobile App: Version 4.7.123 or above.
Network and Connectivity
-
The HySecure Gateway requires an internet connection to access the Accops cloud service.
-
The user PC must have connectivity to reach both the HySecure Gateway.
-
The user's mobile phone must have Internet access to reach APNCS.
-
Both the Accops HySecure Gateway and users' mobile devices must be time-synchronized using NTP servers, so that neither is out of synch. A threshold is always available to address a minor discrepancy between the two. Time zone differences are acceptable.
Firewall Whitelist Requirements
Accops HySecure must have outbound Internet access to the following two domains. The communication is using the HTTPS protocol.
-
aas-drs.accops.io: TCP port 443: HTTPS
-
aas-dms.accops.io: TCP port 443: HTTPS
Licensing Requirements
The Accops HySecure geo-fencing login control feature requires access to the Accops push notification feature for the HyID product. Both features are included in the following editions:
-
Digital Workspace Platinum
-
HySecure Platinum
-
HyID Platinum
-
HyID Gold
Configuration Steps
The following steps need to be carried out for the feature to be in working condition:
-
APNCS to be configured on the HySecure Gateway.
-
HyID policy for the target user(s) to be created using push notification as a token.
-
Users are to register their HyID app on their smartphone.
-
The User can now log in using push notifications.
Step 1: APNCS Configuration on Accops HySecure
Note
- The following configuration must be completed on the Accops HySecure gateway to enable communication between the HySecure gateway and APNCS. For each customer deployment, a new tenant account and key value pair are generated.
Configure Tenant Details
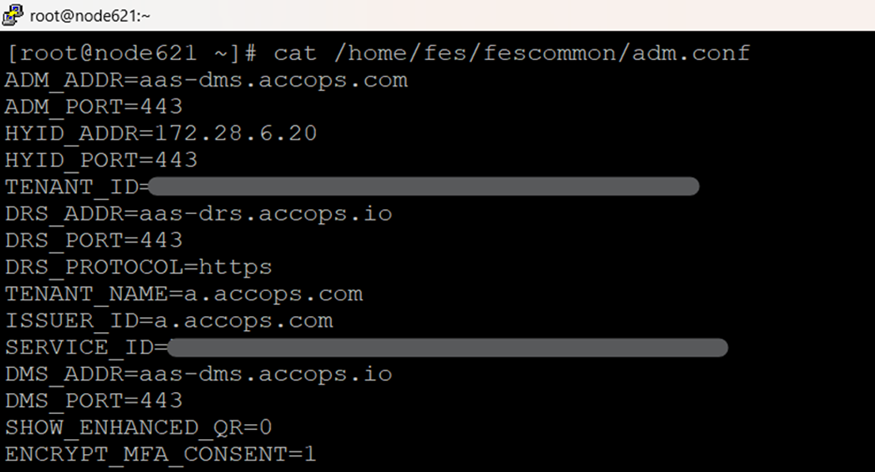
Edit the adm configuration file to add the Tenant details.
Command: nano /home/fes/``fescommon``/``adm.conf
ADM_ADDR=dms.accops.com
ADM_PORT=443
HYID_ADDR=<VIP of your HySecure Gateway>
HYID_PORT=<HySecure Gateway Port>
TENANT_ID=<Provided by Accops>
DRS_ADDR=aas-drs.accops.io
DRS_PORT=443
DRS_PROTOCOL=https
TENANT_NAME=<Customer name submitted during Tenant ID request>
ISSUER_ID=a.accops.com
SERVICE_ID=<Provided by Accops>
DMS_ADDR=aas-dms.accops.io
DMS_PORT=443
SHOW_ENHANCED_QR=0
ENCRYPT_MFA_CONSENT=1
Configure Client Token Manager
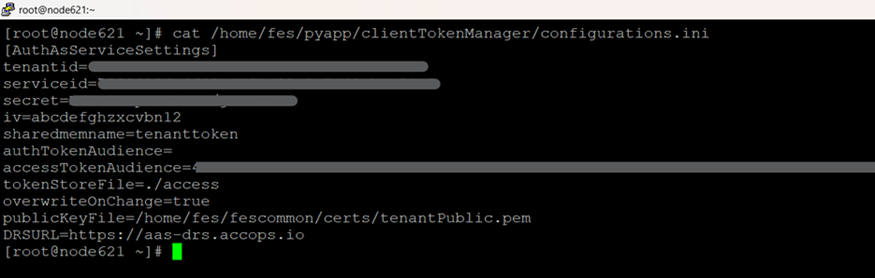
Edit the client token manager configuration file to add the AuthAsServiceSettings section.
Command: sudo`` nano /home/fes/``pyapp``/``clientTokenManager``/configurations.ini
Add AuthAsServiceSettings section:
[AuthAsServiceSettings]
tenantid=<Provided by Accops>
serviceid=<Provided by Accops>
secret=B6hE9lFp+MRhHrs/jVFE6w==
iv=abcdefghzxcvbn12
sharedmemname=tenanttoken
authTokenAudience=
accessTokenAudience=<Provided by Accops>
tokenStoreFile=./access
overwriteOnChange=true
publicKeyFile=/home/fes/fescommon/certs/tenantPublic.pem
DRSURL=https://aas-drs.accops.io
Enable Auth as a Service Feature
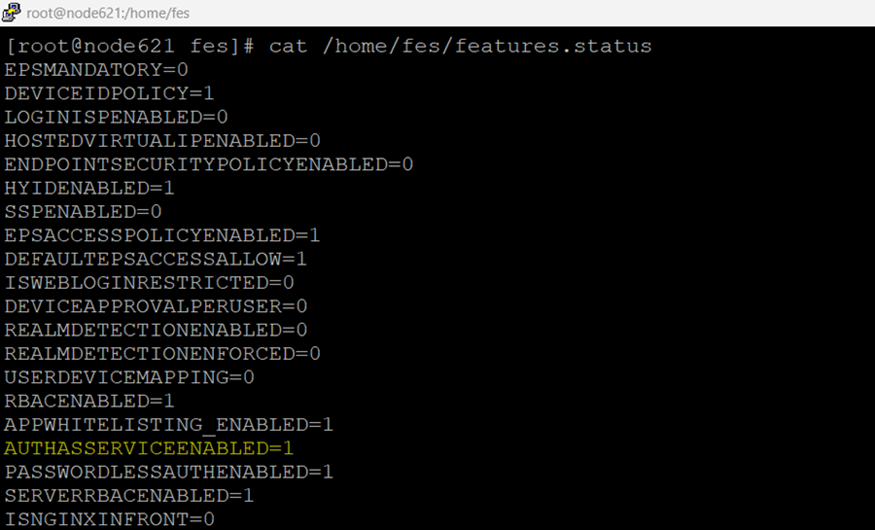
Enable the authentication service feature flag by modifying the features.status file.
Command: sudo`` nano /home/fes/``features.status
Set feature flag:
-
Locate AUTHASSERVICEENABLED and set its value to 1.
-
AUTHASSERVICEENABLED=1 -
Feature Values: 0 = Feature disabled and 1 = Feature enabled
Enable Client Token Monitoring
Configure monitoring for the client token manager service by editing the monitor.conf file.
Command: sudo`` nano /home/fes/``monitor.conf
Set IsclientTokenMonitoringEnabled to true.

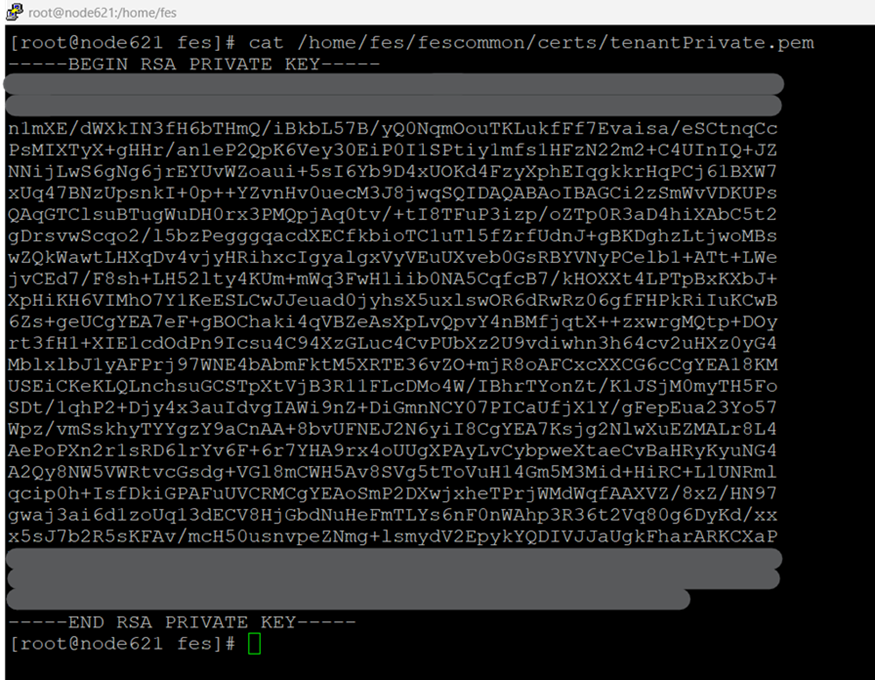
Configure Tenant Private (service) Key
Add the tenant's service key to the tenantPrivate.pem certificate file.
Command: sudo`` nano /home/fes/``fescommon``/certs/``tenantPrivate.pem
Add the service key content:
- Paste the service key content provided by Accops, starting from the BEGIN marker and ending at the END marker.
Tip
Ensure the private (service) key is in proper PEM format, including the -----BEGIN PRIVATE KEY----- and -----END PRIVATE KEY----- markers, and that there is no extra space.
Turning On Client Token Manager Service
Start and verify the status of the client token manager service.
Commands:
-
Start the service:
sudo`` ``systemctl`` start ``clientTokenManager -
Check service status:
sudo`` ``systemctl`` status ``clientTokenManager
Expected Status Output: A successful output will indicate that the service is active (running)
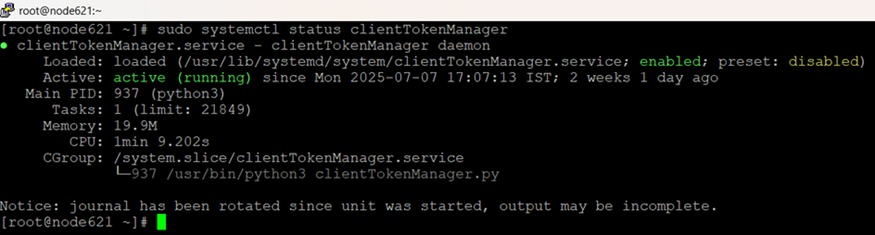
Cluster Requirement: This service must run on all nodes in a cluster to ensure high availability and proper functionality.
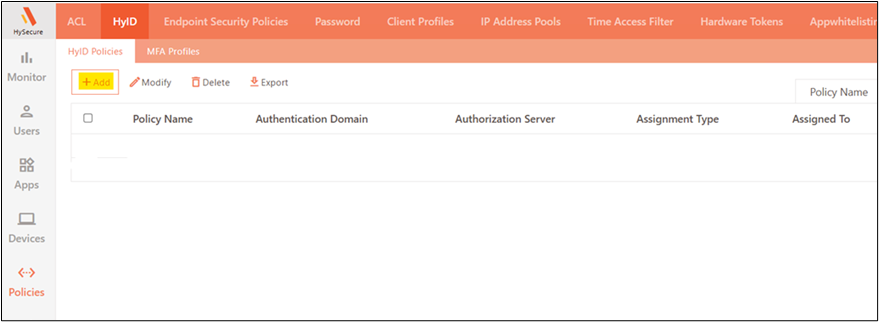
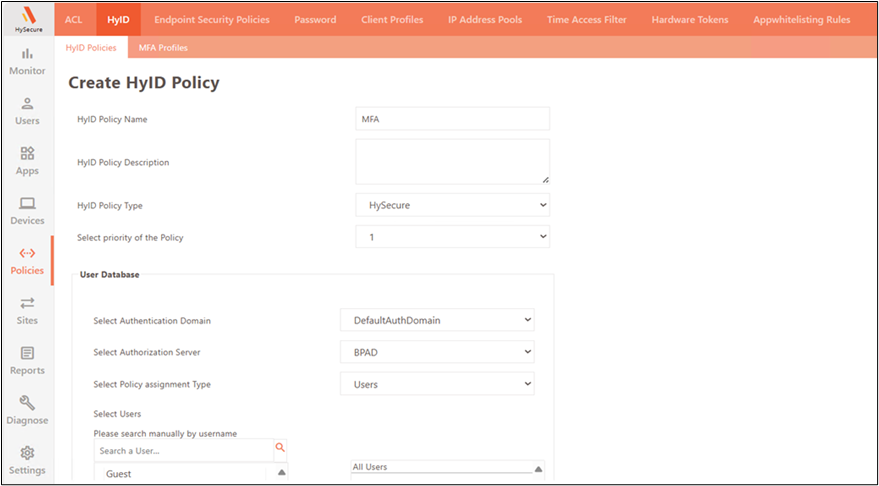
Step 2: Create a HyID Policy for Push Notification MFA
-
Navigate to Policies > HyID Policies.
-
Create or Modify Policy.
-
Click Create New Policy or select an existing HyID policy to modify.
-
Configure Token Selection
a. Under "Select Tokens", enable Push Notifications.
b. Uncheck all other token types if you want users to authenticate only via Push Notification.

-
Under "User consent with additional tokens", select "Mobile Token" only.
Important
If you select any option other than Mobile Token, the user will be prompted on their mobile phone to choose the other token and take additional steps.

-
Assign the policy to the relevant users or groups.
Step 3: Register Device for Push Notification with HyID App
Users must register their mobile devices with the Accops HyID mobile application following these steps:
-
Download the Accops HyID Mobile App
-
Users download the Accops HyID mobile application from the Apple App Store or Google Play Store.
-
Search for "Accops HyID" in the respective app store.
-
-
Log in to HyLite with username and password
-
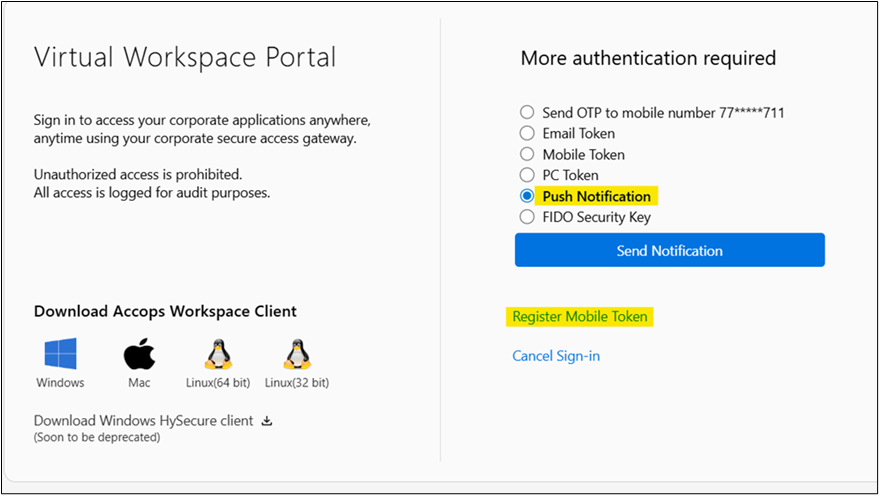
Select Push Notification and click on Register Mobile Token
- When prompted for the MFA option, select Push notification and click the Register mobile device button.
-
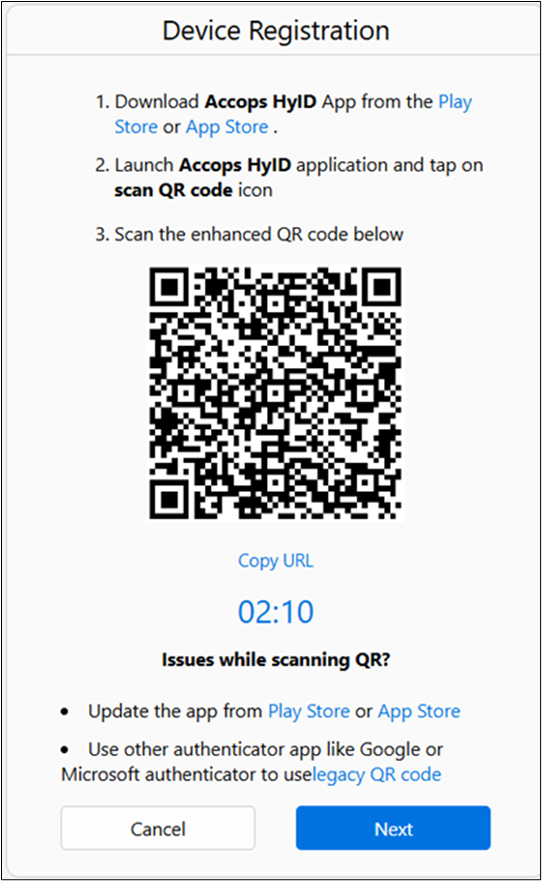
Scan the QR code with your HyID app
- Post correct OTP validation, a QR code will be displayed.
-
Use HyID App to Scan
-
Open the Accops HyID app on your mobile phone
-
Use the lens feature to scan the QR Code
-
Once scanned, you will get a Success notification on your app

-
-
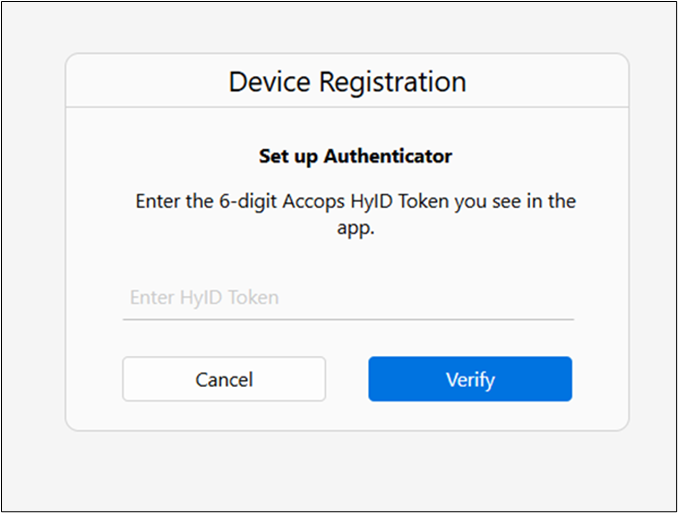
Enter 6-digit Accops HyID Token
- Enter the 6-digit token displayed in the app to validate and complete your device registration.
-
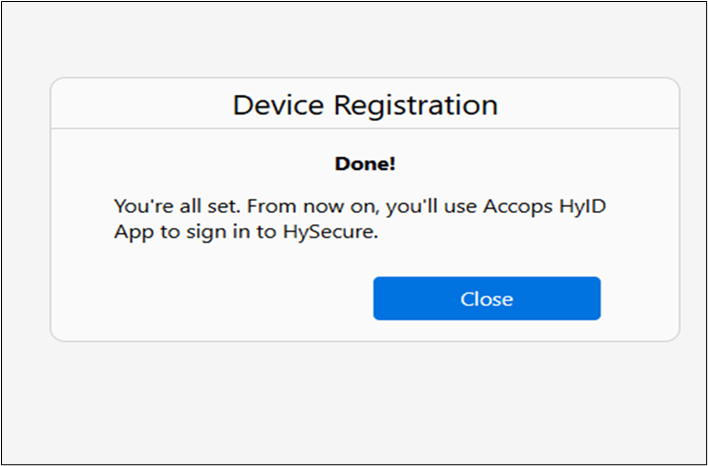
Registration Complete
- Your device is registered. Now you can log in again and use push notifications.
Step 4: Login Using Push Notification
-
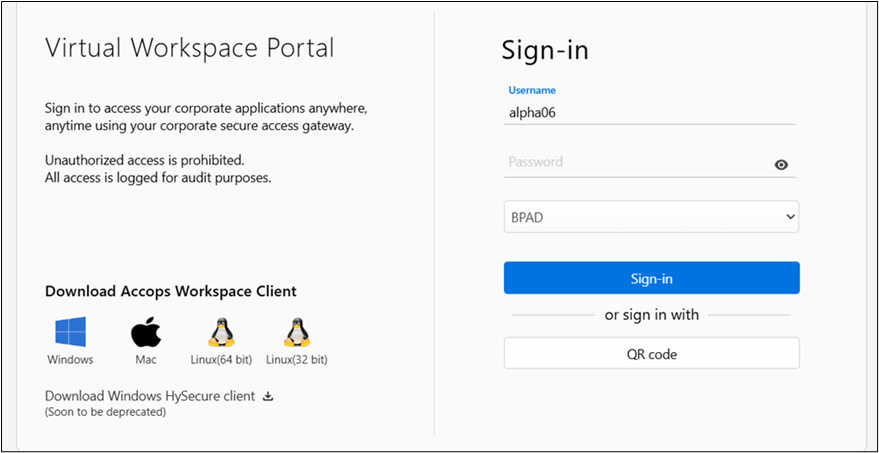
Open the browser or the Accops workspace client on the user's PC.
-
Login using domain credentials in Accops HySecure.
-
When prompted for MFA, select push notification and trigger it.
-
If configured, a number challenge may be shown on the browser or workspace client.
-
Receive and accept the push notification on your mobile phone.
-
If the number challenge is enabled, select the matching number from three options.
-
If configured, share your location (optional or mandatory, depending on admin settings).
-
Complete authentication.
Customize Push Notification
The following features can be customized in push notifications:
Adding a Number Challenge
Number challenge displays a number on the access device (browser or Accops workspace client) that the user must select from three numbers shown on their mobile phone. This ensures the user has access to both devices and prevents unauthorized approvals.
Configuration Steps:
-
Connect to the HySecure gateway via SSH.
-
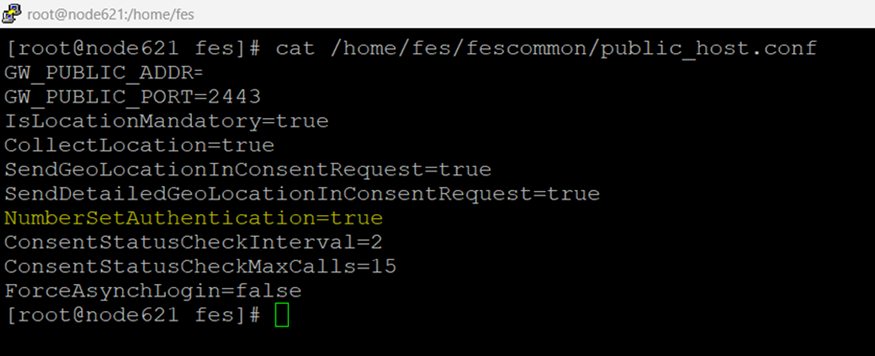
Open the configuration file:
cat /home/fes/``fescommon``/``public_host.conf -
Update the following parameter to enable number challenge:
- NumberSetAuthentication=true
Collecting Geo-location Data
Administrators can configure geo-location data collection with three options:
-
Do not collect geo-location data.
-
Collect if the user allows (login continues if denied).
-
Mandatory collection (login denied if user refuses).
Configuration Steps:
-
Connect to the HySecure gateway via SSH.
-
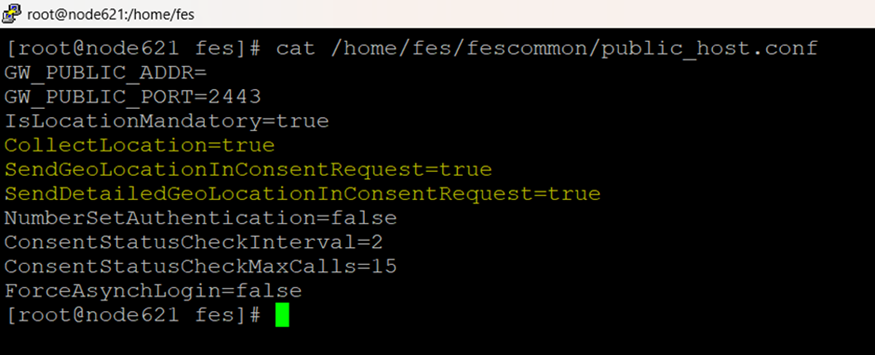
Open the configuration file:
cat /home/fes/``fescommon``/``public_host.conf -
Update the following parameters to enable geo-location tracking:
- CollectLocation=true
- SendGeoLocationInConsentRequest=true
- SendDetailedGeoLocationInConsentRequest=true
Management Options
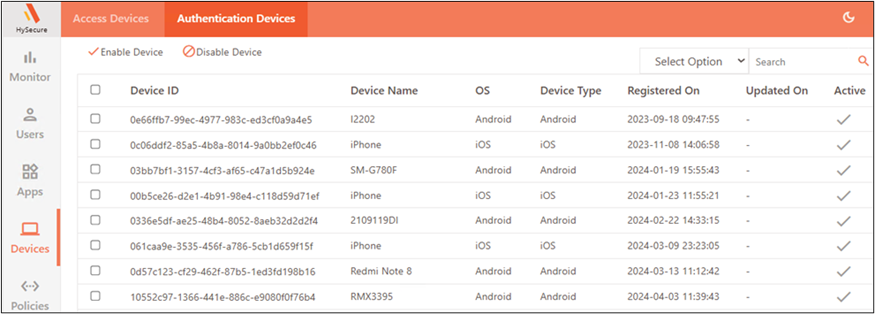
All Registered Authentication Devices
View and manage all registered mobile devices for your tenant.
Location: Navigate to Devices > Authentication Devices
Available Actions:
-
View all registered devices with detailed information.
-
Enable/Disable devices individually.
-
Monitor device registration patterns.
-
Track device status and authentication activity.
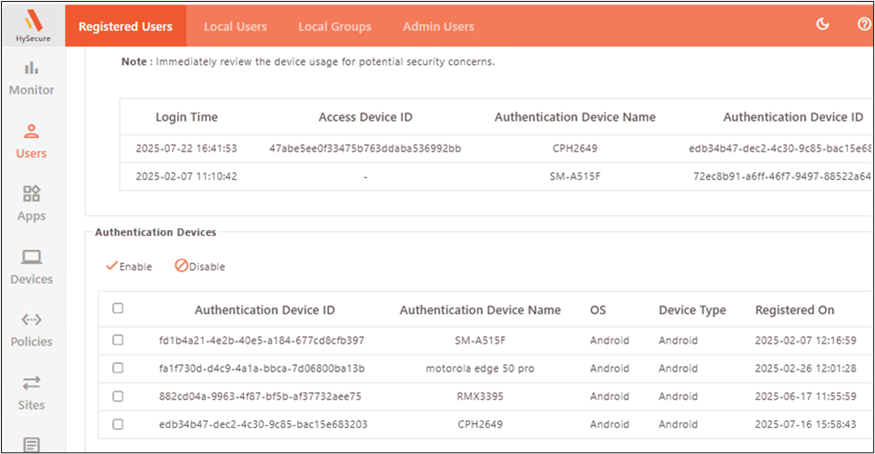
User's Authentication Devices
View authentication devices for specific users.
Location: Users > Registered Users > [Select User] > User Profile
Displayed Information:
-
Total number of devices registered
-
Historical device registration data
-
Device status
-
Authentication activity logs
User's Geo-location During Authentication
Geo-location data captured during authentication is available in:
-
HyID Logs
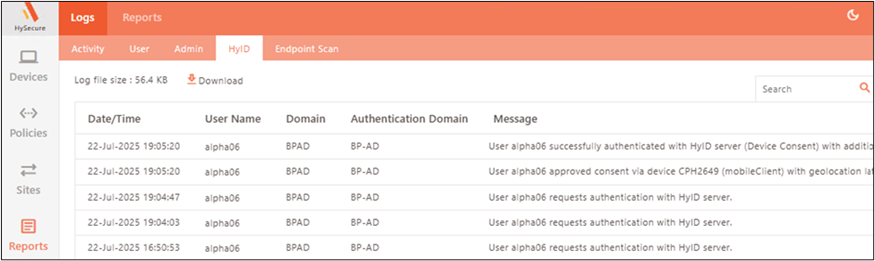

HyID Authentication Log Format
Here we describe the HyID log format used by the Accops HyID. Each row in the log file captures an event during the authentication process with details about the user, authentication server, MFA token, Endpoint details, and authentication success/failure.
HyID CSV Fields Overview
| Field Name | Description |
|---|---|
| Date | Timestamp of the event (Format: M/D/YYYY H:MM) |
| UserName | Username involved in this authentication event |
| RealmName | HySecure Domain |
| AuthDomainName | Authentication domain name |
| AuthServer | Authentication server name or address |
| LoginType | Type of authentication event |
| CommonUserName | Username used for accessing shared Windows resources via the HyID client |
| IsPreAuthenticated | Indicates whether the client has already authenticated the user and wants to perform second-factor authentication. |
| PreAuthenticator | Method for pre-authentication |
| Client Machine UserName | User’s client system's name |
| Client IP Address | Client machine internal/local IP |
| HostName | Client hostname |
| Remote IP Address | Remote IP used for authentication |
| Remote HostName | Remote hostname |
| Token type | Authentication token method/type (Push Notification, Mobile Token, etc.) |
| Risk Type | Risk indicator (typically numeric like "1") |
| TokenDelivery | Token delivery status (e.g., Delivered, Not Requested) |
| Status | Outcome status (usually '1' for success) |
| Policy Name | Applied authentication policy |
| MAC Address | Client device MAC address (if available) |
| WAN IP Address | Client’s public IP address |
| Client Type | Client software/type (e.g., HyLite Portal, Native Client) |
| Client version | Version of client software |
| Message | Human-readable description of the event, such as user requested authentication/user authenticated successfully |
| Source Node | The host name of the HySecure gateway node that served the request for a particular event |
Message Field Description
The Message field provides detailed, human-readable information about the context of each event. It helps understand user actions, authentication outcomes, device info, location, and additional data.
Typical Contents
-
User actions: Consent approved/rejected, authentication requested
-
Outcomes: Success, failure, token status
-
Device details: Device ID, device name, client type
-
Authentication methods: Push Notification, Mobile Token, etc.
-
Geolocation: Latitude, longitude, address, country, postal code
-
Error and status messages: Consent denied, token not requested, etc.
Examples
| Scenario | Example Message |
|---|---|
| Consent Rejection | User demo150 rejected consent |
| Consent Approval with Geo | User demo150 approved consent via device CPH2649 (mobileClient) with geolocation latitude: 16.689783 ; longitude: 74.242802 ; address: Pratibha Nagar Housing Society ; Country: India(IN) ; postalCode: 416008 |
| Successful Push Notification | User demo150 successfully authenticated with HyID server (Push Notification). Authentication device used is device id - edb34b47-dec2-4c30-9c85-bac15e683203 and device name - CPH2649 |
| Authentication Request | User demo150 requests authentication with HyID server. |
| Mobile Token Success | User demo150 successfully authenticated with HyID server (Mobile Token). |
Roadmap
Upcoming Features:
-
Geo-fencing Login Restrictions: Restrict login for users outside their home location.
-
Configurable Radius: Administrators can set the allowed radius from the home location.
-
Automatic Home Location: The system will automatically identify the first geo-location as the user's home.
-
Enhanced Location-based Policies: More granular control over location-based access.