Scheduled Actions and Send Messages
Deployments often require maintenance activities to be performed on one or more desktops at a scheduled time. HyWorks v3.4-SP2 or later enables administrators to configure such schedules and perform actions at the scheduled time.
The actions can be performed directly in the HyWorks Controller Management Console, but the automation that schedules them makes this possible.
In this section, details of scheduled actions and notifications will be provided.
Architecture and Prerequisites
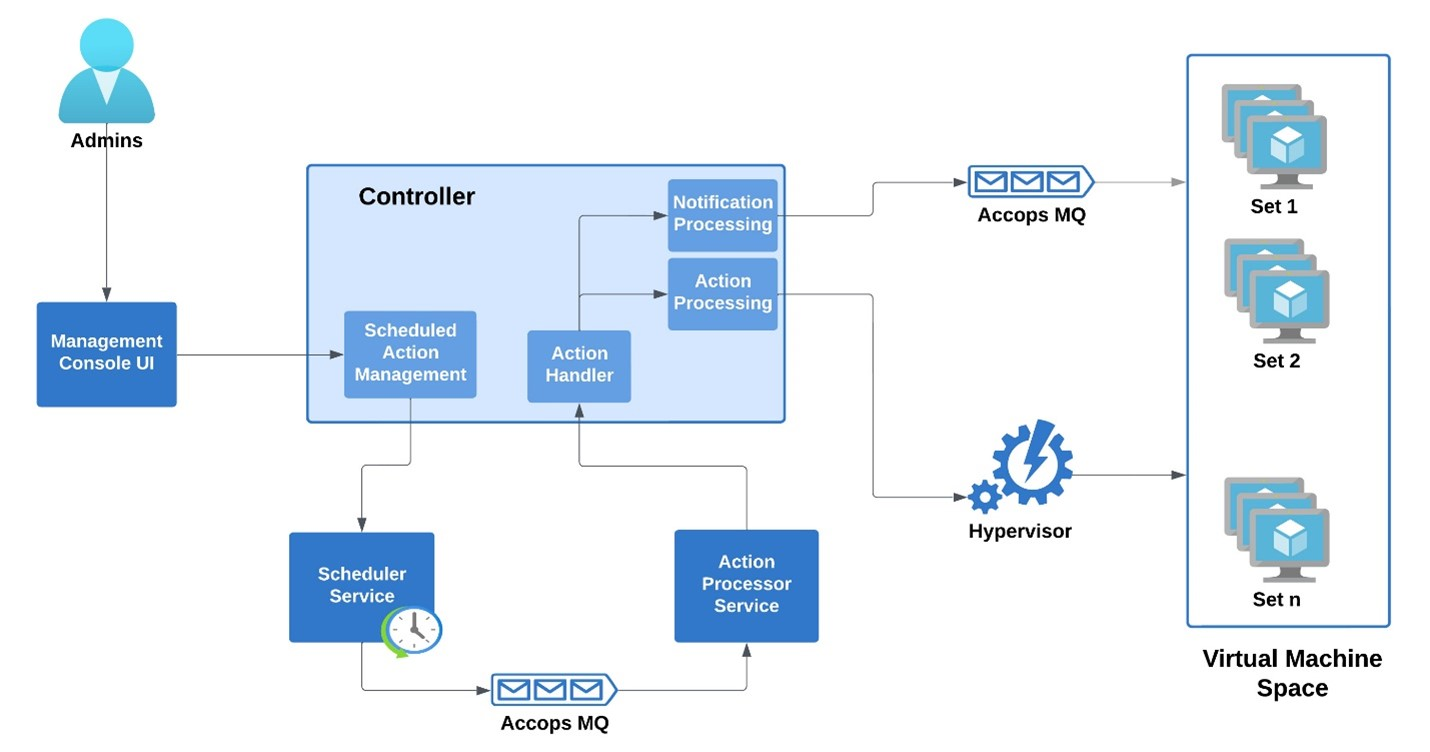
Refer to the diagram below for the required components and communication flow between HyWorks modules for scheduled actions:
Prerequisites
As per the diagram above, the following components are required for scheduled actions and notifications to work from the HyWorks Controller Management Console:
-
HyWorks Scheduler: Service to take schedule data and push it to the message queue.
-
HyWorks Action Processor: To consume data from the message queue and pass it to the action handler on the controller.
-
Accops Message Queue: For temporarily storing schedule data and notifications.
Terminology
-
Publisher(s): Modules that send data to message queues are called publishers.
-
Consumer(s): Modules receiving data from message queues are called consumers.
Port Requirements
The network ports used and required to be opened if any firewall is present between the two components:
| From | To | Port No. | Protocol | Customizable | Purpose | Mandatory | If the port is not open |
|---|---|---|---|---|---|---|---|
| Scheduler/Action Processor Installed on the HyWorks Controller itself |
Accops Message Queue Installed on the HyWorks Controller itself |
5672(Non-SSL) 5671(SSL) |
TCP | No | Pushing schedule data to the message queue | Yes, for capacity planning, scheduled actions, and sending messages in sessions | Mentioned features will not work. |
| Virtual Desktop VMs | Accops Message Queue Installed on HyWorks Controller |
5672(Non-SSL) 5671(SSL) |
TCP | No | Getting messages from the message queue | Yes, for sending messages in sessions | Mentioned features will not work. |
Supported Objects and Actions
Below is the tabular representation of supported objects and actions under the Scheduled Actions feature:
| Object Type | Supported Actions |
|---|---|
| Personal Desktops | Start |
| Shutdown | |
| Reboot | |
| Move to version | |
| Shared Hosted Desktops | Mark active |
| Mark inactive | |
| Start | |
| Shutdown | |
| Reboot | |
| Move to version |
Note
-
Unmanaged shared hosted desktops are not supported for scheduled actions.
-
Shared Hosted desktops associated with a desktop pool having on-demand provisioning based on the capacity plan are not supported for scheduled actions.
-
Physical desktops are not supported for scheduled actions.
Installation and Configurations
Important
-
Scheduled Actions and Sending Messages in Sessions require Accops HyWorks Scheduler and Action Processor modules.
-
Scheduler and Action Processor must be installed on HyWorks Controller Management Nodes only.
Installation
Accops HyWorks Scheduler and Action Processor
The detailed installation and configuration requirements are provided in the scheduler Installation section.
Message Queue High Availability
With the inclusion of critical actions such as Move to version, the message queue becomes an essential component that must remain highly available at all times.
The high-availability of the message queue can be maintained using two methods:
-
All modules that interact with message queues must be configured with both message queue addresses, and these components work with the reachable message queue server.
-
External Load Balancer: With an external load balancer deployed, it ensures the available message queue is used and maintains high availability. Following additional configuration will be needed:
-
Configure a virtual service on port 5672 (Non-SSL) or port 5671 (SSL).
-
Backend real servers will use the actual Accops MQ server host address and port: 5672 (Non-SSL) or 5671 (SSL).
-
HyWorks Configuration
To enable the feature of scheduled actions and sending messages in the sessions, the following configurations will be needed on the HyWorks Controller:
-
From the HyWorks Controller Management Console, go to Settings > General > Advance Settings.
-
In Tags Filter, set it to Message Queue and Capacity Plan. Locate and update the following configurations:
| Configuration | Description Default Value |
Value to set |
|---|---|---|
| Publish to MQ Servers | Provided host addresses will be used to send queue data. Comma-separated -hostnames/IPs of the MQ servers to send messages to. | IP address of load balancer (If load balancer is configured) Comma-separated IP addresses of the MQ servers (If load balancer is not available) |
| Consume from MQ Servers | Consumers will use the provided host addresses to retrieve queue data. Comma-separated IP addresses of the MQ servers to get messages from | Comma-separate IP addresses of the MQ servers |
| MQ Port | Used for communication with the MQ server. Default value 5672. | 5671 - SSL 5672 - Non-SSL |
| Use MQ SSL | To mark as true if the message queue is configured to use SSL. | True (If SSL is configured) False (If SSL is not configured) |
| MQ Username | Username to be used to connect to MQ servers. Default: accopsmqadmin | As per the configured username |
| MQ Password | Password to be used to connect to MQ servers. Default value: guest. | As per the configured password |
| Enable notification listener in DVM tools | If the send message/notification feature is to be enabled in the sessions. Default value: False | True |
| Manage scheduler service | HyWorks Controller to manage the scheduler service on the server. Default value: false | True |
Scheduled Actions Workflow and Management
Scheduled Actions
The workflow of the Scheduled action feature will be briefly discussed here:
-
Schedule Creation Phase
-
An admin creates a Scheduled Action in the Management Console.
-
The controller service creates an action execution schedule for the schedule service.
-
Schedule details are stored in the database.
-
Controller Service informs the Scheduler Service to prepare execution.
-
-
Scheduling & Trigger Phase
-
Scheduler persists the schedule and waits until execution time.
-
At trigger time, Scheduler publishes metadata to AccopsMQ. Metadata includes:
-
ScheduledActionId
-
MessageActionType = ActionExecution
-
-
-
Action Processing Phase
-
Action Processor consumes the message from AccopsMQ.
-
Calls the Controller API to execute the action.
-
Controller validates and creates a background job.
-
-
Execution Phase (Decision Point)
-
Background Worker picks up the job.
-
Action handling depends on type:
Action Type Execution Mode Start / Shutdown / Reboot / Move to Version New background job Mark Active / Mark Inactive Immediate execution
!!! note
Actions may be skipped based on VM / Pool properties. -
-
Status & Completion Phase
-
Per-object execution status collected: Success, Skipped, Failed
-
Final job status updated as Completed or Failed.
-
-
Detailed logs are created and can be viewed from the HyWorks Controller Management Console.
Conditions when Scheduled Actions will be skipped
Scheduled actions will be skipped or will not be allowed in the following conditions:
-
If the capacity plan is applied to the pool.
-
"Move to version" schedule action will be skipped, if the pool recompose type is graceful.
-
If the schedule has been set to "Skip if a session exists", then the action will be skipped if one or more sessions exist on the target desktop VM.
-
If a power operation job already exists for the VM, the power operation action will be skipped.
-
If the VM is not in a valid state for power operation, below are the Valid state for respective action:
-
To start: Stopped
-
To shutdown: Running
-
To reboot: Stopped
-
-
"Move to version" schedule action will be skipped if the targeted version is the same for recompose
-
If the pool is already being recomposed, the Move to version action will be skipped.
Scheduled Actions, Dependencies, and Possible Points of Failures
-
Accops MQ is not reachable at the scheduled time. The scheduler will retry 3 times.
-
The database is unreachable at the scheduled time.
-
HyWorks Controller is giving an exception for Action processing.
-
The Scheduler, Action processor, and Controller are working fine, but the hypervisor is unreachable.
-
The scheduler is not working, or the service stopped at the scheduled time.
Notifications
For notifications, the following flow of actions will occur:
-
The scheduler service triggers an event at the notification schedule time and pushes the schedule metadata to AccopsMQ for processing. Schedule metadata contains the following fields:
-
ScheduledActionId: Scheduled action unique id to identify the scheduled action in HyWorks.
-
MessageActionType: This value will be included in the payload as a notification.
-
-
The action processor consumes the message from AccopsMQ and calls the controller API to process the notification.
-
The controller accepts the request from the action processor, validates it, and creates a background worker job to process it.
-
Background worker picks up the job and checks whether AccopsMQ is reachable. Identify the Action and object types for processing. Get the list of VMs for the notification to be published, based on the objects added to the schedule.
-
Notification will be skipped for VM in the following cases:
-
If VM is part of a capacity planning-enabled pool.
-
In the case of Move to Version, if the pool is not set to recompose type as forceful.
-
In the case of Move to Version, if the VM target version is the same as the current version.
-
-
Get the notification template from the database.
Publish the notification data to AccopsMQ. The queue name will be in the format "DvmAgent-{VMId}". The DVM agent will consume these messages and publish the notification to the logged-in user.
Mark the background job status as completed or failed, and log the status of each object in detail.
Notification templates
-
Skip action if the Session exists.
-
Subject/Header: Planned action on VM
-
Content: Desktop is scheduled for [Action] at [ActionTime]. Save your work and sign out of Desktop.
-
-
Perform Action even if the session exists
-
Subject/Header: Planned action on VM
-
Content: Desktop is scheduled for [Action] at [ActionTime]. Save your work and sign out of Desktop to prevent data loss.
-
Important
-
Notification templates are saved in the database. The HyWorks Controller Management Console does not have an option to modify templates. The template uses the following variables, which can be used to create a custom notification (only from the database):
-
[Action]
-
[ActionTime]
-
[Username]
-
-
Notifications will not be shown in user sessions if the desktop agent service is down or not working for any reason.
Schedule Management
Administrators can create, update, delete, and view schedules on the page.
Add a new schedule
To add a new schedule, follow the steps below:
-
In the HyWorks Controller Management Console, go to the page.
-
Click on the Add button.
-
In the Create a Schedule wizard, Primary Details section:
-
Schedule Name: Provide a logical name for the schedule.
-
Description: Description for the schedule.
-
Date: Set a date for the action to be executed.
-
At Time: The time of action execution.
-
Status: To keep the schedule active or inactive.
-
Skip if session active: Whether to skip the action if there is one or more sessions on the selected objects.
-
Object Type: Personal or shared hosted desktops.
-
Action: Choose the action to be performed on the desktop VMs. See section Supported Objects and Actions for details.
-
Notify User Before: Click the Add Notification button to add notifications that appear in sessions on desktop VMs before executing an action.
-
Provide time in minutes (Notification will be shown before the execution as per the provided time.)
-
A maximum of 5 notifications can be configured, and the minimum and maximum time before notifications are shown to users is 5 minutes and 60 minutes, respectively.
-
-
Click Continue to navigate to the Select Object(s) section.
-
Desktop VMs will be displayed according to the selected Object Type in step #7.
-
An administrator can use Filters to filter out VMs and Show/Hide Columns to customize the displayed details.
-
-
Select one or more desktop VMs and click Save.
-
Scheduled items will be saved and listed on the Schedules page.
Modify Schedule
Administrators can modify an existing schedule by following the steps:
-
From the Schedules page, select an existing schedule.
-
Click Edit.
-
Modify the configurations.
-
Click Update to save the changes.
-
The updated schedule will be posted, and actions will be carried out in accordance with the new instructions.
Note
- Executed and unexecuted, both types of schedules can be modified.
Editable and Non-editable Configurations
While editing a schedule, the following configurations can be modified:
-
Name
-
Description
-
Date
-
Time
-
Status
-
Skip if session active
-
Notifications
-
Selected objects (Desktop VMs)
Once created, the following configurations can not be modified:
-
Object Type
-
Action
Delete Schedules
Administrators can delete an existing schedule by following the below steps:
-
From the Schedules page, select an existing schedule.
-
Click Delete.
-
The Confirm Action dialog will appear, requiring the schedule name.
-
Enter the Name of the schedule to delete, then click Delete in the Confirm Action dialog.
-
Schedules will be deleted.